In 2015, the China Photographic Publishing House released the book
Landscape Photography – American Master Photographers on Their Art, featuring the work of nine American photographers (in order of appearance): Art Wolfe, Charles Cramer, David Muench, Clyde Butcher, QT Luong, Tom Till, Tom Murphy, Elizabeth Carmel, and Ian Plant.
Since it was about studying how each of the photographers developed their way of seeing the world and their means of artistic expression, I thought the contents would be of interest.

The now out-of-print book was written in Chinese by Chinese-American photographer David Tian, the author of four books, based on research and telephone interviews. Being of Vietnamese ancestry, I cannot read or understand Chinese, so I wondered what the book said about me and my photography.
It finally occurred to me to try automated computer translation. The software had been around for a while, but the translations from the early years were not satisfactory. I write our annual family newsletter in English. A few years ago, as a relative in France found it difficult to read, I sent her a French version generated by Google Translate, after which she complimented me on having maintained such good written French language skills. Mandarin Chinese is another ball game. Although the most widely spoken language in the world, it is the hardest language to master. This applies to computers: Google Translate produced broken English.
Each of the book’s nine chapters consists of a narrative biography, an interview with questions and answers, and a selection of images with comments by David Tian. Since I thought that my biography wouldn’t be of much interest to the readers of this blog, I will be skipping it and starting with the interview. When I tried to clean up the automated translation with Chat GPT, the re-write sometimes deviated significantly from my remembrances of the answers, which were supposed to be my words – although probably distorted by the interview process. I used the automated translation as a reference to re-write each of the answers, so they may not be a literal translation. The original chapter in Chinese, whose spreads are shown below, is available as a
PDF.
Questions and Answers
David Tian: What does landscape photography mean to you?
QT Luong: Landscape photography is my vehicle for personal connections with nature, the adventures of getting to locations, the joy of immersion in landscapes, and experiencing them at the best times of the day and year. It is my way of living a creative life and inspiring others. Moreover, landscape photography enables me to advocate for environmental conservation by celebrating the land and bringing awareness of its beauty and fragility.
How did you start landscape photography?
My father was a rather serious photographer and taught me the essentials. However, my passion for photography truly ignited during my mountaineering expeditions in the early 1990s. Captivated by the stunning vistas of the mountains, I felt compelled to capture these moments through photography so that I could remember them and share them with folks at home who could not reach the high peaks of the Alps.
As I moved to America in 1993, I was inspired by the country’s diverse national parks and the rich history of American landscape photography. This prompted me to delve deeper into the art form, ultimately leading me to embrace large-format photography.
What kind of education have you received?
After Ecole Polytechnique in the mid-1980s, I obtained a PhD in computer science from the University of Paris in 1992. I conducted research in image processing and artificial intelligence until 2007 when I embarked on a new path as a full-time photographer. I studied photography on my own, mostly by reading lots of books and looking at lots of photographs.
What makes a landscape photograph wonderful?
An excellent landscape photograph needs two elements. The first is composition. Composition is how the photographer approaches the subject matter, using formal elements to guide the viewer through the image. The second is what I’d loosely call atmosphere. This means conveying a sense of place and time, and also the personal experience and emotions of the photographer.
How do you analyze a scene before shooting?
When approaching a scene, I make an inventory of its visual elements and try to zero in on what visually attracts me the most. I contemplate the emotions and themes that the scene evokes. I evaluate the potential of different viewpoints and lighting conditions. By analyzing these factors, I strive to create images that resonate with viewers on an aesthetic and emotional level.
What do you want to show the world with your work?
Through my photography, I aim to showcase the beauty and diversity of the natural world and foster a deeper understanding of it. Each image, and even more so, each set of images, serves as an invitation for viewers to experience what I experienced, to explore and connect with the wonders of nature. My hope is they will be inspired to appreciate and protect our planet’s precious landscapes.
You only shoot in color. What is your favorite aspect of color photography?
While I always capture the scenes in color, I occasionally explore black-and-white photography. However, I find that color photography allows me to convey a richer, more complete, and more faithful description of the natural world. Color can also add a powerful emotional impact to any image, helping to capture the immersive experience and sense of wonder of being present in nature.
What inspired you to photograph all of America’s national parks?
My first wilderness experiences took place on the high peaks of the Alps because those were the last wild places in Europe. It was mostly glaciated mountains above the tree line. When I started to visit America’s national parks, I was drawn to their natural diversity. In terms of geography and biodiversity, they represented all the different facets of a vast continent. I wanted to exhaust every opportunity to experience that natural diversity. As a self-assigned project, I aimed to create a set of photographs that would try to do justice to their splendor.
What are your plans for landscape photography in the future?
I am continuing the project to photograph nature in America’s national parks, with the goal of publishing a book in 2016. This could be extended in the long term to other U.S. public lands or international parklands, maybe in Canada and Mexico. In parallel, I have begun to pay more attention to the cultural aspect of the national parks, the man-made constructs that differentiate them from pure wilderness and define the park experience for many visitors such as visitor centers, interpretive signs.
Images and comments
The bulk of the chapter featured images selected by the author, with comments written by him. I was amused by two geographic errors. They are understandable as the result of the author mismatching my writings available on the Internet, something easy to do if you are not familiar with locations. I normally offer to fact-check articles written about me and I am always surprised that many authors decline that step. However, with the chapter written in Chinese, this would not have been practical. Since those were not my words and the Google translation was unreadable, I used Chat GPT to rewrite it into proper English. The text below is the raw result of this process, except for a few instances where I have corrected translation mistakes.
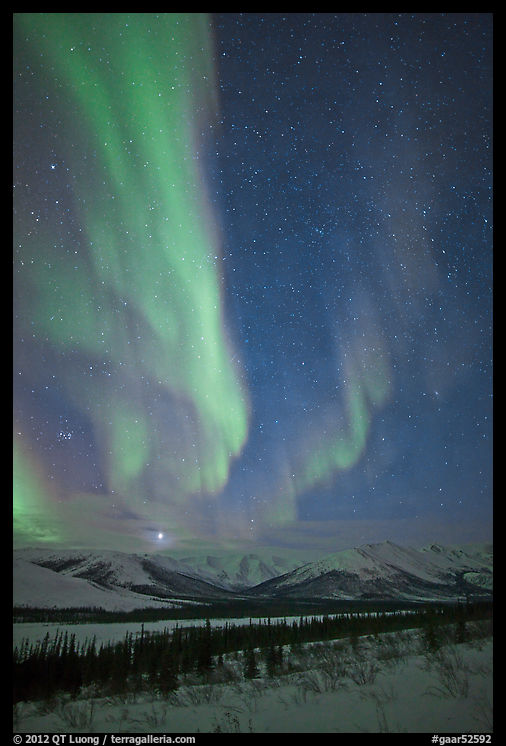
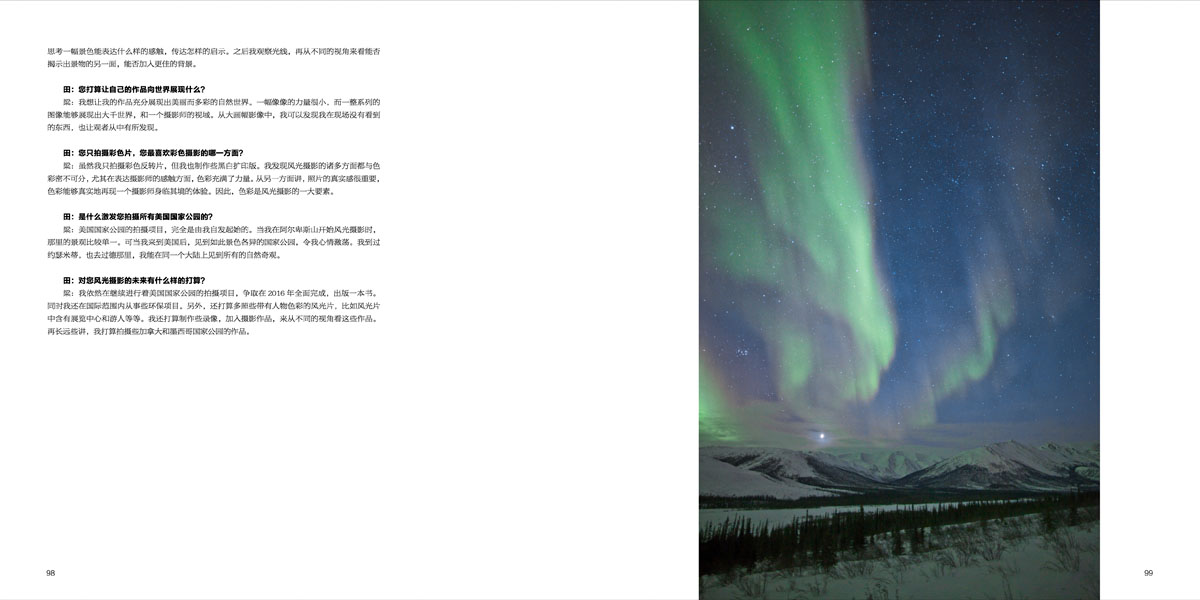
Northern Lights and Jupiter, Gates of the Arctic National Park, Alaska, USA. Canon EOS 5D Mark II camera, 24mm lens, f/1.4 at 8 sec.
That year, Luong and his friends had planned a trip to Alaska to photograph the eagerly anticipated Northern Lights. Upon reaching Gates of the Arctic National Park, they consulted with the park ranger and discovered that in September, during the third and fourth weeks, the river would still be flowing, and the night sky would be dark (unlike the bright Arctic nights of summer). However, during the third week, there would be a bright moon at night, so they opted for the fourth week for their photography expedition.
Since there were no roads leading to the park, they had to rely on a bush plane (a type of aircraft capable of taking off and landing in the wilderness without designated airstrips). Unfortunately, the weather took an unexpected turn in late September, and the pilots couldn’t guarantee a safe return. Consequently, they made the decision to paddle down the Koyukuk River for their journey back from the North Fork.
“It was nearly winter in Alaska by then, and traversing the waterways was incredibly challenging,” Luong reminisced. “But amidst the rugged mountains, flowing waters, snow-covered terrain, and a stroke of luck, perhaps I would have the opportunity to capture some truly unique photographs.”
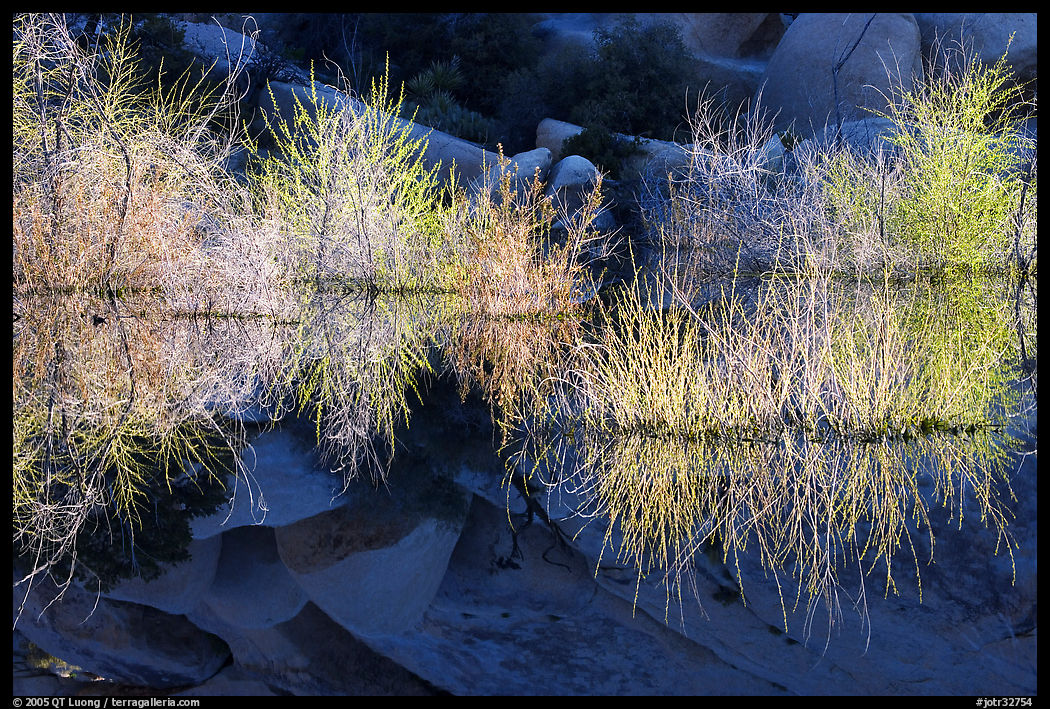
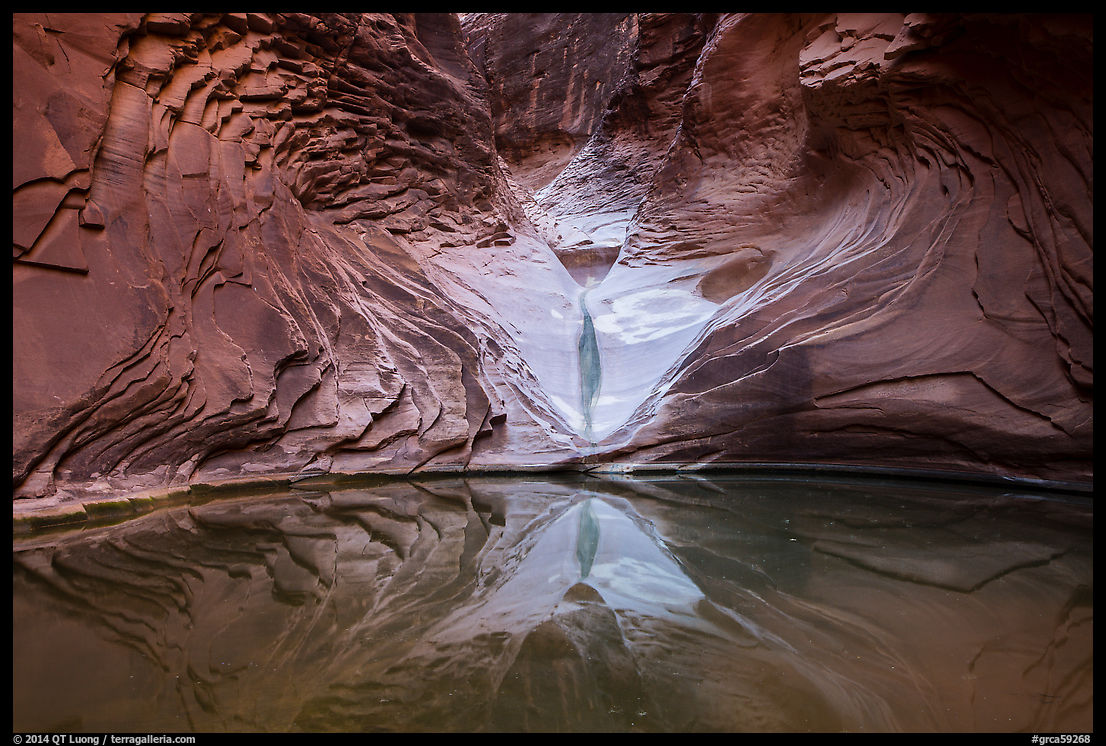
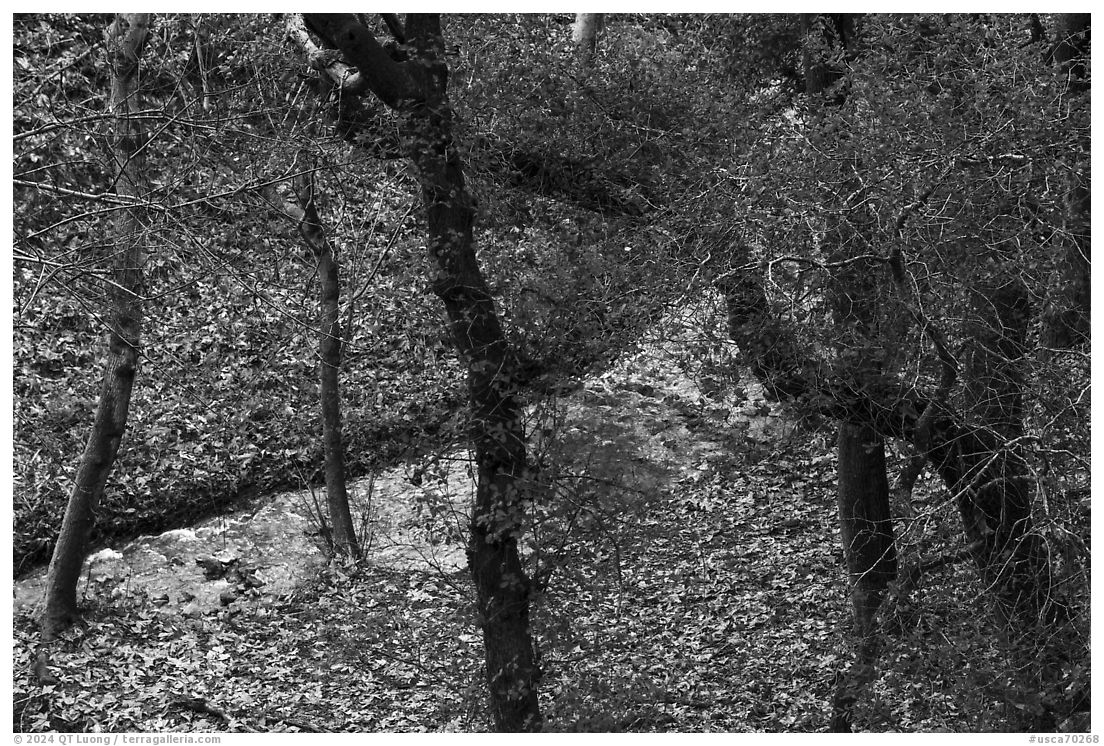
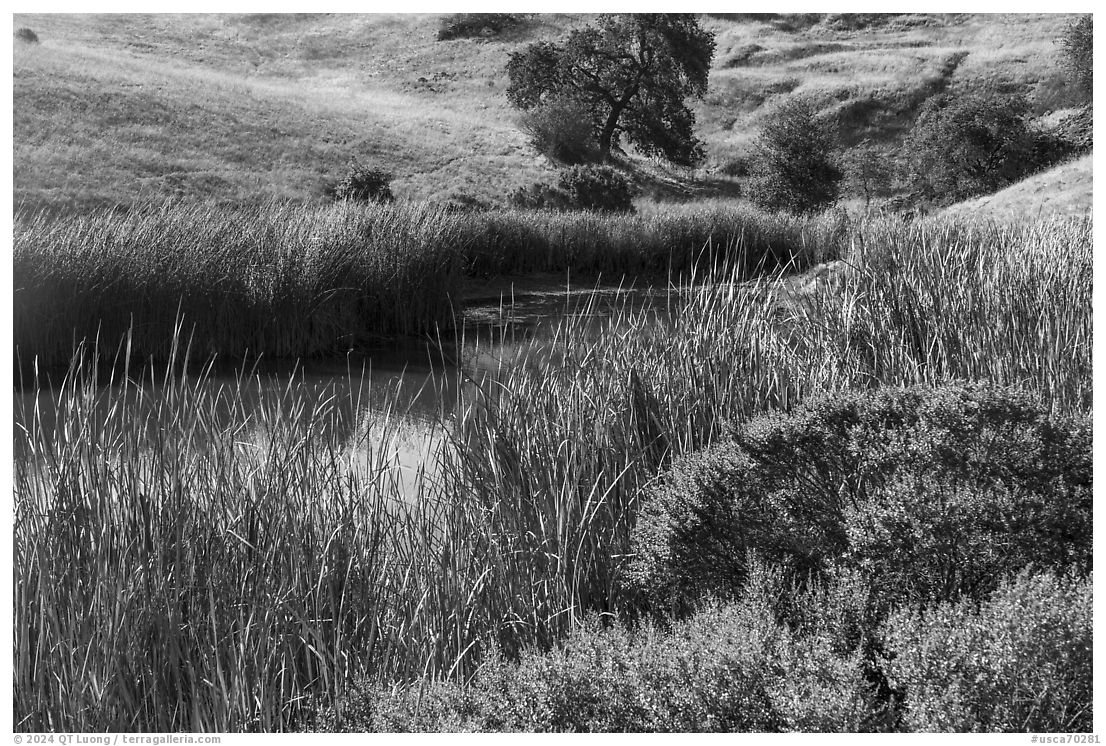
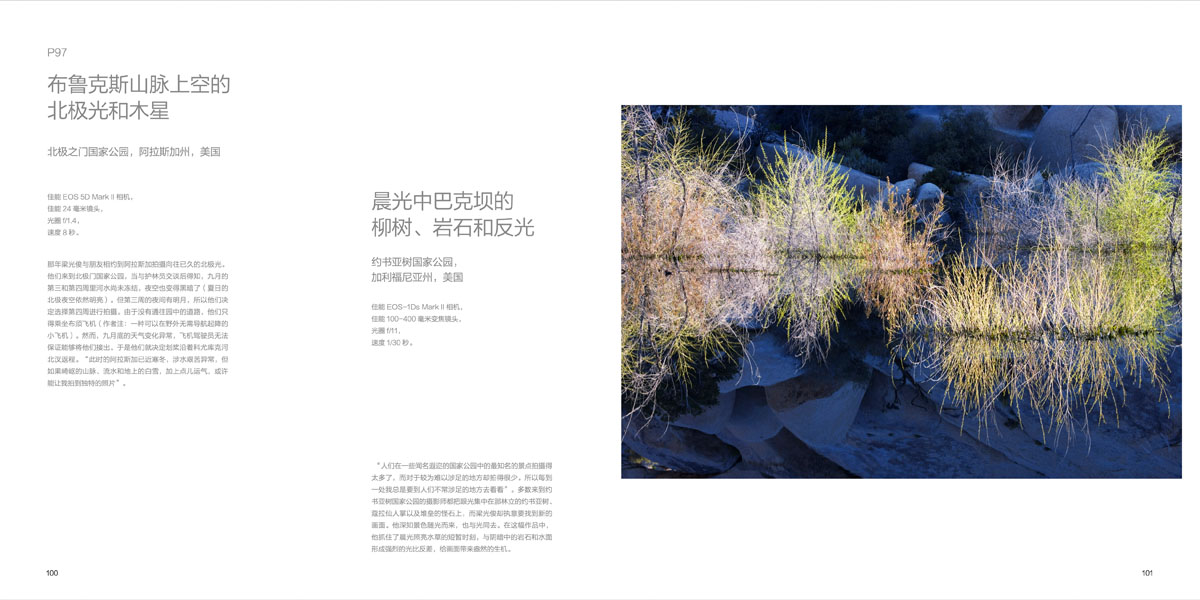
Buck Dam, willow trees, rocks and reflections, Joshua Tree National Park, California, USA. Canon EOS-1Ds Mark II camera, 100-400mm lens, f/11 at 1/30 sec.
With a plethora of famous national parks, many of the more remote and inaccessible locations often remain unphotographed. Luong, however, harbors a desire to explore these less-traveled places. While most photographers flock to Joshua Tree National Park to capture the iconic Joshua trees, cholla cacti, and unique rock formations, Luong remains determined to seek out new perspectives.
Understanding the transient nature of landscapes, Luong focuses on capturing fleeting moments bathed in light. In one of his works, he seized the brief moment when the morning light cast its glow upon the water plants, creating a stark contrast against the dark rocks and water surface. This interplay of light and shadow infuses the image with a vibrant energy, showcasing Luong’s dedication to uncovering the unseen beauty of the natural world.
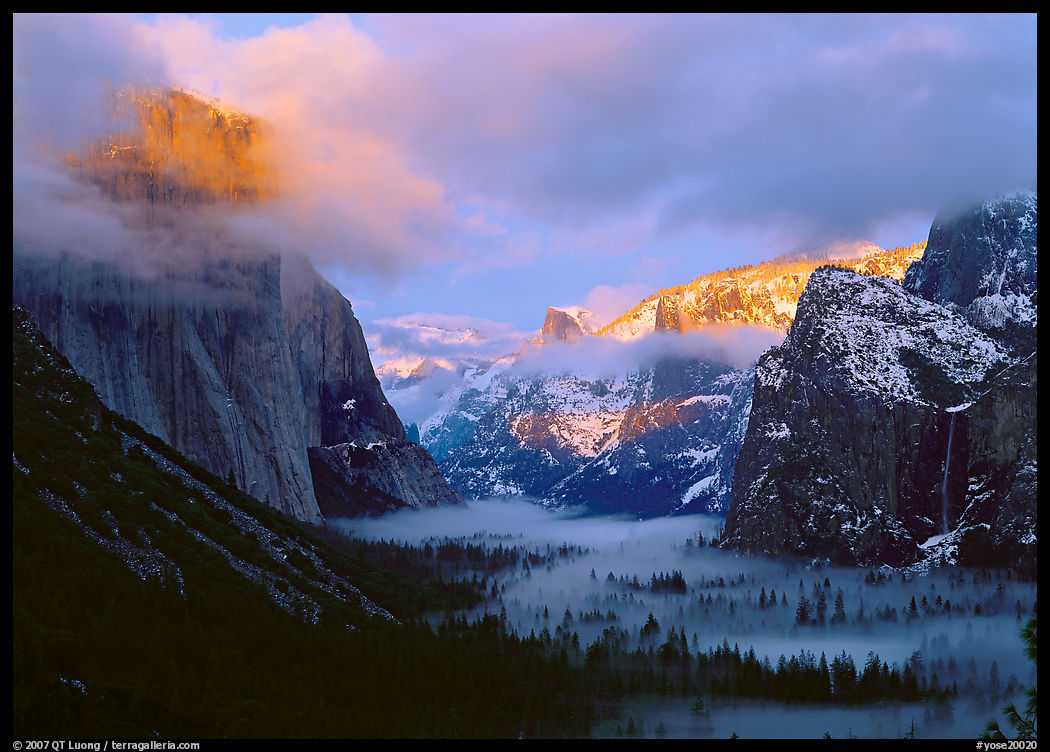
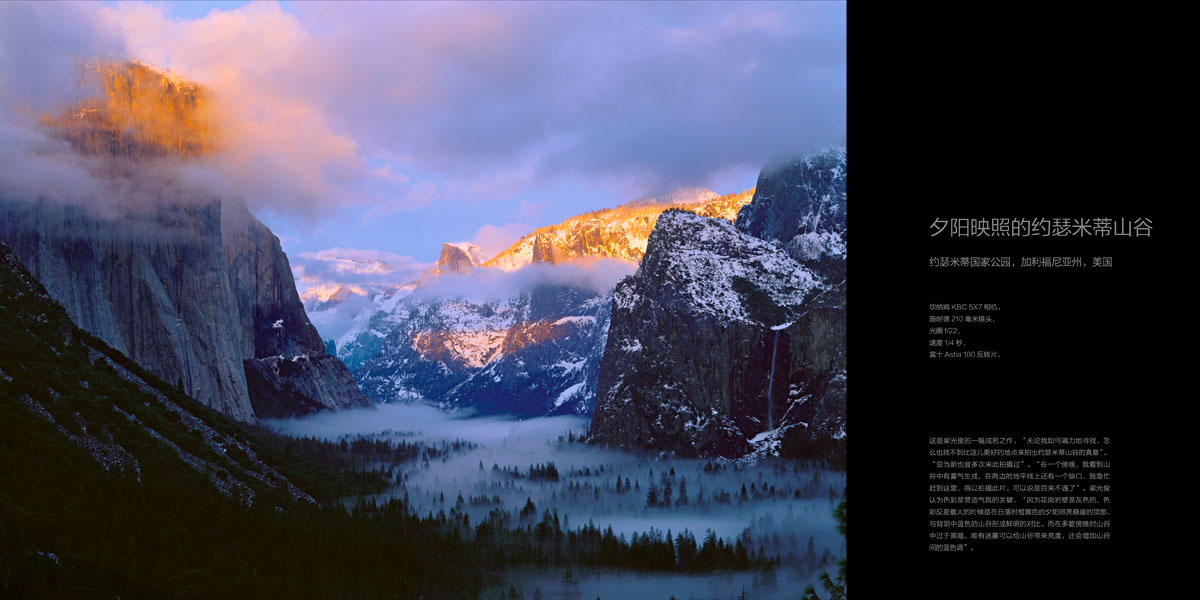
Yosemite Valley illuminated by sunset, Yosemite National Park, California, USA. Canham KBC 5X7 camera, 210mm lens, f/22 at 1/4 sec.,
Fuji Astia 100 film.
This renowned work by Luong epitomizes his unwavering pursuit of capturing the true essence of Yosemite Valley. Reflecting on his experience, Luong remarked, “No matter how extensively I explore, I cannot find a better location to truly encapsulate the beauty of Yosemite Valley.”
He acknowledged the footsteps of Ansel Adams, a legendary photographer who frequented the area for his own captures. Luong vividly recalled a particular evening when he witnessed fog settling into the valley with a distinct opening on the horizon. Seizing the moment, he hastened to the scene and captured the rare spectacle, considering it a stroke of luck.
For Luong, color plays a pivotal role in crafting the atmosphere of his compositions. He noted, “The granite walls exude a gray hue, accentuating the vibrant color contrast during sunset, when the golden-orange rays illuminate the cliff tops, starkly juxtaposed against the blue backdrop of the valley.” He emphasized the significance of fog in brightening the otherwise dark valley, enhancing the prominence of its blue tones and elevating the overall visual impact of the scene.

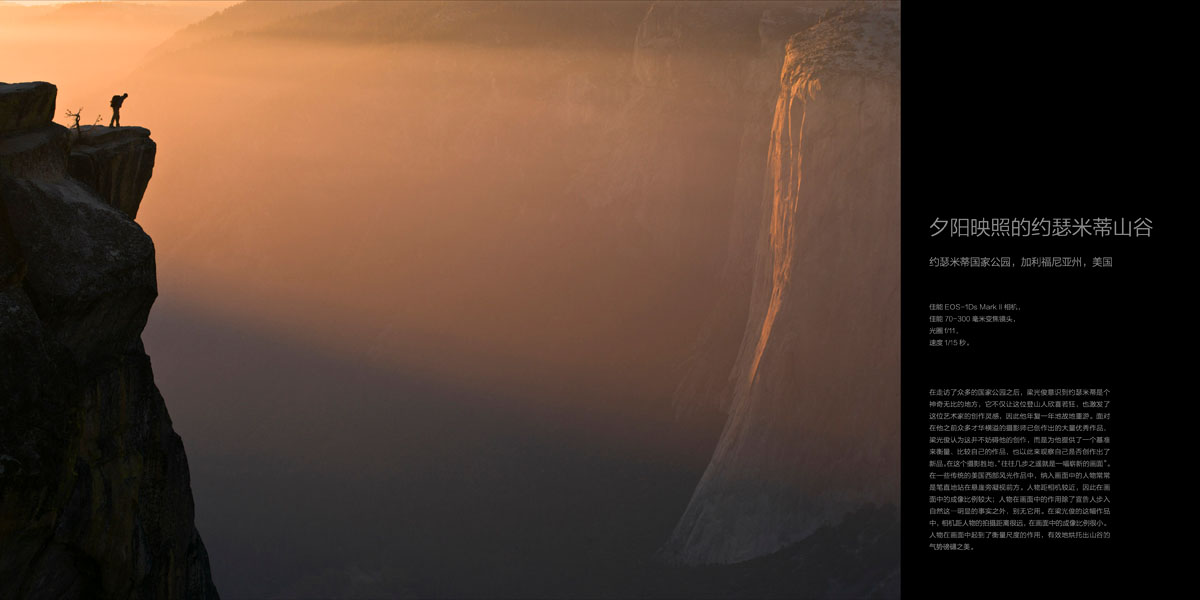
Yosemite Valley illuminated by sunset,
Yosemite National Park, California, USA.
Canon EOS-1Ds Mark II camera, 70-300mm lens, f/11 at 1/15 sec.
After exploring numerous national parks, Luong came to the realization that Yosemite held a magical allure, captivating not only climbers but also inspiring artists. Enthralled by its charm, he made it a ritual to return year after year. Despite the wealth of excellent works by talented photographers who came before him, Luong viewed this as an opportunity rather than a hindrance. He saw it as a benchmark against which to gauge and improve his own creations, constantly striving to innovate.
In this photography haven, he believed that “often a new picture is just a few steps away.” While traditional American western landscape works often feature characters standing upright next to cliffs, gazing ahead, Luong’s approach diverges. In his work, the camera is positioned farther from the person, rendering them as small figures in the frame. Rather than serving as mere focal points, these characters serve to scale the landscape, effectively emphasizing the valley’s majestic beauty.

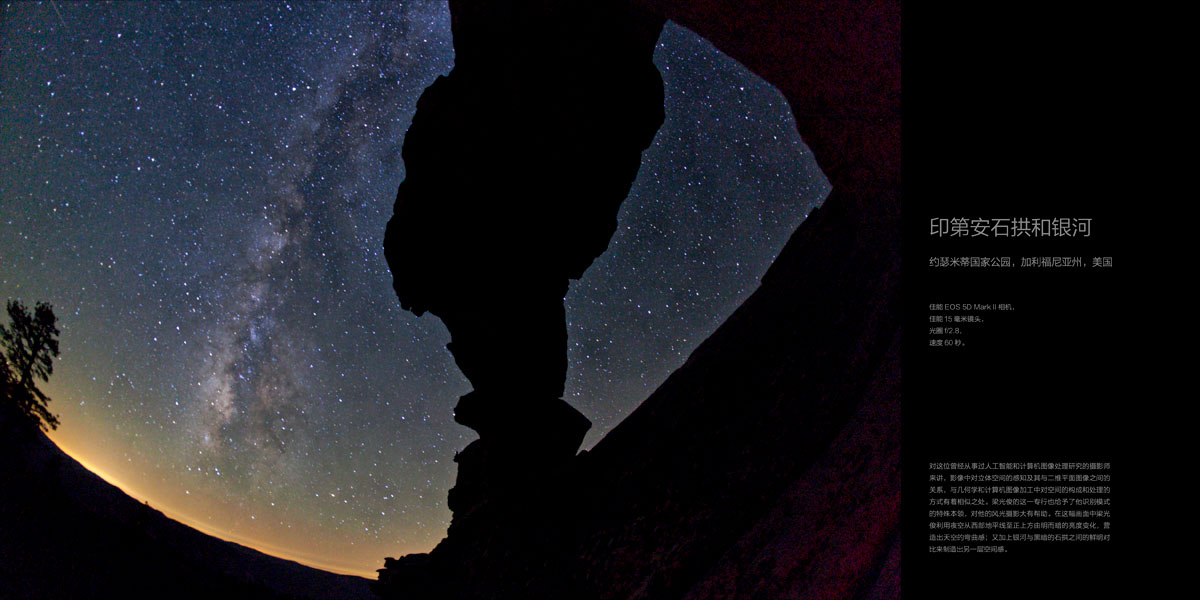
Indian Stone Arch and Milky Way,
Yosemite National Park, California, USA.
Canon EOS 5D Mark II camera, 15mm lens, f/2.8 at 60 sec.
For a photographer deeply immersed in artificial intelligence and computer image processing research, the perception of three-dimensional space within images and its correlation with two-dimensional compositions is akin to the principles governing geometry and spatial processing in computer image manipulation. This expertise serves as a valuable asset in his landscape photography endeavors.
In this particular image, the photographer capitalizes on his understanding of the varying brightness of the night sky, spanning from the western horizon to directly overhead, to craft a sense of curvature in the sky. Combined with the stark contrast between the Milky Way and the dark stone arch, he ingeniously infuses the scene with an additional layer of spatial depth, enhancing the overall aesthetic appeal.
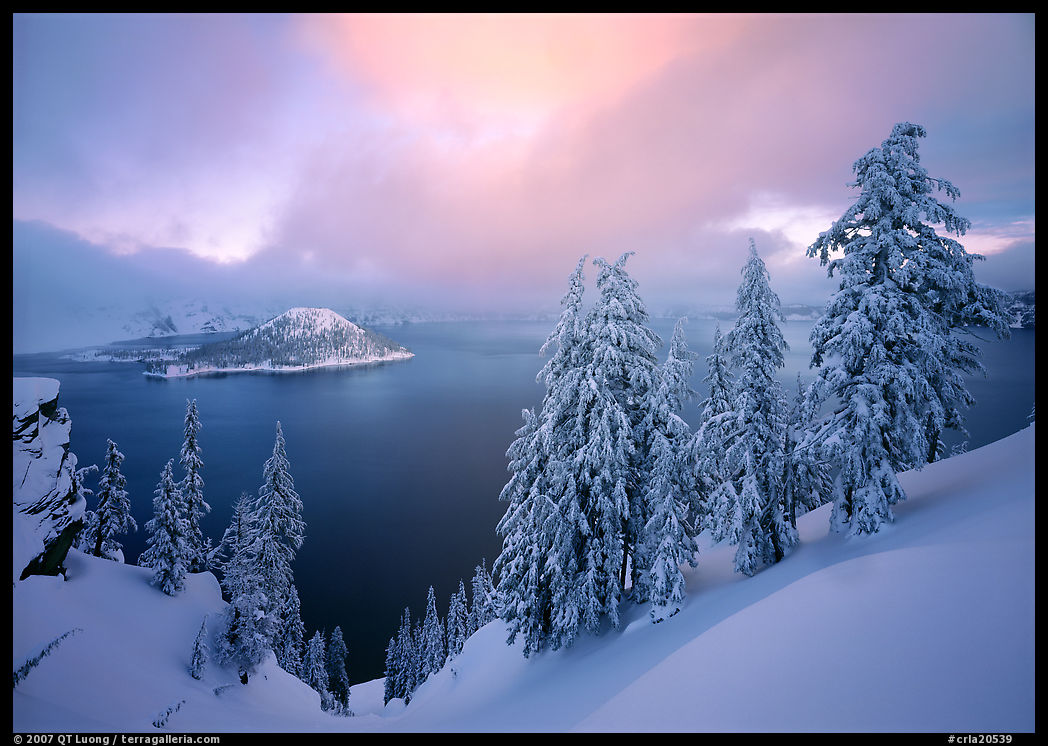
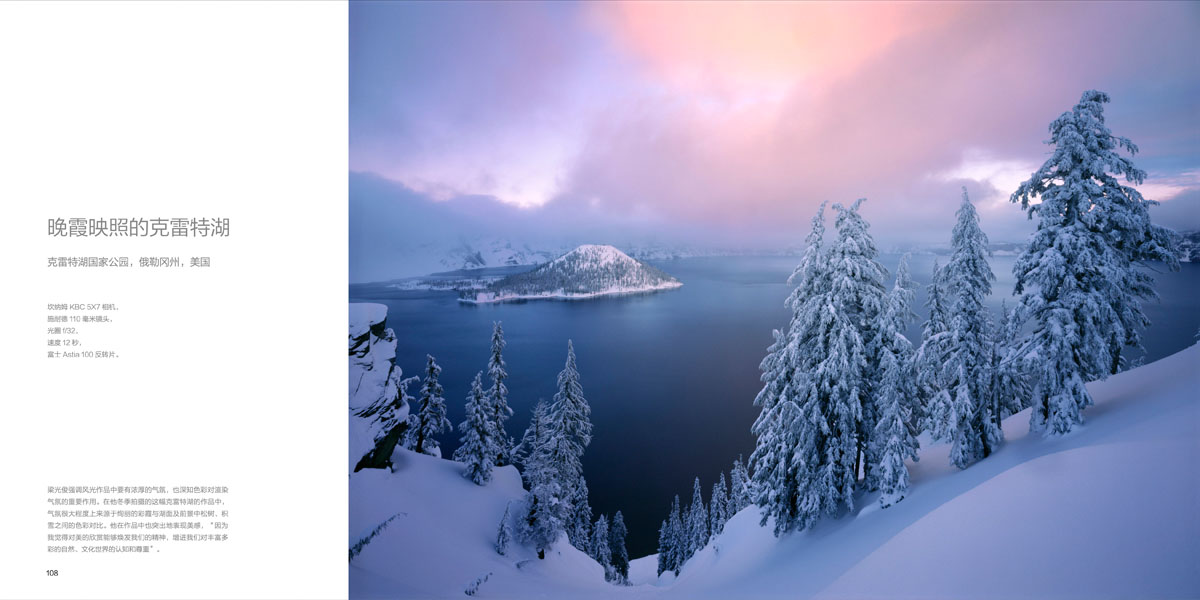
Crater Lake illuminated by sunset,
Crater Lake National Park, Oregon, USA.
Canham KBC 5X7 camera, 110mm lens, f/32 at 12 sec.,
Fuji Astia 100 film.
Luong emphasizes that landscape works should have a strong atmosphere, and he also understands that color plays an important role in rendering the atmosphere. In this photo of Lake Crater he took in winter, the atmosphere comes largely from the gorgeous clouds, the lake surface, and the pine trees and plots in the foreground, creating a color contrast against the snow. He also prominently expresses beauty in his works, “because I think the appreciation of beauty can rejuvenate our spirit and enhance our appreciation of richness and diversity. Recognition and respect for the colorful natural and cultural world.”
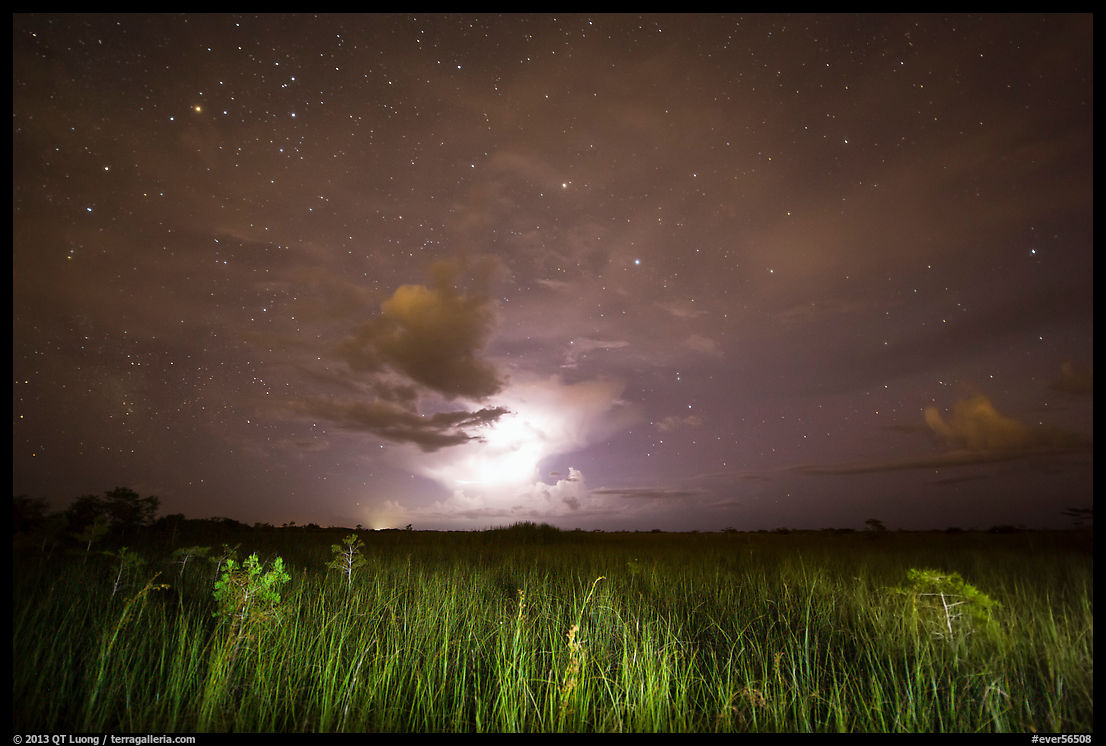
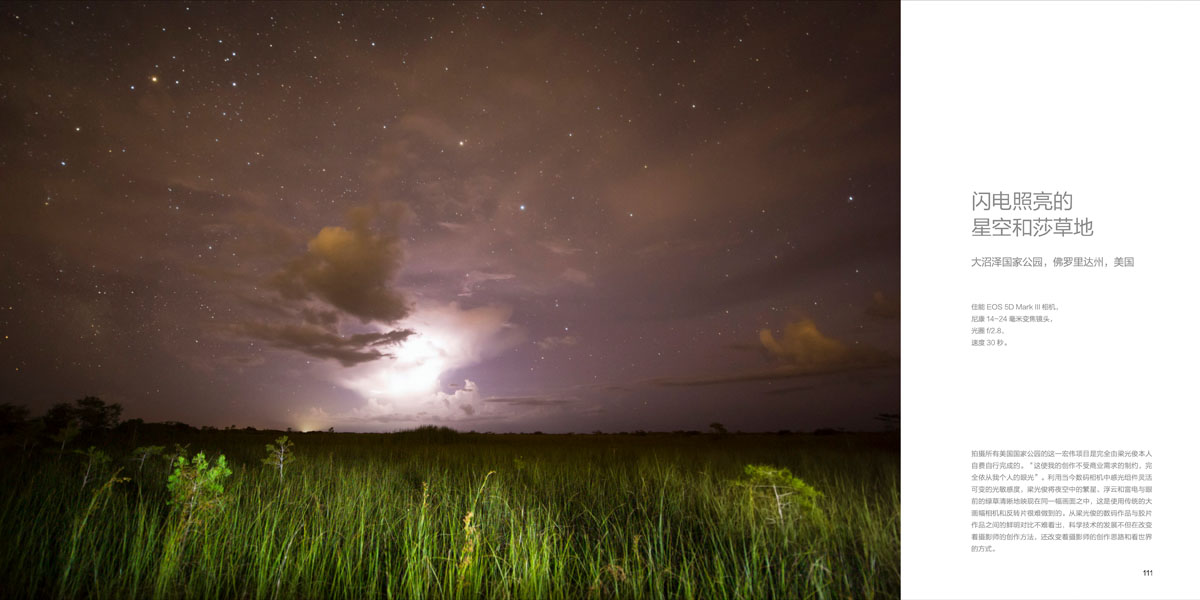
Starry sky and sedges illuminated by lightning,
Everglades National Park, Florida, USA.
Canon EOS 5D Mark III camera, Nikon 14-24mm lens, f/2.8, 30 sec.
This ambitious project to photograph all of America’s national parks was entirely conceived and completed by Luong himself, at his own expense. “This frees my creations from commercial demands and completely relies on my personal vision,” he explained. Leveraging the flexible photosensitive components in today’s digital cameras, with variable light sensitivity, Luong seamlessly combines elements such as stars, drifting clouds, and thunderstorms in the night sky with vivid details of the green grass in the foreground. This achievement, traditionally challenging in large-scale photography, is made possible through the advancements in digital technology, a feat difficult to achieve with reversal film.
Through Luong’s digital and film works, it becomes evident that the evolution of science and technology not only revolutionizes photographers’ creative methods but also reshapes their perspectives and worldview. The sharp contrast between his works showcases how technological advancements are not merely altering the tools available to photographers but also influencing their creative ideas and perception of the world.
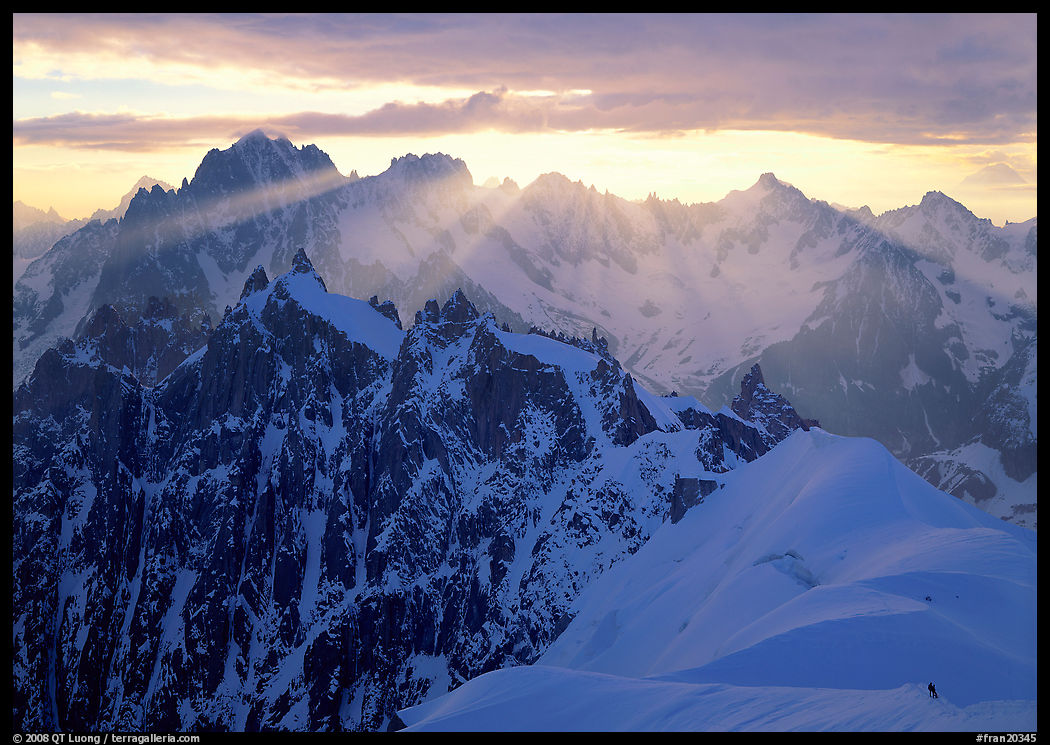
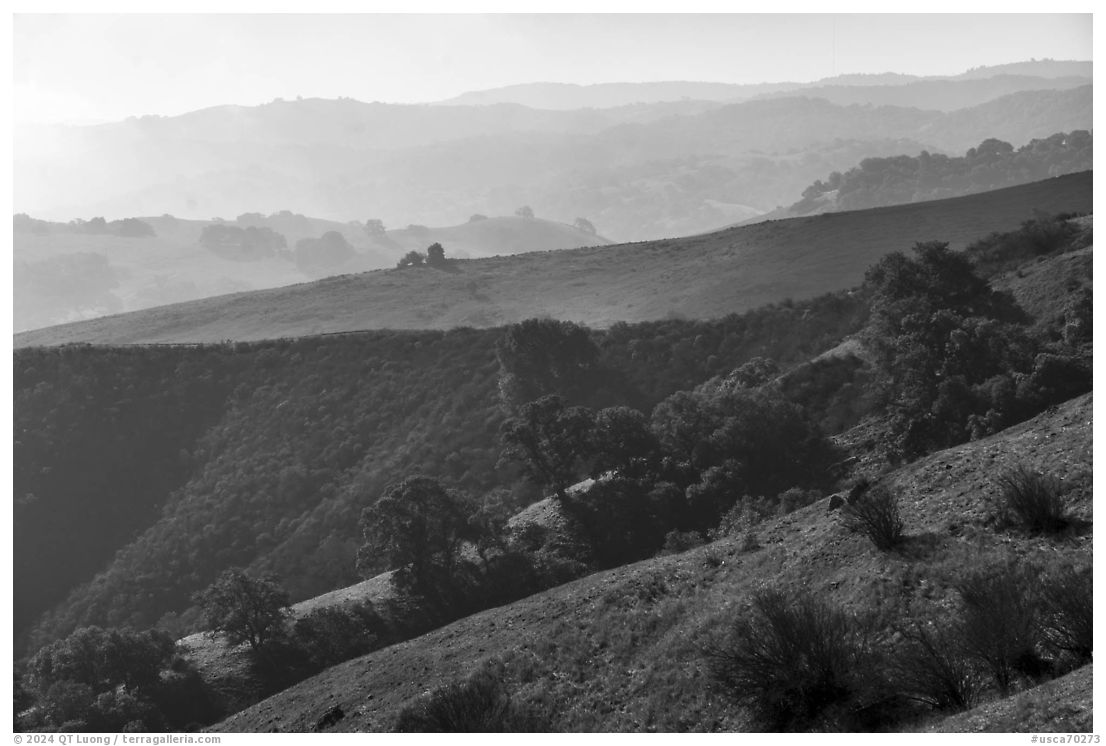
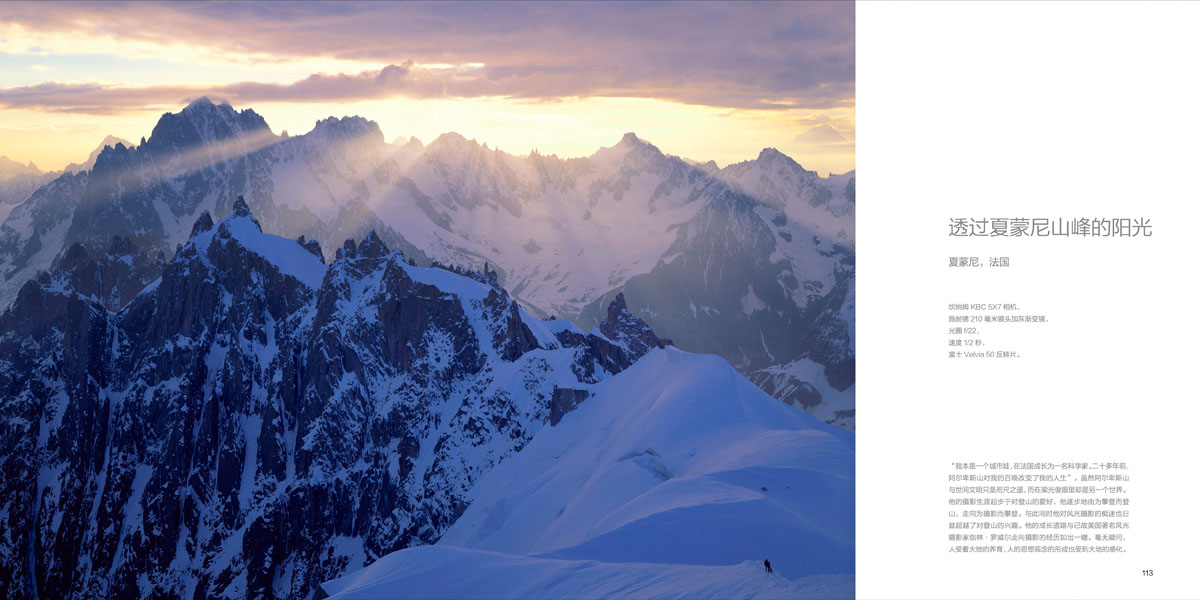
Sunlight through the mountains, Chamonix, France.
Canham KBC 5X7 camera, 210mm lens with GND filter, f/22 at
1/2 sec., Fuji Velvia 50 film.
“I was originally a city kid who grew up as a scientist in France. More than 20 years ago, the call of the Alps changed my life,” reminisced Luong. Despite the Alps being in close proximity to worldly civilization, in his eyes, it represented another world entirely. His journey into photography began as a hobby rooted in mountain climbing, gradually shifting from climbing for the sake of ascent to climbing for the purpose of photography. Concurrently, his passion for landscape photography burgeoned, extending beyond a mere interest in mountaineering. This trajectory mirrors that of the late renowned American landscape photographer Galen Rowell. Undoubtedly, man is shaped by the earth, and the landscapes we inhabit influence the formation of our thoughts and ideas.
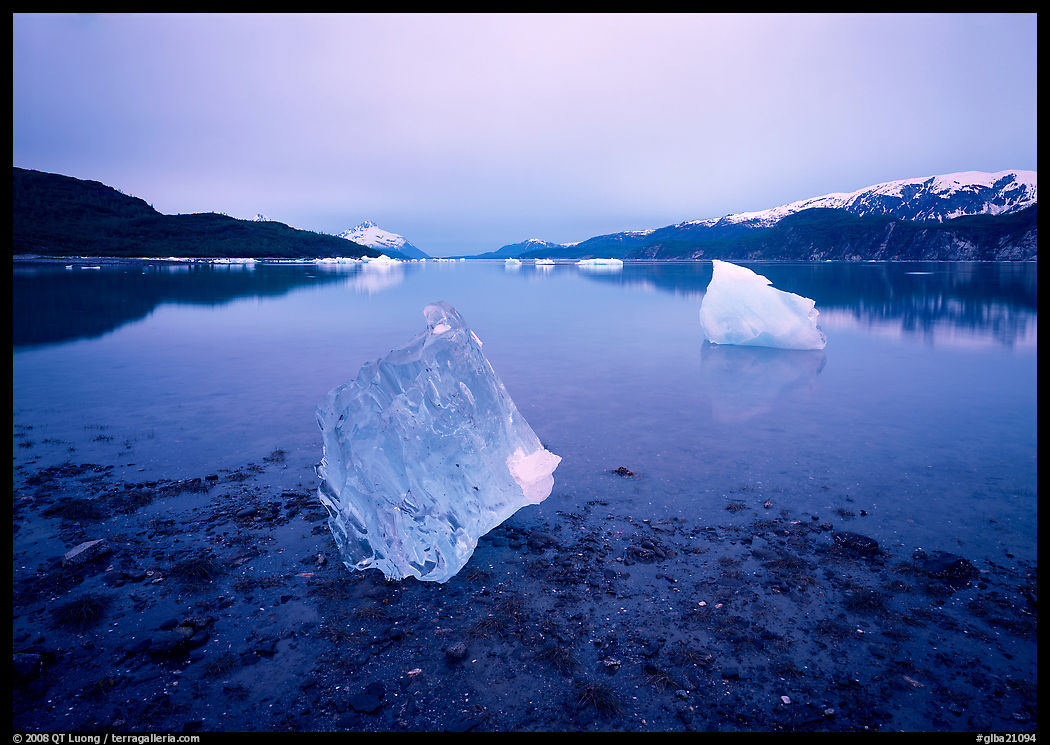
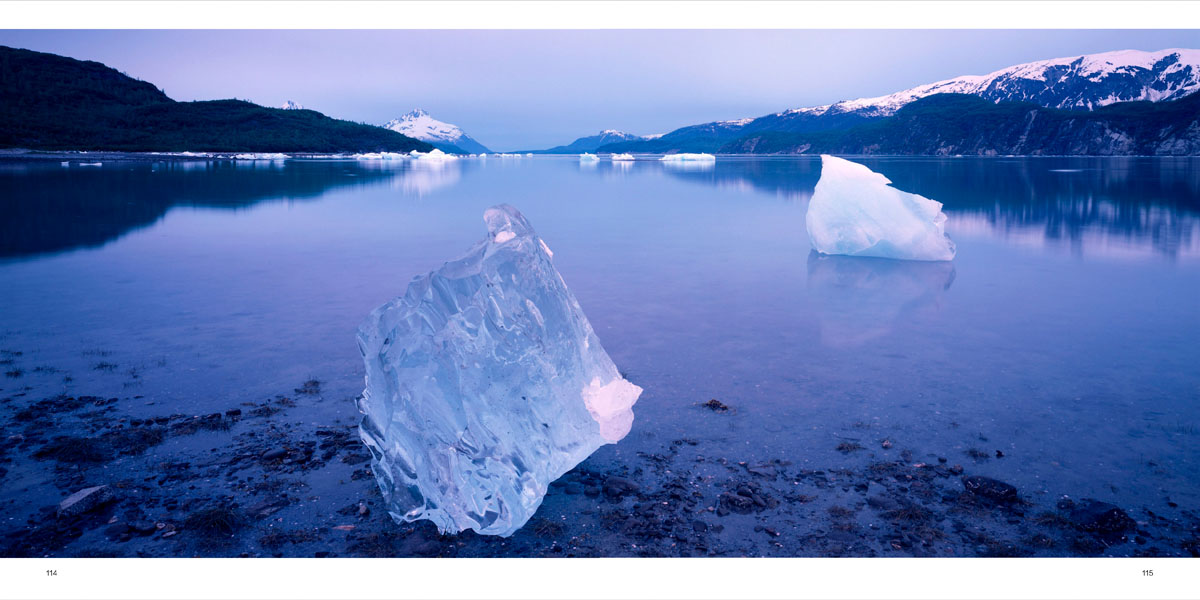
Translucent icebergs at dawn,
Glacier Bay National Park, Alaska, USA.
Canham KBC 5X7 camera, 110mm lens, f/32 at 15 sec.,
Fuji Velvia 50 film.
To capture immersive and poignant scenes at Glacier Bay National Park, Luong dedicated himself to learning kayaking in Santa Cruz, California. Since there were no land routes to the park, Luong and his wife embarked on an adventurous journey. They first flew to an Alaskan Eskimo village and then navigated by kayak along the Kobuk River to Glacier Bay, maneuvering through the majestic icebergs. Luong’s profound passion for nature photography stems from his belief that photography allows him to immerse himself in the natural world. He also deeply understands that love for nature arises from genuine comprehension and personal experiences.
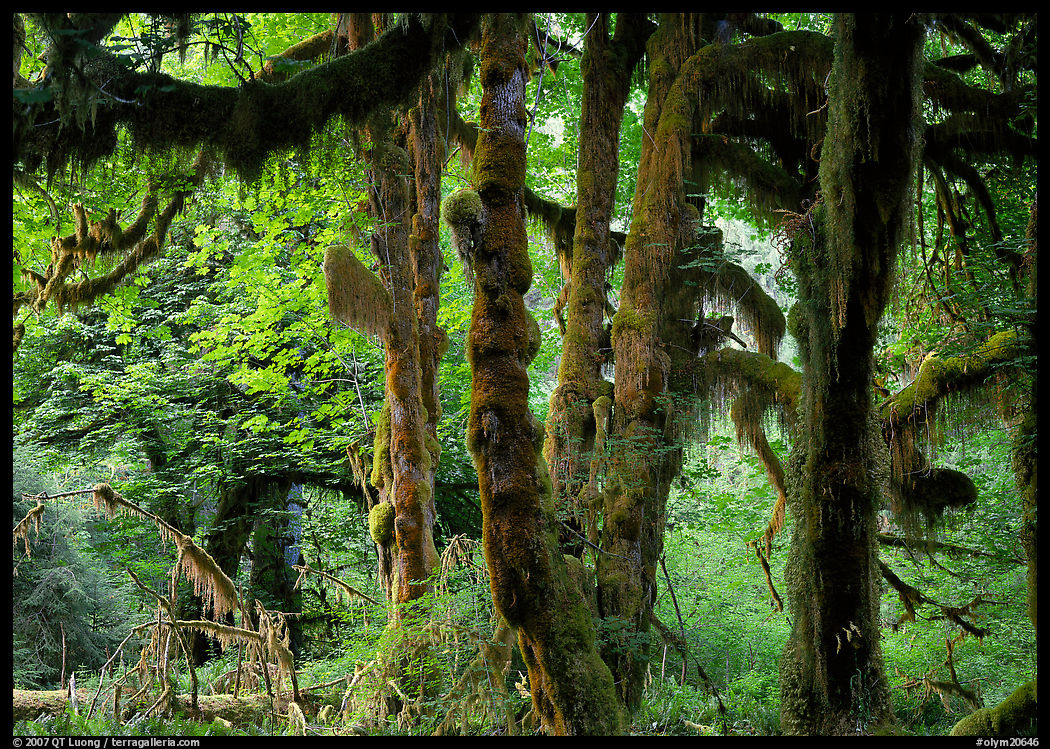
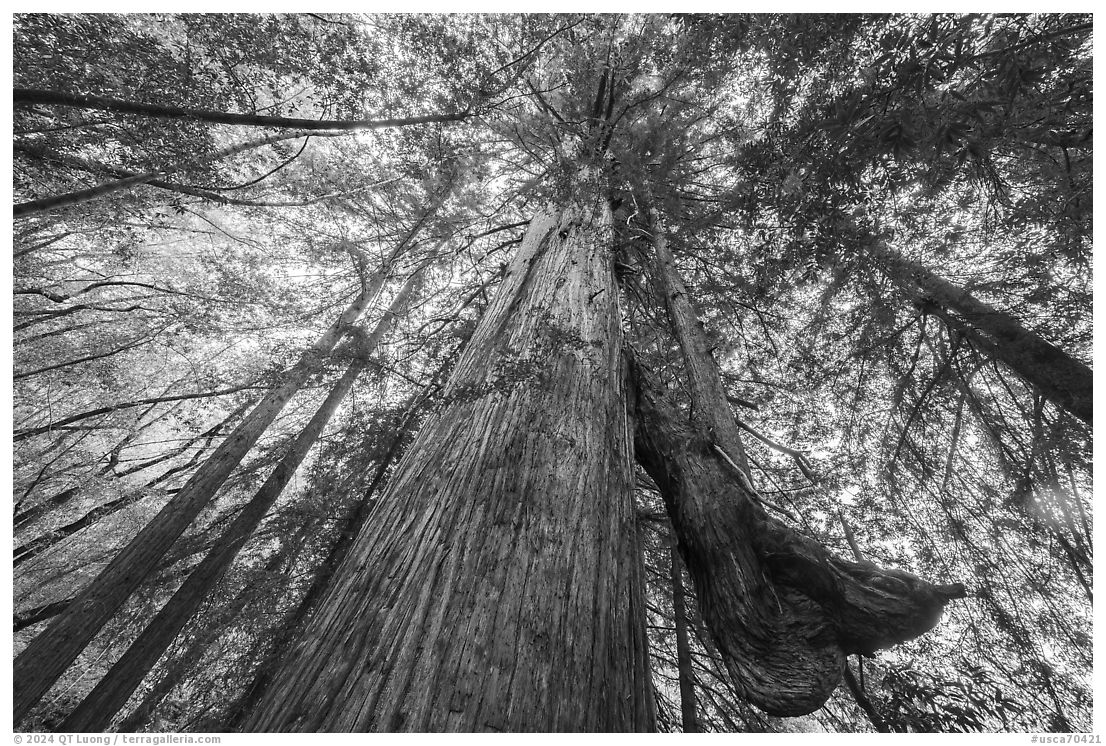
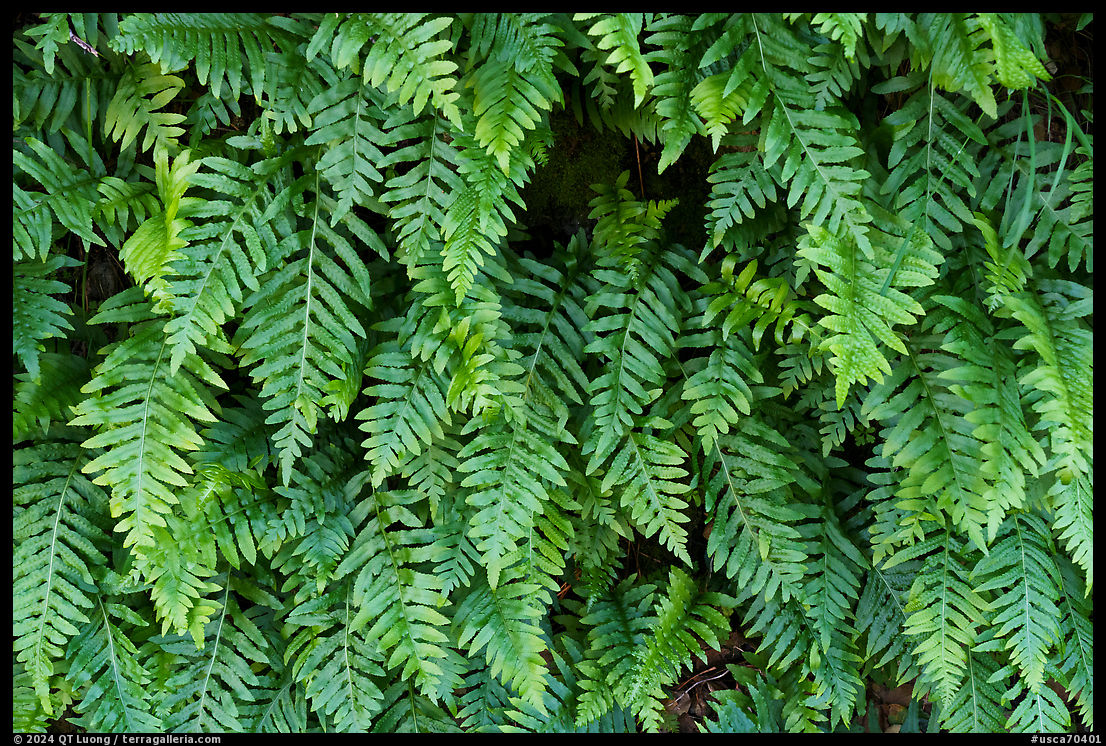
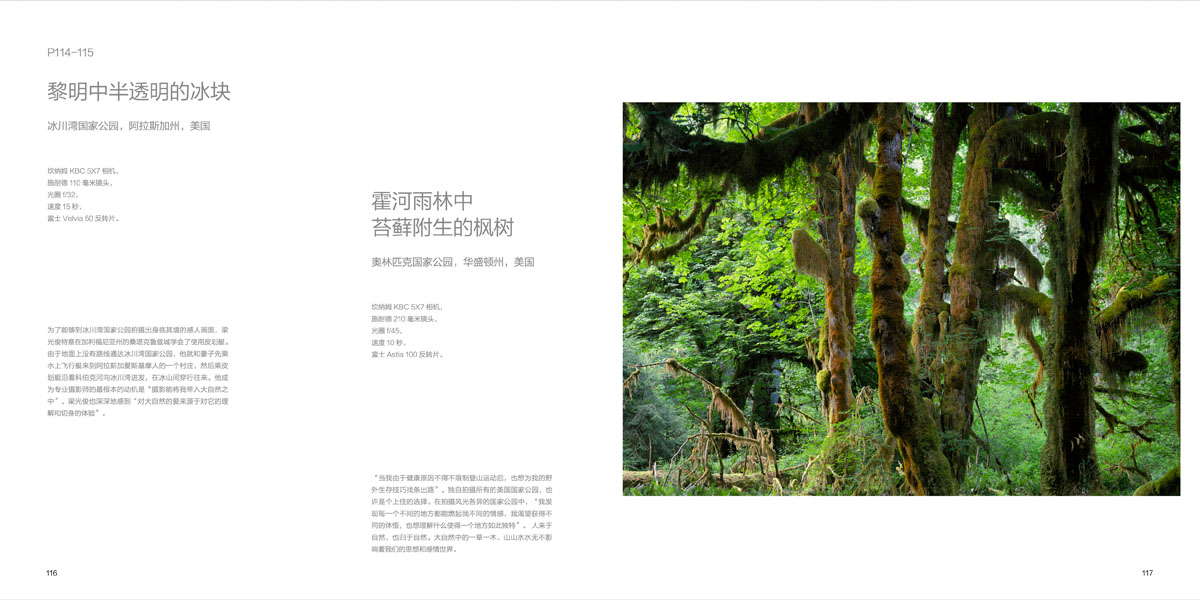
Mossy maple trees in the Hoh rainforest,
Olympic National Park, Washington State, USA.
Canham KBC 5X7 camera,
210mm lens, f/45, 10 sec., Fuji Astia 100 film.
“When I had to curtail my mountaineering activities due to health reasons, I felt compelled to acquire other wilderness skills to navigate this new chapter,” reflected Luong. Embarking on the solitary journey of photographing all the US National Parks proved to be a fitting pursuit. As he traversed the diverse landscapes of these parks, he discovered that each location sparked distinct emotions within him, fostering a yearning for understanding and exploration. “Every unique place holds its own allure,” he mused, “and I am drawn to unraveling its mysteries.” Indeed, the connection between humanity and nature is profound; as we emerge from the natural world, we are inevitably drawn back to it. Every plant, tree, mountain, and body of water in nature carries its own resonance, shaping our thoughts and emotions in profound ways.
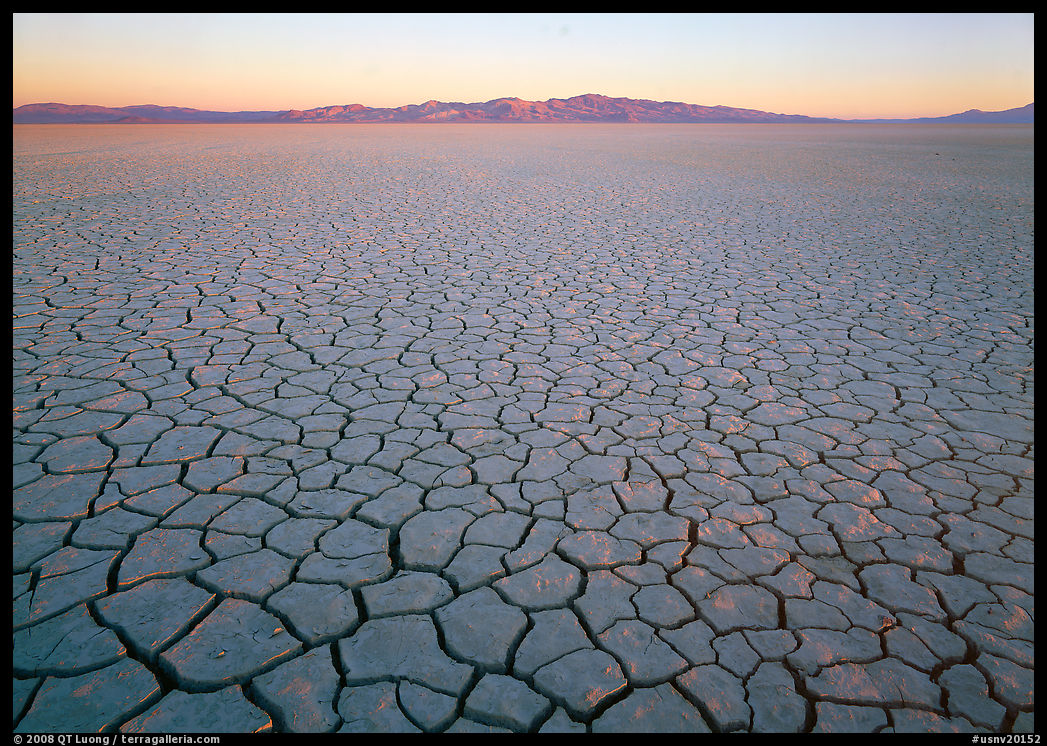
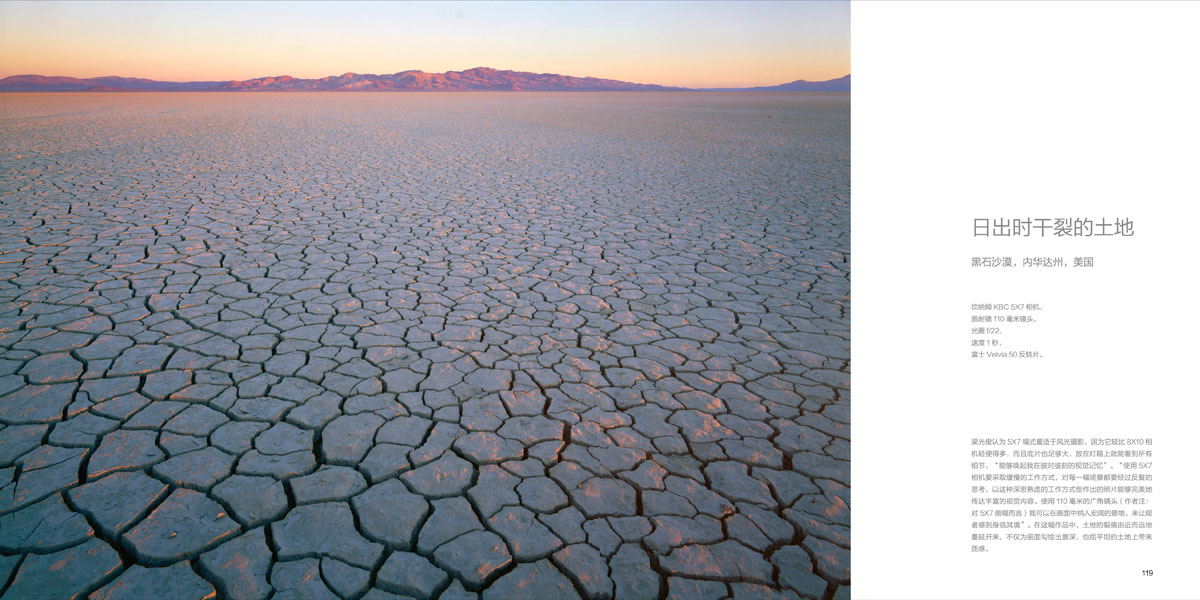
Cracked playa at sunrise,
Black Rock Desert, Nevada, USA.
Canham KBC 5X7 camera, 110mm lens, f/22, 1 sec.,
Fuji Velvia 50 film.
Luong believes that the 5×7 format is most suitable for landscape photography compared to the larger 8×10 format. This preference stems from the fact that the 5×7 camera is lighter and more portable, yet still offers a large enough film size to capture intricate details that evoke his visual memory of each moment. Working with a 5×7 camera requires a slower, more deliberate approach, with each scene meticulously composed and photographed multiple times. This thoughtful method of working allows him to create photographs that convey rich visual content with precision.
Using a 110mm wide-angle lens specifically designed for the 5×7 format, Luong can capture expansive scenery within the frame, providing viewers with a sense of immersion as if they were actually present at the scene. In this particular work, the cracks in the land are depicted from foreground to background, accentuating both the depth of field and the textural intricacies of the flat landscape.
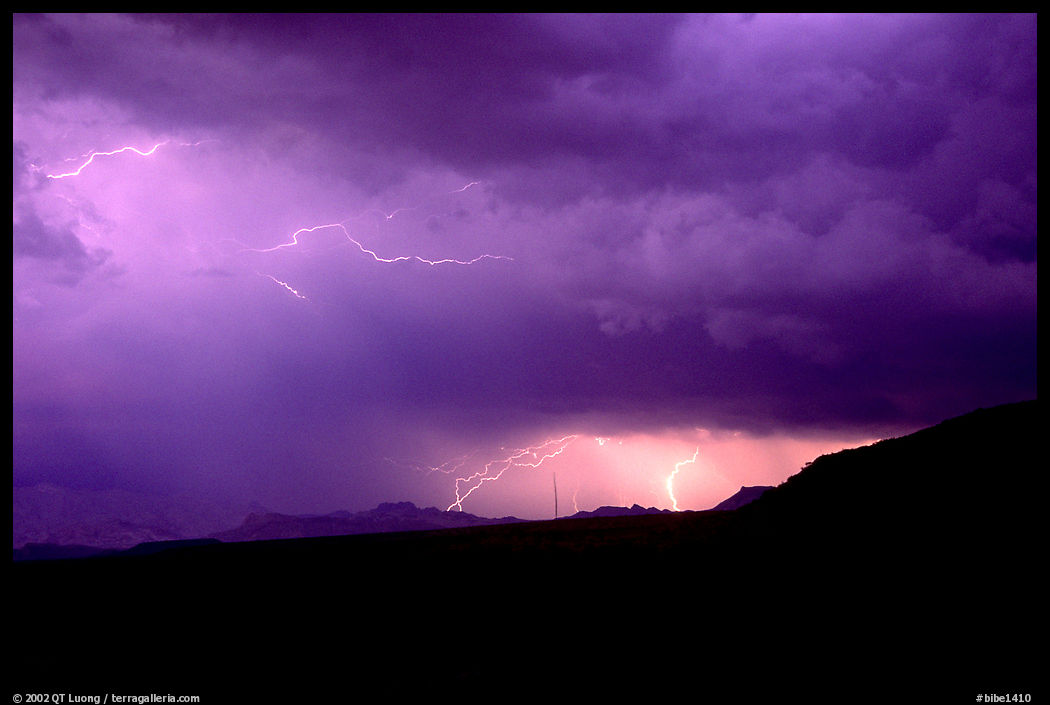
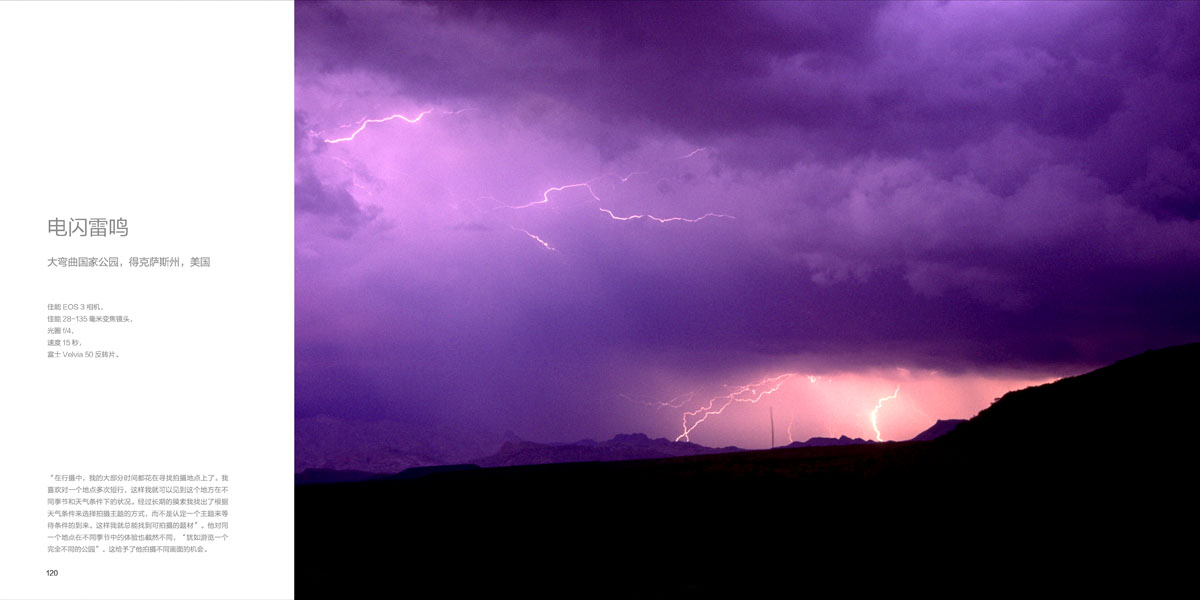
Thunder and lightning,
Big Bend National Park, Texas, USA.
Canon EOS 3 camera,
28-135mm lens, f/4, 15 sec., Fuji Velvia 50 film.
“While traveling, I dedicate a significant portion of my time to scouting locations. I prefer to embark on multiple short trips to a particular area, allowing me to observe its conditions across various seasons and weather patterns,” explained QT Luong. “Through extensive exploration, I’ve come to realize the importance of selecting subjects based on prevailing weather conditions, rather than fixating on a predetermined subject and waiting for ideal conditions to materialize. This approach ensures that I always have subjects ready to photograph.”
Luong shared with his colleagues that experiencing a place in different seasons offers entirely distinct perspectives, likening it to visiting a completely different park altogether. This diversity provides him with the opportunity to capture a wide array of images, each imbued with its own unique essence and character.