Drone Photography with the DJI Phantom 4 Pro
No Comments
Lessons learned with the Phantom 2
I’ll start with a bit of background that will help make clear what is remarkable with the DJI Phantom 4 Pro, and also give prospective users a hard-learned tip. Drone videos have captured the attention of audiences, but although video is the most natural application of drones, they also offer game-changing opportunities to the still photographer. I have been quietly experimenting with drone photography since late 2013, shortly after the DJI Phantom 2 came out. Model aircraft have been around for a long time, but flying them required a lot of skill. The computer-based control of drones made it possible to fly them out of the box. The Phantom 2 was the first ready-to-fly drone on which you could practically mount a camera with satisfying image quality. DJI pioneered consumer drones with its Phantom and remains the leader. It’s not simple technology, as evidenced by the failure of several crowd-funded drone companies.
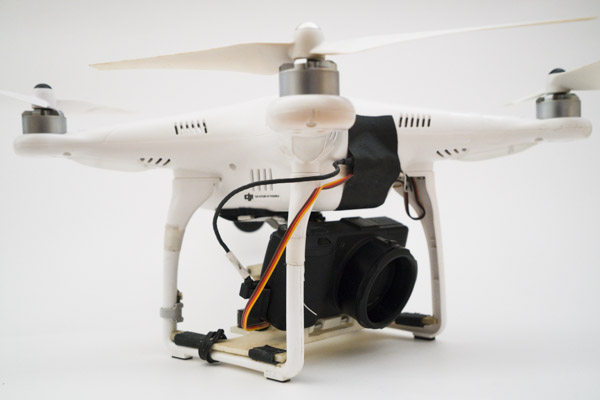
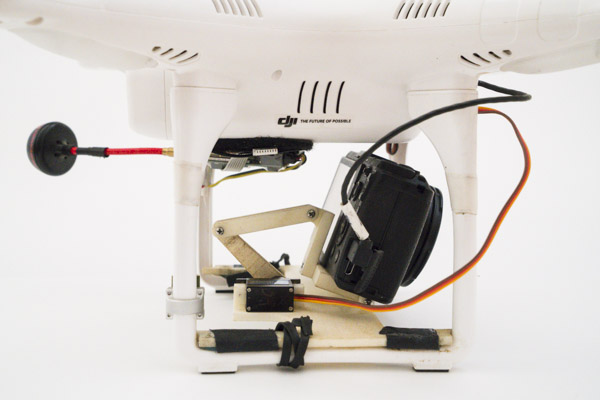
Like its predecessor, the Phantom 2 was meant to carry a GoPro, however with inspiration from Eric Cheng and help from my mechanical engineer brother-in-law, I designed a custom, 3D-printed mount that made it possible to fly a Ricoh GR while controlling the tilt angle or shutter. The Ricoh GR remains an excellent camera for its size and weight (245 g) even by 2017 standards. The DIY rig provided great image quality at fraction of the cost of larger drones, in a considerably more portable and less intrusive package. It mobilized the largest possible sensor camera (APS-C) in the smallest possible aircraft. I do not expect any commercially available drone to better that ratio for a long time.
There were two main limitations. First, besides the shutter, there was no way to control remotely the camera settings. More importantly, with the Phantom 2 already struggling with the additional weight, installing a gimbal was out of the question. The camera, tilt platform and video transmitter add to 425 grams, a serious payload for a 1,000 grams drone – comparison, the Phantom 2 Vision camera and gimbal system added 245 grams. In my first iteration of the rig with the camera directly mounted to the aircraft, I needed shutter speeds above 1/800s to ensure a sharp image. This went down to about 1/30s with the installation of vibration dampeners, and then the platform mounted on the landing gears.
My Phantom 2 reliability had been declining over time. The main reason had been my improper handling of the batteries. Since they take more than two hours to charge, I often fully charged them to be ready well ahead of shoots and kept them charged if because of conditions the flight did not take place. But those LiPo batteries absolutely need to be stored about half-full otherwise their performance degrades. A degraded battery may appear half-full but doesn’t provide enough voltage to sustain flight. Try not to panic when the aircraft begins to auto-descend while being a long distance from you and a safe landing area! In many cases, I was able to bring it back by pushing the throttle up, but this situation still caused a few crashes, which in turn may have damaged the flight system. In the end, I did not dare fly my Phantom 2 unless the area was entirely devoid of people.
The Phantom 4 Pro and its accessories
When I decided to retire the Phantom 2, the choice was between Mavic Pro, Phantom 4 Pro, and Inspire 2. The portability of the Mavic Pro – the size of a large camera body, therefore fitting easily in a camera bag – was very tempting, but eventually, I chose the Phantom 4 Pro as the best compromise between image quality, size, and price. The Mavic Pro has a smaller sensor. To get better image quality than the Phantom 4 Pro with DJI, one would need to buy the Inspire 2 Professional Combo at a cost of $10,000. There are of course many other improvements, but from a still image quality viewpoint, that’s a system that costs six times more for a sensor only twice the surface area.With the basic Phantom 4 Pro model, you use your phone or tablet as a display. I bought instead the Phantom 4 Pro+ version where the remote controller comes with its built-in display. The main advantage is quick deployment: you don’t have to attach the display, and since the screen is way brighter than a phone, it is usable without a shade. I don’t have to manage a separate device, since charging the controller also charges the display. It is challenging enough to keep my iPhone charged! The drawback is that the android-based hardware isn’t as good as some phones, and more importantly, it doesn’t support third-party apps that can provide functionalities not included in DJI’s app.
Given my previous experience, the new DJI battery hub that keeps the batteries at the optimum charge level for storage was a must-have accessory. Beware of third-party hubs that offer the charging capability but don’t have a storage mode. On the other hand, third-party car chargers work just fine and can be connected to the DJI hub. DJI claims a flight time of 30 min, but in practice I limit flights to a bit more than 20 minutes. Although they are expensive, I suggest getting at least 3 batteries. They come in a standard 5300mAh and a “high capacity” 5870mAh, which is the one I recommend.
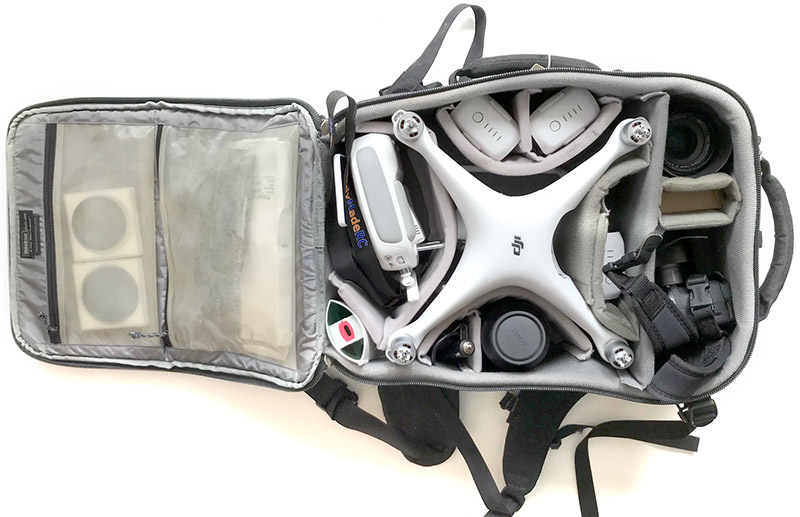
The Phantom 4 Pro and all accessories fit in a Think Tank Airport Accelerator, together with a Sony A7R2 and three zooms covering focal lengths from 16mm to 300mm – the smaller size of the mirrorless system helps! If I need to carry a more extensive camera system, I dedicate an entire backpack to it and carry the Phantom 4 pro in a small shoulder bag.
Imaging capabilities
The Phantom 4 Pro is the first Phantom equipped with a camera including a Exmor 1-inch sensor, similar to what is found in a Sony RX100 camera. By contrast, the Phantom 4 and Mavic Pro have a 1/2.3 inch sensor comparable in size to that of a camera phone. Although the image quality from the Phantom 4 Pro is a step down from the GR with its APS format, it is a class above most compact cameras and certainly all camera phones. DJI’s current top-of-the line ready-to-fly drone, the Inspire 2, uses the micro 4/3 format, which sits between 1-inch and APS – therefore not matching my first custom rig.
Since the Phantom 4 Pro uses a 20 MP camera with a relatively small sensor (the full-frame Canon 5D mk3 had only 22 MP), images get noisy at higher ISO. Fortunately it is often possible to use lower ISOs even in dim light because the stability of the aircraft and 3-axis gimbal that compensates for aircraft motion allows for sharp images at low shutter speeds. That may be the most significant improvement in terms of imaging over the Phantom 2 generation. Shutter speeds of above 1s are now possible, so it is like having a tripod in the sky. Unless you use a bulky and expensive gyrostabilizer, those shutter speeds are not even possible from a manned aircraft. It also helps to use RAW files, and DJI conveniently provides them in the universal DNG format. All the camera settings are accessible during flight via the remote controller.
Transmission and Flight capabilities
Back in the Phantom 2 days, to see on a screen what the aircaft was seeing, you had to install your own video link independently from the remote control link, and those third-party add-ons provided barely adequate resolution and transmission distance. In the summer of 2014, this changed with the introduction of DJI Lightbridge, which offered full HD video transmission at distances of up to 3 miles. Back then, Lightbridge was also an add-on, and cost an extra $1,400. Nowadays, Lightbridge 2 is installed on all generation 4 models, even the Phantom 4 which as of this writing is discounted below $900.
The flight capabilities and integration are a tremendous improvement over the Phantom 2 generation, which is remarkable because it’s been only 3 years! The new flight technology now includes not only GPS, compass, and gyroscopes, but also radar, obstacle avoidance stereoscopic cameras, and visual tracking, making flying an almost foolproof matter.
The controller will warm you if you are attempting to take off from a restricted area such as the vicinity of an airport (although I use beforehand Airmap for planning purposes), or if the aircraft needs recalibration.
The main precaution is to make sure that you are taking off from an area which is clear within GPS tolerances, and that a GPS home point has been acquired. This ensures that should the aircraft need to auto-return, it will do so safely. The aircraft will automatically return home if the signal is lost or if the battery is low, but in doing so it takes only distance into account, so you should keep some margin to account for headwinds. I plan to land with about 20-35% of battery remaining. It is not even necessary to pilot the aircraft for landing, provided that you have a clear area with GPS, all you need to do is to press the dedicated “return to home” button. Although the aircraft is equipped with obstacle detection, I generally try to fly high enough that there are no obstacles, but as I’ll discuss later that’s not only for safety.
Looking for new perspectives
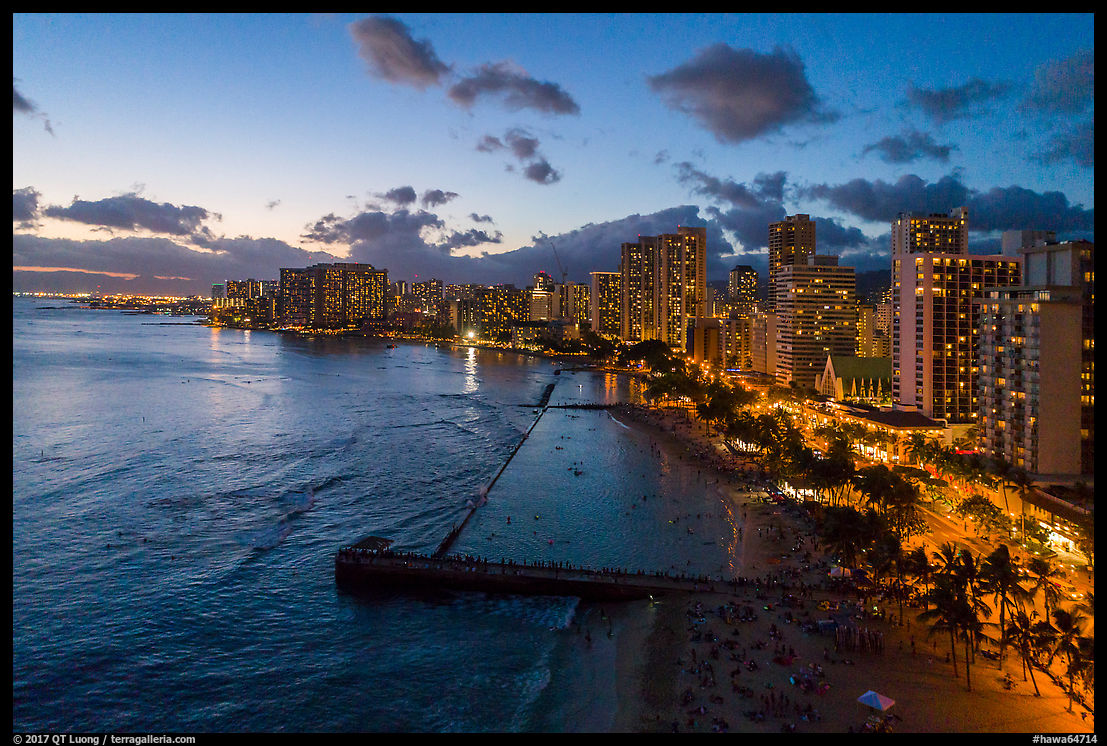
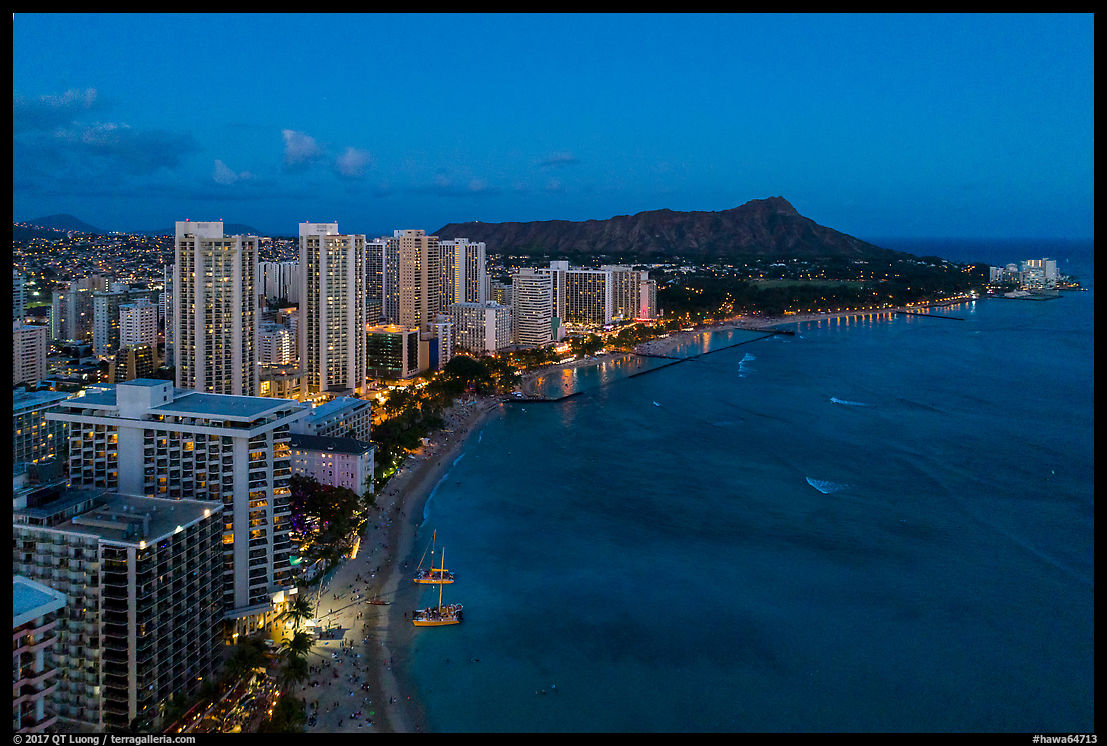
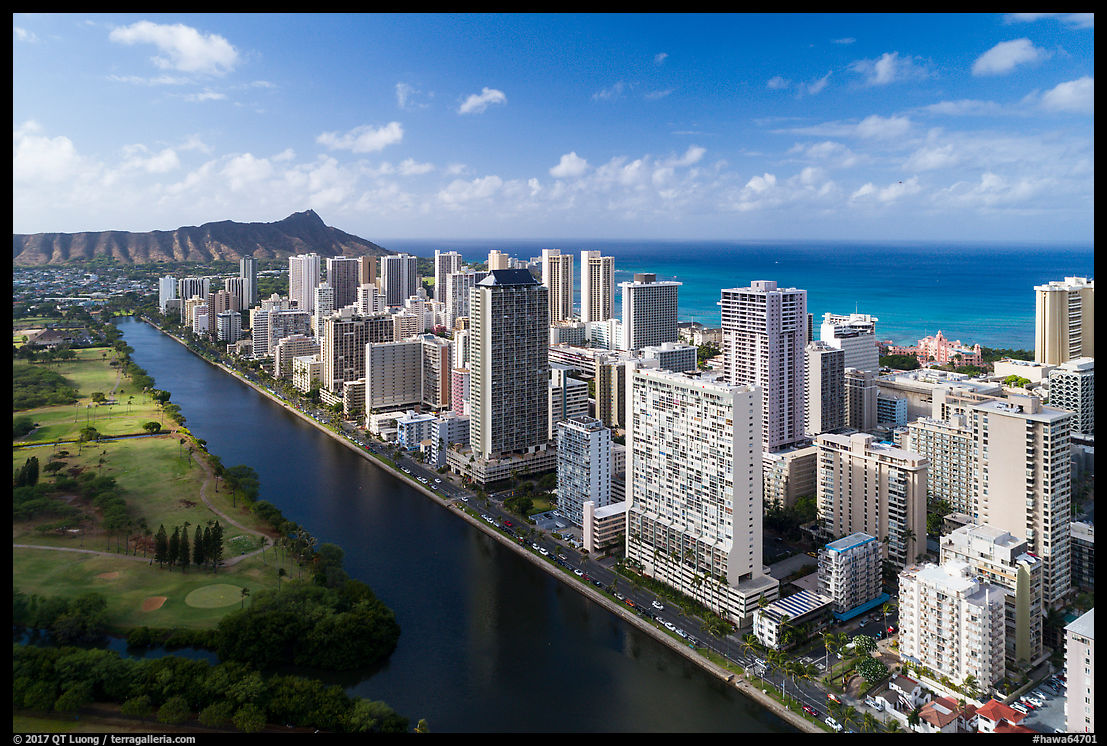
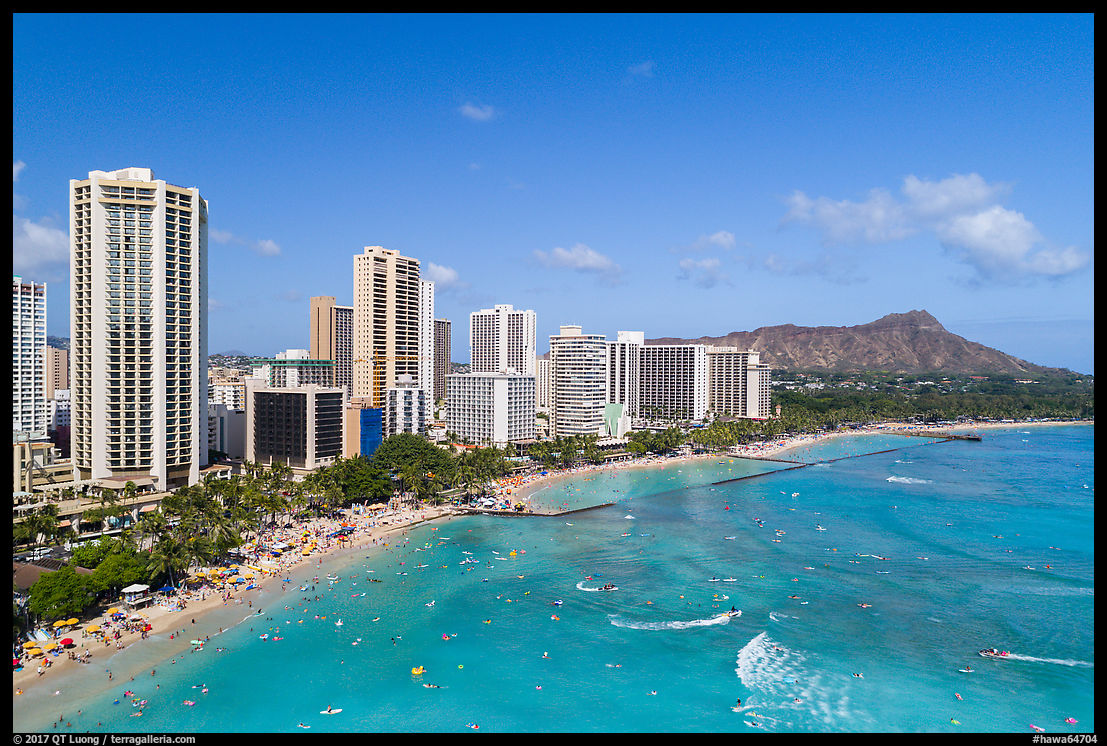
As a result of improved safety, I felt comfortable flying above busy Waikiki in Hawaii on my first trip with the Phantom 4 Pro. The appeal of aerial photography is the ability to see places from a vantage point otherwise inaccessible. Waikiki is built on the site of a former swamp. You drain a swamp by digging a canal around it, and there are no high-rise buildings on the side of Waikiki opposite to that Ala Wai Canal canal. Similarly, since the viewpoint is above water, aerial photography is the only way to photograph Waikiki skylines rising above the ocean. For those images of buildings, I find the convergence caused by the moderate down tilt of the camera distracting. Since a tilt-shift lens isn’t an option, the perspective controls of Lightroom came to the rescue.
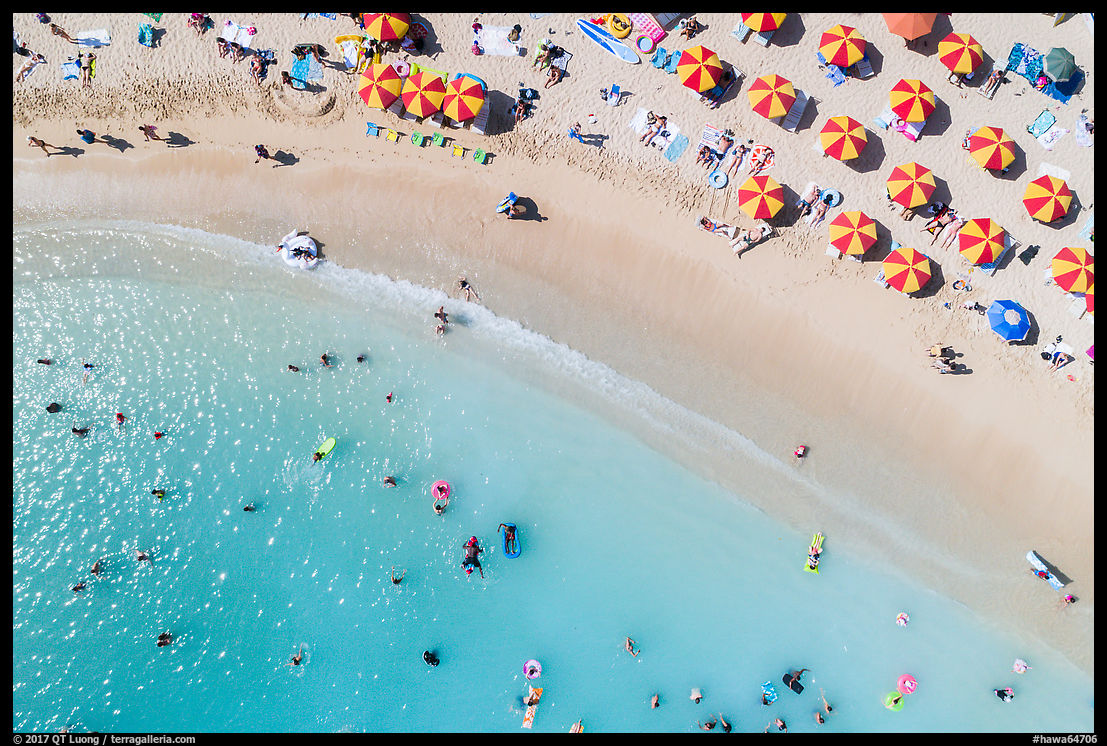
Perhaps the most unique perspective made possible by drones is the ability to look directly top down. You cannot do that from a fixed structure since the structure itself would be showing in the photograph, and as a aircraft passenger, you’d have to lean out of the aircraft while it is doing a steep bank, quite the uncomfortable position. Creating those photographs with a drone is easy, and their graphic nature often intringing.
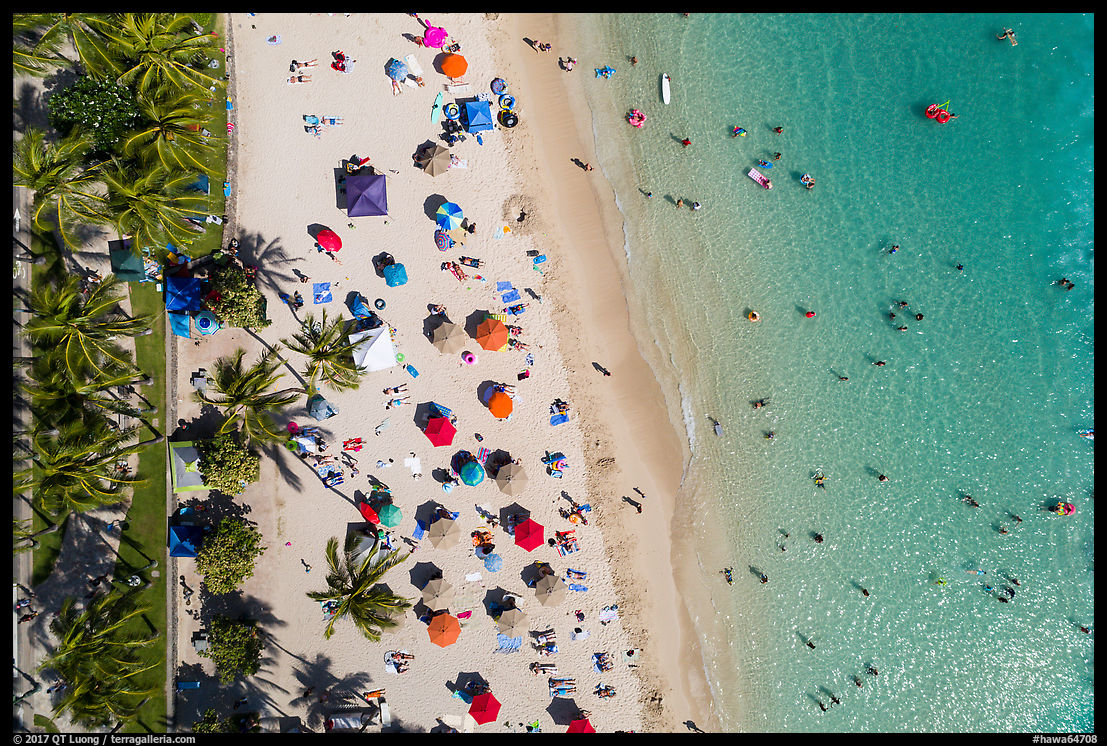
Because the blade noise might inconvenience some, if people are present, I avoid flying low. All of the images on this page were made from a relatively high elevation. The drone would be barely audible in quiet conditions, and at the ocean side, its noise is drowned by the surf. Some people, including drone pilots, object to flying at all above people or roads, but curiously they have no objection against manned aircraft doing so. Yet no lightweight drone crash has resulted in a single fatality – a study showed that significant head injuries are unlikely even with a direct hit. People have been killed in their beds by falling aircraft. I’ve found that many people who enjoy looking at drone photographs object to having a drone hover above them. Would you be amongst them or are you tempted by the new photographic opportunities?

