Solar Eclipse over the Tetons: Photographing (?) the Real Icon
19 Comments
Summary: For the total solar eclipse of August 21, 2017 in Grand Teton National Park I chose a backcountry location discovered by William Henry Jackson. My shooting plan to capture this iconic shot did not involve straight photography, but rather a timelapse and a 360-degrees panorama.
Attending or not attending ? That is the question
I am a landscape photographer. Without the connection to the land, photographing a celestial event doesn’t get me that excited. Don’t get me wrong, I understand the difficulty and admire well-crafted close-ups of celestial objects. However, those astronomy pictures lack the sense of “being there” which defines most of my work. They could have been made in a wide range of locations – and are best shot with telescopes. Tens of millions were expected to see the 2017 eclipse, the most accessible ever in America during our lifetime, and therefore the most viewed ever. Most of their successful close-up images would be similar, whereas I am striving for the distinctive.
The last total eclipse in America happened 38 years ago. The next best thing to a total eclipse is an annular eclipse, which occurred in May 2012 in America. To photograph it, I traveled to West Texas because the sun would be low on the horizon at eclipse time (story and photos here). When I learned of the 2017 eclipse, I was initially disappointed that it would happen at midday in summer. The sun would be overhead, high above terrestrial features. To include both the sun and the landscape, one would have to use a very wide-angle lens, which would make the sun tiny in the picture.
I initially thought about sitting this one out. But I read that a total eclipse is something else, to which a partial eclipse barely compares, and this made me curious. Even if I would not come back with a great picture, I’d be able to witness a total eclipse with my own eyes without having to travel to the ends of the earth. Sometimes, the experience must supersede the photograph.
The most spectacular location ?
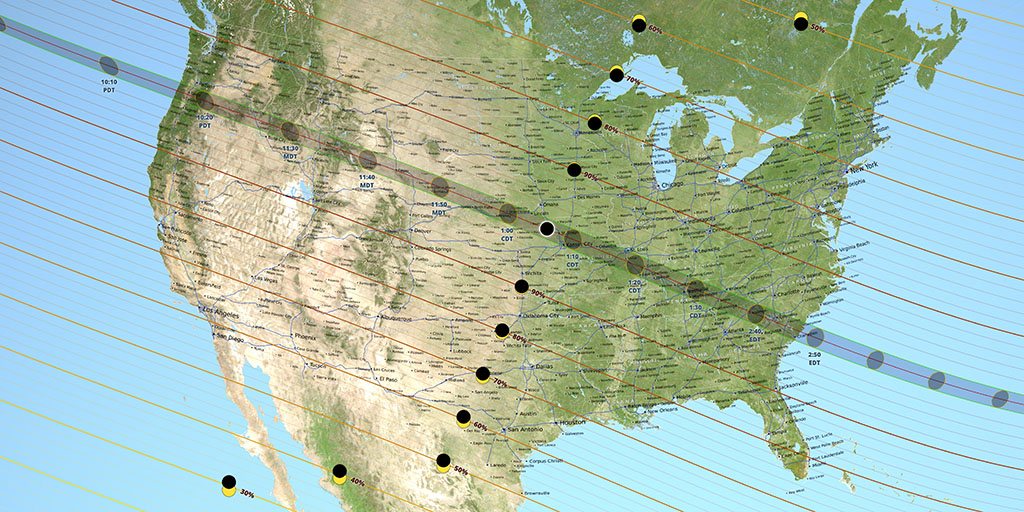
Since the eclipse is a natural event, I wanted to experience its power in the midst of a pristine landscape rather than in the city. Looking at the coast-to-coast 70-mile wide path, there were a number of national parks traversed. However, it was pretty clear to me that the most spectacular location would be Grand Teton National Park, home to one of the most striking mountains – if not the most striking – in the country. Would you agree?
This sit well with me, since I am mostly known as a national parks photographer, and many readers have asked me for a followup to Treasured Lands. Experiencing a spectacular natural event at a spectacular location appealed to others as well. If monetary value is an indicator of desirability for a location, note that the Washington Post article Airfares to solar eclipse destinations soar to astronomical levels mentions Jackson WY as the airport topping the charts of overpriced flights.
Pursuing the iconic shot
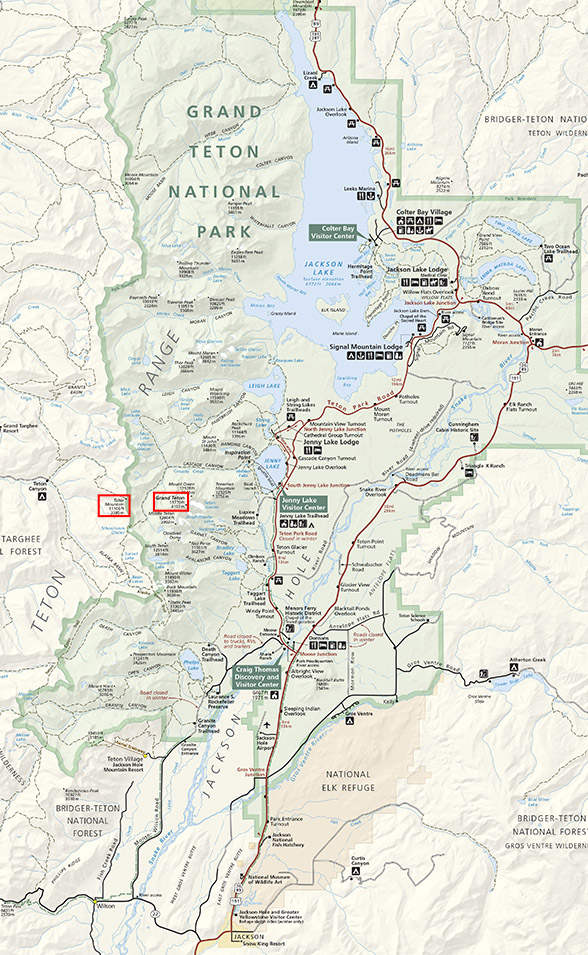
Map of Grand Teton National Park. In red boxes: Grand Teton and Table Mountain. All front country areas are east of the Teton Range.
There was just was a slight problem. Standing in any of the park’s easy-to-access front country areas, the Tetons would be west of you, but at the 11:36 am totality time, the sun would be coming from the Southeast (133.3 degrees azimuth). To me, choosing Grand Teton National Park to photograph the eclipse and not including the Grand Teton in the picture meant missing what would be a defining shot.
Others recognized that this was the iconic shot of the event. Astrophotographer Alan Dyer, in his excellent 296-page ebook How to Photograph the Solar Eclipse presciently writes “How many hours will it be after the eclipse before images like this begin to pepper the internet, garnering thousands of hits and likes”. The image in question was a composite of a large sun in the western sky over the Grand Tetons superimposed with a wide-angle image taken from the Wyoming side. What I didn’t expect was that despite their usually strict standards, even the venerable National Geographic didn’t resist the temptation, displaying on their Instagram an image even more outrageous than Alan Dyer’s example of what not to do (see image and read commentary on the controversy). Although I strive for truthfulness, I admit having done my share of digital alterations. However, I’ve always tried to honor reality by not publishing such images of something that could never exist, even if labeled as “photo illustration”. Nature photographs derive much of their power from the assumed connection with reality.
Following the footsteps of William Henry Jackson
In this case, the solution to the problem was pretty simple: find a backcountry location northwest of the Grand Teton to photograph from.
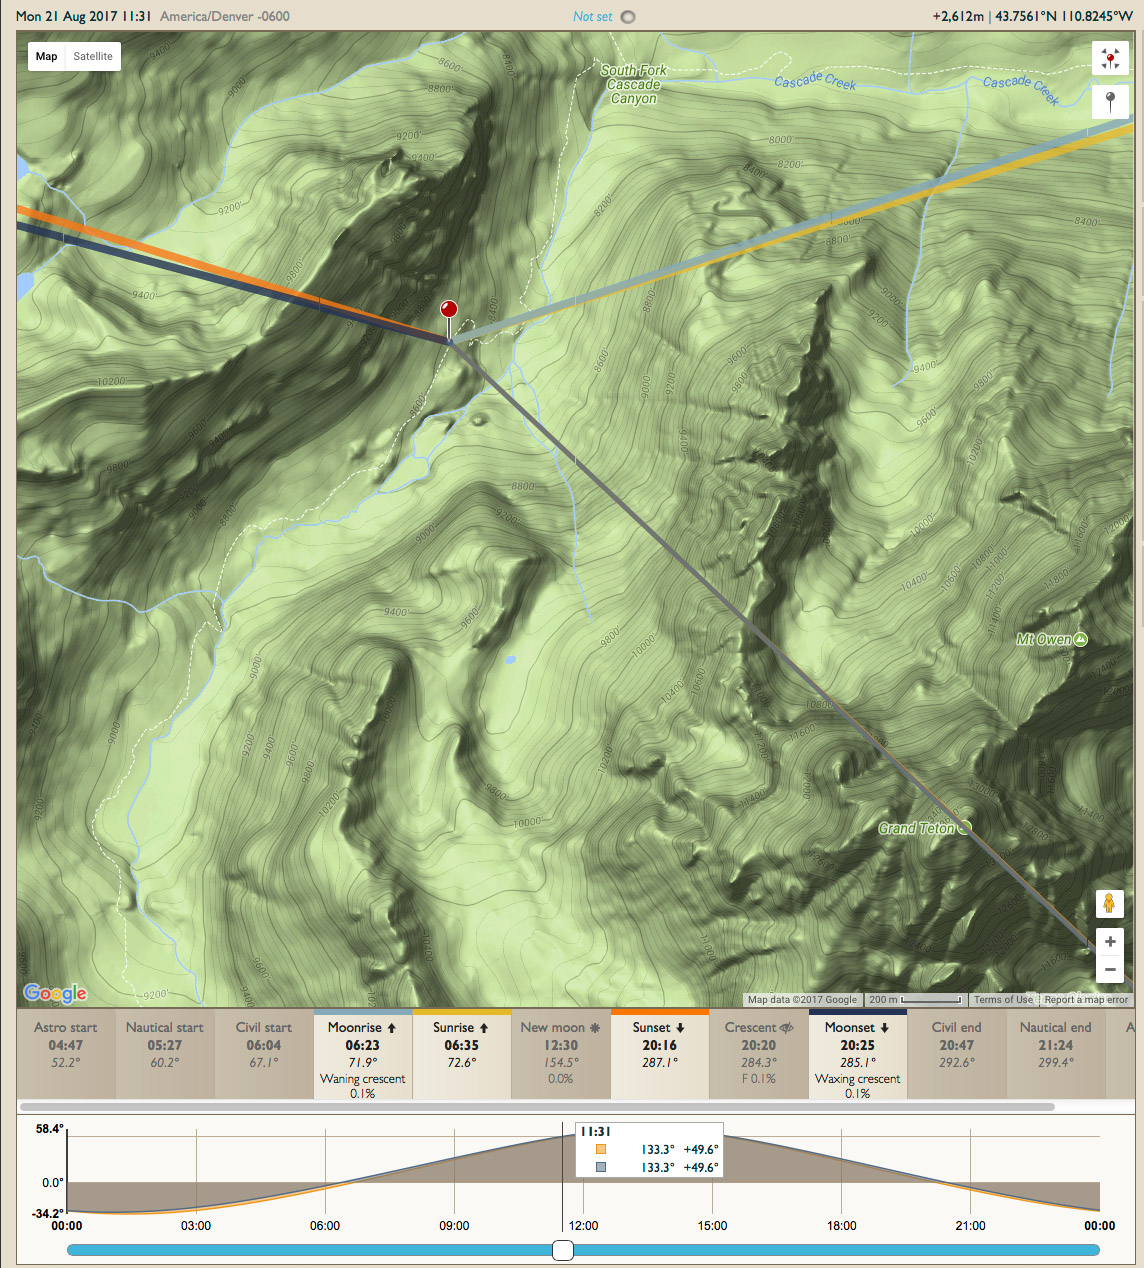
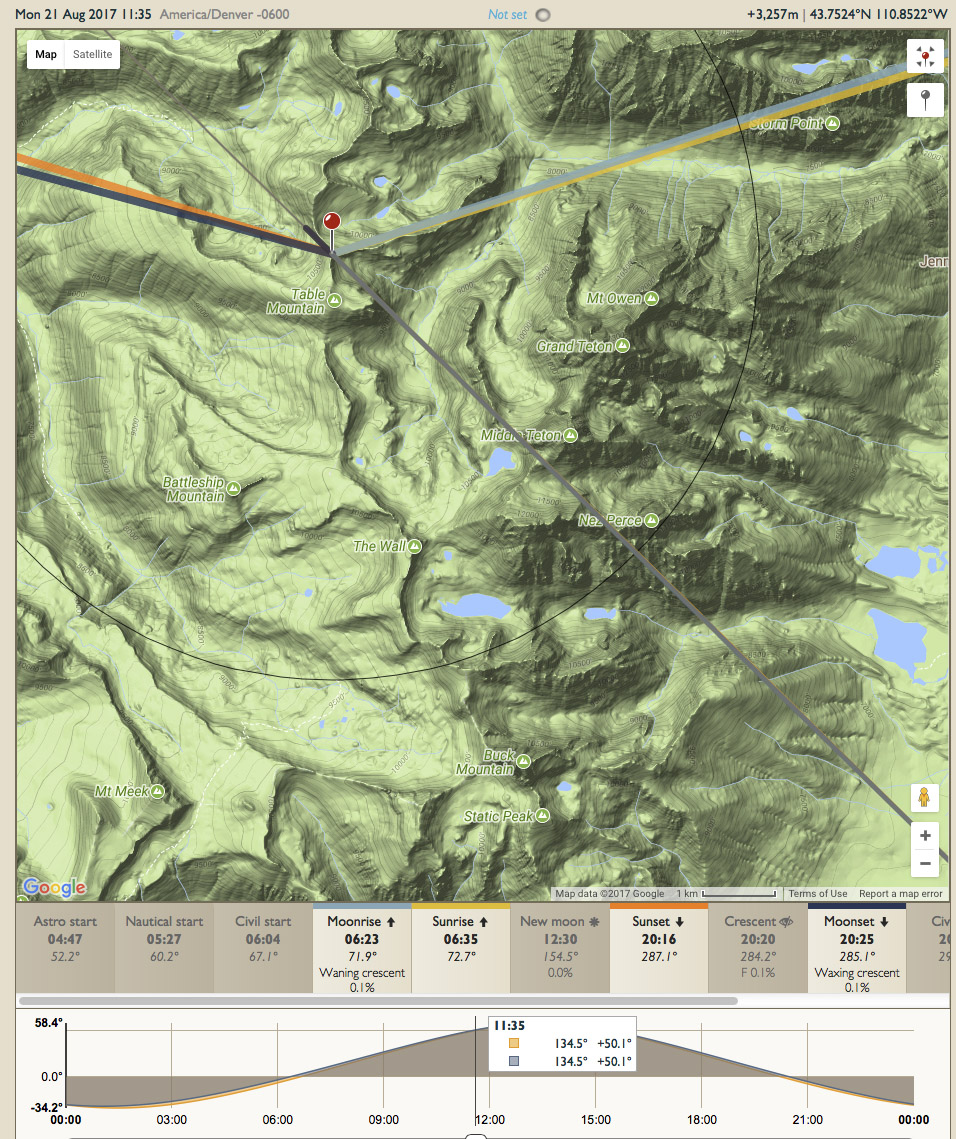
Photographer’s Ephemeris screenshot with South Fork position aligning sun and Grand Teton
Tracing the position of the Grand Teton at a 133.3 degrees azimuth with the Photographer’s Ephemeris yields a location on a trail in the South Fork of Cascade Canyon. The hike from the South String Lake Trailhead is 13 miles RT and only 1,700 feet elevation gain. However, having been at Cascade Canyon Forks before, I remembered that from that location the shape of the Tetons appeared quite distorted and indistinct because you are standing so close and low. This was confirmed by a photo from my friend Mike Cavaroc, a nature photographer and hiker living near the Tetons. In addition, the position in a deep canyon would not provide any view of the horizon. I had read that the sight of the land from a mountain top was special during an eclipse, and was as interested in the light on the land as in observing the sky.
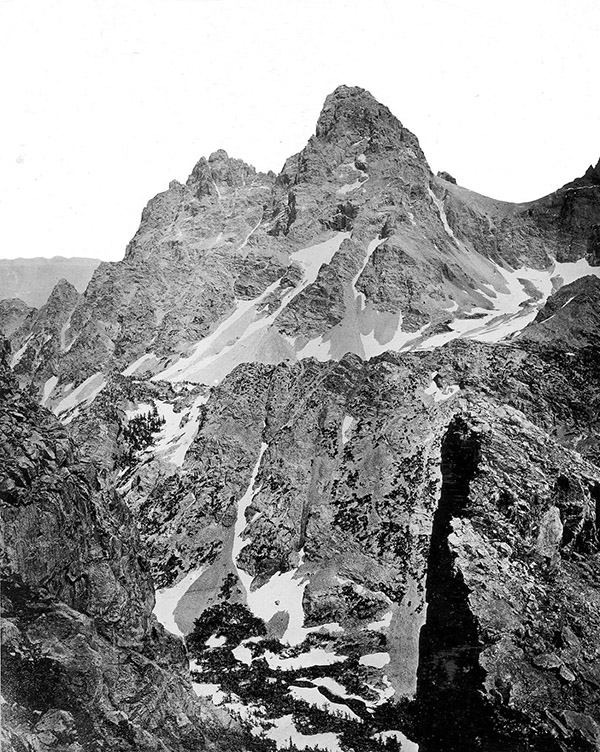
Grand Teton by William Henry Jackson, 1872
I looked for a higher vantage point on the west side of the Tetons that would preserve its iconic shape and allow a view of the horizon. The flat-topped, 11,106-foot peak called Table Mountain sits just at the border of Grand Teton National Park. Although nowadays the immense majority of photographs of the Tetons are from its Wyoming side, the first ever photographs of the Tetons were made from Table Mountain in 1872. Or more precisely from near Table Mountain. The photographer was none other than William Henry Jackson, whose photographs were instrumental in establishing Yellowstone National Park, and on that occasion he and his party happened to have made the first ascent of Table Mountain. Talk about standing on the shoulders of giants! Read about Jackson’s efforts.
The only reason why the view isn’t photographed more often is that the effort to reach Table Mountain, from the Teton Canyon Trailhead, is even more substantial than to reach the South Fork, since it involves a 11.5-mile RT hike with 4,000 feet of elevation gain. But if Jackson did it in the 19th century, is it too much to ask of us, with our modern outdoor equipment and lightweight cameras, to hike the mountain?
Pinpointing the backcountry location
Although William Henry Jackson benefited from a “tabula rasa” (pun intended), because nowadays there is a trail to the summit of Table Mountain, all the modern photos of the area tend to be taken from that summit. Such are the effects of a beaten path. While sitting at home planning for the trip, I thought I could find a better location.First, looking at the published photos from Table Mountain, I noticed a foreground with a slope and snowfield that I found distracting. I much prefer a view that shows the full height of the mountain from its base in the South Fork to a truncated one. So did William Henry Jackson.
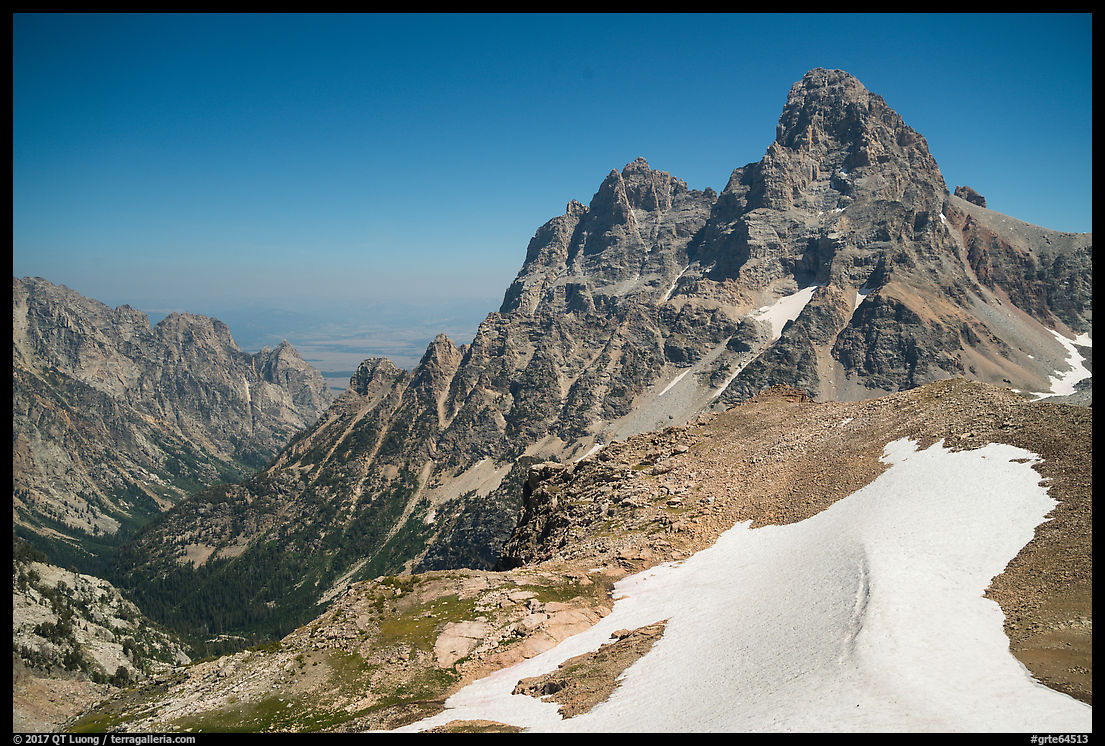
Tetons from the top of Table Mountain
Second, using the Photographer’s Ephemeris, I determined that if shooting from the Table Mountain, the sun would be placed right of the Middle Teton. Centering the sun a bit better called for moving north on a ridge adjacent to the summit. While the excursion looked good on the map, I wasn’t sure of the exact nature of the terrain. It so happened that I had the perfect opportunity for reconnaissance, as exactly two days before our hike up Table Mountain, my brother-in-law and I climbed the Grand Teton. We were able to confirm visually what the map had indicated, and pinpoint the particular spot on the ridge were we wanted to be, just before a sharp drop.
Photographer’s Ephemeris screenshot with sun direction from ridge north of Table Mountain
A third reason for not shooting from the summit is that Mike Cavaroc had warned me of possible overcrowding at the summit – not a good situation for photographing a 360 pano, let alone commune with nature. It turned out he was right. A headcount on Table Mountain accounted for about 250 people and 7 dogs. This is illustrated by the following crop from my 360 panorama. The distance from my viewpoint to Table Moutain was nearly half a mile. This short distance made a big difference. Don’t settle for the obvious location!
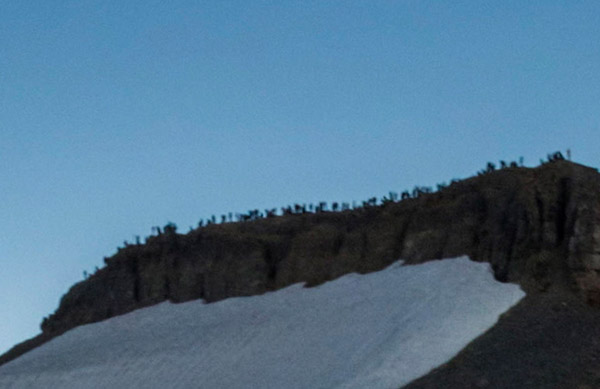
Table Mountain summit during eclipse, crop from 360 panorama
A Non-Photography Shooting Plan
The totality lasts about two minutes, but it represents the crux of the experience. Since this was my first total eclipse, I didn’t want to spend that time looking at an electronic screen. But I still sought to capture as much of the experience as possible. Although I carried a medium telephoto zoom (70-300mm) and a square filter made of Baader Astro solar film, I mostly planned to set up a pair of Sony A7R2 with wide-angle lenses and no filter.The first camera would run a timelapse to capture all the temporal extent, starting from five minutes before totality to five minutes after totality, at the shortest possible interval of one second. A longer time span than the 12 minutes wouldn’t be that useful because the variation in light is rather slow farther from totality, and extended shooting of the sun without a filter isn’t the wisest thing to do. As calculated at home, framing both the sun at an elevation of 49 degrees and the Tetons in the horizontal orientation needed for video required using the 16-35mm f/4 lens at 16mm. That camera would run basically unattended once the timelapse was started.
I would use the second camera to create a high-resolution 360-degree panorama during totality to capture the spatial extent (technique explained here), and in particular as much as possible of the eerie light and 360-degree sunset-like glow that happens at totality. Since I’d forgo the time-consuming nadir, this would require me to shoot 12 frames at 14mm, which would take most of the two minutes, but since I am using a rotator with click stops, I would not have to look via the finder at any time, and could instead keep my eyes directly on the sun, sky, and landscape.
I deliberately renounced trying to make single still photographs but was hoping to be able to extract them either from the timelapse frames, or from the 360 panorama, which is about 27,000 pixels wide by 13,500 pixels high. This is quite a bit more than the trendy 360 video captures and could be used to make prints of tremendous quality. Let see how this turned out.
Eclipse day
On August 21st, it was a bit tough to wake up at a 2:30am, since the day before we had gone to bed past 1:00am after descending from the Grand Teton. My brother-in-law, sister-in-law, and I drove for two hours from the Colter Bay Campground in Grand Teton National Park to the Teton Canyon Trailhead. Even that early in the morning, motorists were already staking out pullouts. At 5:00am, more than a hundred cars were already at the dusty Teton Canyon Trailhead. Fortunately, two deputies were there to make parking an orderly process. We began the steep ascent via the Face Trail and soon were hiking in T-shirts despite the early hours.
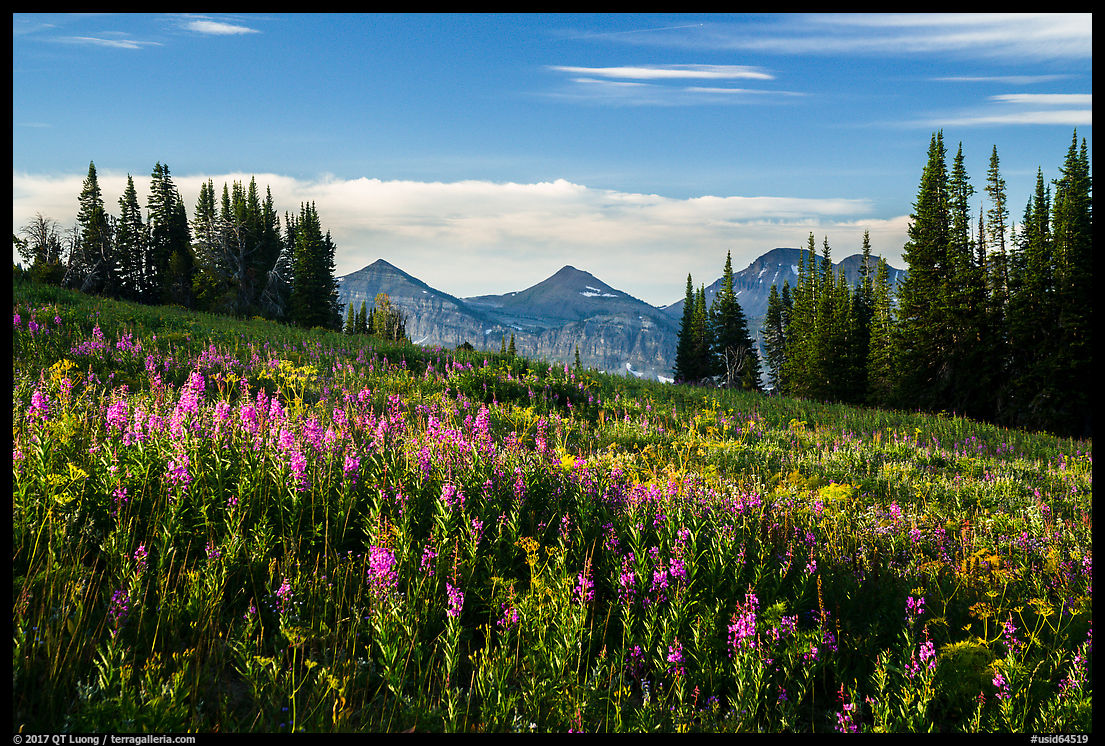
Late summer wildflowers on Trail to Table Mountain
The trail turned out to be spectacular, and worth hiking even without the final view of the Tetons and the eclipse. Even when the destination is the greatest, the journey can be its own reward.
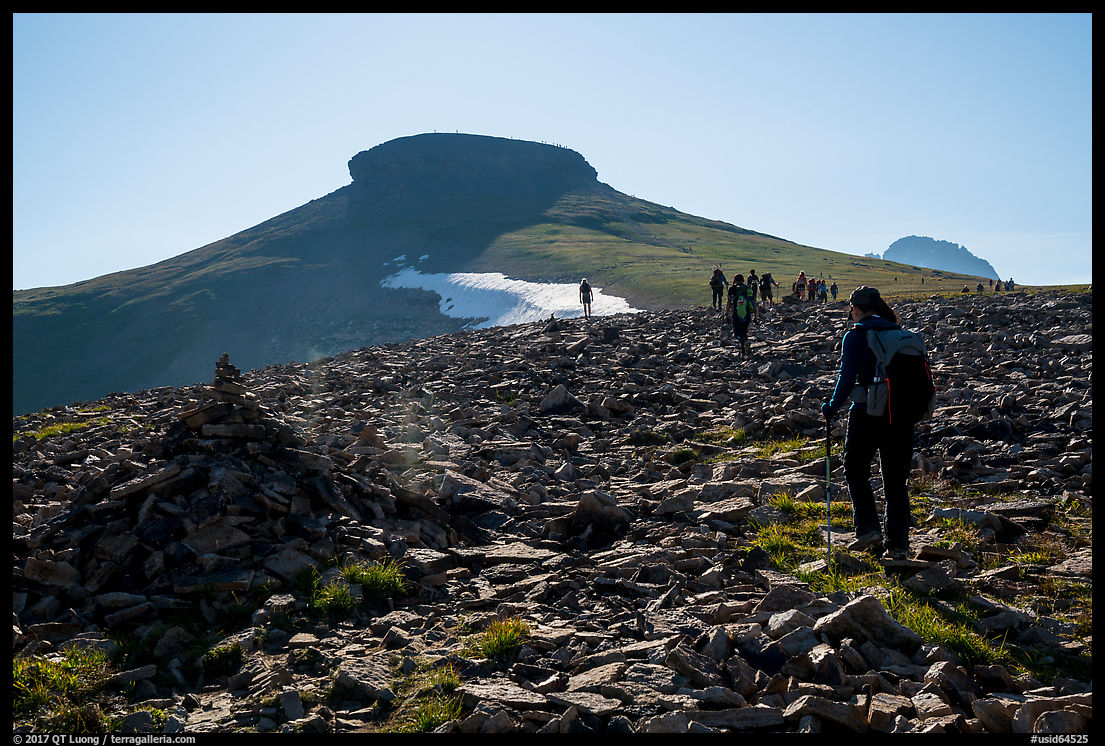
Approaching Table Mountain
We bypassed the Table Mountain summit and headed directly to the ridge. However, arriving at about 10am, we found the spot occupied by a photographer who had camped there the night before to make sure he got it. If you have a good idea, you won’t be the only one! In order not to get in his view – and not having him in ours, we had to scramble down the ridge, which meant that I’d miss parts of the horizon in my 360-degree pano. Yet, I was able to capture more than 180 degrees of horizon. Even on the busiest day in the history of Grand Teton National Park, we secured a spot with no one else is sight for half a mile.
I had brought only one cable release, which doubles as an interval timer for timelapse. At the last minute, I thought that if I used it on my 360-degree camera, I would’t have to engage the self-timer as I normally do in order to avoid vibration from pressing the shutter. With 12 frames, and a 2-second self-timer (I normally prefer 5 seconds), the time savings would amount to 24 seconds, almost one quarter of the totality. Not something to be scoffed at! With the same goal, for the panorama camera, I kept a relatively short shutter speed of 0.5s, and this would also prevent the sun would not be blurred as it moved. Since I had to stop down the lens a bit for depth of field, this resulted in a ISO of 800. I am not sure what is the exact value of the f-stop, since the lens, an adapted Nikon 14-24mm, does not transmit metadata to the Sony camera.
This was possible because Sony cameras support a downloadable timelapse app that I could use to run the timelapse. I did a short test run of the app, and it appeared to work fine. Since I was anticipating the exposure at totality to be around ISO 100 f/4 4s, I set up the lens wide open and the ISO at 400. At five minutes before totality, this resulted in a shutter speed of 1/400s. I anticipated that the shutter speed would slow down to 1s at totality, which was the longest possible shutter speed that would not disturb the timelapse interval spacing.
The totality came, and it was awesome. Having seen before the northern lights and erupting volcanoes, I can confirm that it is the most awesome spectacle in nature. And having witnessed a partial eclipse before, I can now say with confidence that it doesn’t even remotely approach the experience of totality. This is one occasion where I did not expect pictures to do justice to the beauty and strangeness of the experience.
The results
The 360 degrees panorama turned out to be quite difficult to assemble, due to the variation in brightness during the eclipse, and the fact that it was shot near a mountaintop. I am grateful to Jordi Navarro Isern of Spain for his expertise in putting it together.Check out the interactive 360 degrees panorama.
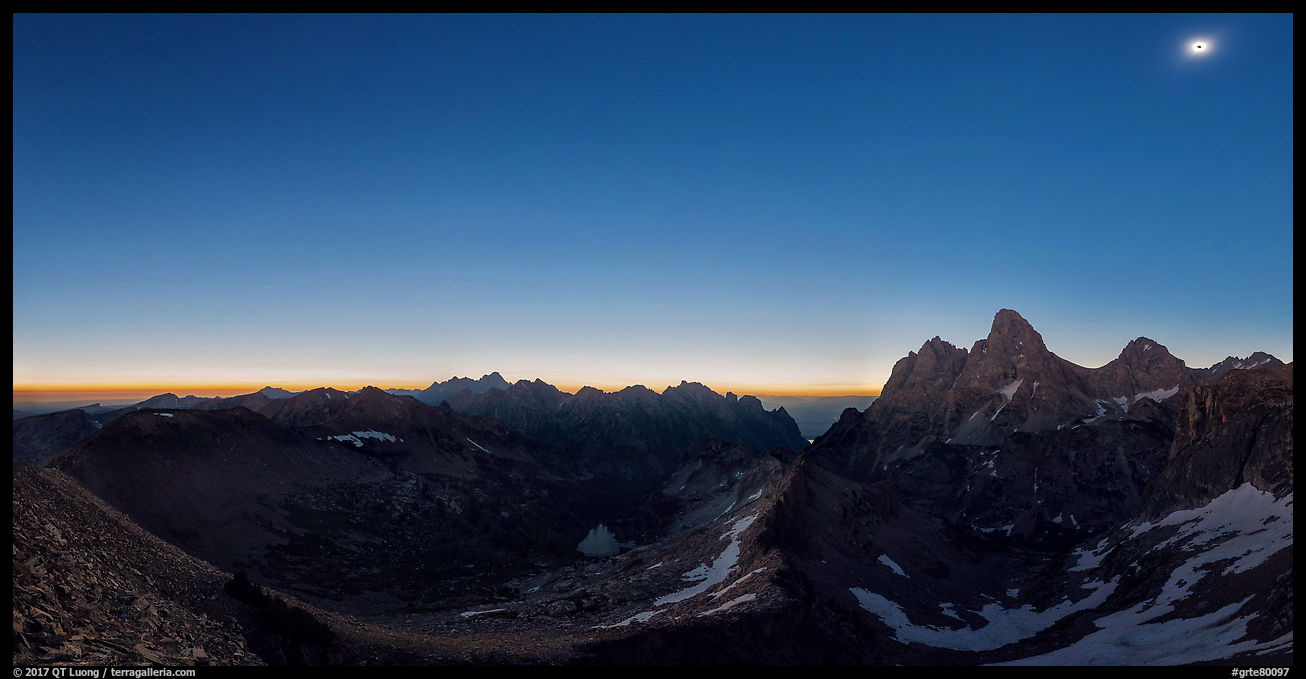
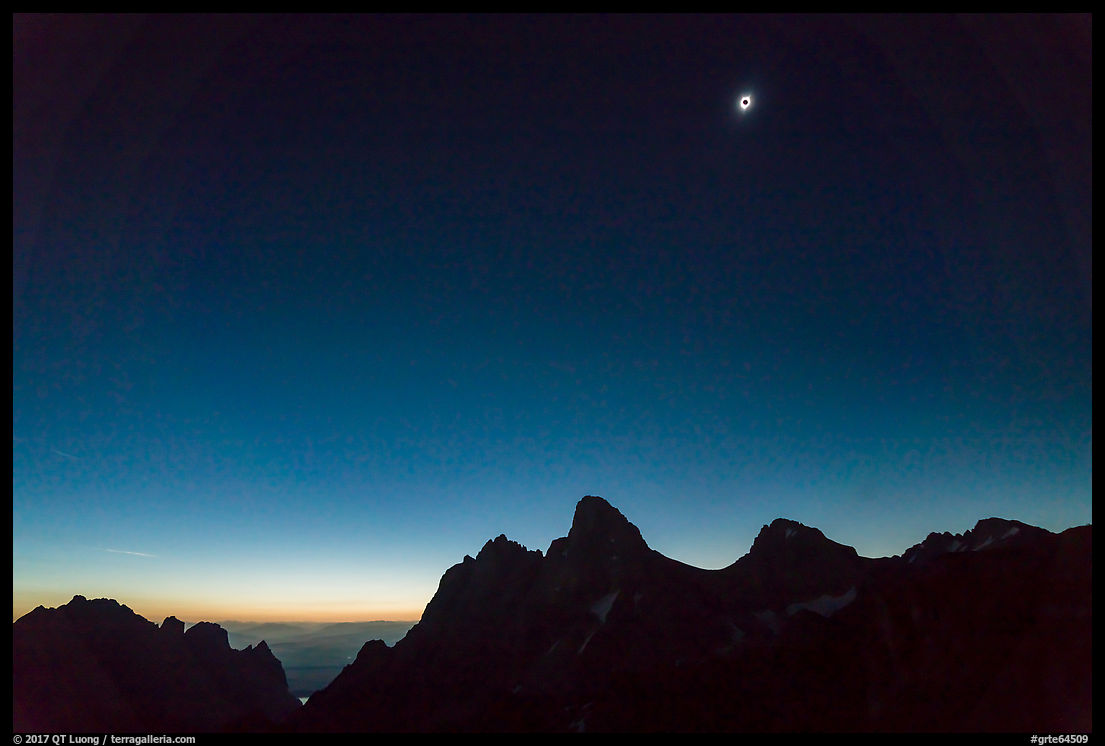
Tetons and horizon during eclipse, crop from 360 panorama (larger image)
As I was starting to shoot that 360 panorama at totality, although engrossed in the moment, I couldn’t help notice that the shutter sound of the timelapse camera was odd. It didn’t seem to slow down any bit. Shortly after the eclipse, a quick review confirmed my suspicion. Although the letter “A” was displayed, the camera app had acted as if the exposure mode was manual, and the shutter had remained at 1/400s for the whole sequence, which represented an underexposure of 8 f/stops! In the past, I had used the timelapse app before, but not in variable light.
Here is the raw, uncorrected time-lapse where the constant exposure captured the dramatic changes in light. (YouTube Link)
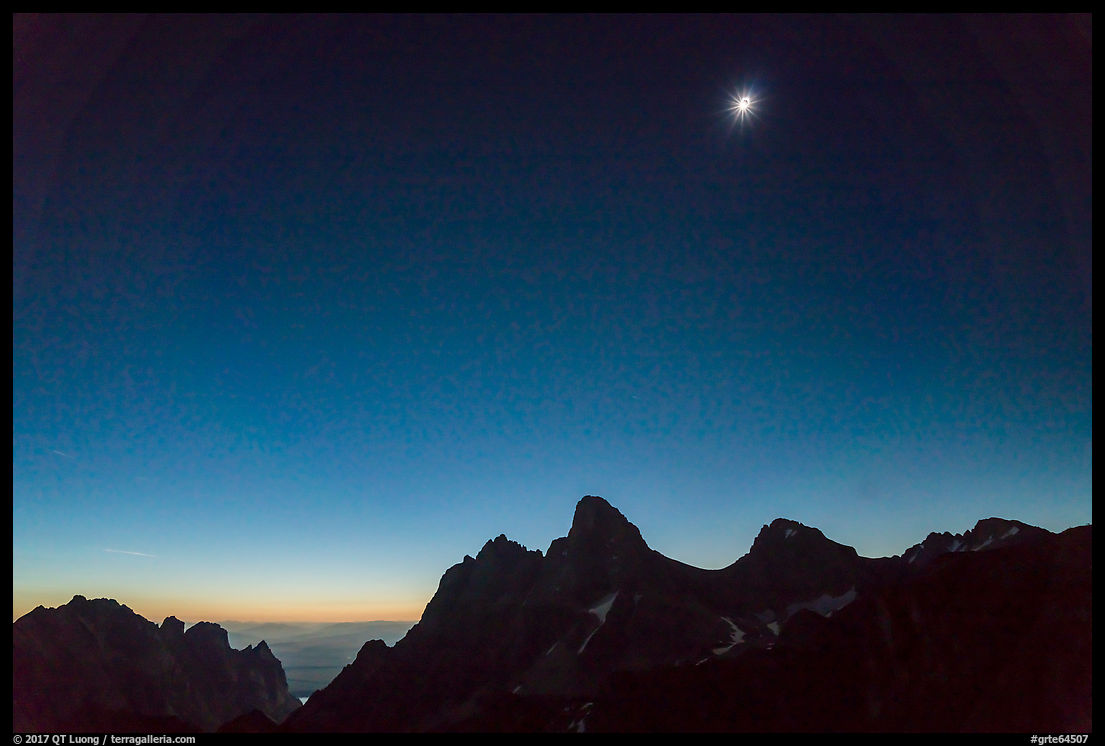
I do not know about lower in the Valley, but at 11,000 feet, it actually didn’t get dark like it did in the video, but rather like a twilight just a bit darker than the 360 panorama, maybe like 30 to 40 minutes after sunset. I noticed only one star – visible on the interactive VR 360 degrees panorama. A few years earlier, shooting with Canon cameras would have meant those frames would remain dark because brightening them would result in much noise. The combination of capabilities of the Sony sensors and Lightroom processing made it possible to salvage those shots with little effort: Here is the result of applying the following settings: Exposure +5, Shadows + 50, Luminance noise + 70, Color noise + 100. I will post a corrected video later as well.
Beginning of totality
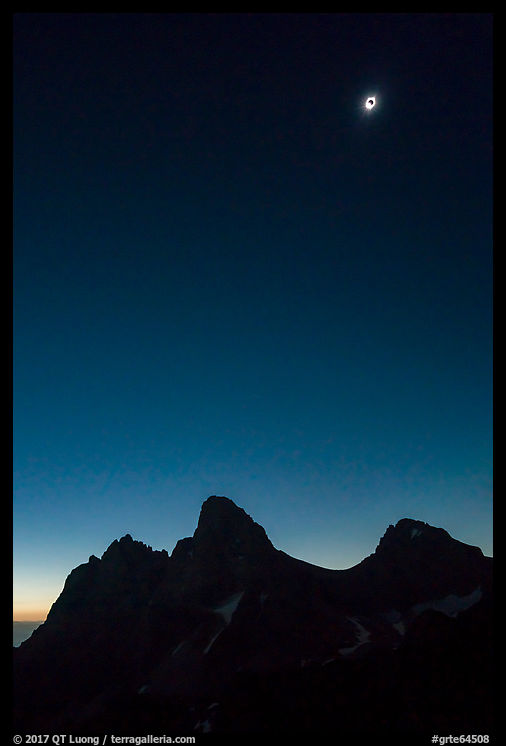
Diamond ring
Totality
Fortunately, my mistake did little to mar an awesome experience, and I am grateful that modern camera technology is so forgiving! Besides practicing and rehearsing in similar conditions before such a rare event, there are few things I would have planed differently. As for the execution of the 360 panorama, next time, I will consider either automating it with a Gigapan or simplifying the capture by shooting a 15mm fish-eye on a single row. This will allow me to attend even more cameras, and maybe tackle the close-ups, although they are not my primary goal. The whole experience left me totally in awe, and you will see me again under the shadow of the moon. I hope that this long write-up has inspired you to plan your own future eclipse trips.


Awesome experience QT, I l like the 360 shot. We shot with 2 Canon cameras from Mormon row from the other side of the Tetons. Tights and stacked wide angle of barn.
Thanks for commenting and sharing. You made excellent close-ups and composite sequences, very well done! Love the shadows over the board as well.
Incredible story QT. Kudos and thanks for sharing your insights on the eclipse.
Richard, I know that you understand the importance of experiences. If you haven’t seen this one, plan for in seven years!
I’m certainly considering it. My son will be older by then so it would make it easier to travel. The upcoming eclipses in South America & Spain/Morocco sound appealing as well since they will have longer totality.
QT! It was great to meet you in Jackson during such an exciting time 🙂 Your photography is stunning and I enjoyed reading about the journey it took for you get these photographs – well worth it. Mike has so many great things to say about you and now I know why!
Thanks for the kind words, Erica. Wishing you and Mike the best!
Superb work, story, and execution. Really excellent stuff, and yes, thank gosh for the forgiving modern technology. 😉
Thanks Gary, although I must say that although it wasn’t a plan that was too ambitious from a photographic point of new, I still managed to botch the execution.
Terrific story and photographs QT! Creative and well-planned! I always enjoy seeing your photos and reading your words!
I suspect the star you see is Regulus, which was the closest visible space object to the sun during the eclipse.
I checked the 360 – and the object above and to the right of the sun is not Regulus, which was below and to the left from where I viewed the eclipse in John Day Oregon…and Regulus was about 2 sun diameters from the sun. Not sure what the star is in your photo.
Thanks Richard. Regulus is notable because it appears in the close-up photos of the eclipse, but I suppose its proximity to the sun makes it more difficult to see and capture.
hi QT:
Thanks so much for sharing the details of your experience. I’m an amateur, and some of the technical aspects of photography leave my eyes spinning in my head, but the level of preparation and the research that you did before setting out is so inspiring. The next eclipse is in 2024 over New York State. I plan to be in Rochester for the event. Maybe I’ll document my experience as well as you’ve documented yours. 🙂
Kurt, I don’t always do that much research, but this was a one-time event! You have seven years to prepare 🙂
Fantastic write-up and images, QT! Looks like it was well worth the effort to go up to Table Mountain, and great job getting a different vantage point up there. It was great seeing you again and we’ll definitely keep you posted when we head out to California.
Yes, even without the eclipse, that would have been a spectacular hike. The location fulfilled my goal of capturing the iconic picture, but I really like the composition you found (https://www.freeroamingphotography.com/blog/total-solar-eclipse-jackson-hole/)
Whoah!! Excelent planning, execution, results
I was in Eastern Oregon (Eldorado Mine), got clear skies, & also shot 360 panorama
My previous eclipse was 7/22/2009 China (Zimei Pass, Eastern Tibetan Plateau, 16k ft) with Gongga Shan in foreground (23K ft, 3rd highest peak behind Mt Everest)
https://en.wikipedia.org/wiki/Mount_Gongga
I had high-cloud interference, & was shooting 360 deg panorama. I was using a nominal Totality exposure of
1 sec F4 ASA 400
for my 360 pano setup (Canon 300D, 7.5mm circular fisheye, 4 shots around, 90 deg interval)
Because of clouds, it was dark during Totality — scene was kinda under-exposed. You can see the “noise”
http://www.eclipse-chaser.com/equipment.html
[ you can see the pano rig, with my equatorial mount — loaded with APO refractors. The big white one (5.1″ f8 1040mm FL) used medium format Pentax 6×7 (film), the orange one was at ~1400mm FL (Canon Xsi). The 3 APOs on counter-weight shaft were 800mm f8 (Canon 5DII), 600mm f5.6 (Canon 5D), 200mm f2.8 (Canon 350D) ]
which agrees with your 4 sec F4 ASA 100
Results here:
http://www.eclipse-chaser.com/2009
I originally planned on Emei Shan to observe eclipse — 9K ft sacred Buddhist Mtn (World Heritage site). But, clouds 1 week before E-day scared me away. I hired a driver (German, married to Chinese woman) who took me to Zimei Pass. Drove east, climbing to high elevation (altitude adaption), stayed with native Tibetan family. Photos below:
https://www.flickr.com/photos/chimpanzee/collections/72157620544886690/
I shot 360 panorama from Eldorado Mine (East Oregon)
http://www.eclipse-chaser.com/2017
I used nominal Totality exposure for my 4 panorama raws (90 deg intervals, 7.5mm circular fisheye, Canon 300D crop sensor)
1 sec F4 ASA 400
which agrees with your 4 sec F4 ASA 100. But, the raws were WAY over-exposed!! It looked like over-exposed daylight shot! The orangish glow of horizon — LOST. It ocurred to me that above nominal Totality exposure is WAY off — I got similar results from 2006/Egypt
http://www.eclipse-chaser.com/2006
http://www.eclipse-chaser.com/2006/pano/index.html
The raws looked like daylight shots, horizons were whitish (blown out) with some orange.
Next time, I will have to meter the scene in Aperture-priority (EV compensation = -1 EV), determine aperture & Shutter-speed, set to Manual..shoot.
My multiple-exposure shot also used nominal Totality exposure (1 sec F4 ASA 400) — WAY over-exposed
http://www.eclipse-chaser.com/ME
I had to dial-down the Totality raw (similar to how you had to dial-up the under-exposed time-lapse raws), before super-imposing the partial frames (Baader filter, 1/60 ASA 100)
I shot with THREE sun-tracking mounts:
1) Celestron GP mount (4K video)
Astrophysics 4.1″ f6 (630mm FL) + Panasonic Lumix GH5 (rental, 4:2:2 10-bit internal recording)
^^^ controlled by Androi app “Image App” over BT/WiFi — LIVE video with shutter control.
2) Losmandy G11 mount (photo #1)
Astrophysics 5.1″ f8 (1040mm FL) Canon T1i (crop-sensor)
Tamron 400mm/4 + Nikon TC301 (800mm f8) Canon 5D2
Canon 200mm/2.8 + Canon Xsi (crop-sensor)
3) Takahashi EM100 mount (photo #2)
Takahashi FC100 (800mm f8) + Nikon D810 (36M pixel, rental)
Nikon 300mm/2.8 + Nikon TC301 (600mm f5.6) + Canon 5D
2) & 3) were controlled by Xavier Jubier’s superb SEM (Solar Eclipse Maestro), using 2 Macbook Pro laptops. Unfortunately, 2) FAILED to fire cameras!! I mounted 3 cameras, did test-shot..looked good. For some reason, SEM went into “simulated time”, I caught it & switched to “actual time”. But, something happened — STILL trying to figure out the glitch!!
Thank you for sharing your methods and results. I’m impressed by how many different cameras you operated and the range of imagery that you got!
Not sure why 4 sec F4 ASA 100 resulted in overexposure for you. My own files don’t have the information (the TL camera was underexposed, and the pano camera didn’t record exact f-stop because of adapted lens), but from the files of my brother-in-law who was shooting next to me, with such an exposure, all the horizon highlights were good and only the corona was clipped – which was expected.