How to make 360 degrees spherical panoramas
9 Comments
I’ve been asked how I created my 360 spherical panoramas (360s). By the way, if you haven’t, be sure to check the latest ones from the Grand Canyon. A detailed tutorial would take several posts, so instead I’m going to try and explain just the finer points I’ve learned – information which doesn’t seem to have been shared by prominent practitioners of this genre.
In this post, I am concerned only about making high-quality 360 degrees (horizontal) by 180 degrees (vertical) panoramas, which means besides high resolution and dynamic range, absolutely seamless stitches over the entire sphere. For making less demanding 360s, there are much easier solutions, from mobile phone apps to a devices such as the Ricoh Theta which creates a 360 in a single shot.
Tripod
Even thought it is much smaller than a flat Gigapixel panorama, a 360 is actually more difficult to pull out successfully. Technique needs to be perfect. 360 means that you are looping back on a sphere, so any alignment flaw will be visible.While it is quite practical to create normal multi-image panoramas by hand-holding, especially with distant subjects, this just does not work for 360s. Unless you create the 360 from a flying platform (maybe more on that in a future post), you are going to have something at a camera distance less than your height. Close subjects easily cause misalignments if you are not rotating exactly along the optical center. They also require you to stop down a lot for depth of field, resulting in low shutter speeds even in daylight.
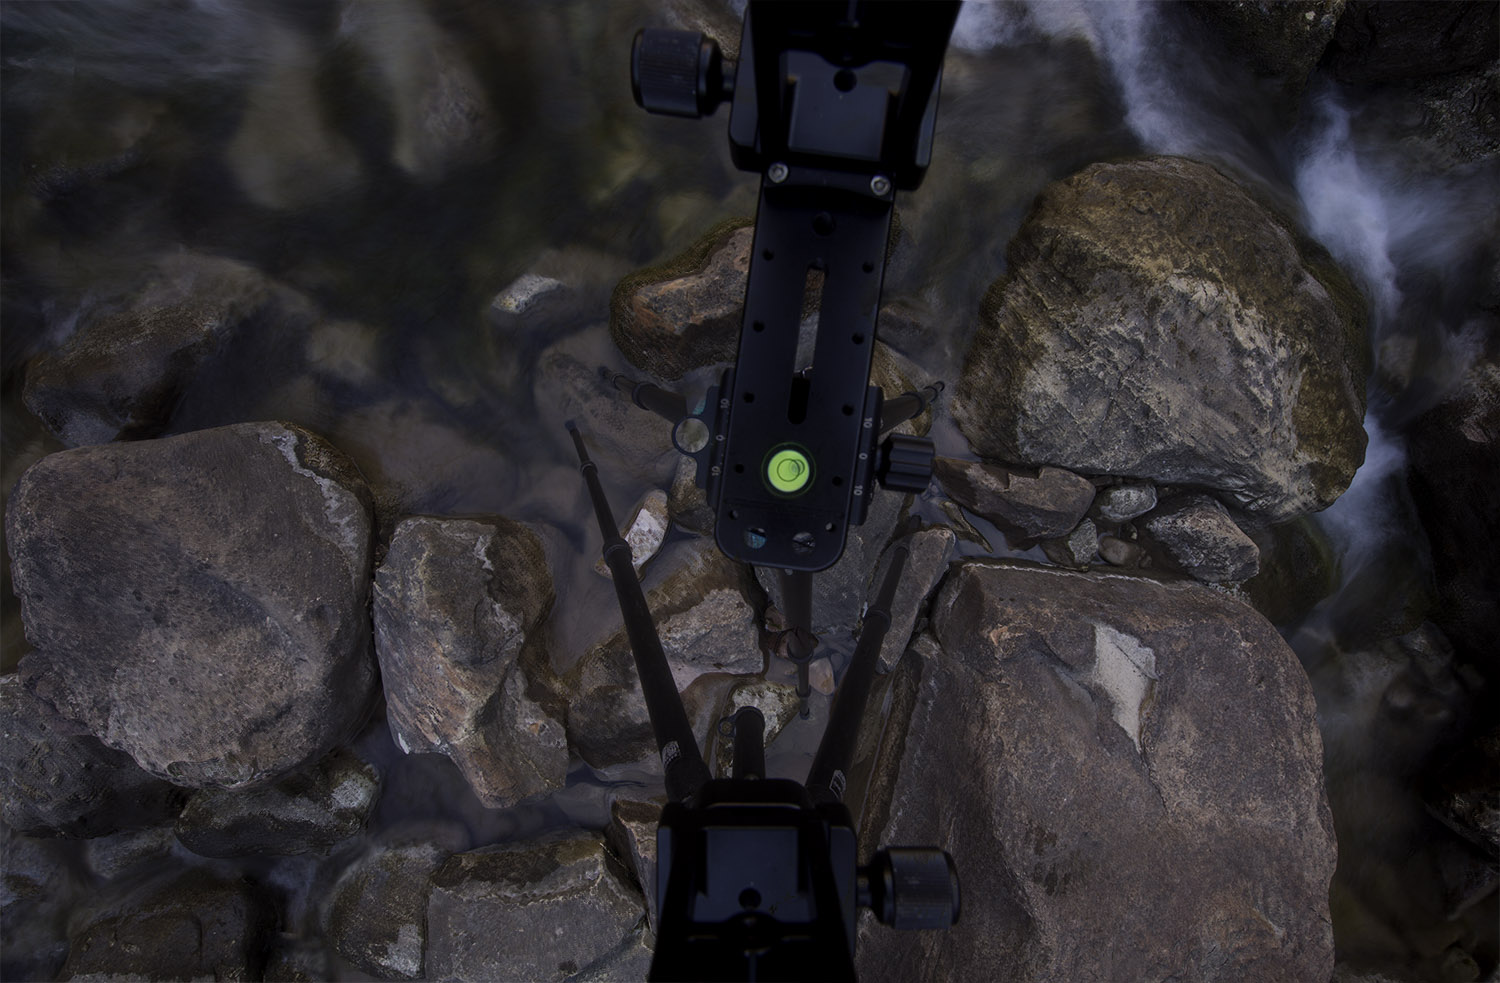
Panoramic head
To work on a tripod, you need a two-axis panoramic head, also called spherical head. Its main purpose is to make sure your lens rotates about its optical center (often referred to as nodal point, although this term is not technically correct) in two directions. This is necessary because except for circular fish-eye lenses (8mm), you cannot capture 180 degrees vertical with a single row of shots, even with your camera mounted in vertical orientation – the normal way to work. Separate degrees of rotation make it easy to shoot multiple rows.Spherical heads are readily available from Nodal Ninja (several choices designed from the ground-up for 360s), Really Right Stuff (RRS – more versatile, but generally heavier and not as convenient for 360s) and several others.
Factors in choosing a spherical head are: capability to support, provide enough adjustment and clearance for your camera and lens, ease of use, versatility (can components be used as a one-axis head ?), compatibility with Arca systems, possibility to reverse the vertical component, size and weight.
I prefer to mount the spherical head on top of my existing ball head, as it makes it faster to level and align the spherical head.
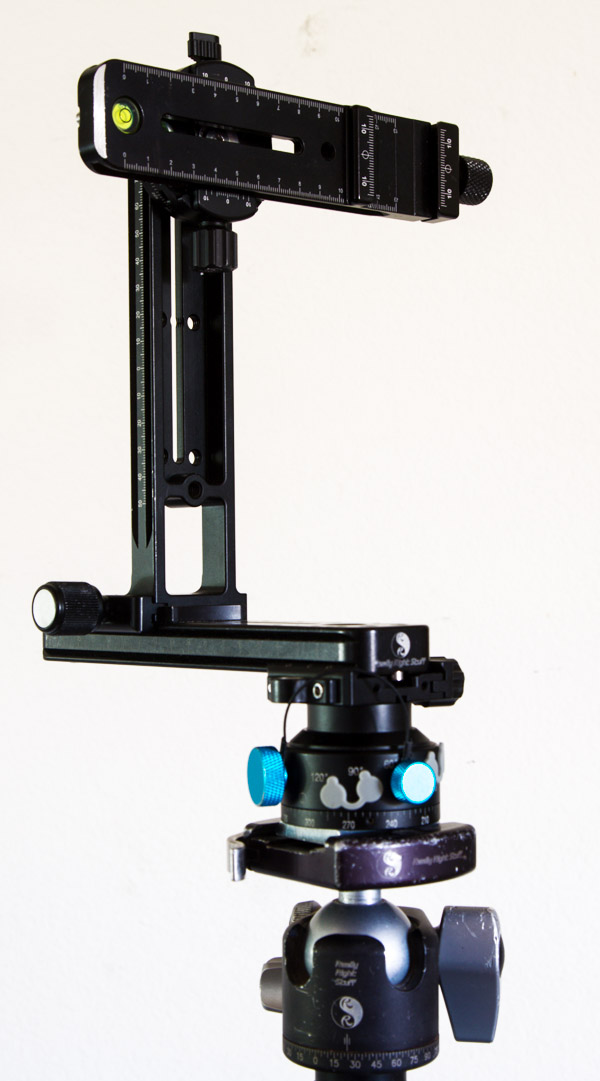
I made my own by mixing components from four different companies:
- Horizontal rotator: RD 5 from Nodal Ninja. Unlike RRS gear, this has very useful click-stops to take pictures at a fixed angular rotations – several increments are available. I mount it on a custom-machined Arca-compatible plate for quick attachment to existing ball head.
- Clamp: 42mm screw knob clamp from Sunwayfoto. Not strictly necessary, since base rail could be attached directly to rotator, however this makes it possible to easily use rotator as 1-axis head for 54g (lightest Arca clamp).
- Base rail: MPR-192 rail from RRS. Sturdy, large integrated bubble-level. I installed a MPR-C flange for marking the pre-determined position of the vertical rail.
- Vertical Rail with 90 degrees clamp: DMC-200 from Sunwayfoto. Longer than the corresponding RRS product, provides more clearance for shooting up.
- Vertical rotator: DDH-03 panning clamp from Sunwayfoto. Despite smaller size and lighter weight, locks much better than the corresponding RRS product (RRS subsequently designed a much stronger vertical rotator, but it is quite heavy and bulky)
- Camera slider: rail with integrated Arca clamp from Hejnar Photo. This was custom designed and manufactured for the same cost as their stock sliders – talk about really right stuff ! – to be the longest possible slider which doesn’t get into the field of view of the 15mm fish-eye lens. If I plan to use the Nikon 14-24 instead, I carry the longer MPR-CL II from RRS.
Aligning the panoramic head
Once you’ve chosen your spherical head, the next task is to align it for your camera(s) and lens(es) at home. For a zoom lens, you need to sample different focal lengths, as each of them will require a different setting. You will then note the correct settings so that you can reproduce them easily in the field. That’s what the markings on the rails are for. I determined settings for all the lenses I am likely to use for a pano, and printed those numbers on a label taped to the rail.Align the vertical rail by sliding it (or the whole horizontal rail) so that the center of the lens is aligned with the base axis of rotation. This alignment depends only on camera dimensions. It is independent from lens choices.
For the camera alignment, find two horizontal objects, one very close, one far. Position equipment so that they line up in the center of the image. Stopping down and using magnified live-view helps. Rotate the camera as far as it will go while keeping both objects in the image. If the near and far points are still vertically aligned, rotation doesn’t cause mis-aligments and you are done. Otherwise slide the camera back or forward until they are aligned, and verify that rotation doesn’t cause mis-alignments. This camera alignment is specific to the lens and camera used.
Lens
Whereas in normal photography, only the sensor resolution determines the image pixel count, for a 360, it also depends on the choice of the focal length. Longer focal lengths yield proportionally higher-resolution panos. On the other hand, longer focal lengths require proportionally more shots, which is problematic when the light is quickly changing. In the table below, I have indicated panorama sizes obtained with a Canon 5DmkIII (5760 × 3840 pixels, 22MP), as well as number of shots required with an overlap of 30% between images.The resolution you need is proportional to the screen size, and inversely proportional to the field of view of the virtual lens. For instance, to display with the perspective of a 35mm lens on a 2000 pixels screen, this would be (360 / 54) x 2000 = 13,333 pixels .
You should use the shortest lens that provides the resolution you want. Many experienced shooters prefer the 15mm Fish-eye, as it offers a good compromise: large enough for display on big screens, yet only one row to shoot, plus up and down, with large overlap that makes assembling the 360 easy. I often use the 14mm since I carry a 14-24 as part of my standard kit. More information is available on this panoramic lens database.
| Lens | FOV (h,v) | # rows | shots by rows | # shots | pano size |
| 8mm fish | 180,180 | 1 | 2(3) | 2(3) | 7680×3840 |
| 15mm fish | 150,100 | 3 | 1+6+1 | 8 | 15400×7700 |
| 14mm | 104,81 | 3(4) | 1+6+6 (+1) | 13(14) | 19880×9940 |
| 17mm | 93,70 | 4 | 1+8+8+1 | 18 | 22224×11112 |
| 24mm | 74, 53 | 4 | 1+10+10+1 | 22 | 28134×14067 |
| 35mm | 54, 38 | 6 | 1+12+12+12+12+1 | 50 | 38116×19058 |
Pano sizes are theoretical numbers. In practice, some pixels are wasted by distortion correction. Spherical panoramas always have a 2:1 aspect ratio.
Formulas:
nb_pixels_pano_h = (360/FOV_lens_h) * nb_pixels_camera_h
nb_shots = FOV_pano / (non_overlap_percent x FOV_lens)
nb_pixels_camera_h=5760
non_overlap_percent=0.7
FOV_pano=360,180
Shooting
Level the head. This is faster if you are using a ballhead or leveling base, but then lock the head really tight because you are going to put a lot of stress on it later. Use the panning base of the ballhead to align the base rail with a tripod leg.Switch to manual focus. You need to make sure not to change the lens focus between shots, as this causes stitching problems. With ultra wide lenses, it to obtain enough depth of field it is enough to focus near hyperfocal distance and stop down the lens. Exposure should also be manual. If shooting RAW, white balance can be synchronized in post processing. Since the field of view is so large, the dynamic range will often be too large for a single exposure, in which case you should use exposure brackets.
Once all your camera settings are correct, shoot as many rows as necessary to cover the whole sphere, while making sure that you have enough overlap between views, ideally around 30%.
The less efficient way to proceed is to look in the viewfinder. It is better to pre-calculate number of shots needed, and use the angular scale to execute them. The most efficient is to use a head with click-stops. With it, you can rotate the camera mindlessly. You do not to have to look at a scale in dim light. If standing at the edge of a cliff you can focus on your footing.
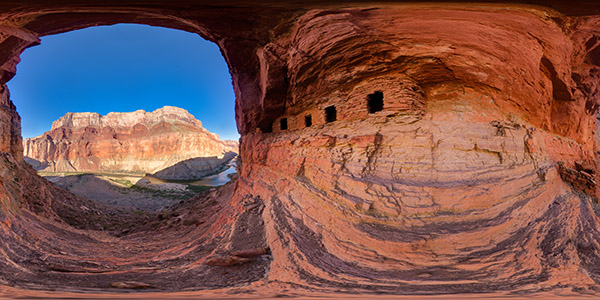
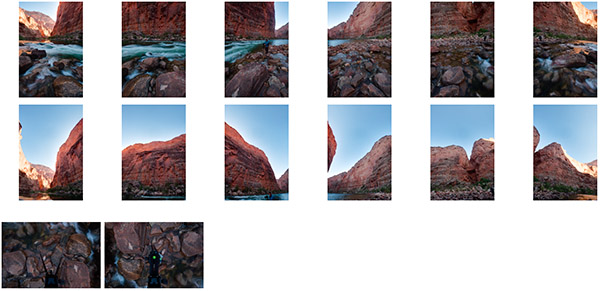
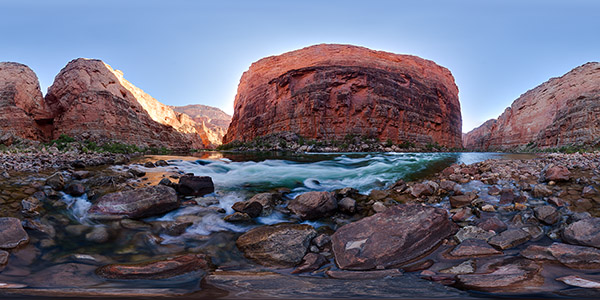
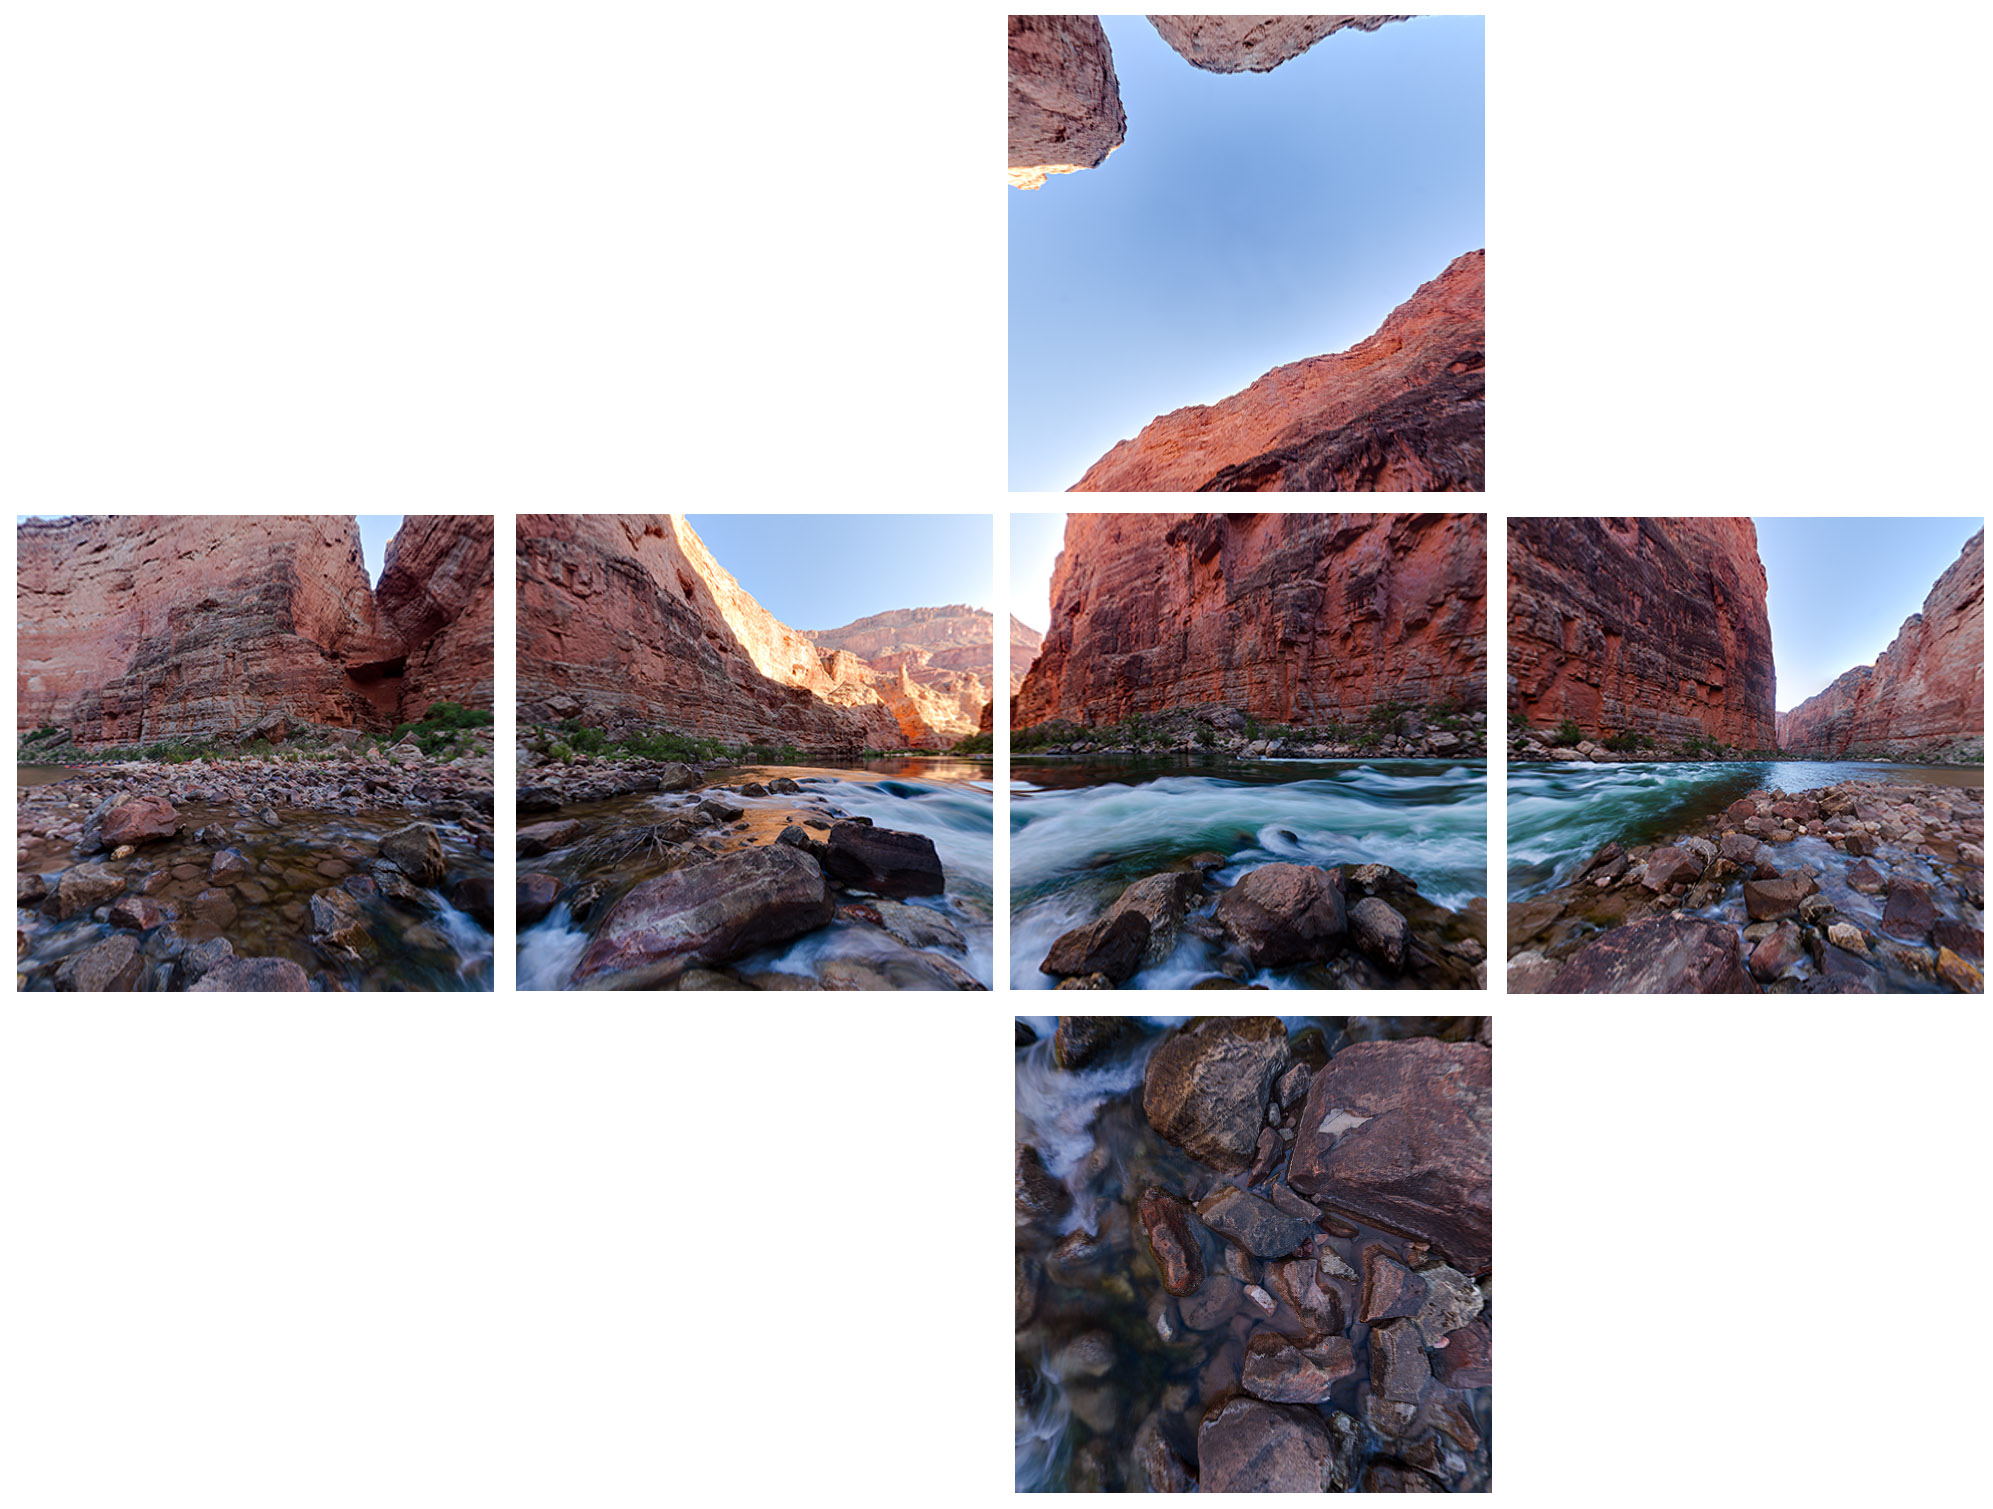
Here are the 14 images (after multi-exposure merging) which were used to assemble the Colorado River panorama:
Removing the tripod
Photographing the entire sphere is difficult because of the tripod. Photoshop it out ? This would be very time-consuming, and often problematic because the tripod and head covers quite a large portion of the image. In fact, most of the time I remove the tripod without a trip to Photoshop, in the stitching software (Autopano Giga).The key is to take a picture of the ground lying under the tripod, while making sure that the camera stays in the same position. The simplest would be to hold the camera in place with one hand at arm’s length, then take the tripod out with the other hand and shoot, but this assumes you can keep the camera in the same position with precision and shoot handheld. I’ve seen a number of complicated tripod techniques on the Internet. Although I came up with the idea myself, I’m sure there are others using the technique I am going to describe.
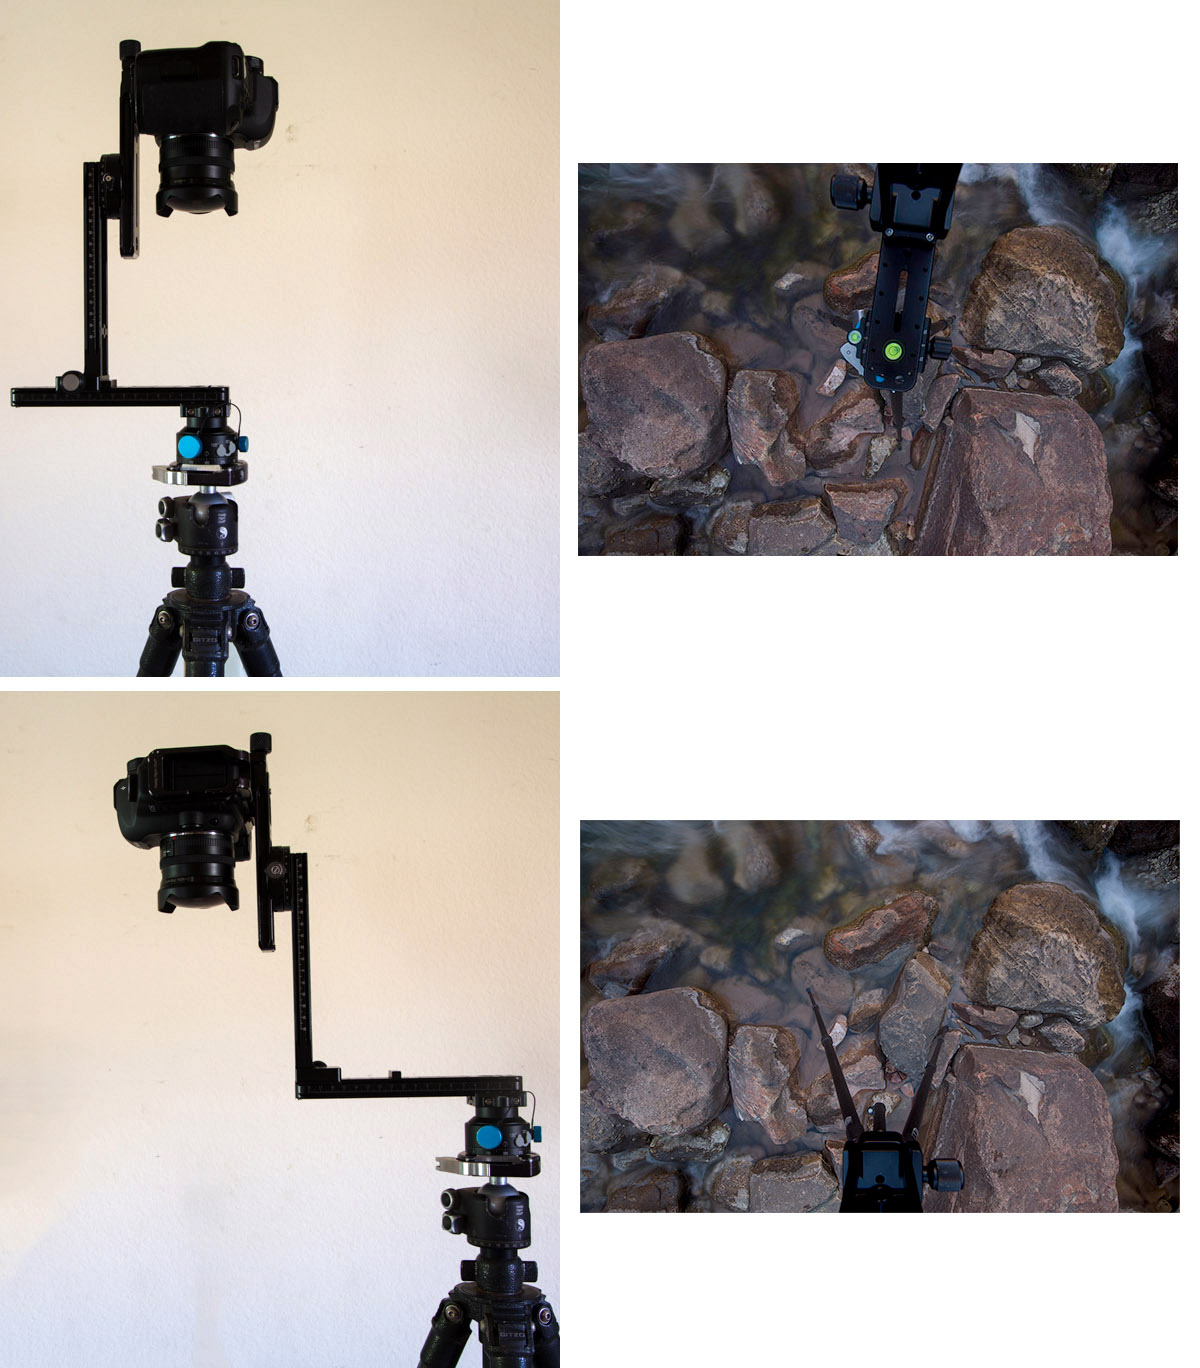
First take a shot looking straight down. Mark the point on the ground which intersects the optical axis. For that, I use a plumb line, but it is also possible to look at the image. Then reverse the vertical rail and place it near the end of the horizontal slider so that the camera overhangs. The camera now looks directly at the ground. Such a cantilevered position is a good test of your ball-head holding power ! Then move the tripod to a position where the optical axis of the camera intersects again with the mark on the ground. Take a second shot. The tripod is still present in the second shot, but it is in a different position than on the first shot. After the two images are aligned, if you’ve proceeded carefully, the two positions of the tripod won’t overlap, so it is easy to select the portions of each image without the tripod.
You’ll notice that most of my 360s are photographed with the camera in the shade. This way I do not have to worry about removing the tripod’s shadow – not to mention having the sun in the picture.
Assembling
If exposure brackets were used, I first merge them – in batch mode – using Lightroom/Enfuse, which uses exposure blending rather than HDR to create natural looking images with better dynamic range.Photoshop CC’s Photomerge can assemble multi-row 360s, but not a full 360×180 panorama. You need specialized panoramic software for that. Autopano and PTGui, the two leaders, are both very powerful. Hugin is free and quite close to PTGui. PTGui has more options. As promised by its name, Autopano is more automated. For our purpose, the main difference between Autopano Pro and Autopano Giga (my choice) is that the later let you mark which areas you want to keep or eliminate in two overlapping images. That’s how I remove the tripod, but it is also possible to align images in Photoshop prior to assembling and erase layers to achieve the same effect. Once the 360 is assembled, I color-correct it in Photoshop as I would for a normal image. In the case of the Colorado River, here is the resulting file:
Displaying
The 360×180 is assembled as a spherical image. You need software to display it as a virtual really view. I use Krpano because of its performance, automatic switching between Flash & HTML5, and inclusion of tools to convert the spherical image to cube images which are easier to edit if necessary. You may prefer software with a graphical interface, but I like to edit code. Pano2VR is the less expensive choice with all necessary functionality. Panotour is a nice graphical interface to krpano but lacks the conversion tools. Panotour Pro (which includes them) is much more expensive. All those generate on the fly normal-looking perspectives from the 360 file such as those:
If all those steps have not discouraged you, I wish you a lot of fun creating 360 spherical panoramas, and would enjoy seeing your creations.


Extensive information (and book) on Virtual Reality Photography, particularly 360°x180° panoramas, is available at: http://www.vrphotography.com
Amazing technology with a number of wonderful uses.
Thanks for the useful reference.
hi QT,
enjoying your pics, for a long time.
regarding this post, it is to mention that the stiching sw is very impotend for good results.
eg. by using PTGUI, you can omit the ball head, no need to level the pano-head, just be roughly horizontal +/-15° and shoot.
PTGUI handles the stitching perfectly also in this case, leveling in the sw is easy.
so the right sw is a “big decision” that can make the difference!!
Thanks for the comment. I agree that software is important. Shooting handheld may work sometimes (not for the Grand Canyon river scene or this: http://www.terragalleria.com/360/asia/pindaya1.html) but, as in regular photography, using a tripod will consistently produce better results for the reasons I mentioned. There are flaws that even the best software won’t fix. You are also right that most software can level the pano, but while this works well in man-made scenes, it isn’t so easy if there are no straight vertical or horizontal lines, which happens frequently in natural environments.
Loved the pano from Pete’s Mesa. I’ve only been to The Maze once, and didn’t have time to get to Pete’s Mesa. May I ask your route? Thanks. -Richard
Maze visit here… http://richardbarron.net/traveller/2012/06/08/siren-song-june-2012/
Hi Richard, I enjoyed your images and write-up about the Maze.
On your Maze hike of Day 8, you passed very close to Pete’s Mesa. After you exited the Maze, you set foot on a ridge and made a sharp 90 degree turn towards south, about 4 miles away from the Chimney Rock trailhead. if you had made a 90 degree turn north and continued about half-a-mile, you would have reached Pete’s Mesa. That’s the ridge just right of the number “5000” near the upper right corner on your map.
Here’s more about Pete’s Mesa: http://www.terragalleria.com/blog/2013/12/02/sunrise-at-petes-mesa-canyonlands-national-park/
Yes, that makes sense. We actually contemplated that route, but the heat was becoming insufferable on that hike.
I’m hoping to do The Maze again, maybe in winter.
Hey QT,
Great post on panoramics and super pics here on the blog. Only just found the site, so I’ve a bit of catching up to do. I’ll post some further comments and questions if thats ok?
Kaizen
It is very, very easy to make a good nadir when the legs do give shadows 😉