Using a rain deflector to photograph moonbows
9 Comments
Watching a moonbow with your own eyes is an awesome experience. While the camera can capture colors that the eye doesn’t see (as explained in my previous blog post about moonbows), the way it works doesn’t capture the experience that well. A long moonlit exposure looks almost the same as a daylight exposure that one would be able to make with a strong neutral density filter. The image differs substantially only by the presence of stars in the sky, however on a full moon night, only the brightest stars are visible.
For this reason, I have found moonbows to be one of the subjects where a time-lapse movie is more compelling than a still image. The motion of the stars gives them a presence beyond sparse pinpoints. The displacement of the rainbow as the moon moves across the sky adds interest.
While with some effort it is sometimes possible to deal with the spray while making still images, in time-lapse photography one needs to take pictures continuously, for extended periods of time. This means no stopping even when spray is coming at you, and no downtime to wipe the lens. Under those circumstances, unless you can photograph from above the spray (as at Cascade Falls), the only way to get clear images is to use a rain deflector.
The rain deflector is not a piece of equipment you hear about in photography circles. It works by spinning a clear piece of glass in front of the lens at a high velocity (3000 rotations per minute). This creates a centrifugal effect and a vacuum effect which throws water out of the glass. It’s quite tricky to make because you want high velocity rotation, but you don’t want any vibration. There is only one commercially available spinning rain deflector, the Israel-made Spintec, imported in the US by InnoVision Optics, a company which sells highly specialized equipment to the movie industry. Not many units are sold, so they charge quite a premium for it – even a simple power cable costs $140.
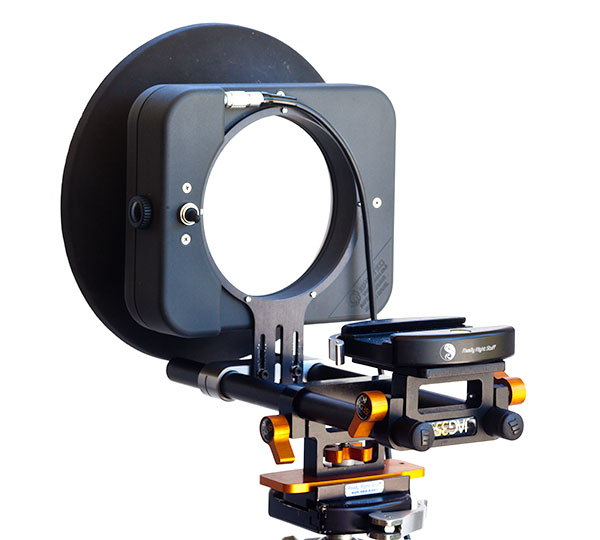
After buying the deflector for $1725, you need to accessorize it, which isn’t as obvious as it seems. While one can mount it like a filter, I was wary of loading a lens with a relatively heavy accessory this way. Unless one uses a lens with a tripod mount, the weight would also be poorly distributed, certainly a potential source of vibration with long exposures. In addition, Steve Bumgardner (watch his behind the scenes video for “moonbows”) warned me that the filter mount can easily go out of alignment, causing a contact between the spinning glass and the lens. At 3000 RPM, this would instantly scratch the glass (a $300 custom Tiffen filter). Following his recommendations, I ended up mounting it using a movie-standard 15mm rod system based on the JAG35 baseplate. I replaced the stock rods with a pair of longer and lighter 9″ carbon fiber rods from Redrock Micro. Since all my cameras have quick-release plates, I added a B2 LLR II quick release clamp from Really Right Stuff. That clamp may look overkill, but I chose it because of its additional holes which I use to make sure that the assembly does not rotate out of alignment.
The deflector requires a 12V battery – a standard in the movie world – which isn’t included. You can buy ready-to-use cables for a variety of video batteries. Instead, I modified the power cable with stripped leads that comes standard. I attached it to a barrel jack (2.1mm x 5.5mm) compatible with two different batteries which serve other purposes as well. The Powerstream Universal lithium ion battery pack PST-MP3500 (also Tekkeon MP3450) offers 45WH, which is enough to run the rain deflector all night. In addition, its built-in multi-voltage capability means that I can also use it to power my cameras (the 5D2 and 5D3 require 7.5V) as well as other electronic devices. The battery sold by Dynamic Perception to power their Stage Zero dolly has a capability of 32WH, but being only a 12V battery, it is lighter (200g v 440g) and smaller.
Last, a rain cover is needed. For daytime use, it needs to be black, in order to block light from reflecting from the back of the filter. Its front opening has to be large enough to fit the rain deflector. Not too many rain covers satisfy both requirements. The Vortex Media Pro SLR Storm Jacket (medium size) worked for me.
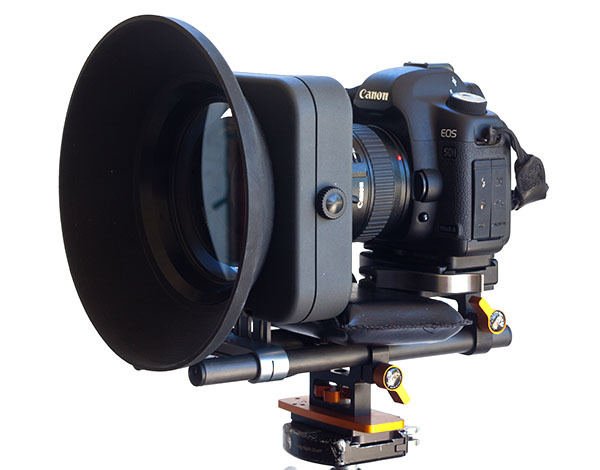
I usually use the 16-35/2.8 lens with the rain deflector. By placing the front just a few millimeters away from the spinning glass, it is possible to zoom to 16mm without vignetting, although because of the mount flex I feel more comfortable with a bit more of a margin. The deflector itself weights about 750g. Mounting system and power add another 750g (using the lighter battery). The entire assembly remains light and small enough to be turned side ways (for verticals) and even used hand-held. I think that besides moonbows, it gives me the capability to work in a broad range of weather situations.
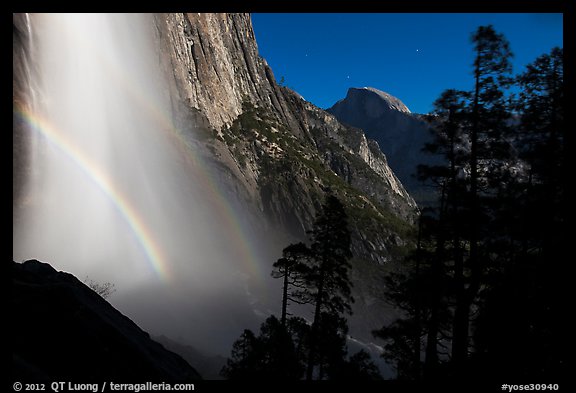
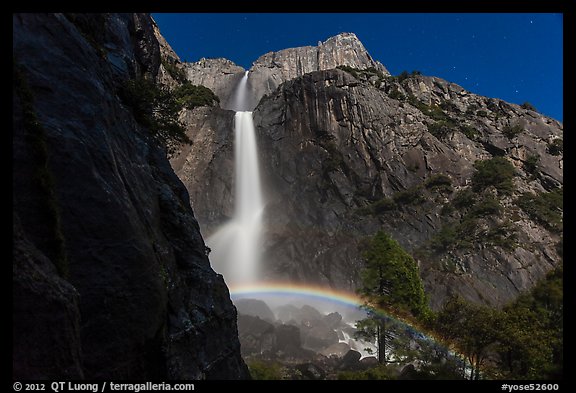
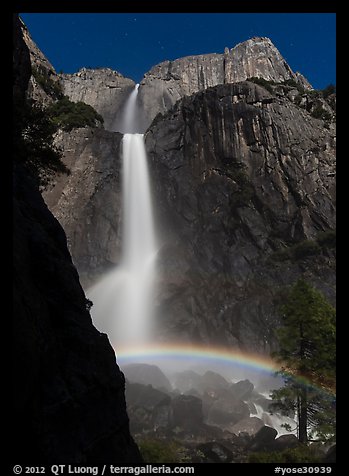
Besides producing a movie, using a time-lapse set-up is a convenient way to capture still images of variable phenomena. The first image below was created for a time-lapse. It was shot at 3am, so I was glad I didn’t have to be standing there all night in the cold. Instead, I could pick the best frame from the hundreds captured. The drawback is that for a time-lapse movie, you often want to frame wider in order to have latitude for moves, so you’d crop for the still image. For the second image, I didn’t really mean to produce a time-lapse movie. I was planning to shoot stills that night, but I just got too cold to hang around, so I set-up a time-lapse and went down to try to warm up. Both spots where the camera was placed were so wet that it would have been difficult even to take a still image without the rain deflector. The more mist, the better the rainbow, though ! Please let me know if you prefer original or cropped versions:
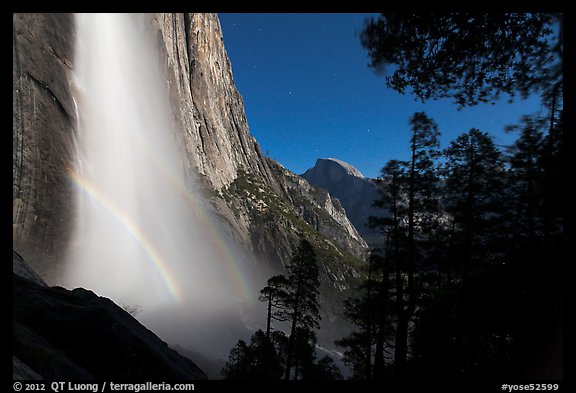
Original image for time-lapse movie
Cropped still image
Original image
Cropped still image
(click here if you don’t see link to vote)


Interesting and informative post! I liked the cropped version best.
Interesting stuff. I have a slight preference for the uncropped version of the first photo, mainly for the added context showing the left wall of the falls and more of the Lost Arrow Chimney. The second photo works better cropped to the portrait orientation. Can’t wait to see the time-lapse.
Very neat, I too look forward to seeing the videos. Would be cool to see the rain deflector in action too.
My preference is for the uncropped first image (love the context, shows a beautiful space, not just a phenomena).
The second image looks best cropped. uncropped it looks like a snapshot, though some of the context to the right is nice. The cropped one of the second image really does a lovely job of showing the waterfalls and the verticality of the place.
~nicholas
Thanks. I ended up using the cropped version of the second image in Treasured Lands.
Very good information on the deflector. I first heard of one from watching a Yosemite Notes video. Your images are great and I like both versions of the one image cropped or uncropped.
Wow! What a place to photograph a moonbow!! Thanks for sharing!
An informative post on a piece of gear I’ve been very interested in. I have a question for you: You mention the rain deflector is $1725 but you didn’t break down the cost of the necessary accessories. What was the total kit cost with everything included? Great images.
Cheers.
The Jag35 baseplate is $220, Vortex Media Pro Storm Jacket $40. Mine are more expensive, but a OK portable 12V Li-Ion battery can be bought on ebay for less than $30. CF rails and a QR system are nice, but not necessary.
Great Article, the Moonbows BTS also.
These Deflectors are wonderful, too bad they’re $2K (with Accessories) and sound like a Jet Engine. I put links to these Videos on my YouTube Channel’s “Lens Playlist”.