Photographing Moonbows in Yosemite
5 Comments
A moonbow is a rainbow produced by moonlight, rather than direct sunlight. While observing a rainbow in the sky requires rare and unpredictable combination of conditions, it isn’t too difficult to predict the appearance of spray moonbows, which occur in the mist of waterfalls.
Yosemite moonbows have been known for some time. John Muir described the experience of seeing them. They’ve been photographed for at least 3 decades, but it’s only recently that they became a popular subject. Normally the light is too faint to excite the cone color receptors in human eyes, so they appear to the eye as a silvery arc. The camera has no trouble to capture the colors with a long exposure. However, during last May’s “supermoon” – which is the brightest one will see during our lifetime -, the light was bright enough to see the colors directly.
The moonbow is brightest on the night of a full moon, with the two days before and after the full moon also usable, making it a five day window per month when the water is flowing enough to produce mist. In Yosemite, this is usually April, May, and June, so this week-end will be your last chance for the year, even though this year it might not be great since the flow is already low due to small snowpack. Once you know when the moonbow rises on a given day, it is an easy matter to predict its timing for the other days: a moonbow will appear 50 minutes later each day from the same spot.
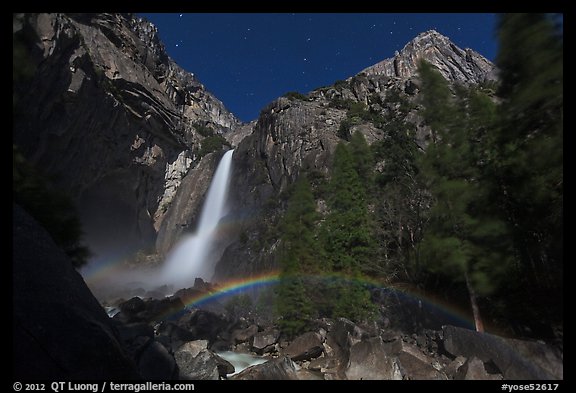
Any waterfall with a significant amount of mist front lit by the moon can produce a rainbow, but the easiest viewing is provided by Yosemite Falls. There are two classic locations for which Don Olson posts predictions, Lower Yosemite Fall seen from the bridge at its base, and Upper Yosemite Fall seen from Cook’s Meadow. Don’s predictions are for the base of the falls, where the mist is normally the thickest, but rainbows can appear higher at earlier times.
In recent years, the two “classic” locations have become extremely popular. On the week-end of May 5, 2012, there were hundreds of photographers at each location, and constant road traffic until mid-night, so expect a very “social” experience there ! While the meadow has plenty of room for people to spread out, the bridge is fairly cramped.
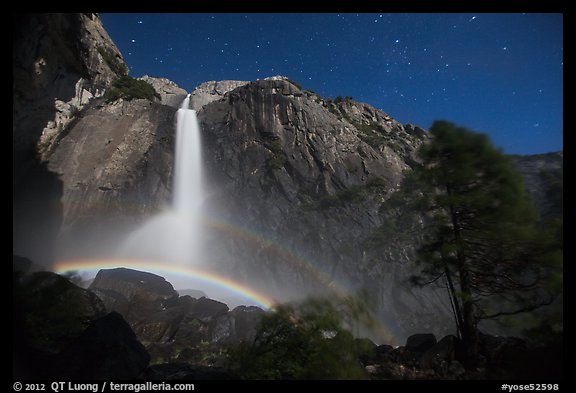
I avoided the crowds by moving to a spot much closer to Lower Fall, right against the cliff, which I had rediscovered (I’d seen it before in photos made by Carlton Watkins in the 19th century) in this great episode of Yosemite Nature Notes – a must-watch if you have any interest in Yosemite Moonbows. I like this view better than the classical one from the bridge because you get a glimpse of Upper Yosemite Fall in alignment. Needless to say, at that close range it was wet. Since the water comes from snowmelt, it was cold. The first night I made the mistake of wearing breathable-waterproof fabric. My top was the Alpinist jacket, the flagship Goretex shell from highly regarded Marmot and my bottom the PreCip pants, which although lighter, is still advertised as a waterproof rain pant. Soaked to the bone, exposed to the full force of the spray, I barely escaped hypothermia. Those fabrics are just not waterproof if constantly hit by water with any significant velocity. On subsequent nights, I wore rubber-coated fabrics, which despite partly suffering from de-lamination, actually kept me more dry.
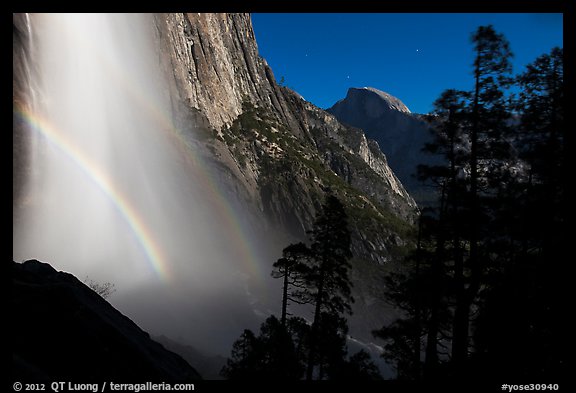
On the night of Saturday, which I anticipated would be the most popular, I spent the night on the Yosemite Falls trail, away from the valley, to capture the moonbow on Upper Yosemite Fall and the iconic Half-Dome in the background. I was going to try a higher spot (see daytime view), but in the evening there was almost no wind. The upper part of the waterfall would have no mist and therefore no rainbow, so I set up at a slightly lower spot. It turned out that the wind picked up during the night, but I chose not to disturb the set-up for reasons which will be clear in the next post. The view isn’t as open, however, being closer to to the mist gave a double rainbow.
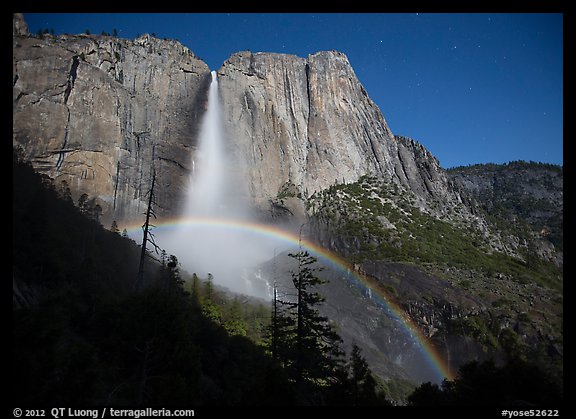
Using another set of cameras and tripod, I also photographed from the point where the trail turns the corner and you see Upper Yosemite Falls for the first time. Despite the very late hour – it was midnight, I was surprised to see quite a few folks up there, despite the 2 hour hike from the valley floor. It is well worth it, as Upper Yosemite Fall being so much taller than Lower Yosemite Fall, and plunging into an open bowl, produces a much more spectacular rainbow, which is much more impressive from here than from the distant meadow.
For those who’d like to try it yourself, here is some technical information.
- Gear You will need a camera capable of long exposures (a full-frame DSLR provides the best image quality) and a tripod, as the light is fairly faint. A way to lock the shutter for bulb exposures can be very useful. Even if you don’t shoot them wide-open, fast lenses will make it easier to see your composition.
- Exposure Light meters don’t work in such faint light, so you’ll have to use manual exposure. For a full moon, my basic is exposure is f/2.8, 30 seconds, ISO 640. With a locking cable release, you can try longer equivalent exposures either at lower ISO to minimize noise (such as f/2.8 45 seconds ISO 400, f/2.8 90 seconds ISO 200, f/2.8 3 minutes ISO 100) or at smaller apertures to improve lens resolution and depth of field (such as f/4 1 minute ISO 640, f/5.6 2 minutes ISO 640) or both. Don’t use too long of an exposure, though: above 5 minutes, some bands of color may merge together as the rainbow is moving during the exposure. With those exposure values, the image will look like a daytime shot – too bright to convey a night feeling, but you can darken it later, resulting in a less noisy image than one created directly with a night-like exposure. On the nights before and after full-moon, although it looks the same to the human eye, the light is actually significantly dimmer, so be sure to adjust exposure accordingly.
- Focus Autofocus doesn’t work in such faint light, and it is also quite difficult to focus manually. The best way to proceed is to focus the lens at infinity using the moon (or any other distant light source), and then tape your focus ring so that it doesn’t move. For instance I use my 24/1.4 lens almost exclusively for night photography, so I have tapped it semi-permanently with a wide patch of gaffer tape.
- Keeping the lens dry In many cases, you’ll be standing close to the rainbow-producing mist of the waterfall. The fine mist droplets do not ruin the images the same way as larger rain drops do, however they do add up. To get the clearest image, you’ll need to keep your lens dry. Bring plenty of lens tissue, and keep your lens cap on when not exposing. Remove it just before taking the picture. Once you feel the beginning of a breeze, which means more mist and a better rainbow, you’ll have a few seconds before the lens gets too wet. If you are standing very close to the mist – which yields the best rainbows – your lens will get wet instantly, so you’d need more sophisticated equipment that I’ll describe in the next post: using a rain deflector to photograph moonbows.
View more Moonbow images


Thanks for the wonderful images and very detailed article QT!
What a wonderful “How to” post on shooting Moonbows. I’ve yet to see one, so I’m really looking forward to making an image of one of them, hopefully soon.
Thanks for sharing your experiences QT! Great set of images you captured from your trip.
Thank you for a very detailed and informative article on shooting moon bows in Yosemite. On my first try in 2010 I managed to capture some shots, however, they weren’t in sharp focus. I’m going again this May with the record snowpack expecting much better results.
Good luck, it should be a spectacular year. Since it is going to be so wet, I would make sure to pre-focus before getting to the shooting spot!