Sony A7R5 vs A7R4: technical review from a landscape photographer’s perspective
10 Comments
When Sony announced the fifth iteration of its high-resolution camera, the A7R5 (or A7R V) its AI-based autofocus got the most attention. Action photographers also benefit from faster data handling and a much larger buffer. Video saw several improvements, including UHD 8K with 10-bit capture. However, the sensor and stills resolution are unchanged from its predecessor, the A7R4 (A7R IV). Like others who mostly photograph landscapes, my initial reaction was going to skip this expensive upgrade because most of what it brought had little relevance to my work. However, I took a closer look, and after a few weeks of testing decided to keep the camera. Read on to find out why.
Besides being relevant for photographers trying to decide whether to upgrade, this in-depth write-up provides technical tidbits to those interested in current camera technology and shooting methods (for instance, the image stabilization results are quite instructive) as well as a few practical tips for A7R5 owners.
First impressions
Body and LCD. Compared to the A7R4, the A7R5 gains a bit of weight (723g vs. 665g) and thickness, but the base plate is identical and I can re-use the A7R4 L-bracket. Some of the thickness is for a new and clever rear-body flip LCD screen mechanism. The A7R4 screen could tilt only along the horizontal axis, whereas the A7R5 gains three axes of rotation, making it possible to position at almost every angle. The A7R4 screen was good for low and high shots. The A7R5’s is also useful for self-portraits, vertical images, and aiming the camera straight up from a mid-size tripod. You can even store it entirely away from view. In addition, it now supports full touch-screen functionality, including touch shutter.
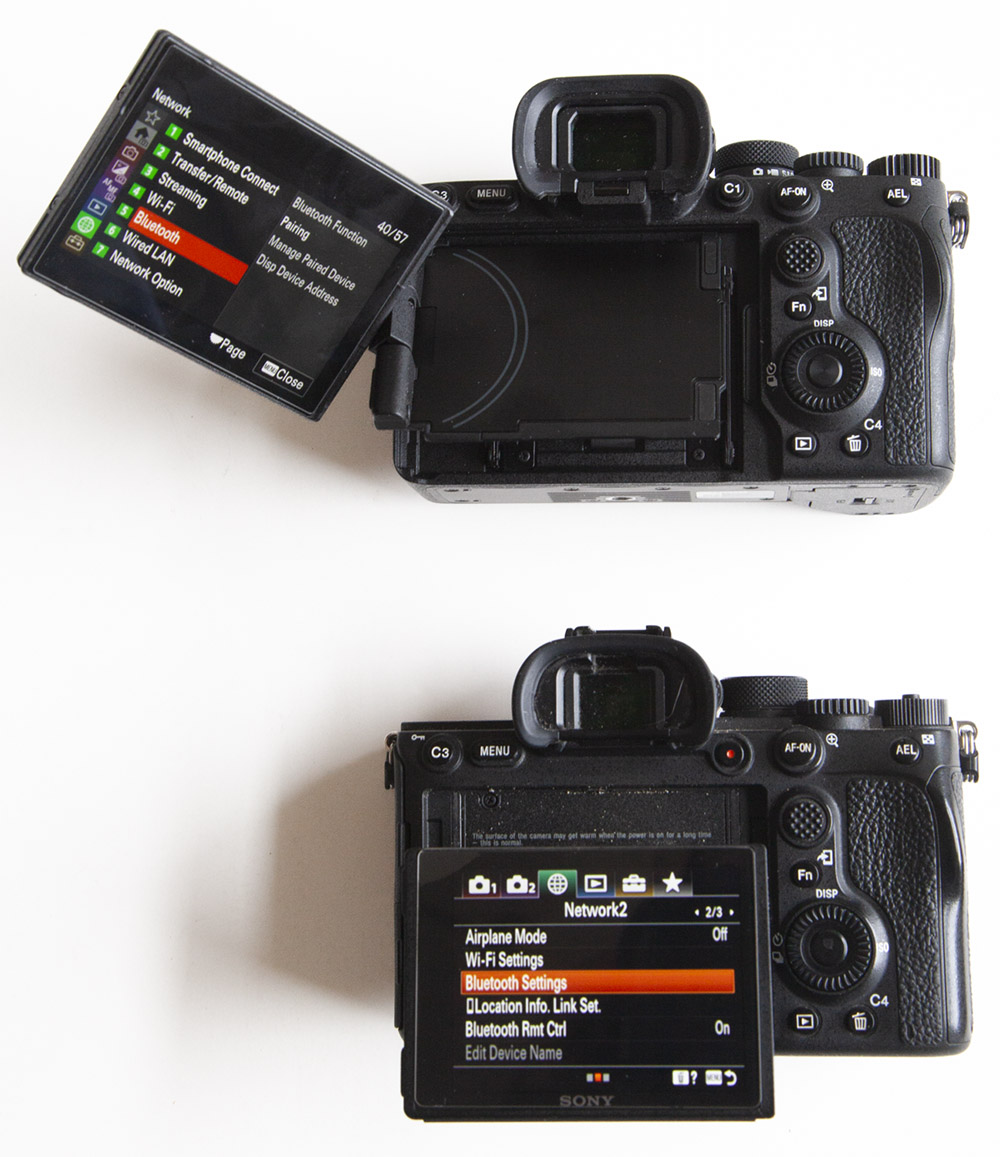
Top: A7R5 (notice flexible flip screen and new menus). Bottom: A7R4
Viewfinder.The larger housing accommodates a big viewfinder which has a great 0.9x magnification (with a normal 50mm lens) comparable to the superb viewfinders of the film area that made looking through a SLR camera a joy. Peering into the A7R4, with its 0.78× magnification, the difference is striking. However, if you have trouble seeing the entire big viewfinder without moving your eyes, you can choose a lower magnification (Setup > Finder/Monitor > Viewfinder Magnification), although it would be nice if there were more choices to fit every eye. It also helps that the finder’s resolution increased from 5.76 Mp to 9.44 Mp, resulting in an unprecedented viewing quality for a digital viewfinder. This has to be enabled by Setup > Finder/Monitor > Display Quality>High, which is not compatible with Setup >Finder/Monitor > Finder Frame Rate > High, so you have to choose between high resolution and high refresh rate.
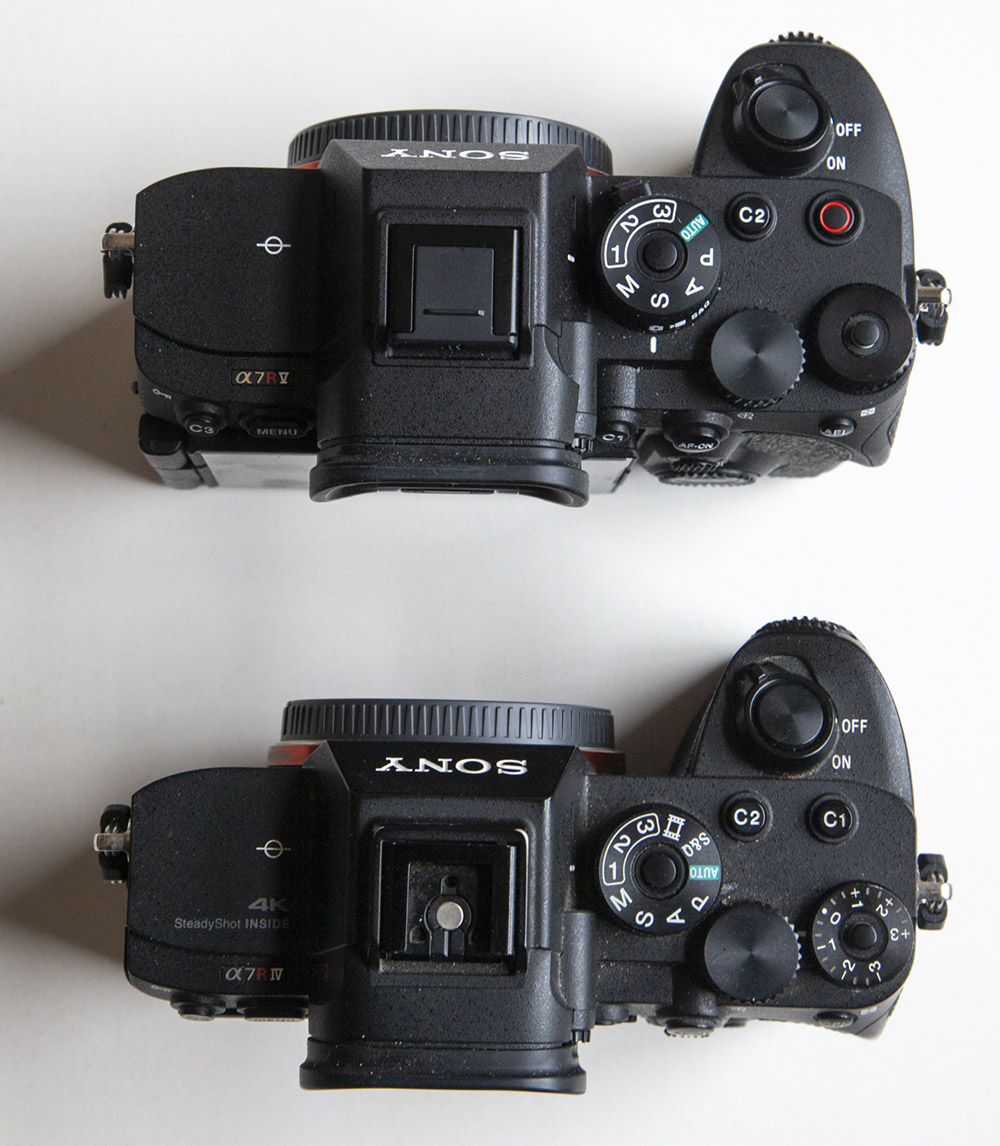
Top: A7R5. Bottom: A7R4
Buttons and dials. The layout of the controls is almost unchanged, which is a good thing. Two minor changes were maybe unnecessary but eventually inconsequential, and one is a definitive improvement. At first, I was alarmed that the C1 and video start buttons had been switched, breaking 8 years of habits, but then found out that they can be reassigned. The exposure compensation markings made it possible to zero its value without looking at a screen, but Sony dropped them because that dial can now be assigned a different function. There are even more customization options than before, to a point that may be overwhelming for some. The choice between stills, video, slow/quick modes is now made through a secondary mode dial, which usefully decouples them from the choice of the main exposure modes (P/A/S/M/presets) when recording video and creates independent video presets.
Menus. The redesigned menu layout is an improvement in terms of the organization over the A7R4, making browsing rather than memorization possible. Sony’s menus have gotten better over the years, but that also means that they have constantly changed. Although the grouping of functions is more logical, some things remain unintuitive. For instance, when deploying the Bluetooth remote RMT-P1BT, you would think that all the relevant settings are under the Network > Bluetooth menu, but it is not enough to turn the Bluetooth function on and do the Pairing there, you also need to go to the Network > Transfer/Remote menu to enable Bluetooth Rmt Ctrl.
Beyond those external changes, there is a more powerful image-processing engine. Besides making possible faster operation, it supports useful new features. This article focuses on the four of them that help improve image quality:
- Lossless Raw Compression
- Focus bracketing
- Improved Image Stabilization
- Motion-compensated Pixel Shift
Lossless Raw Compression
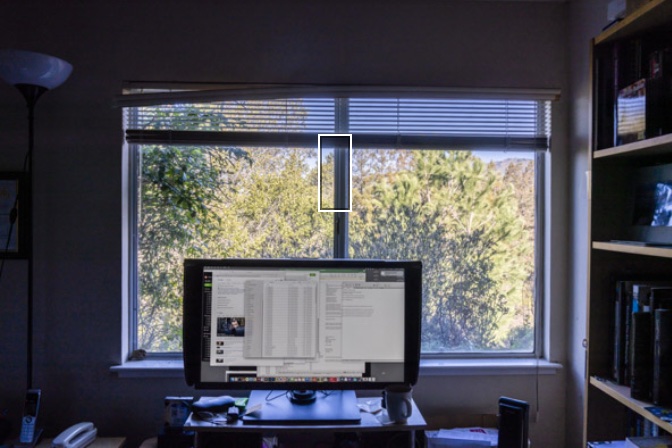
The first new feature of the A7R5 that caught my attention on its specs sheet was the availability of lossless RAW compression. What is it and why?When the A7R was released, using a compression algorithm, Sony kept the RAW files to a reasonable size, comparable to other manufacturers. Unfortunately, unlike competitors, Sony’s compression algorithm was lossy, which means that the full data captured by the sensor could not be recovered from it by decompression. Their compression algorithm (explained here in great detail) works by rounding pixel values, and this can introduce visible posterization under some circumstances. In practice, artifacts occurred in uniform zones near high contrast areas. Brightening shadows made them more noticeable, such as in the example below.
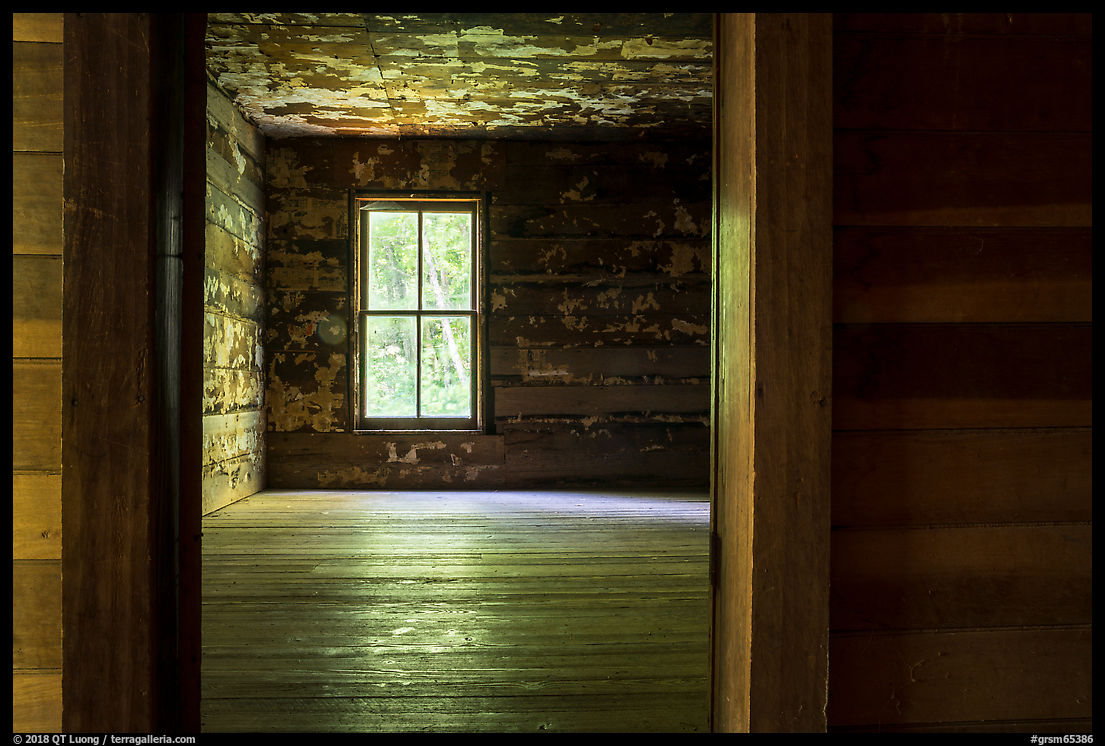
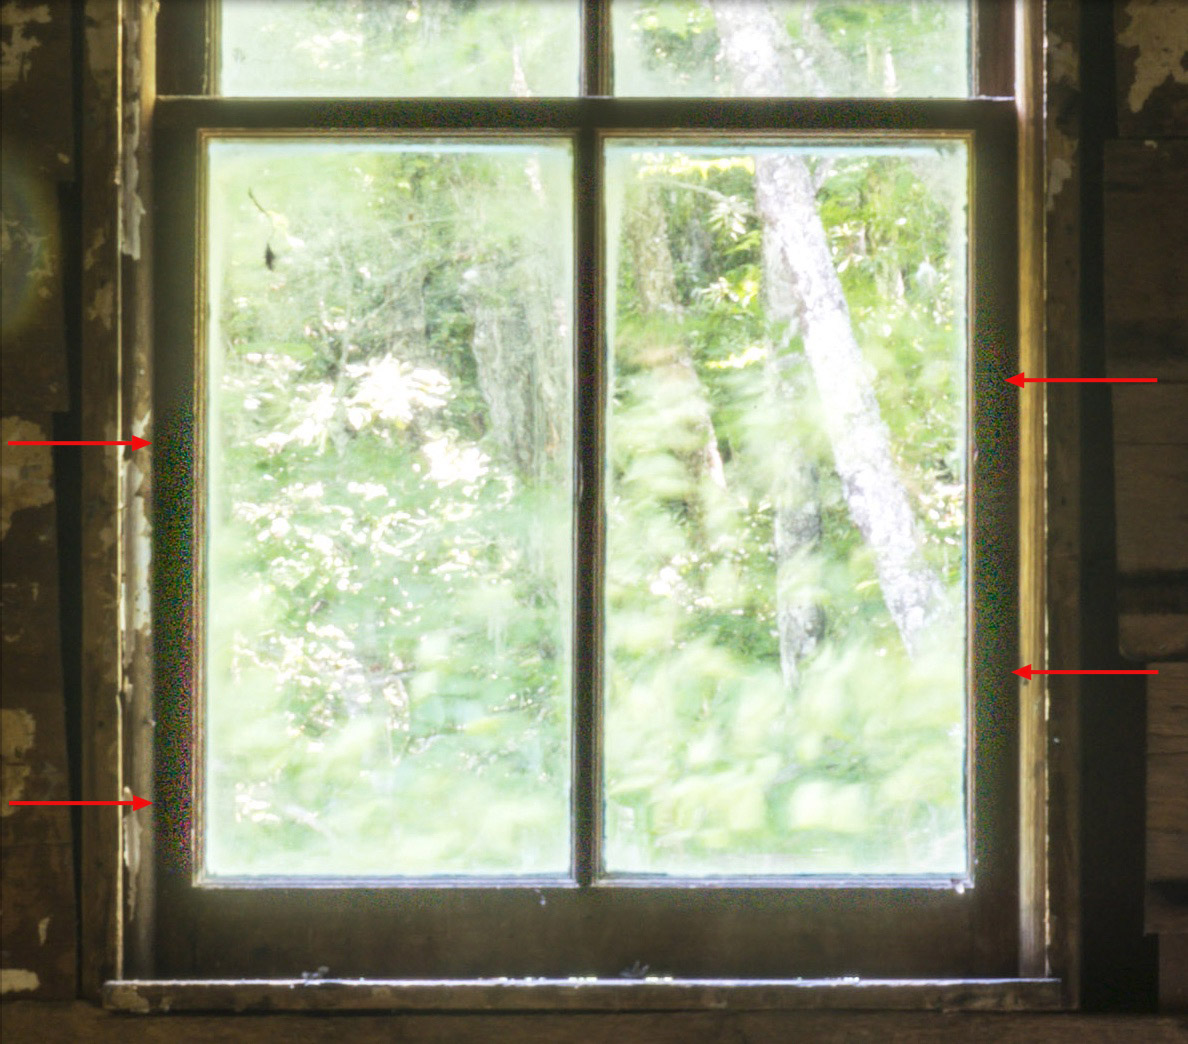
Great Smoky Mountains National Park, 2018. Sony A7R2, 24-105mm, compressed RAW. Compression artifacts are visible on both the left and right sides of the window frame.
Although some photographers have never observed such artifacts, they are easy to reproduce. In fact, I didn’t have to go anywhere to take such a picture, I had just to stand behind my desk! See the detail on the bottom left:
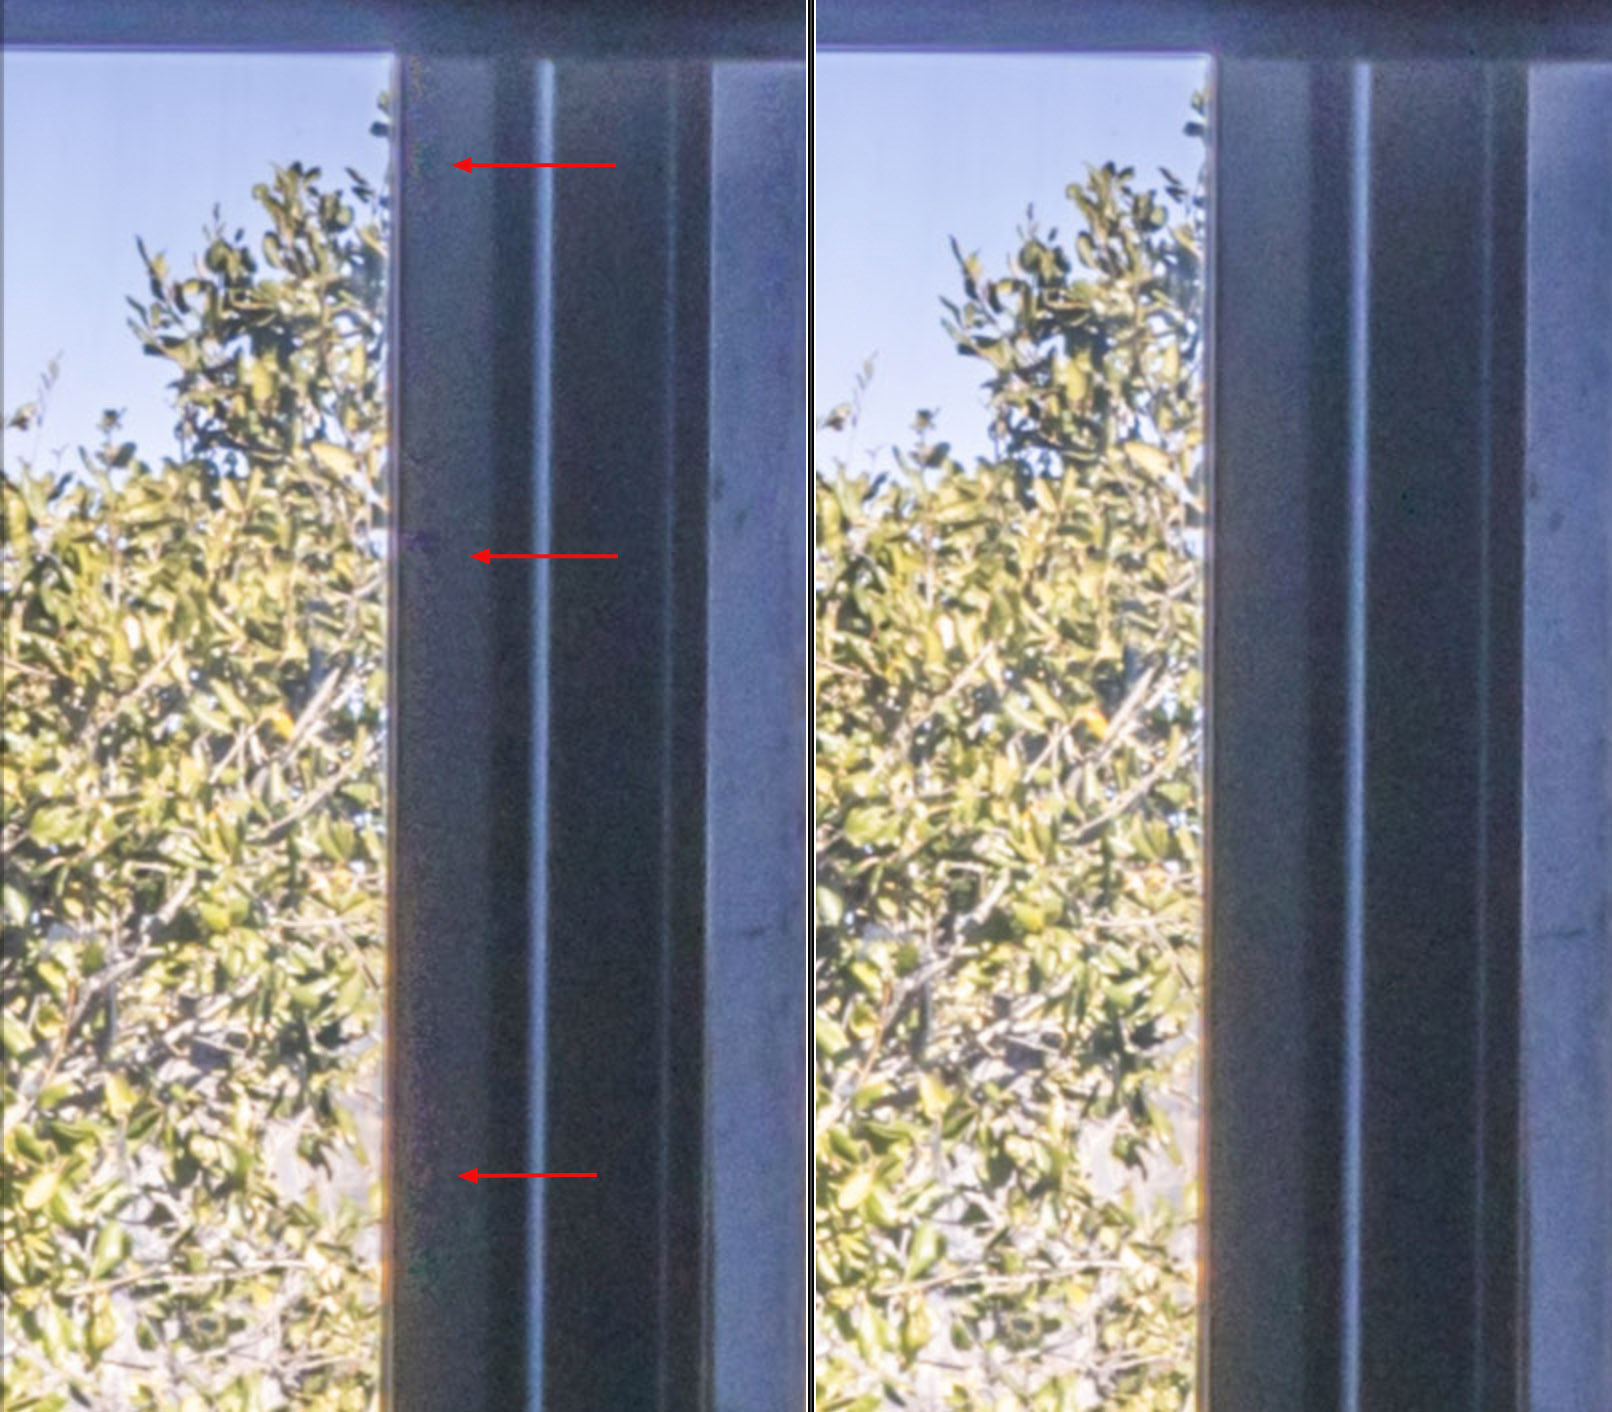
San Jose CA, 2023. Sony A7R5, 24-105mm, Left: Compressed RAW. Right: Lossless compressed RAW
Sony listened to users by releasing an uncompressed RAW option via a firmware upgrade for the A7R2 in September 2015. This format preserves all the sensor data and avoids compression artifacts, however, it remains less than ideal because the file sizes are huge. For that reason, I continued to mostly use compressed RAW, which is entirely adequate for most scenes, switching (or often forgetting to do so) to uncompressed RAW for high-contrast scenes.
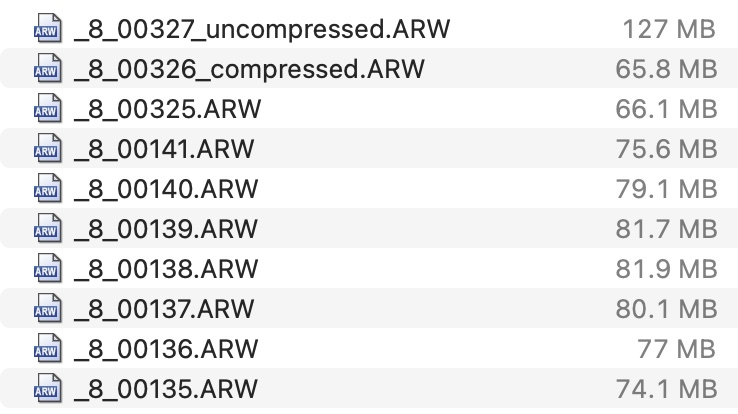
File sizes with uncompressed RAW, compressed RAW, and lossless compressed RAW (unmarked default)
Finally, in 2021, Sony took advantage of the new processing power of its flagship A1 to introduce a lossless compressed RAW mode. In such a format, similar to a ZIP file, decompression allows you to expand the compressed file back to all its data, while the lossless compressed file is smaller than the uncompressed file, but not quite as small as a (lossy) compressed file, as seen in the example above. New with the A7R5, the lossless compressed RAWs can be recorded at smaller sizes of 15MP and 26MP in case you need the RAW format but not the full size of 60MP. Those files, downsampled from 60MP, are not subject to Bayer interpolation (see later section), and therefore higher-quality than native files of the same size such as those captured in APS-C mode.
Focus bracketing
Another feature that had been available in other brands and lacking in Sony cameras was automated focus bracketing. By automatically taking a series of frames focussed at different distances, the camera creates a stack that can then be merged by post-processing (I use Photoshop or Helicon Focus) for extended depth of field not possible with a single picture by the process of focus stacking. Individual frames can be captured at “optimal” apertures of f/5.6 or f/8, preserving image sharpness that is compromised by diffraction at smaller apertures, but doing so requires even more frames than if a smaller aperture was used. The technique has been indispensable in medium-format digital cameras even when their resolution was below 30 MPs, and as full-frame cameras easily surpass that territory, it can help unlock their full imaging potential.
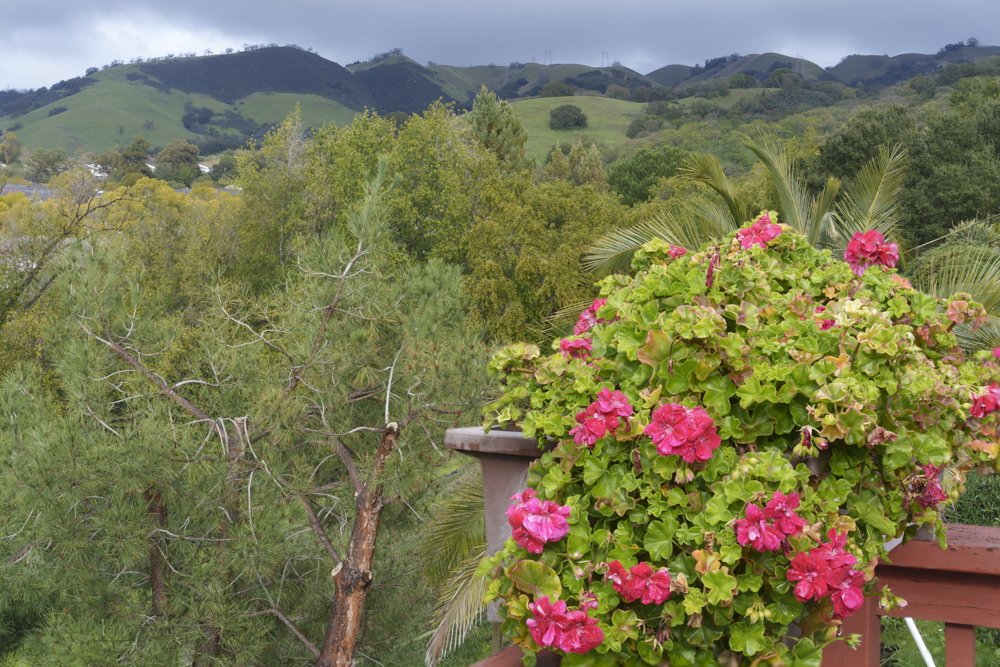
San Jose CA, 2023. Focus stack, Sony A7R5, 55mm lens f/11. The closest point was located at 1.8 m. Selecting step size 4 resulted in 17 frames automatically captured.
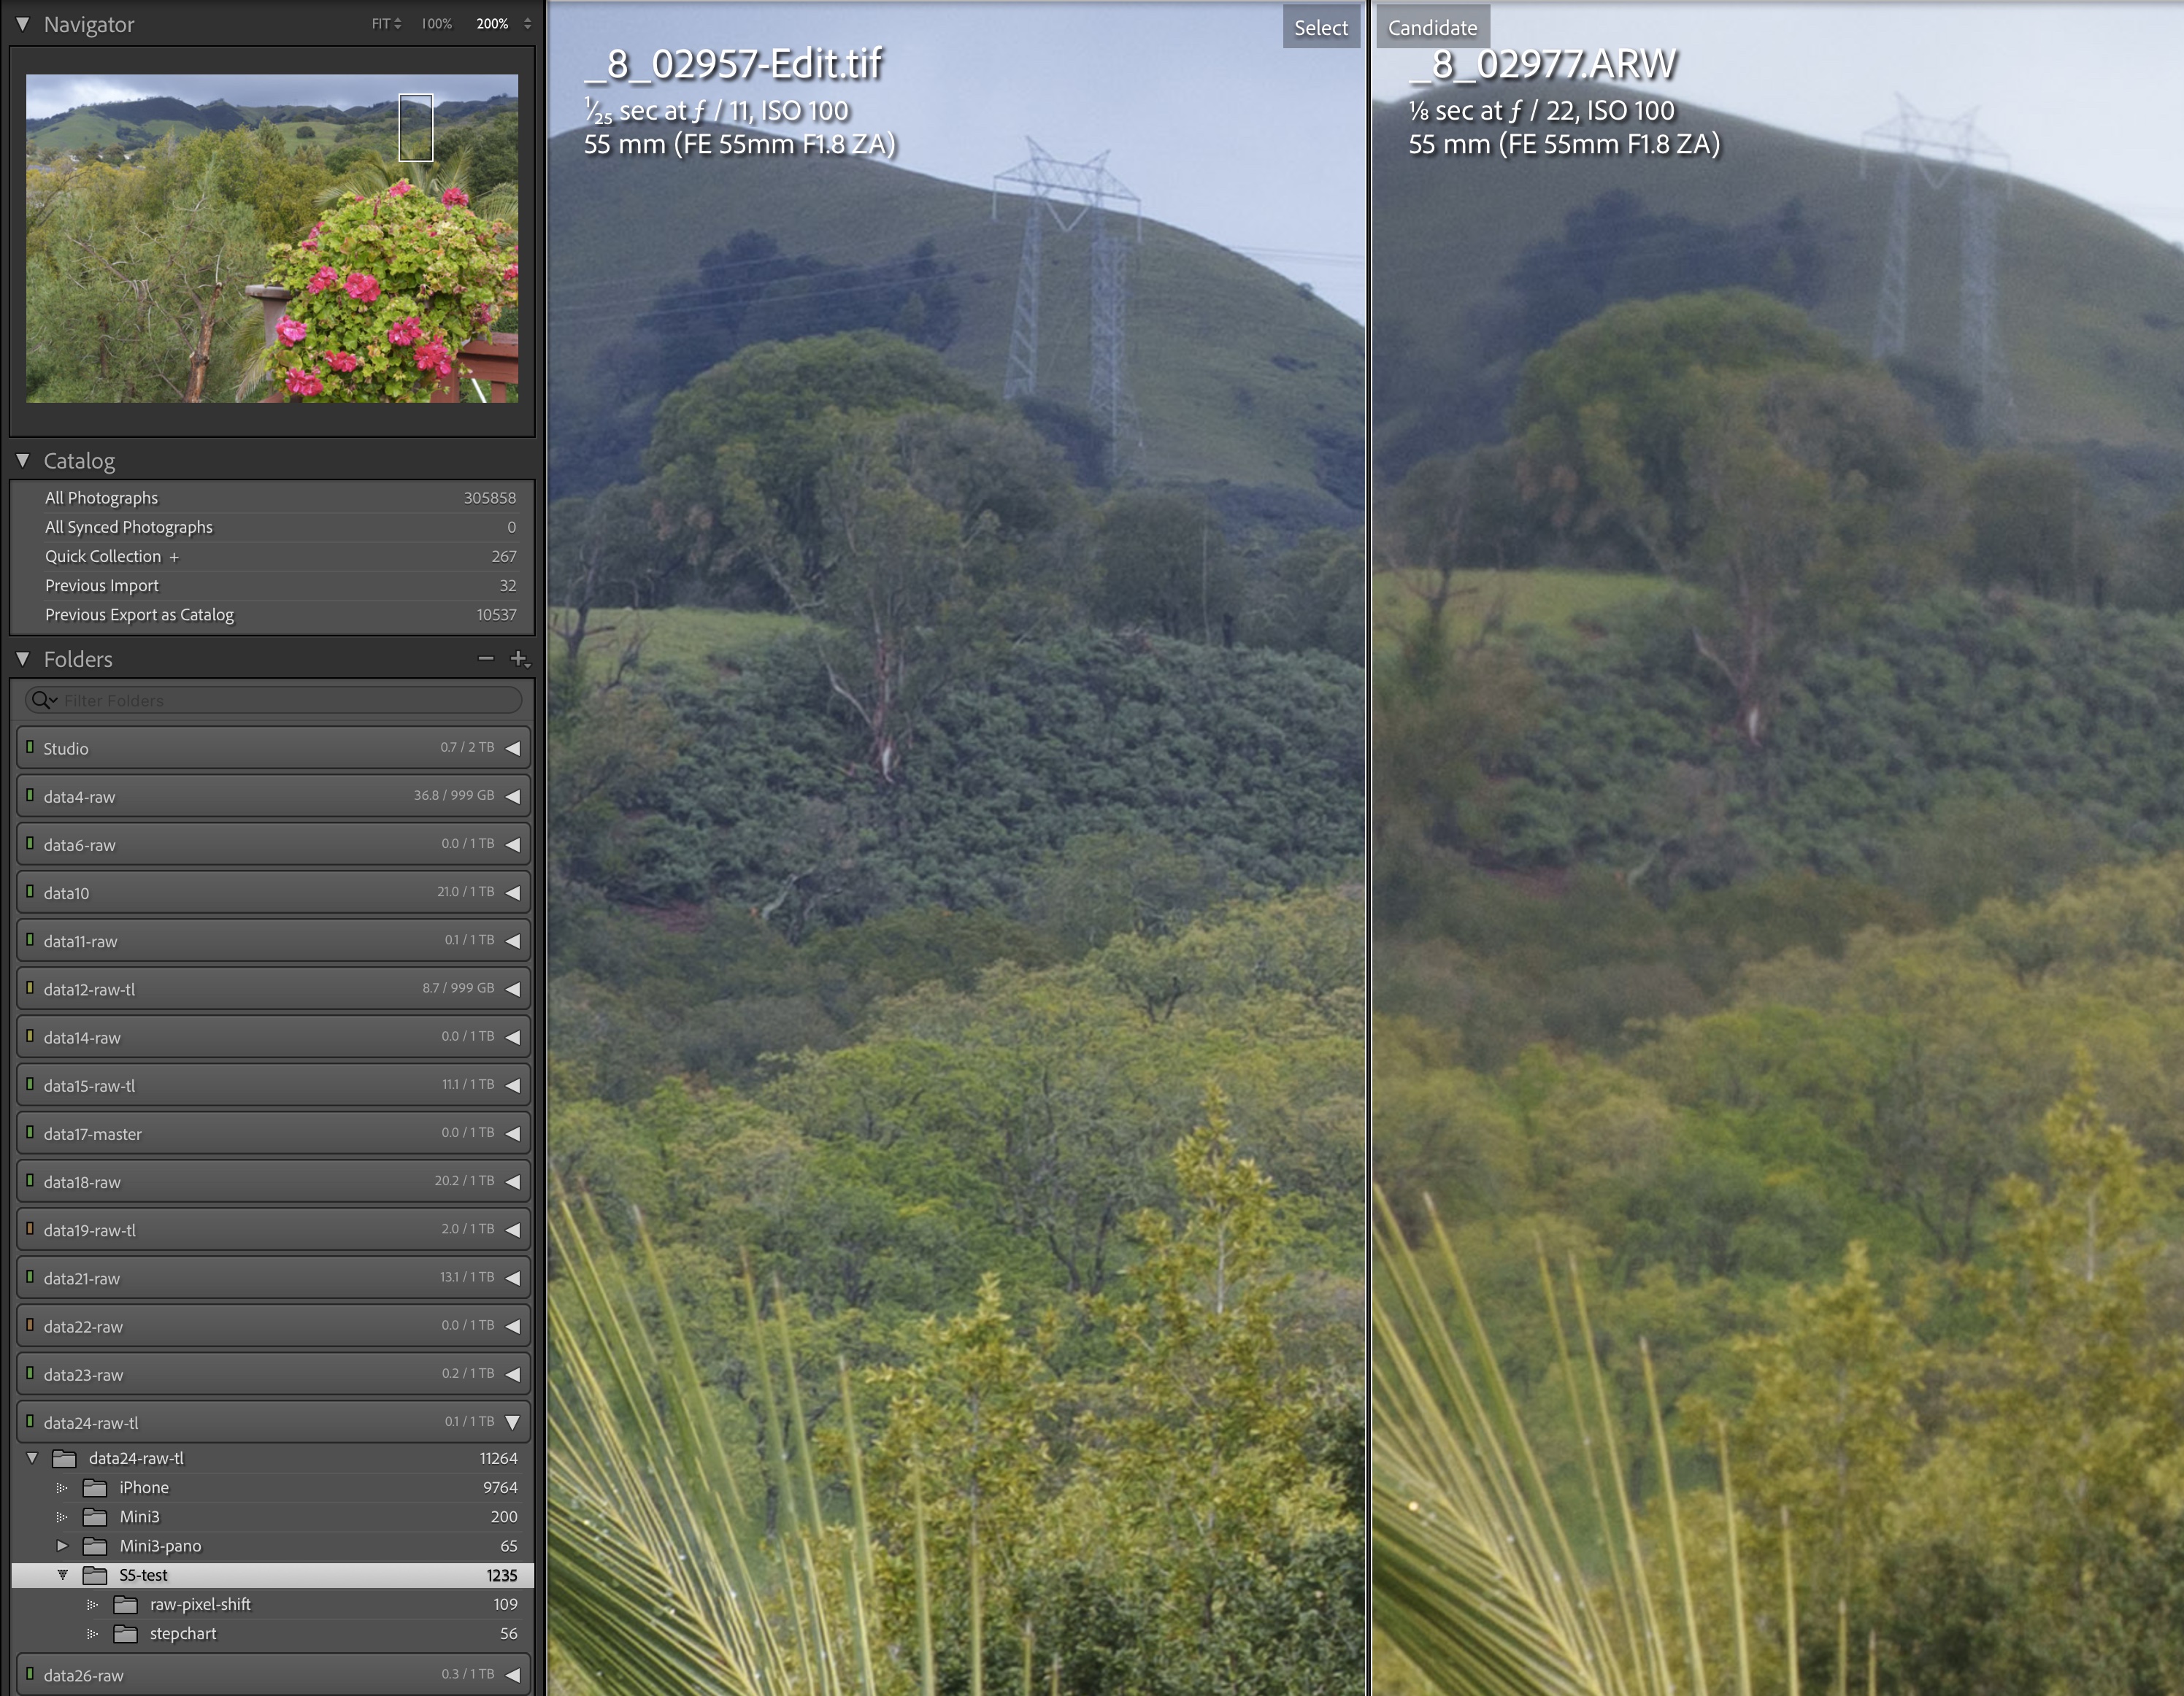
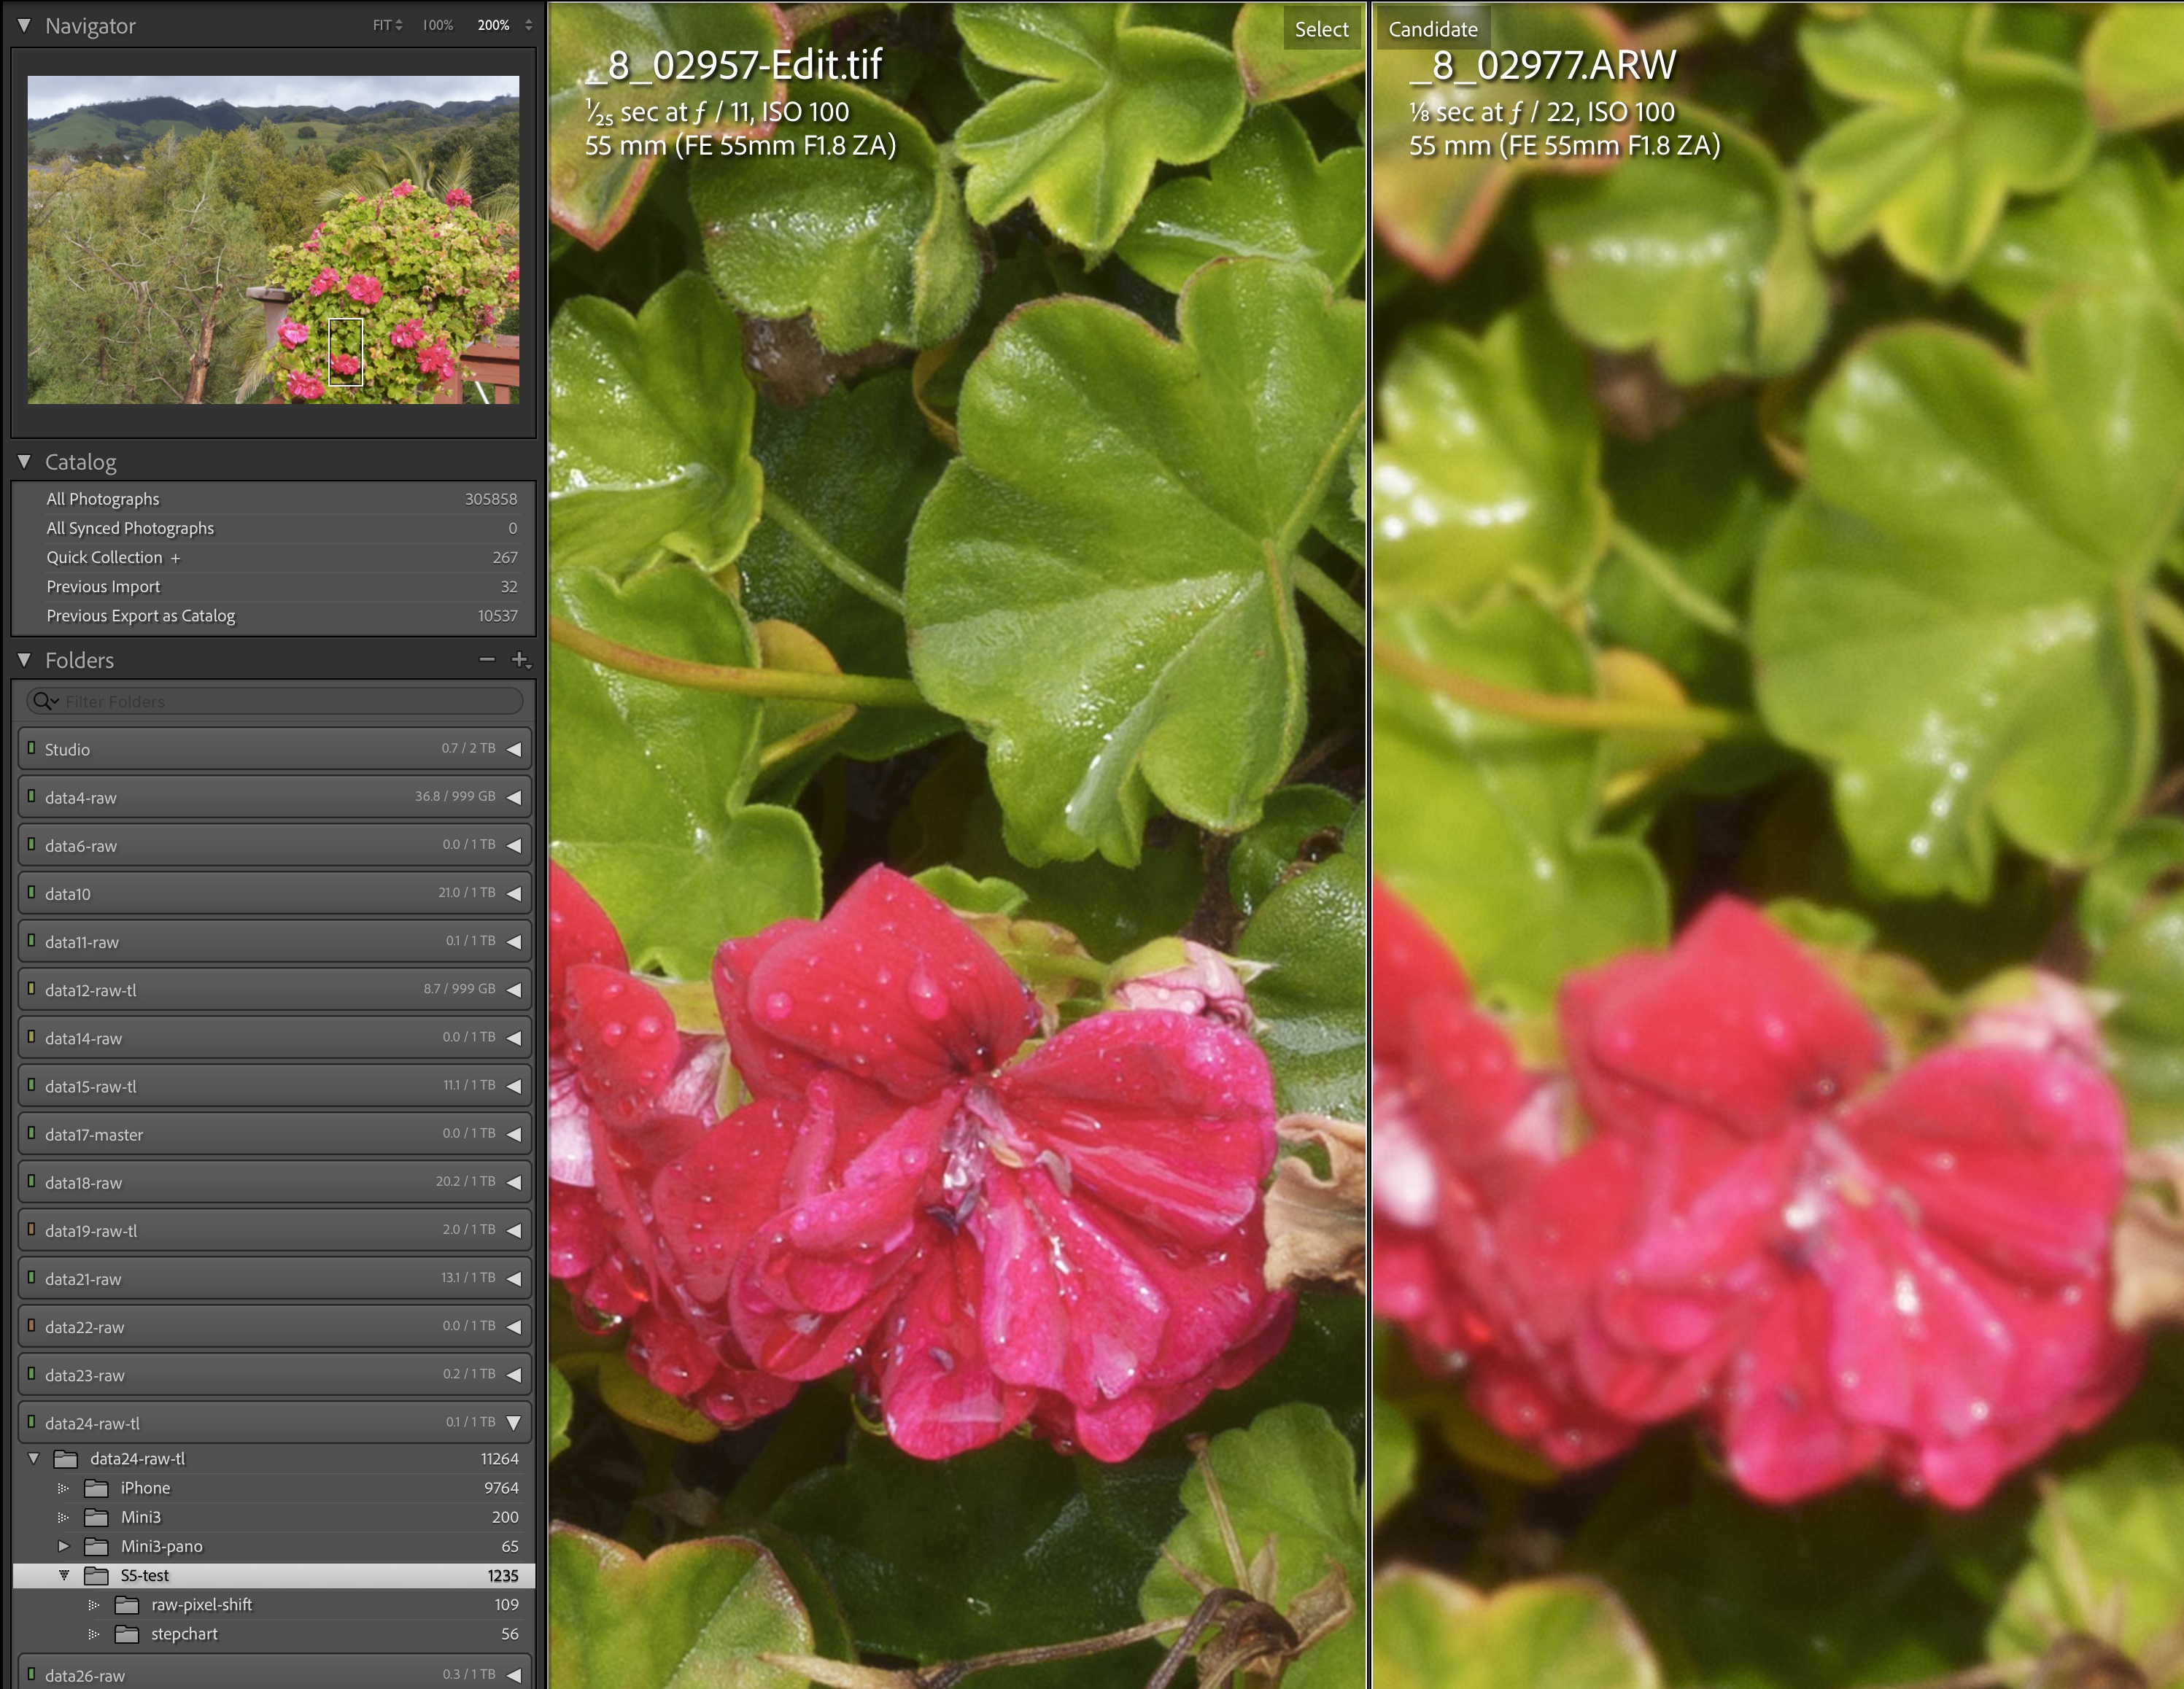
Left: Focus-stacked image. Right: frame focused at the hyperfocal distance (4.5 m) and stopped down to the smallest aperture of f/22. At infinity (top), the focus is adequate, but details are blurred by diffraction. The close flowers were not within the depth of field area, which means that it is not possible to get everything in this image sharp with a single frame. Click to enlarge.
Taking the series of frames by focusing manually is tedious, time-consuming, and error-prone, especially in those situations where dozens of frames are necessary. Sony’s lack of automated focus bracketing was partly alleviated by third-party triggering devices or apps. For instance, the app Shutter, brought automated focus bracketing to the A7R4 and more recent cameras (but cannot support earlier cameras such as the A7R3). The app works, but has two major drawbacks: it depends on control via iPhone, and it is extremely slow, taking about 9 seconds between each frame. Keep in mind that a close-up focus stack can easily involve several dozens of frames and take several minutes. The A7R5 is the first Sony camera with built-in focus bracketing. It is easily accessed as one of the drive modes and operates at a more reasonable speed of about 0.4 seconds between frames. A drawback of making it a drive mode is that it cannot be combined with other drive modes such as exposure bracketing or pixel shift (unlike with Shutter). Fortunately, if like me you generally use the self-timer (another drive mode) instead of a remote release, you can combine it with focus bracketing by a custom option: Shooting > Drive Mode > Bracket Settings > Selftimer during Bracket.
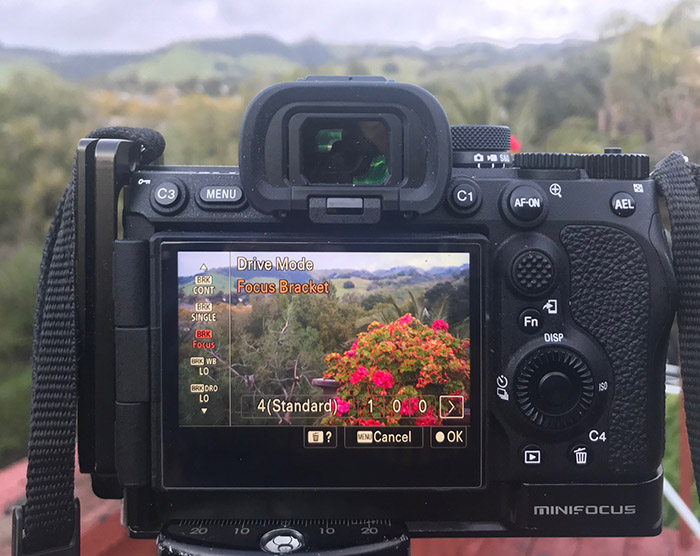
You set up a near focus point, relative step width from 1 to 10, and the maximum number of shots up to 299, then upon shutter release the camera keeps taking pictures at increasing focus distances until the focus reaches infinity or the number of pictures reaches the set maximum (which I set up at a high 100 by default since the camera will stop automatically upon reaching infinity). In determining the actual step width, the camera takes into account both the aperture and the focal length, so you don’t have to factor those in your choice of the relative step width. Depth of field is proportional to the f-number and inversely proportional to the squared focal length. Opening the aperture by two f-stops divides the actual step by approximately two, doubling the number of frames. Doubling the focal length divides the actual step by approximately four. For an example, see the table below that indicates the number of frames in the stack with a close focusing point at 1.2 m (4 feet) which isn’t even that close – the Sony 24-105 focuses down to 0.4 m. Those numbers can be pretty large with longer focal lengths.
| Relative step width | 1 | 2 | 4 | 8 | |
| f/8 | 24 mm | 8 | 7 | 6 | 4 |
| 50 mm | 64 | 51 | 34 | 21 | |
| 100 mm | 252 | 195 | 129 | 78 | |
| f/16 | 24 mm | 5 | 5 | 4 | 3 |
| 50 mm | 33 | 25 | 17 | 11 | |
| 100 mm | 126 | 97 | 65 | 40 | |
Number of frames in focus stack as a function of relative step width, focal length, and aperture
Choosing the optimal step width requires experimentation and I am still trying to figure it out, but in general, the standard default 4 seems to works well. With 8 steps, there is no focus banding, but contrast/resolution appears a bit lower. Unless you want to deal with a massive number of frames, it doesn’t seem to be a good idea to go to the smaller steps, especially with longer than normal focal lengths.
Sony’s implementation is no worse than competitors, but unlike Shutter‘s, it does not let you select the far point. This wastes a number of frames, especially in macro situations, and you cannot know in advance how many frames will be taken. In addition, I have sometimes seen a bit of variation between the faraway frames of stacks, which could indicate that the camera doesn’t reliably reach exactly infinity. That defect doesn’t make the focus bracket feature unusable, but it might be prudent to add to the stack a picture manually focused at infinity.
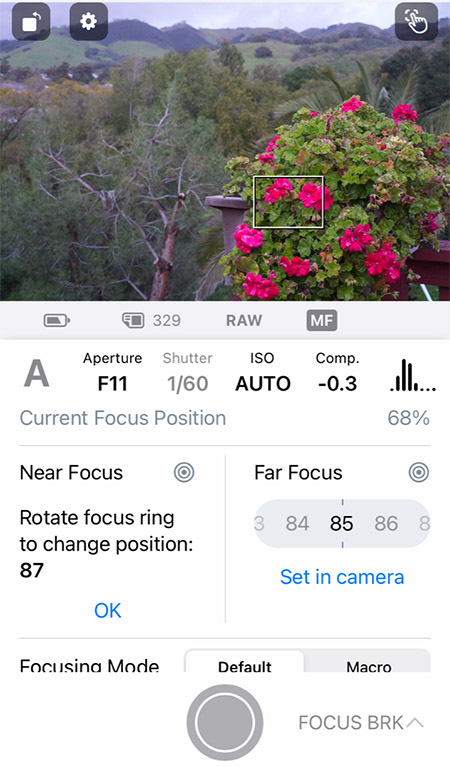
iPhone screenshot with Shutter App
When shooting large stacks, the much larger frame buffer (583 RAWs vs. 68 RAWs for the A7R4) is helpful. At first, the option to create a new folder for every focus bracket series appeared useful, until I realized that the file numbers start at 0 for each series. Apparently, quite a few designers think it is a good idea since the same thing happens with the panoramic series on the DJI drones, but I much prefer to have distinct file names for every image.
Improved Image Stabilization
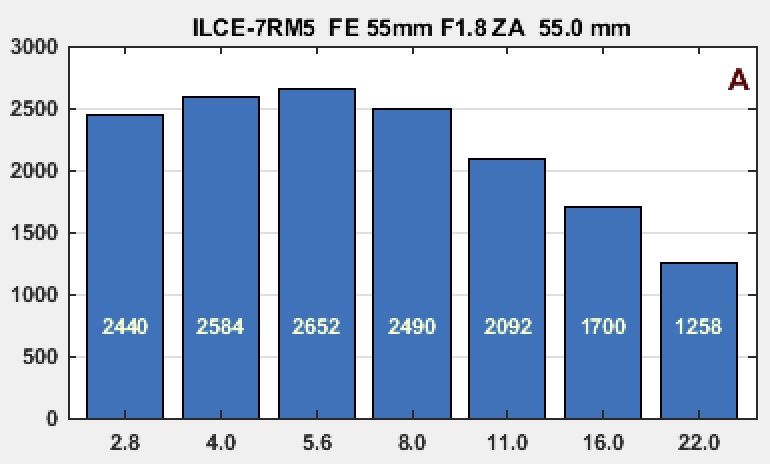
Sony claims that a new system with a precision up to a single pixel level has enabled “up to 8-step compensation effect for stills” but this number refers to obscure CIPA standards. Besides the fact that Earth’s rotation limits stabilization performance to 6.3 stops, does anybody seriously expect image stabilization to be that effective? Eight stops separate a shutter speed of 1/400s and a shutter speed of 1/3s. On the other hand, Sony claimed 5.5 stops for the A7R4, so maybe there is some actual improvement. Since I didn’t find any actual measurements on the internet, I set out to figure out how much of an improvement there is.To obtain each data point, I photographed ten times a frame-filling SFR Plus Auto target and ran Imatest to measure how sharp the frame was. The lens was the excellent Sony 55mm f/1.8 lens with aperture set in the f/4 – f/5.6 range. ISO was in the 50 to 800 range. The camera was hand-held with my left hand supporting the lens. I took each picture independently with reasonable (but not maximal) care, in single frame mode. Images were captured in RAW and exported from Lightroom with all sliders zeroed. The numbers reported are the average over 38 measurements within a frame of MTF 50 values (in LW/PH), which correlate well with image sharpness. To provide you with a reference point and put findings in perspective, here are how those numbers vary when the 55mm lens is stopped down while shot on a tripod at ISO 100.
In case you are worried about the effect of ISO variation on the measured hand-held results, I evaluated that variation by also photographing on a tripod so that by cancelling the influence of shutter speeds, the only variable left was ISO. Going from ISO 50 to ISO 800, MTF 50 went from 2610 to 2470, which is a (surprisingly?) relatively small variation.
Since the Sony 55mm lens does not have image stabilization built-in, it comes only from the in-body image stabilization (IBIS) system of the camera. I went through all four combinations of cameras (A7R4/A7R5) and IBIS on/off. Each point in the table and graph below is obtained by averaging measurements taken over ten frames.

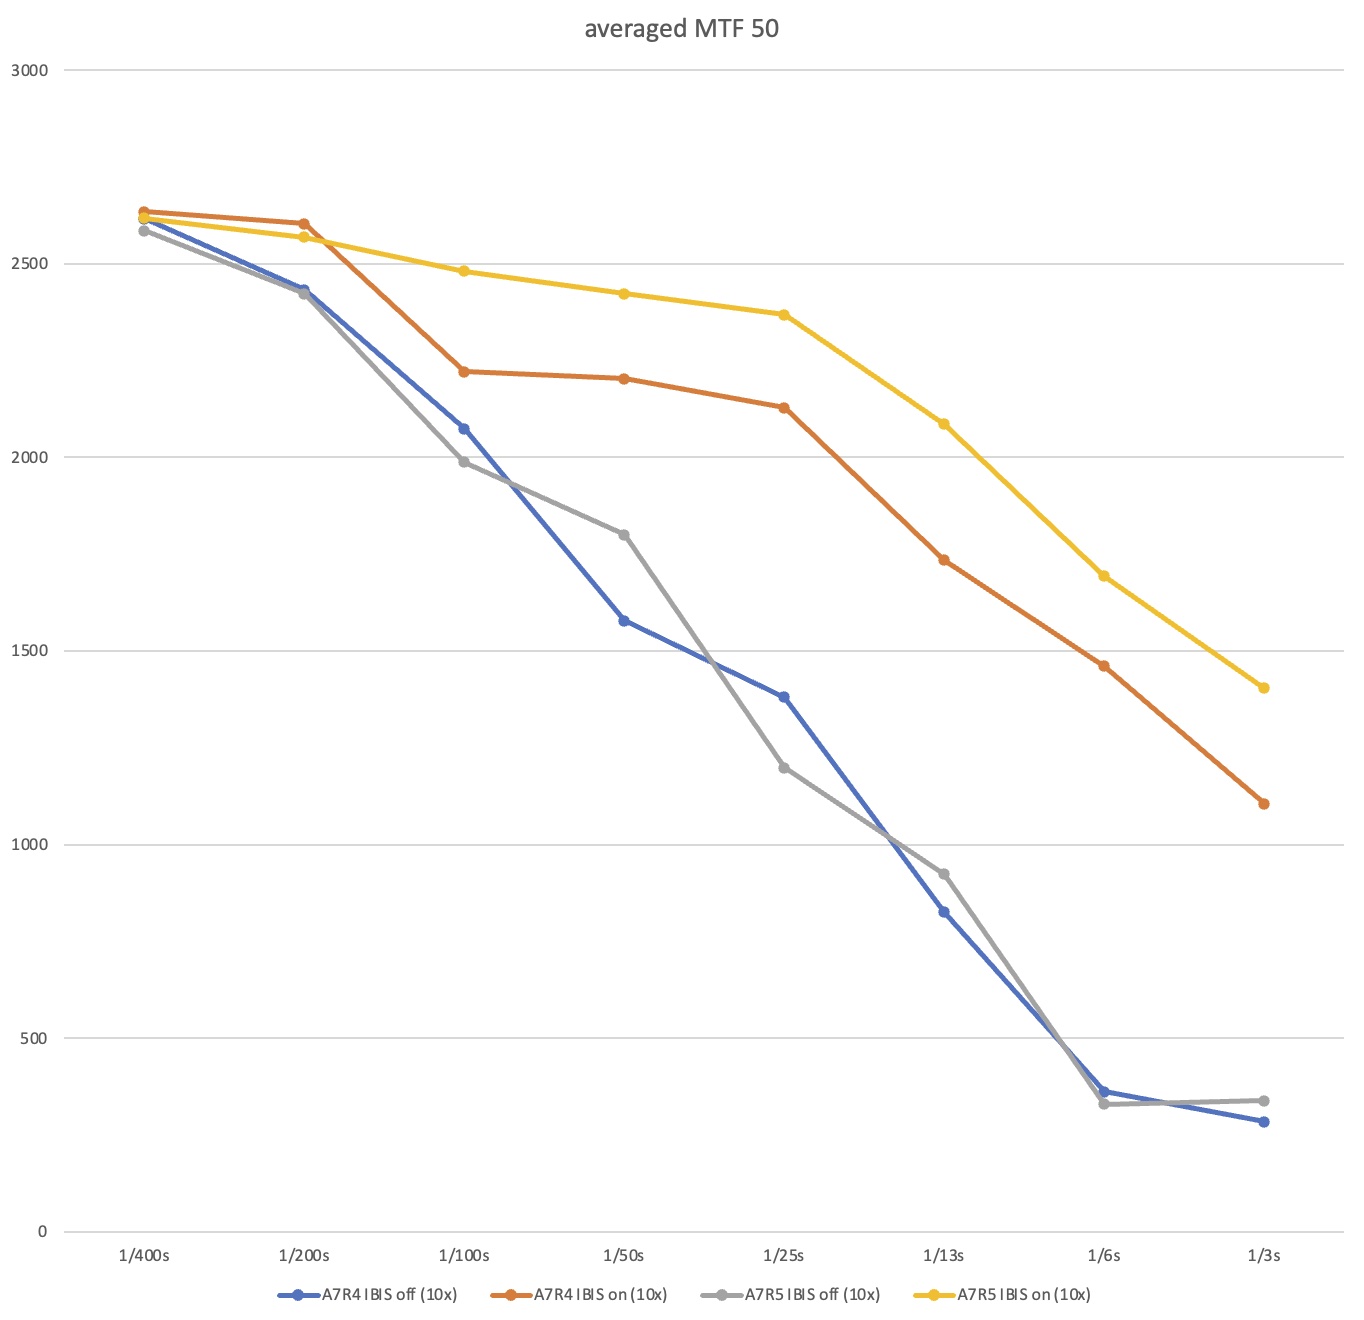
Sharpness as a function of shutter speed.
The data isn’t perfect since ten frames are not that much, and trying to characterize the performance of IBIS with a single number is over-simplistic as what is being measured is the probability of getting a sharp image rather than image sharpness. However, there are still useful observations to be made.
- As expected, sharpness decreases as shutter speeds slow down, and measurements with IBIS off for each camera are similar.
- For any shutter speeds below 1/400s, there is degradation in sharpness compared to shooting at 1/400s (or on a tripod), regardless of whether IBIS is used or not. Keep in mind that this is a 55mm lens, for which traditional wisdom recommends a hand-held speed of 1/60s or faster.
- Even at 1/200s, IBIS improves image sharpness. The improvement increases as the shutter speed drops.
- Down to 1/25s, with IBIS, sharpness remains high (but your assessment may vary).
- IBIS on the A7R5 outperforms the A7R4 by a fairly consistent margin from 1/100s to 1/3s.
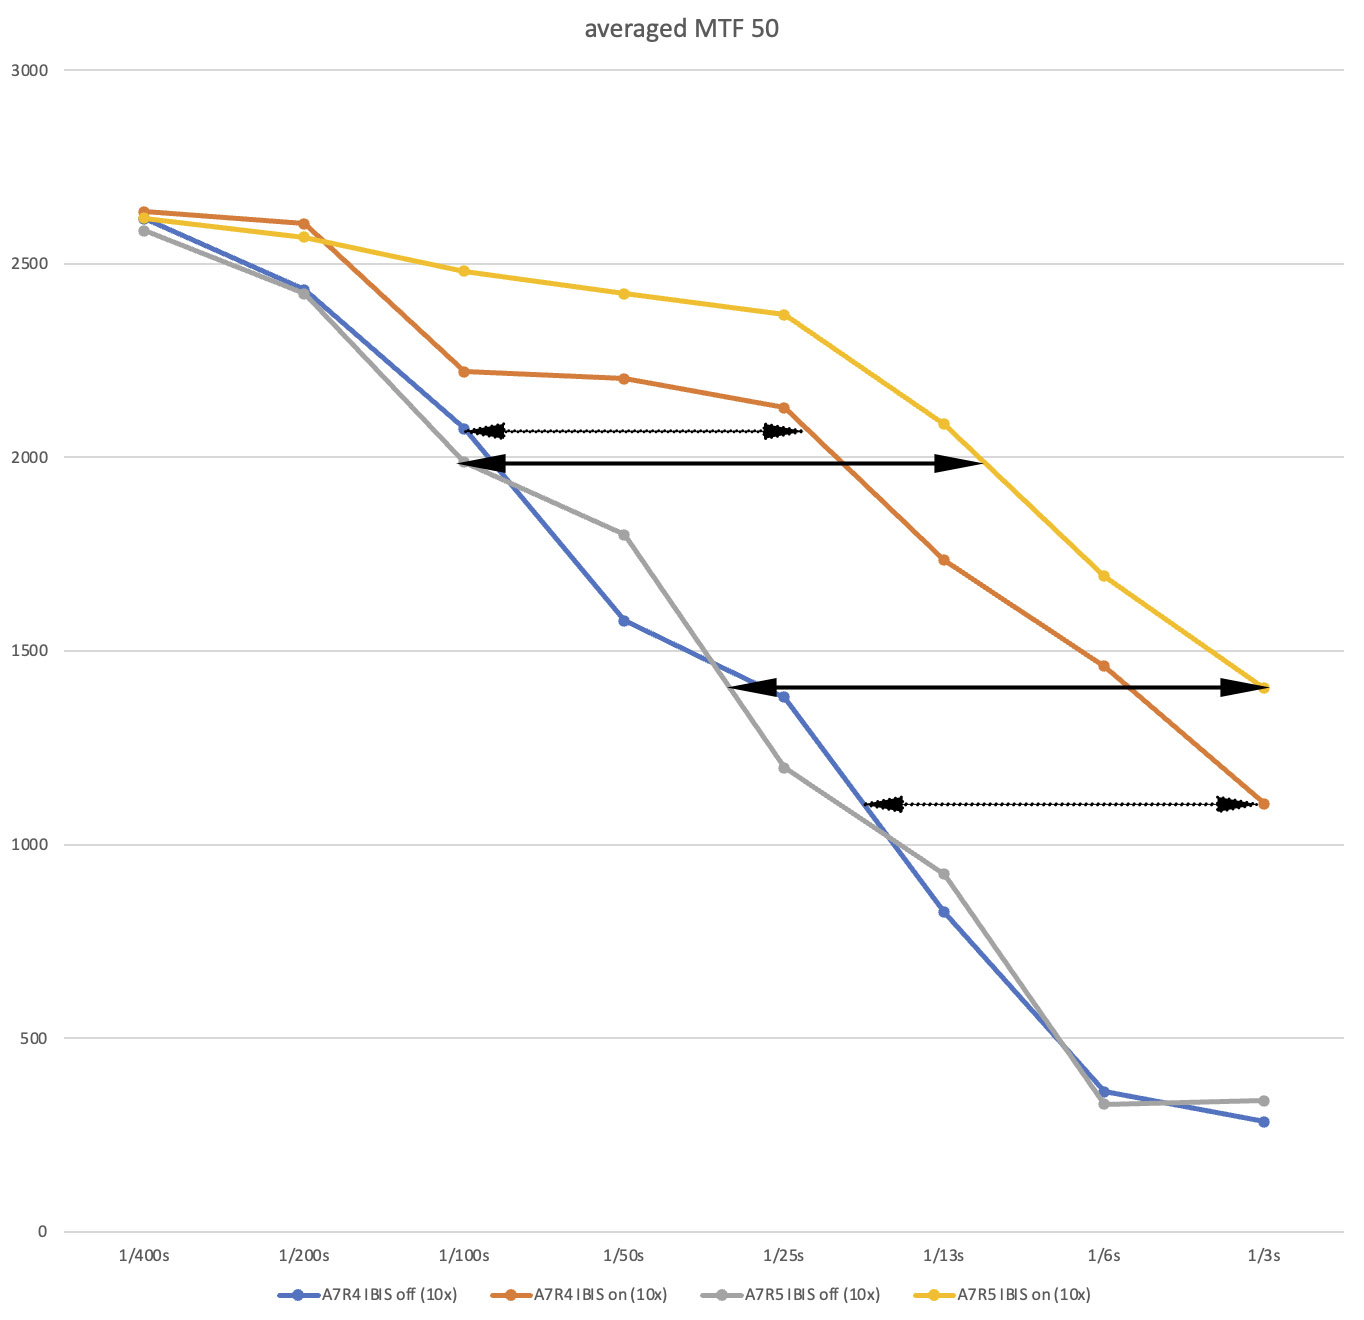
Determining the number of stops gained with IBIS. Solid arrows: A7R5, dotted arrows: A7R4.
One could argue that landscape photography is best done from a tripod, but there are many situations when I choose to photograph hand-held, either for flexibility, trying to keep pace with non-photographers, or because I left the tripod behind for a long hike.
Motion-compensated Pixel-Shift
The Sony A7R3 introduced two pixel-shift modes for tripod use. The camera captures a series of additional frames as the sensor shifts by a few microns within the focal plane. Those frames were then composited in Sony Imaging Edge desktop software to yield images with improved resolution. How does that process increase resolution?

Bayer Pattern (courtesy of Colin M.L. Burnett)
A color pixel is supposed to be a location with a value for each of red, green, and blue (RGB). However, those values are not sensed by almost all modern cameras. Instead, they use a black-and-white sensor covered in a Bayer pattern of R,G,B filters. Instead of all three colors, each site only detects the brightness of one color. RAW demosaicing software, either in-camera for JPG generation or on the desktop, must make an estimate (interpolation) as to what the values for the two missing colors are. The exception are the Foveon (acquired by Sigma) sensors which use three layers to capture true RGB values at each pixel site. Because those values are captured rather than interpolated, they produce three times the amount of data as Bayer sensors. Foveon claimed that this translates to an image as detailed as one captured with a Bayer sensor with three times the number of pixels, but a more estimates puts one full-color pixel as equivalent to between 1.7 and 2.1 Bayer pixels.
In the first Sony pixel shift mode, the idea is to overcome the limitations of the Bayer interpolation by capturing full color information at each pixel. The Bayer filter is fixed, but the sensor moves. The shift is of exactly one pixel, and four images are captured to obtain a readout of the R, G (twice), B values for each pixel site by sampling all the positions of the 2×2 Bayer grid. The software composites those images to create an image of identical size but of higher fidelity, with true RGB values at each pixel instead of interpolated RGB values. Using the most conservative estimate 60 x 1.7, I expect such an image to be at least equivalent to one produced by 100 MP camera such as the Fuji GFX 100s.
The Voigtländer Macro Apo-Lanthar 65mm, maybe the sharpest lens in the Sony system (and possibly all of 35mm photography) illustrates what is possible with a top lens, but I was curious to see if anything could be gained with a less stellar lens, such as my bread and butter Sony 24-105mm zoom set at the same focal length. A feature that works only for high-performance lenses is not as useful. Let’s do a bit of pixel peeping!
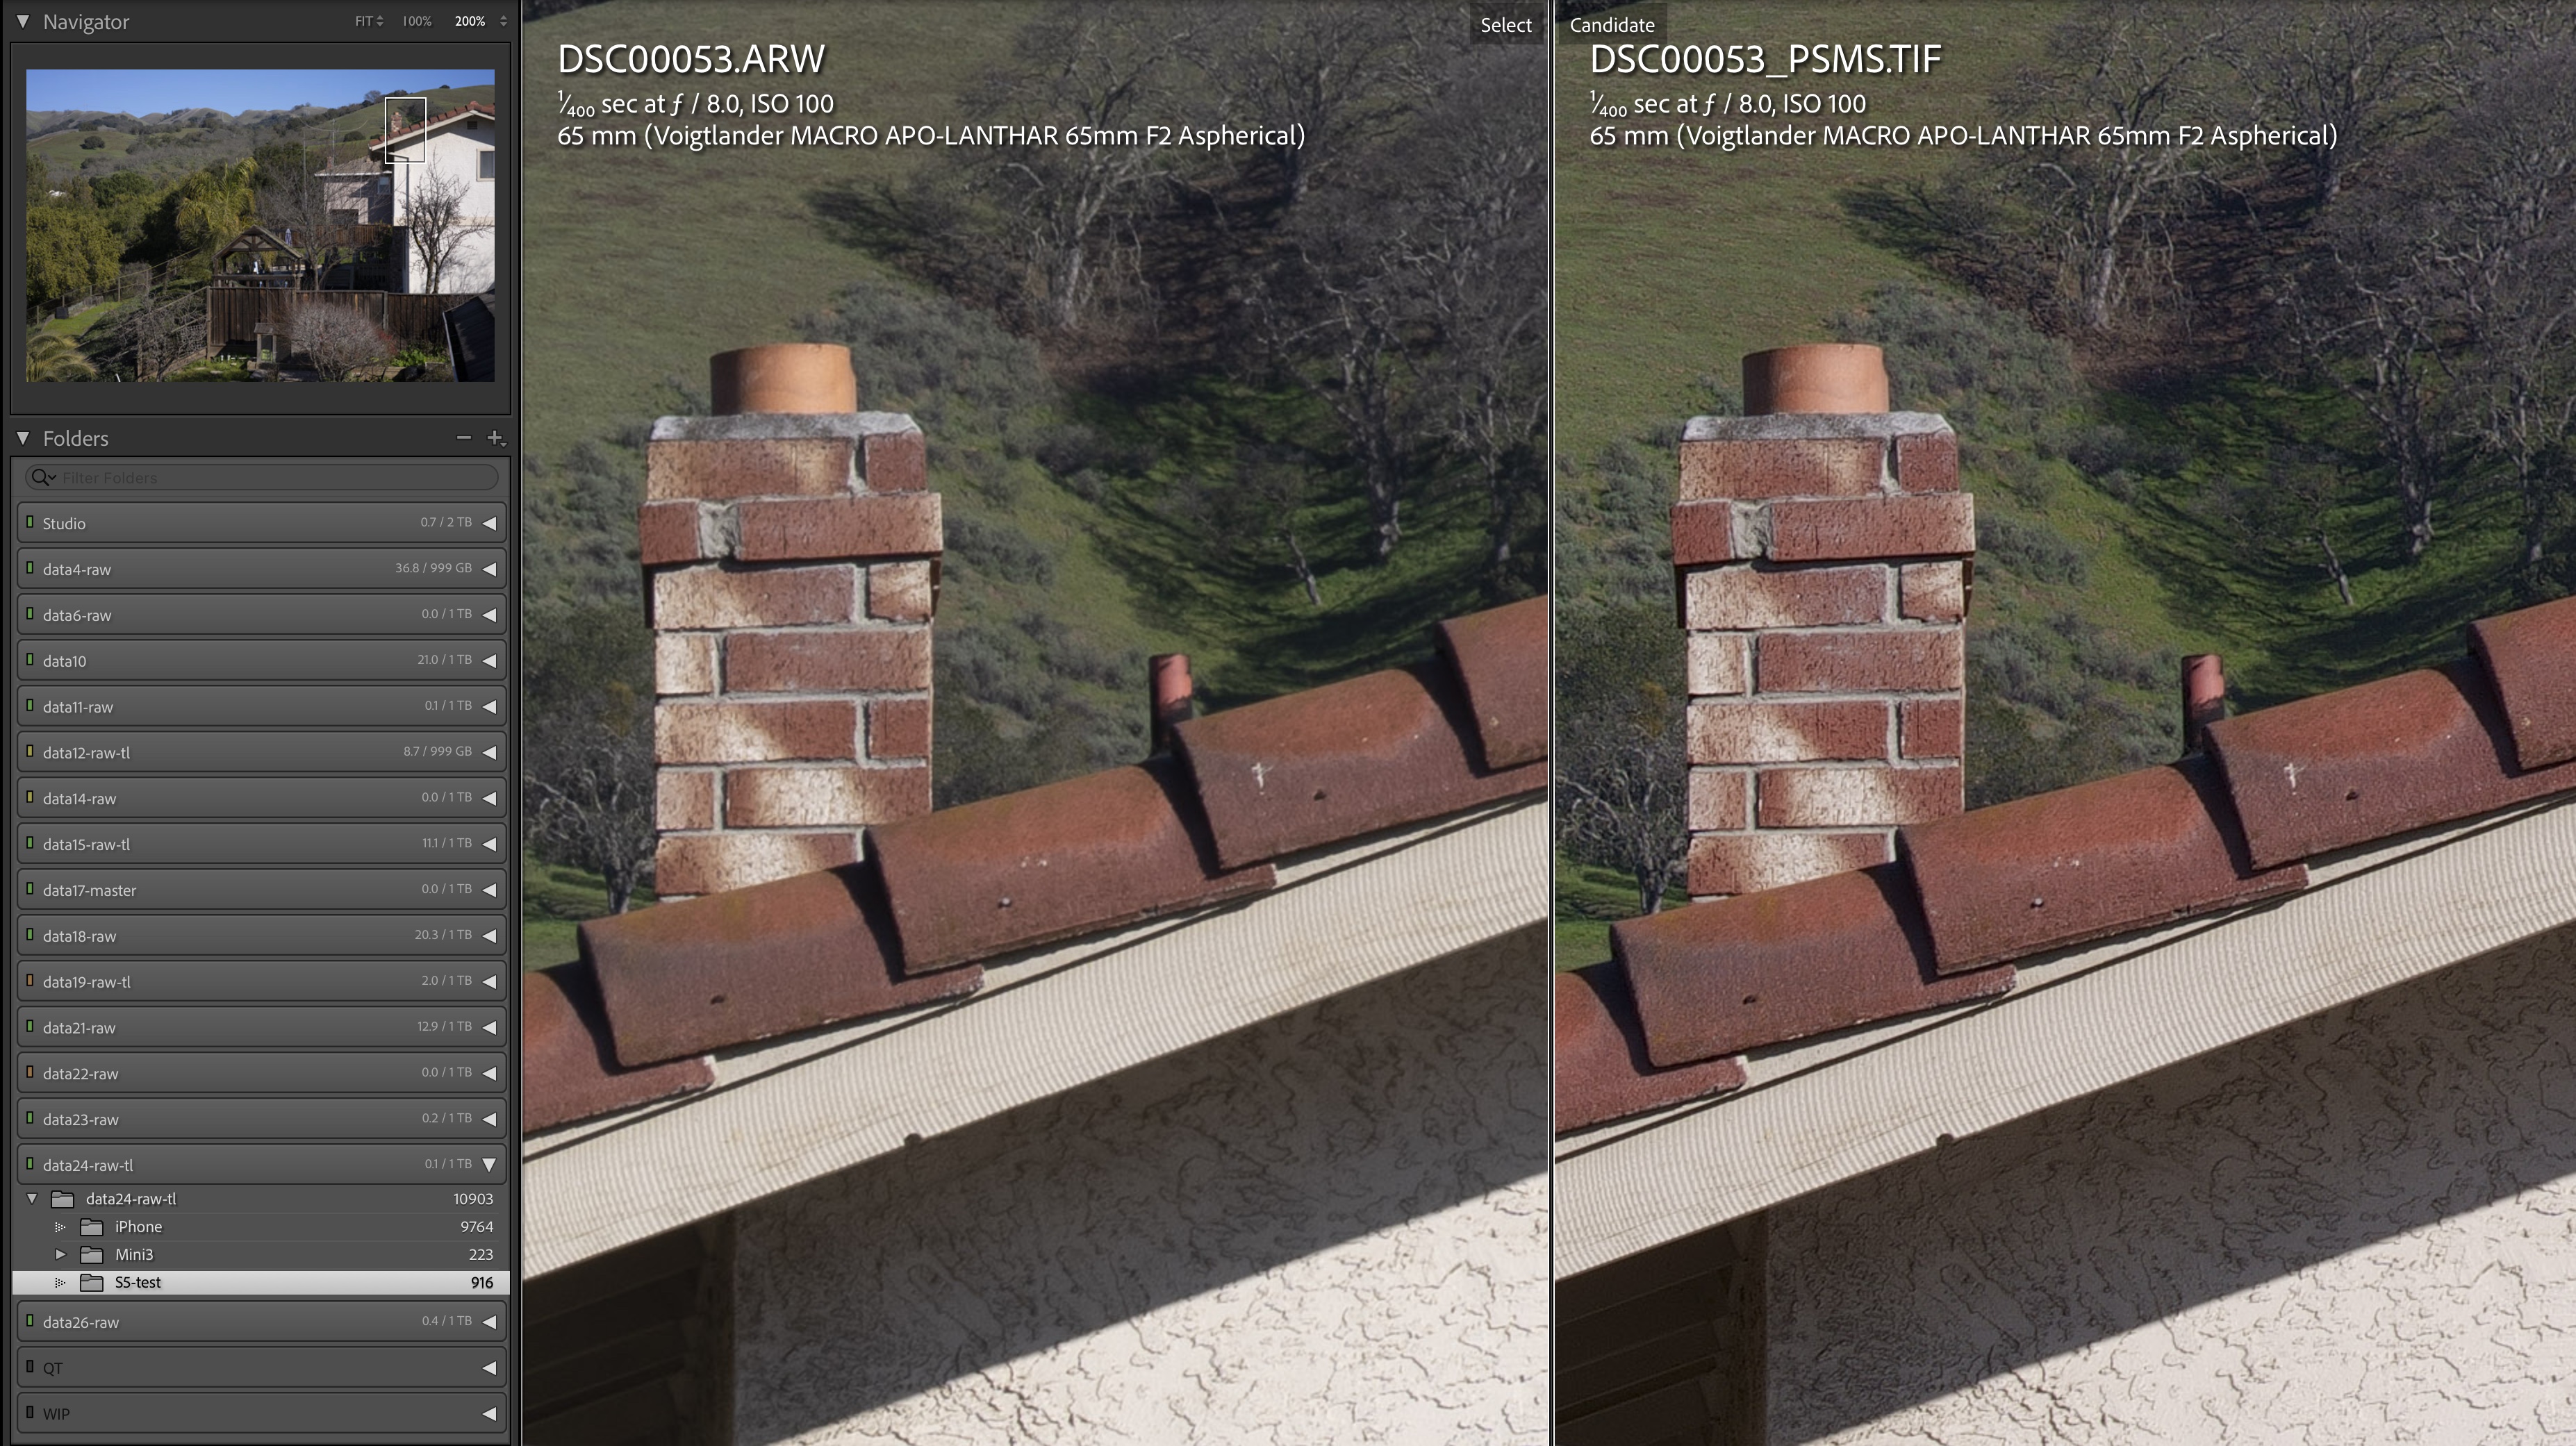
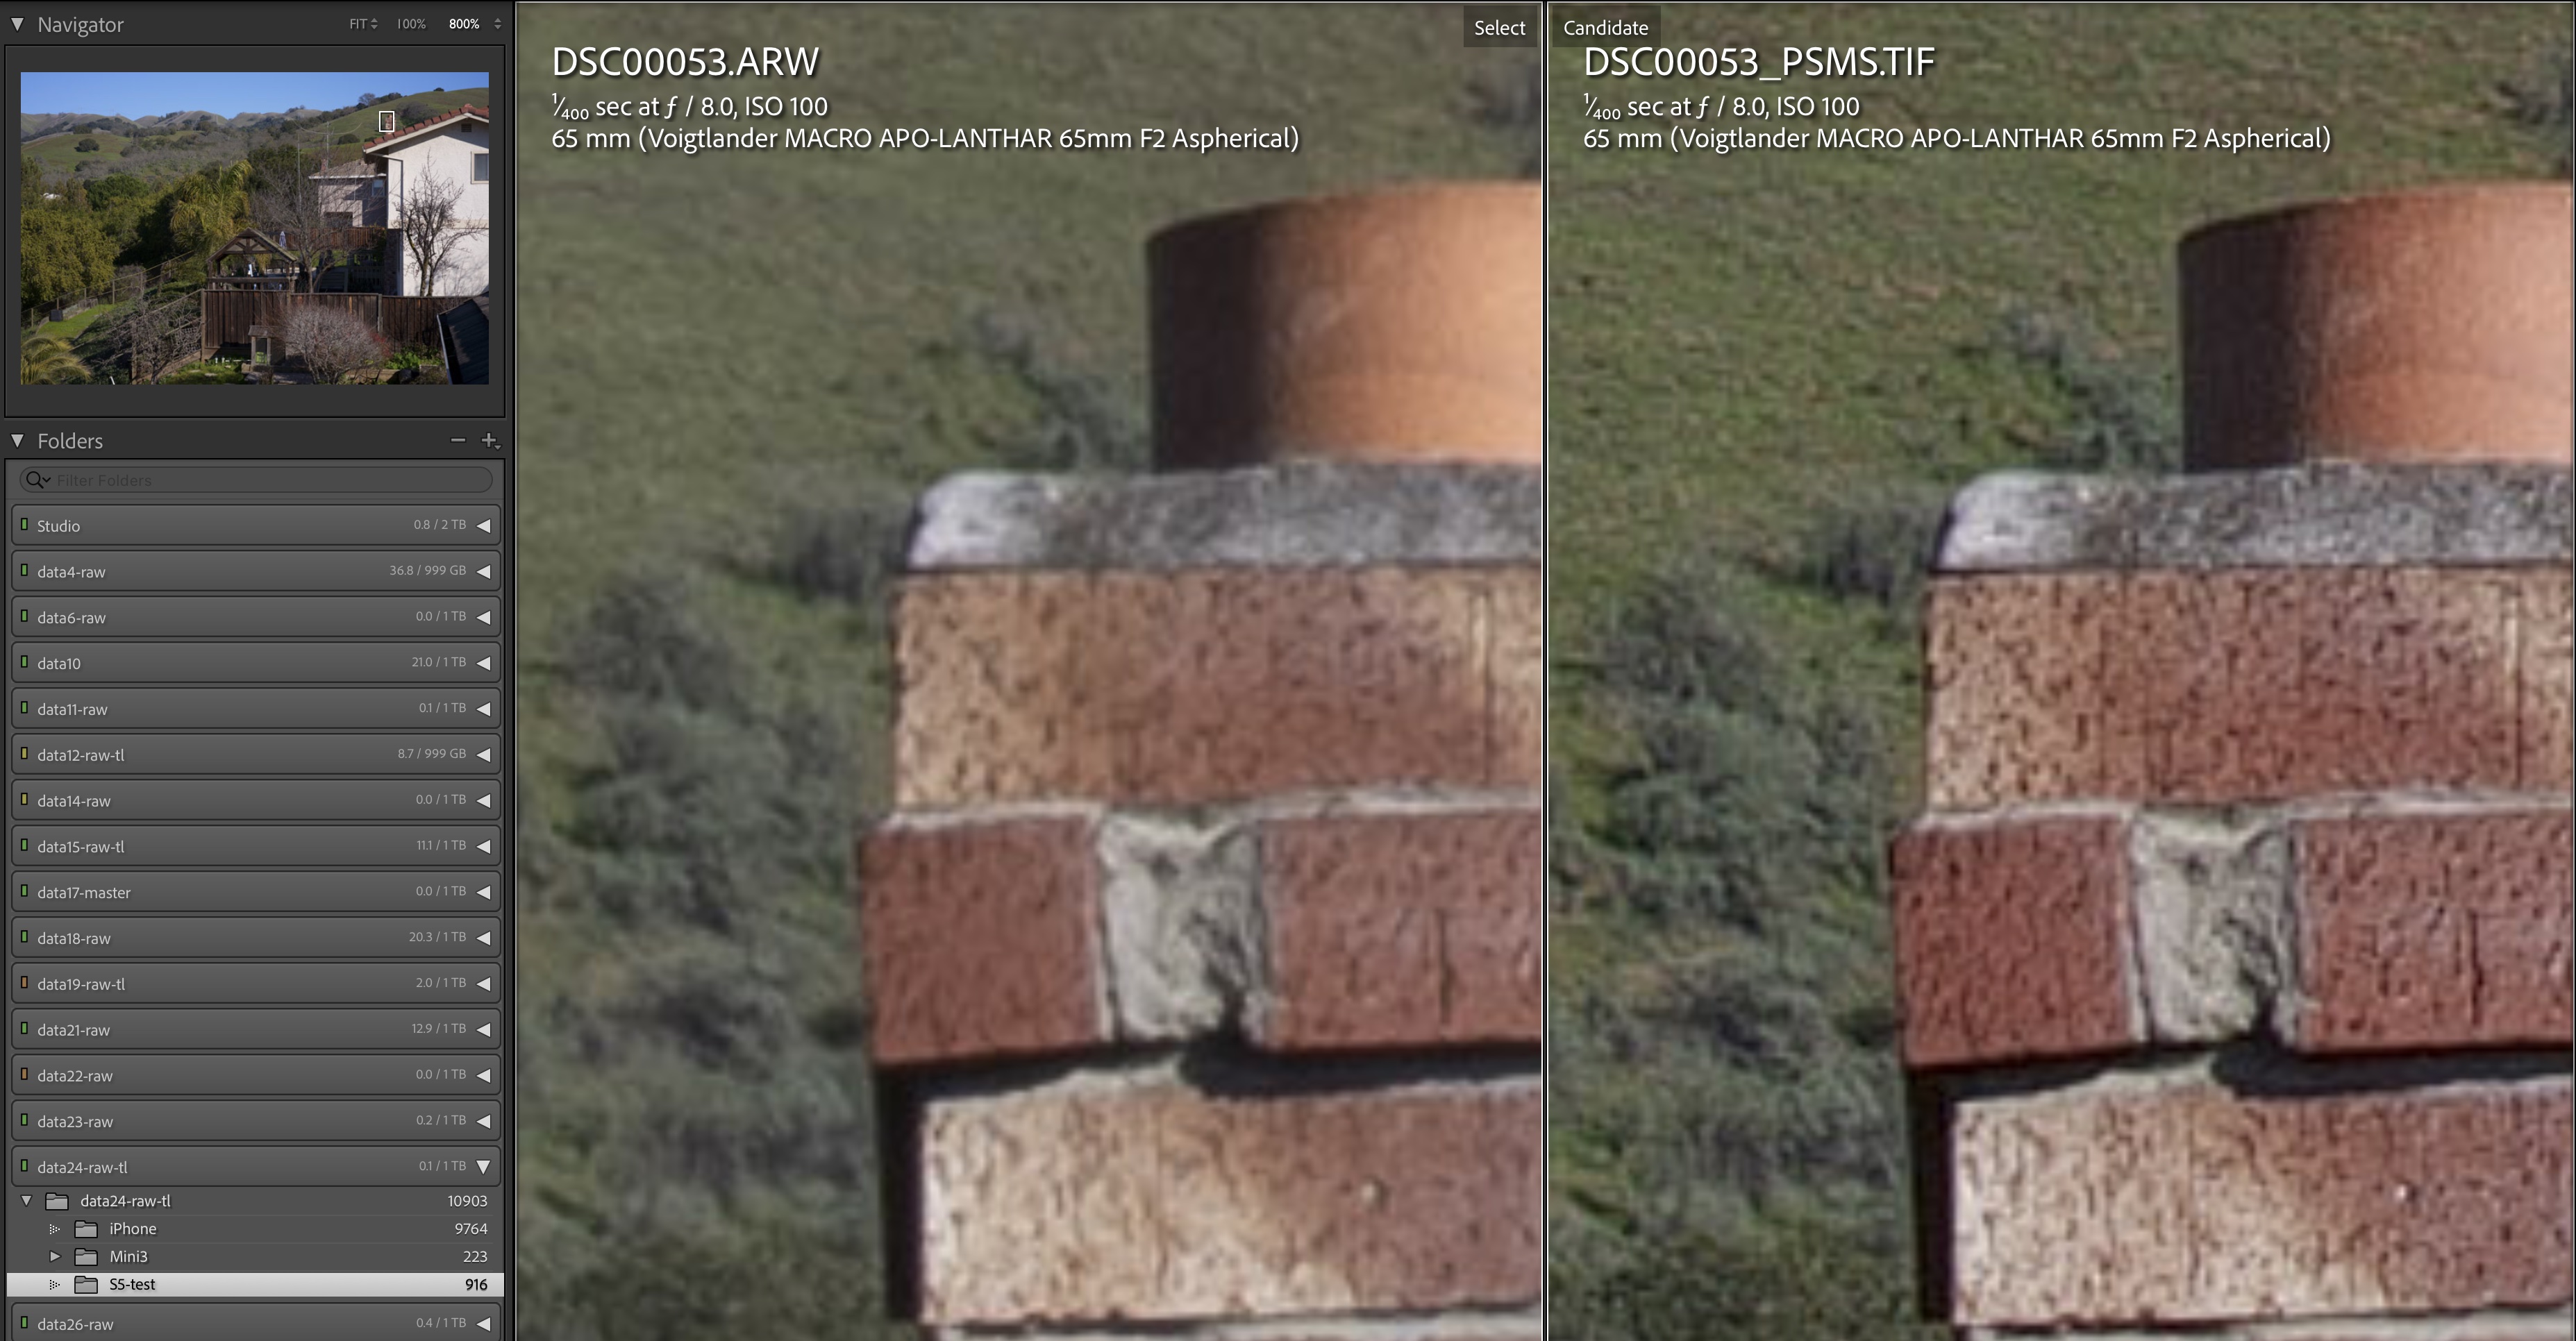
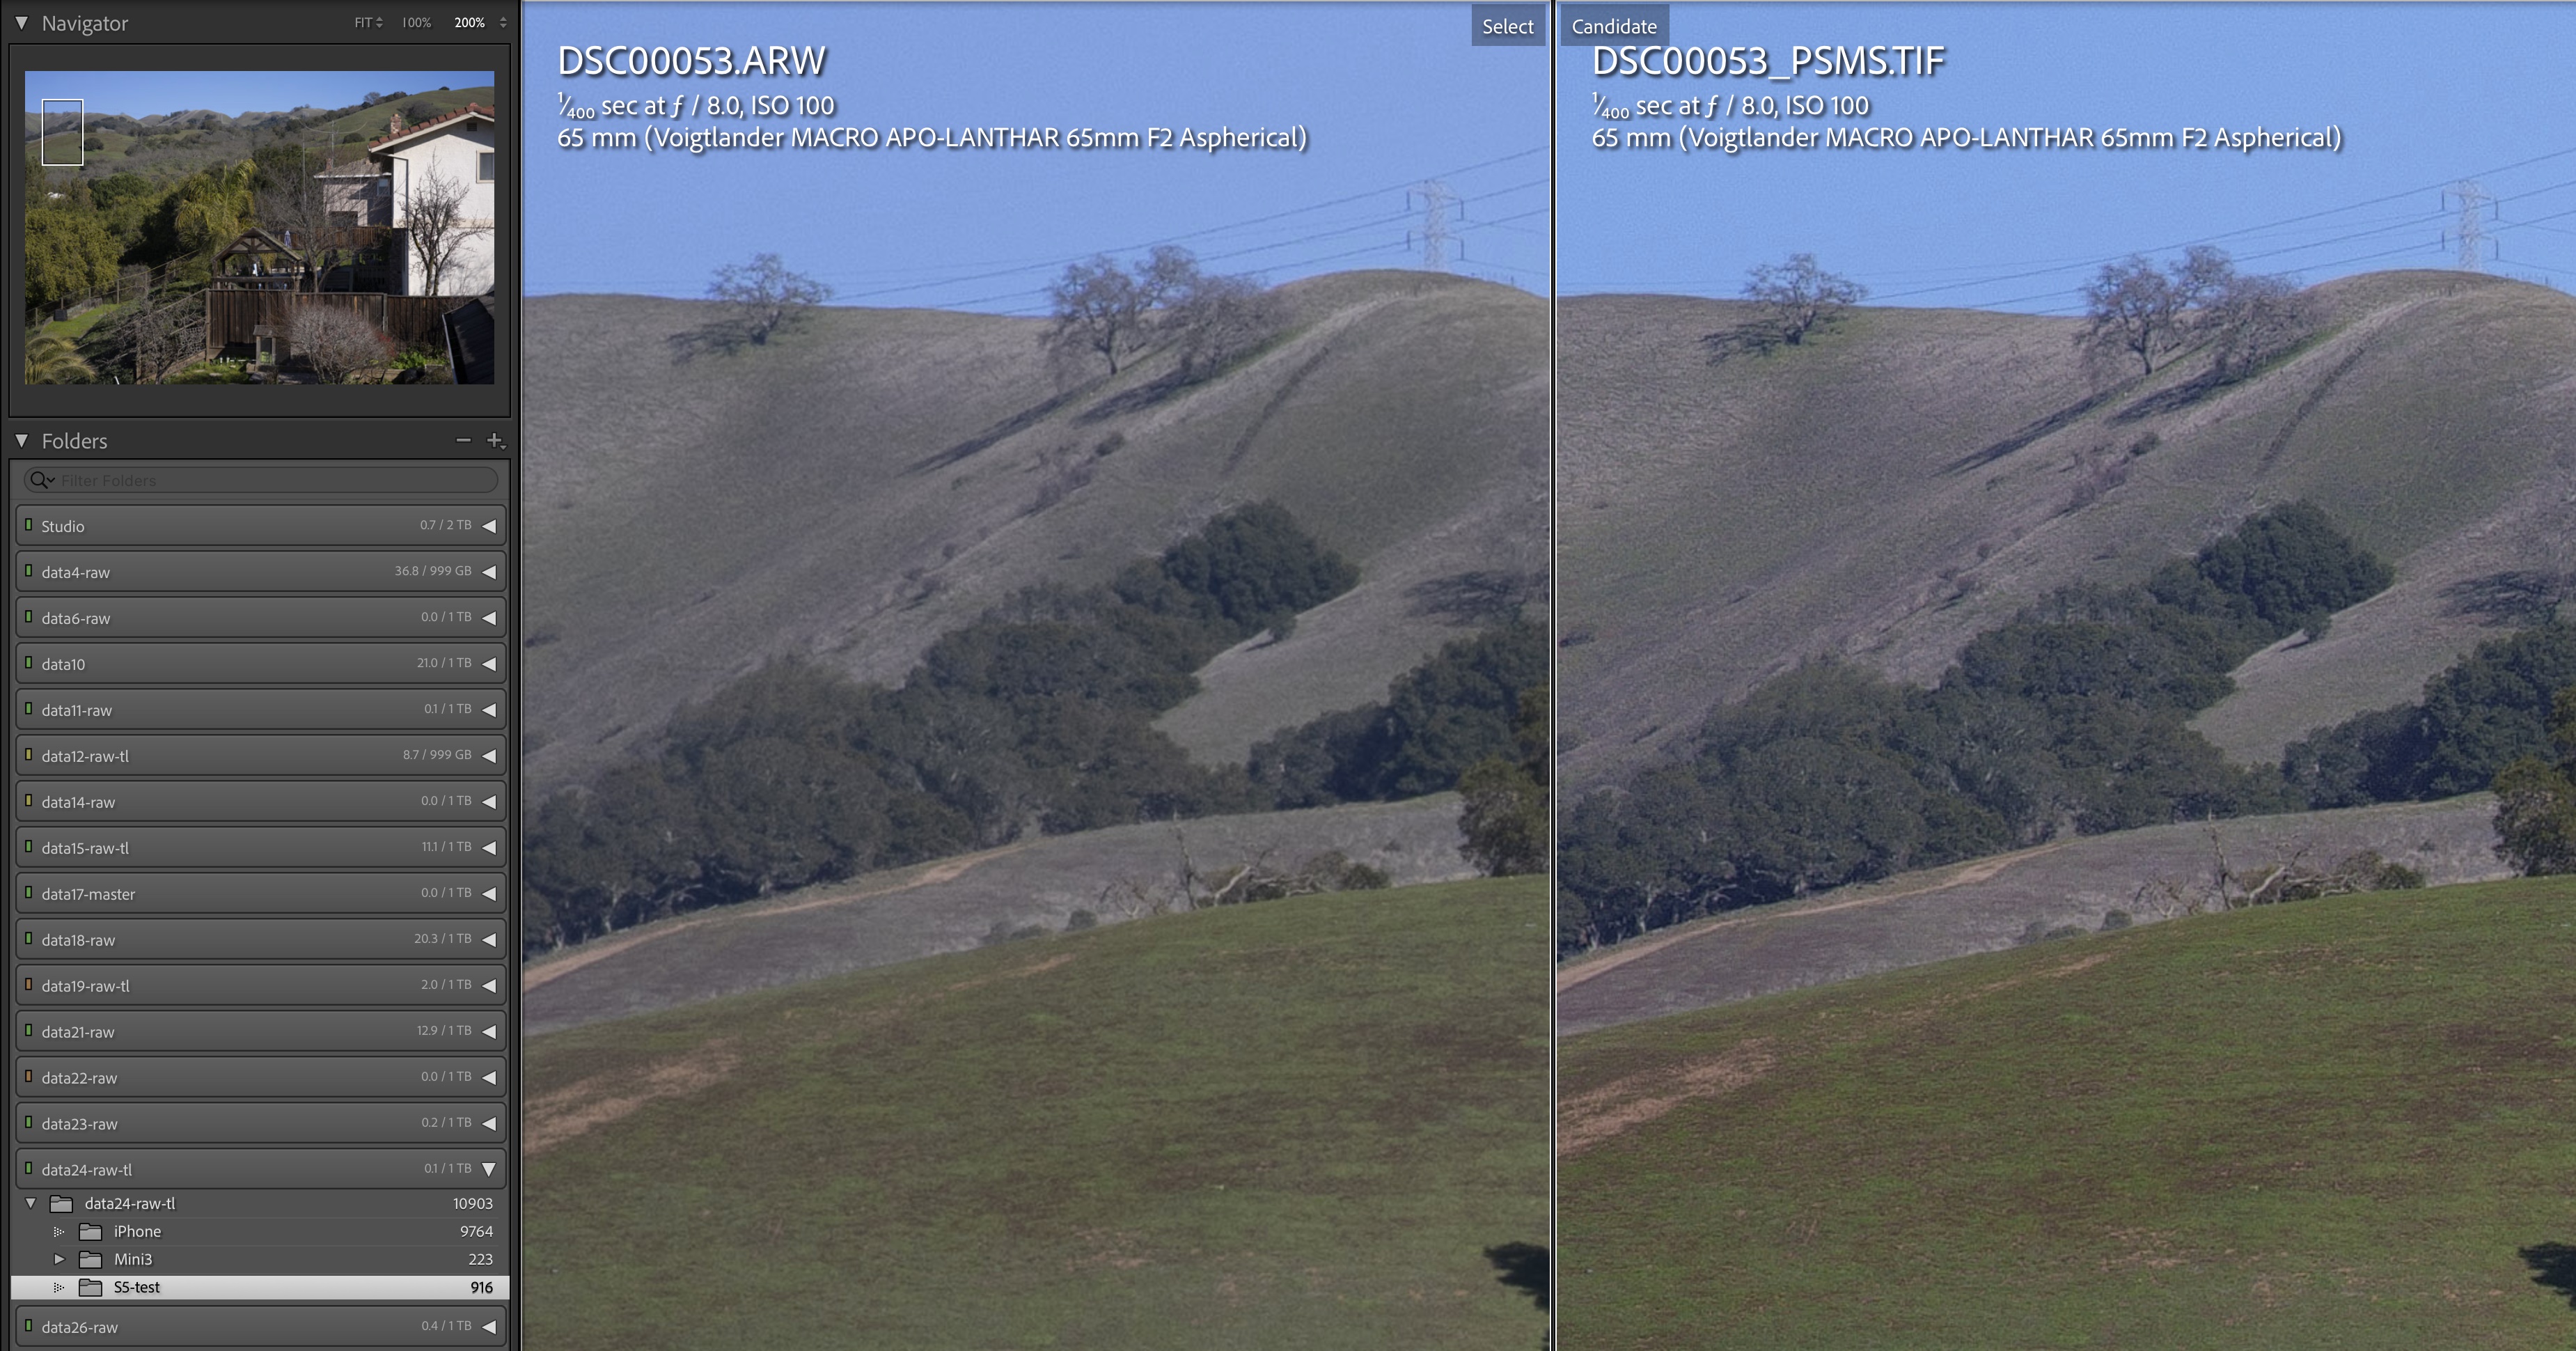
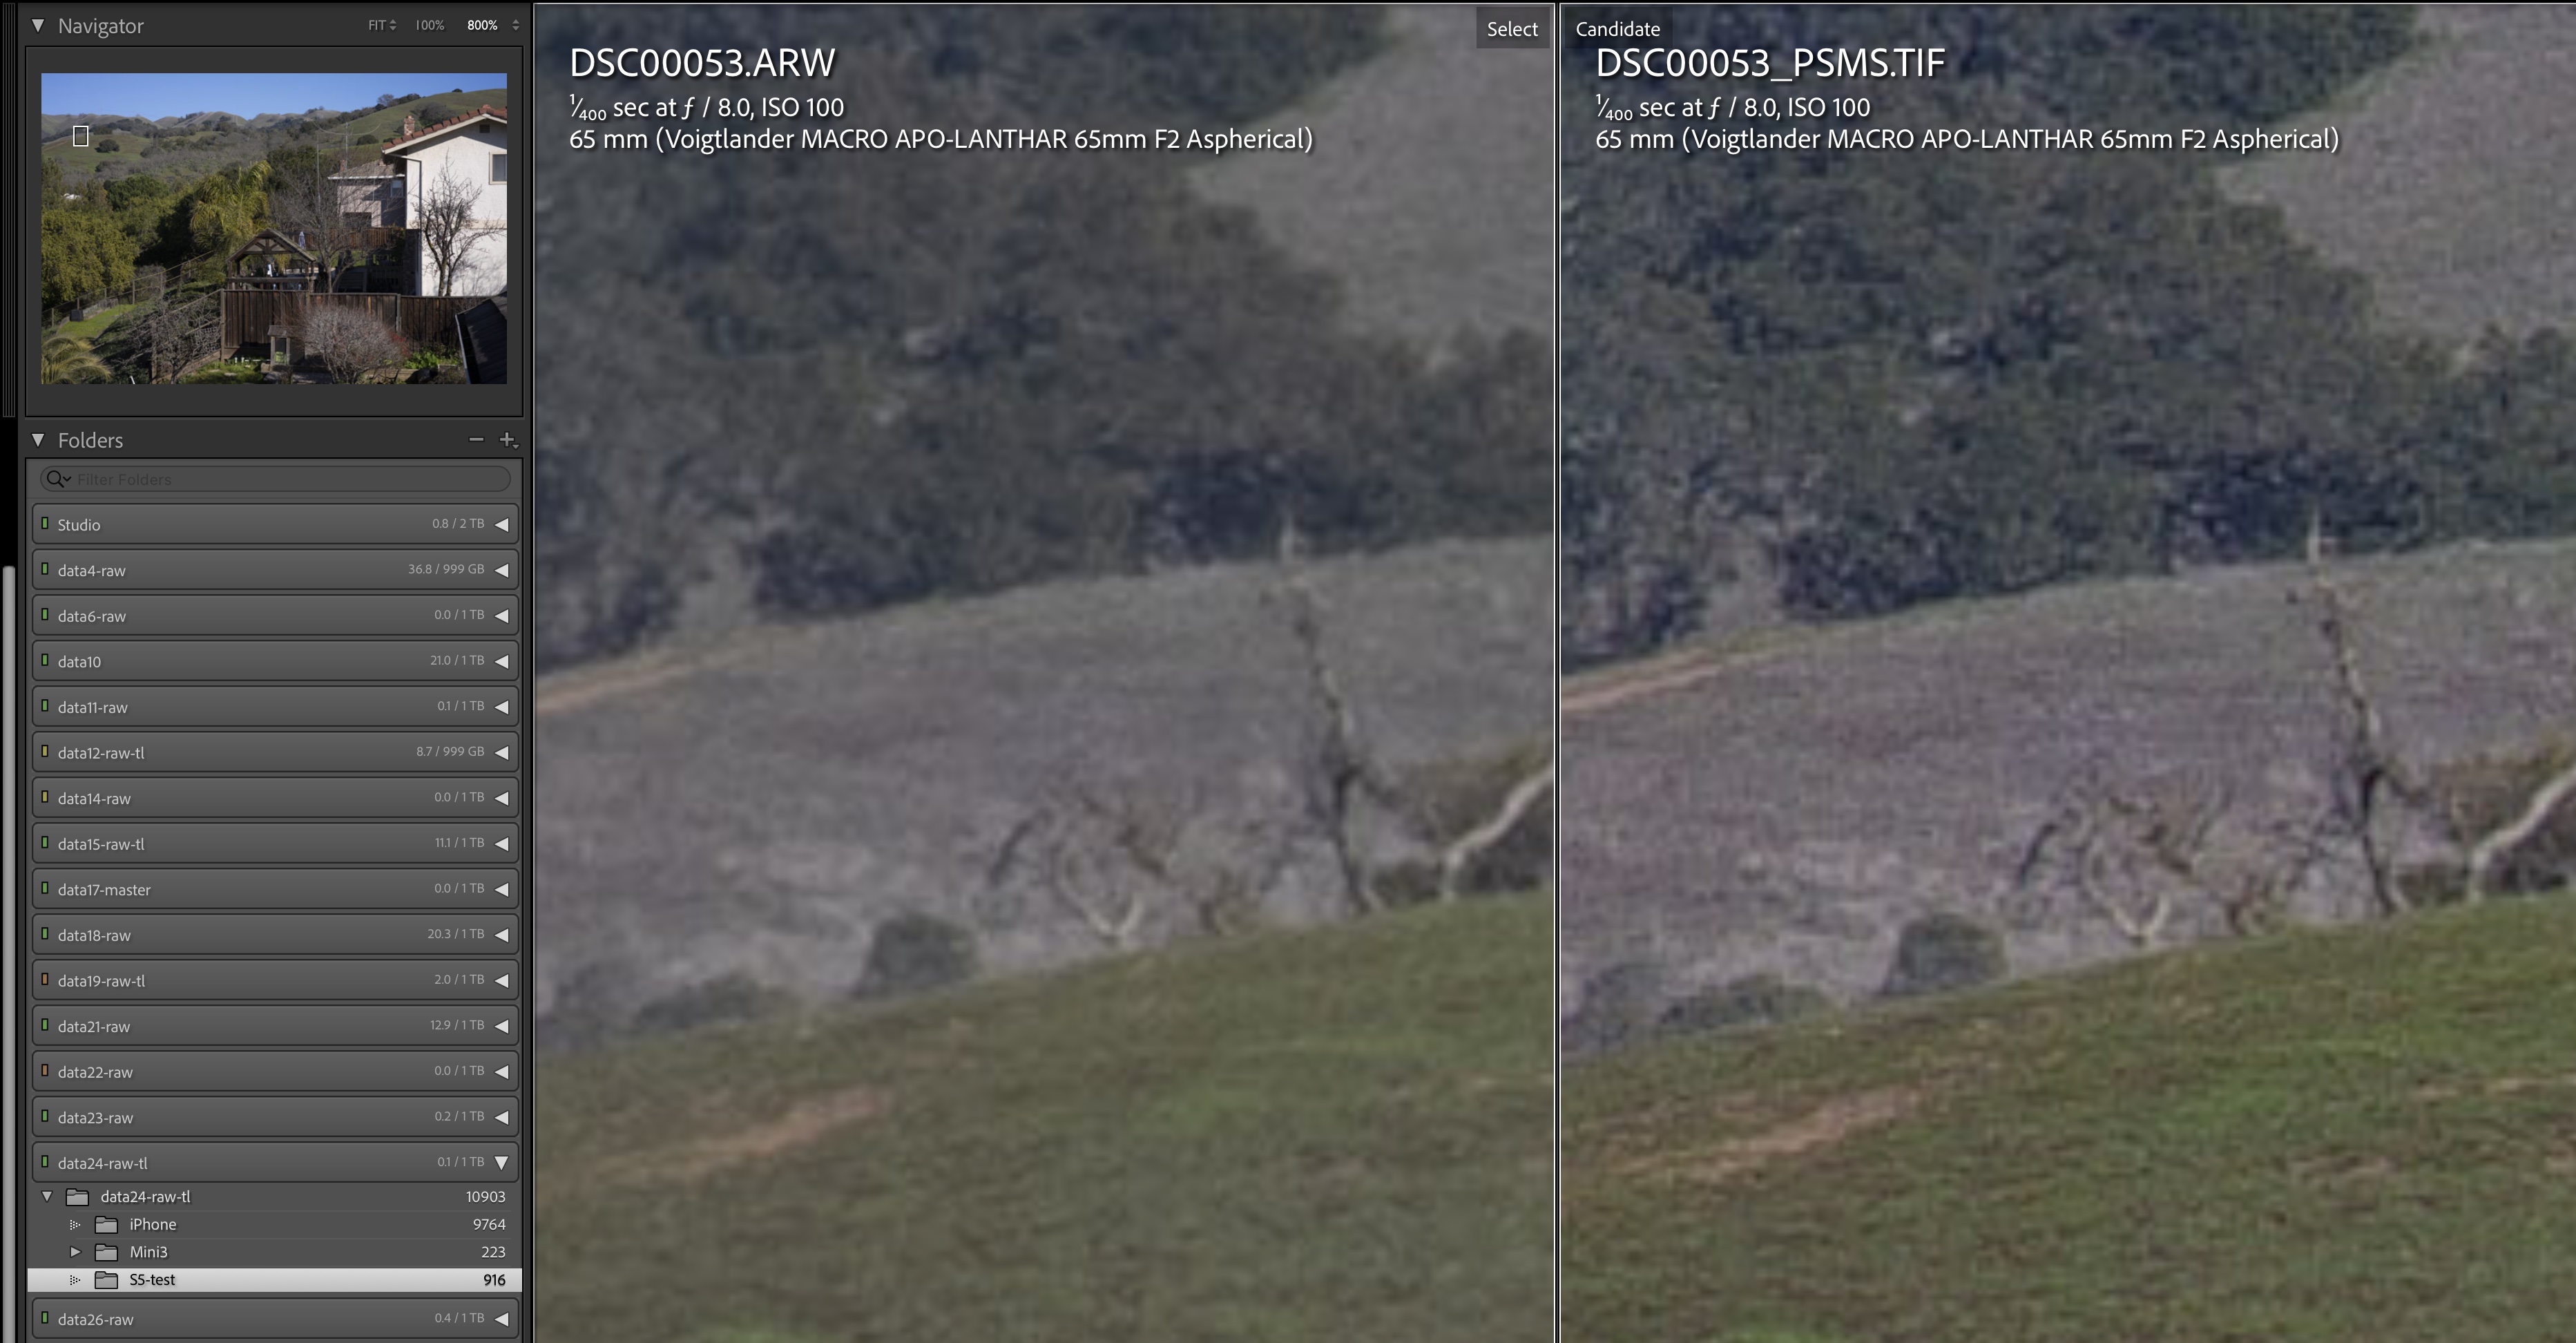
Sony A7R5, Voigtländer Macro Apo-Lanthar 65mm, left: single frame, right: pixel shift composite of four images (click to enlarge)
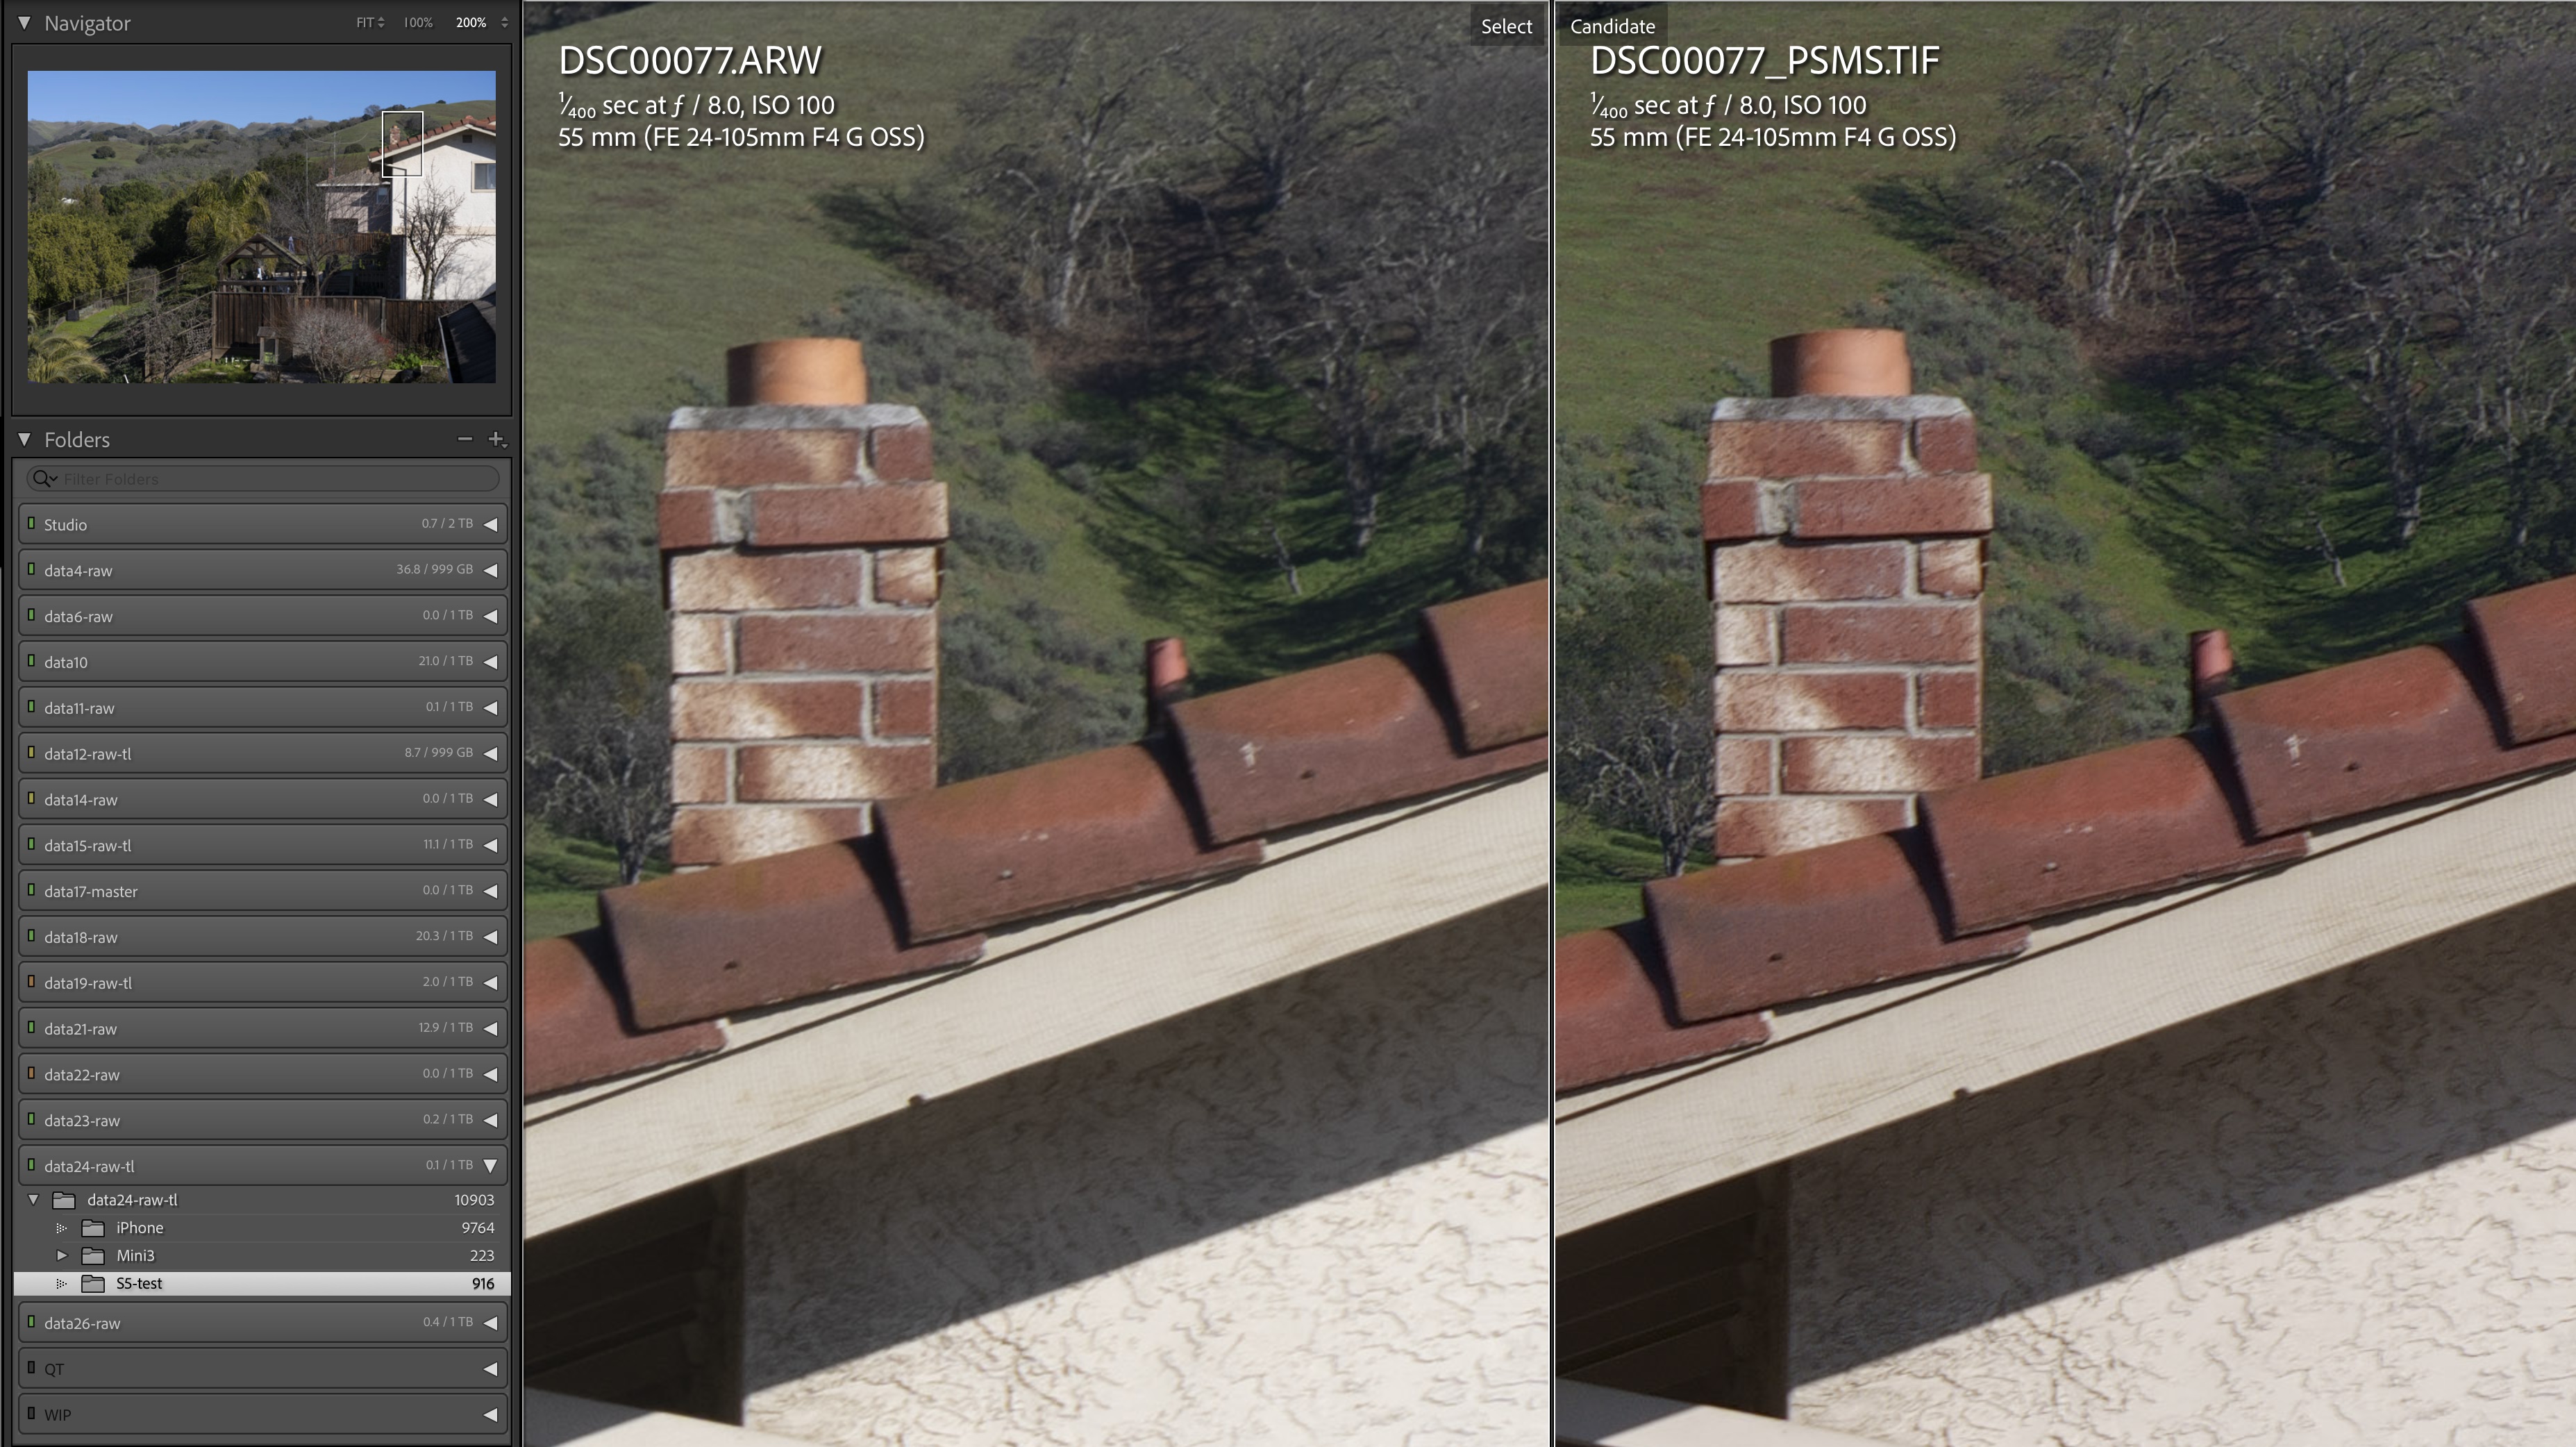
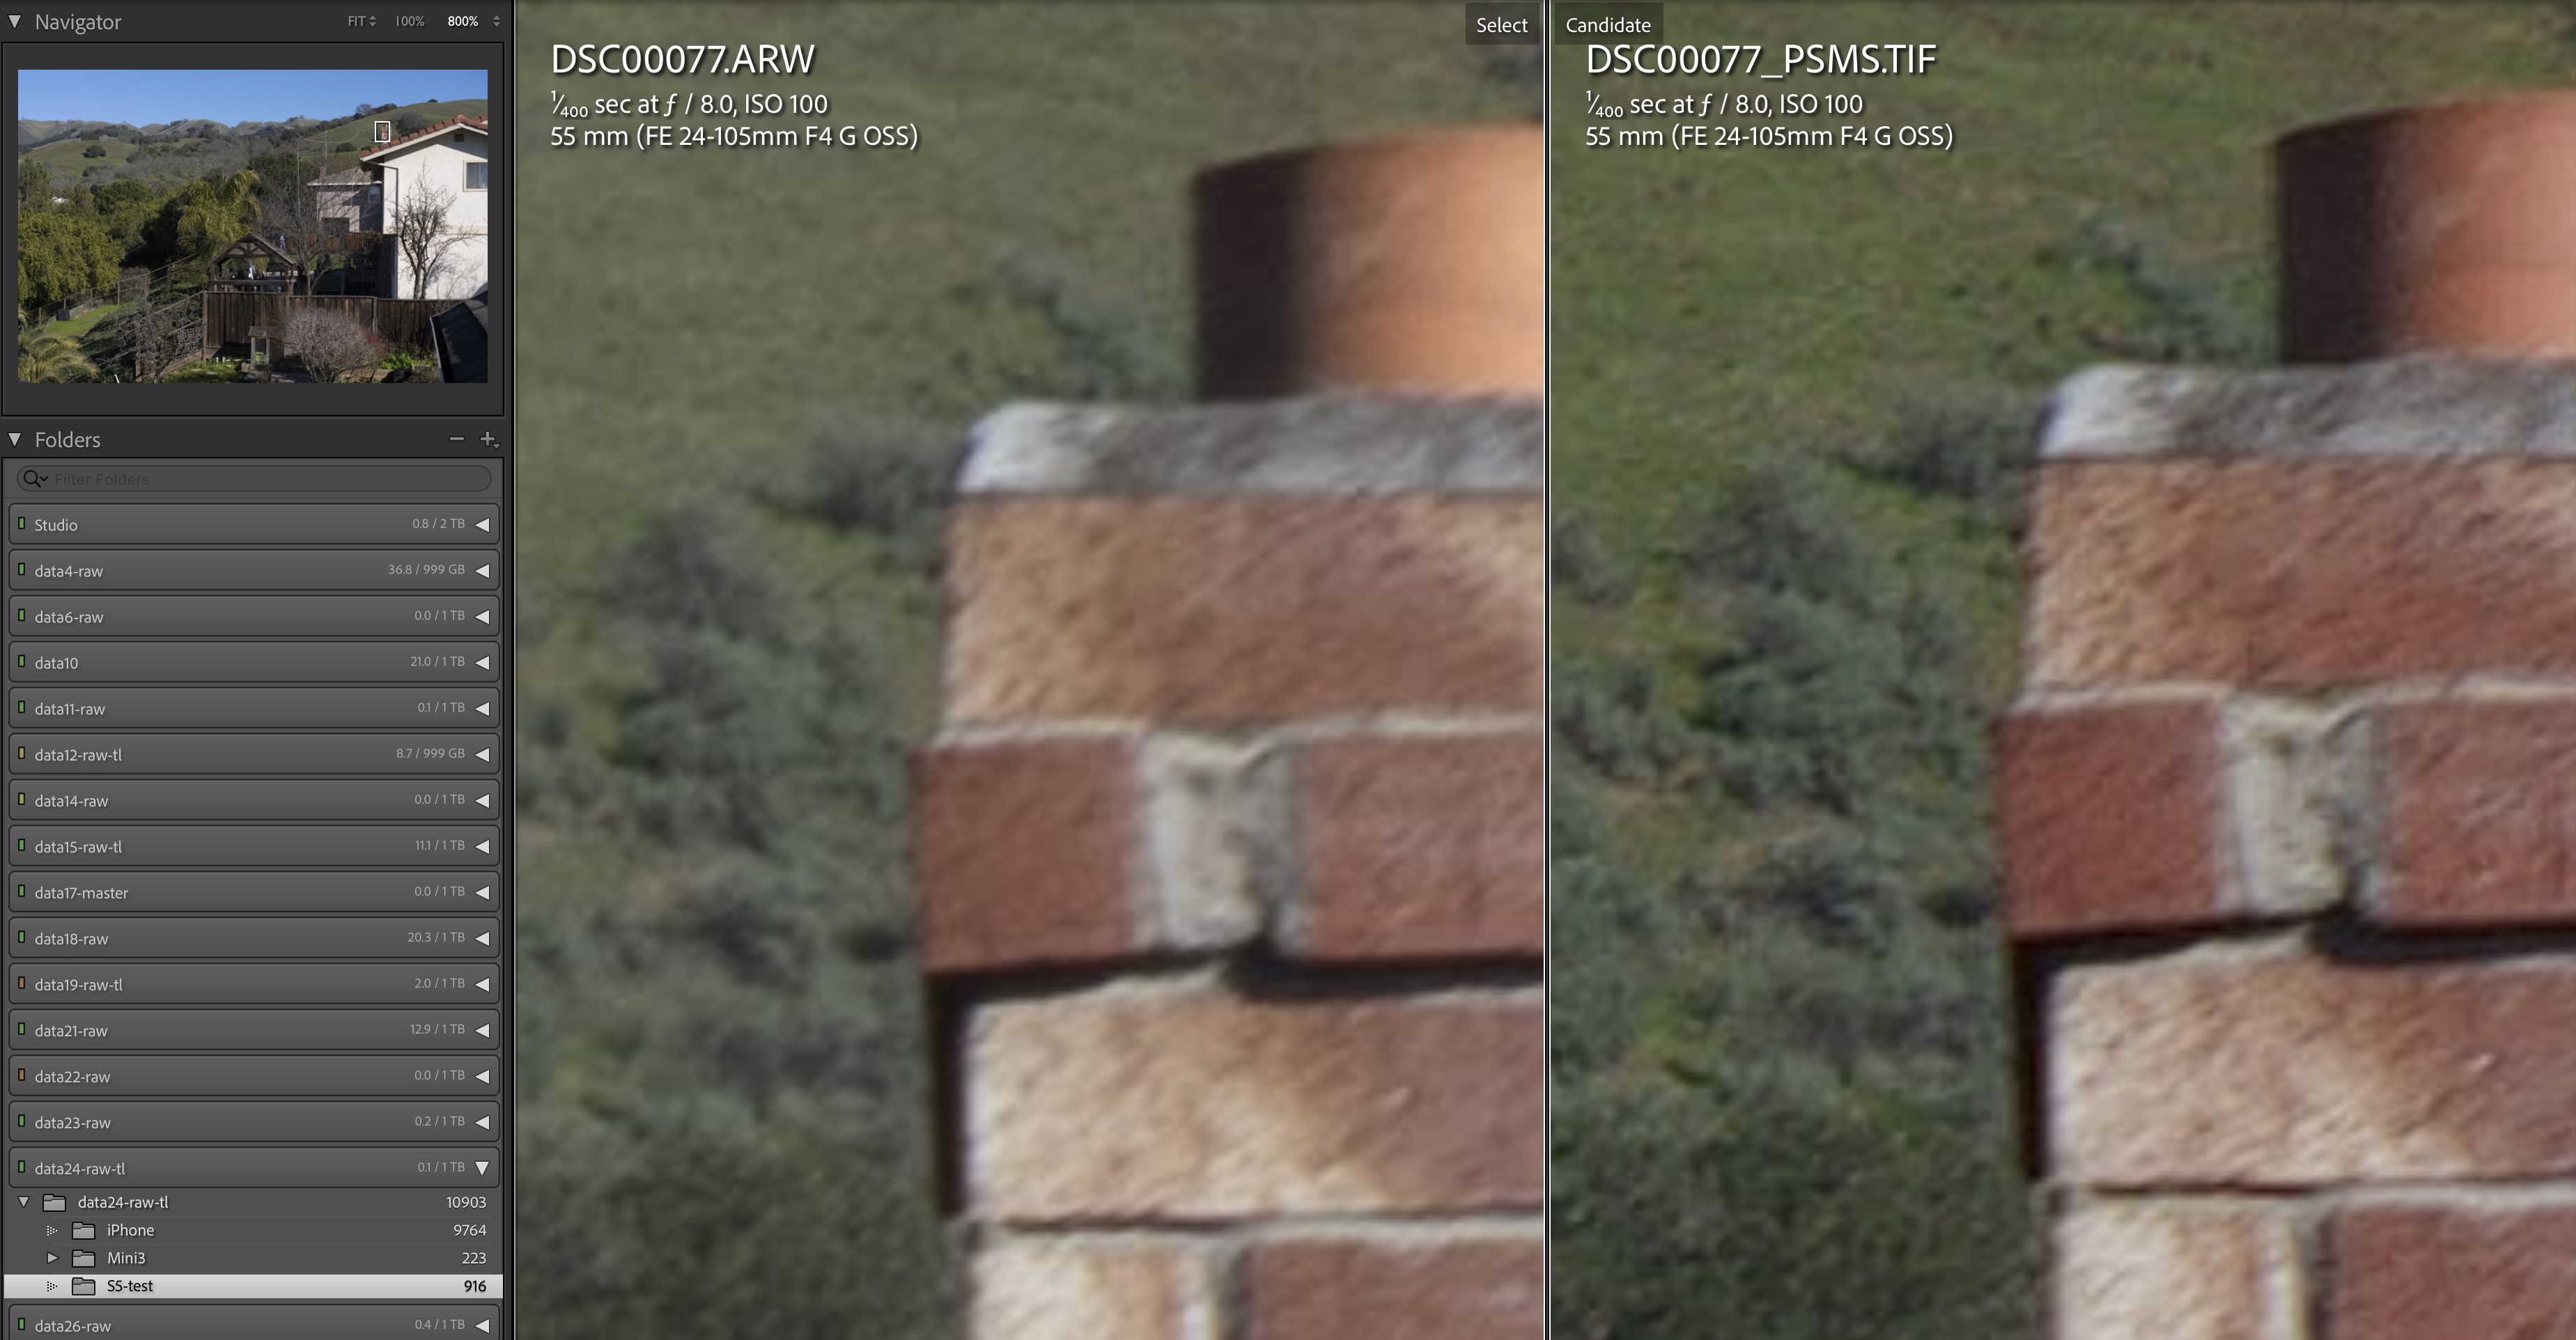
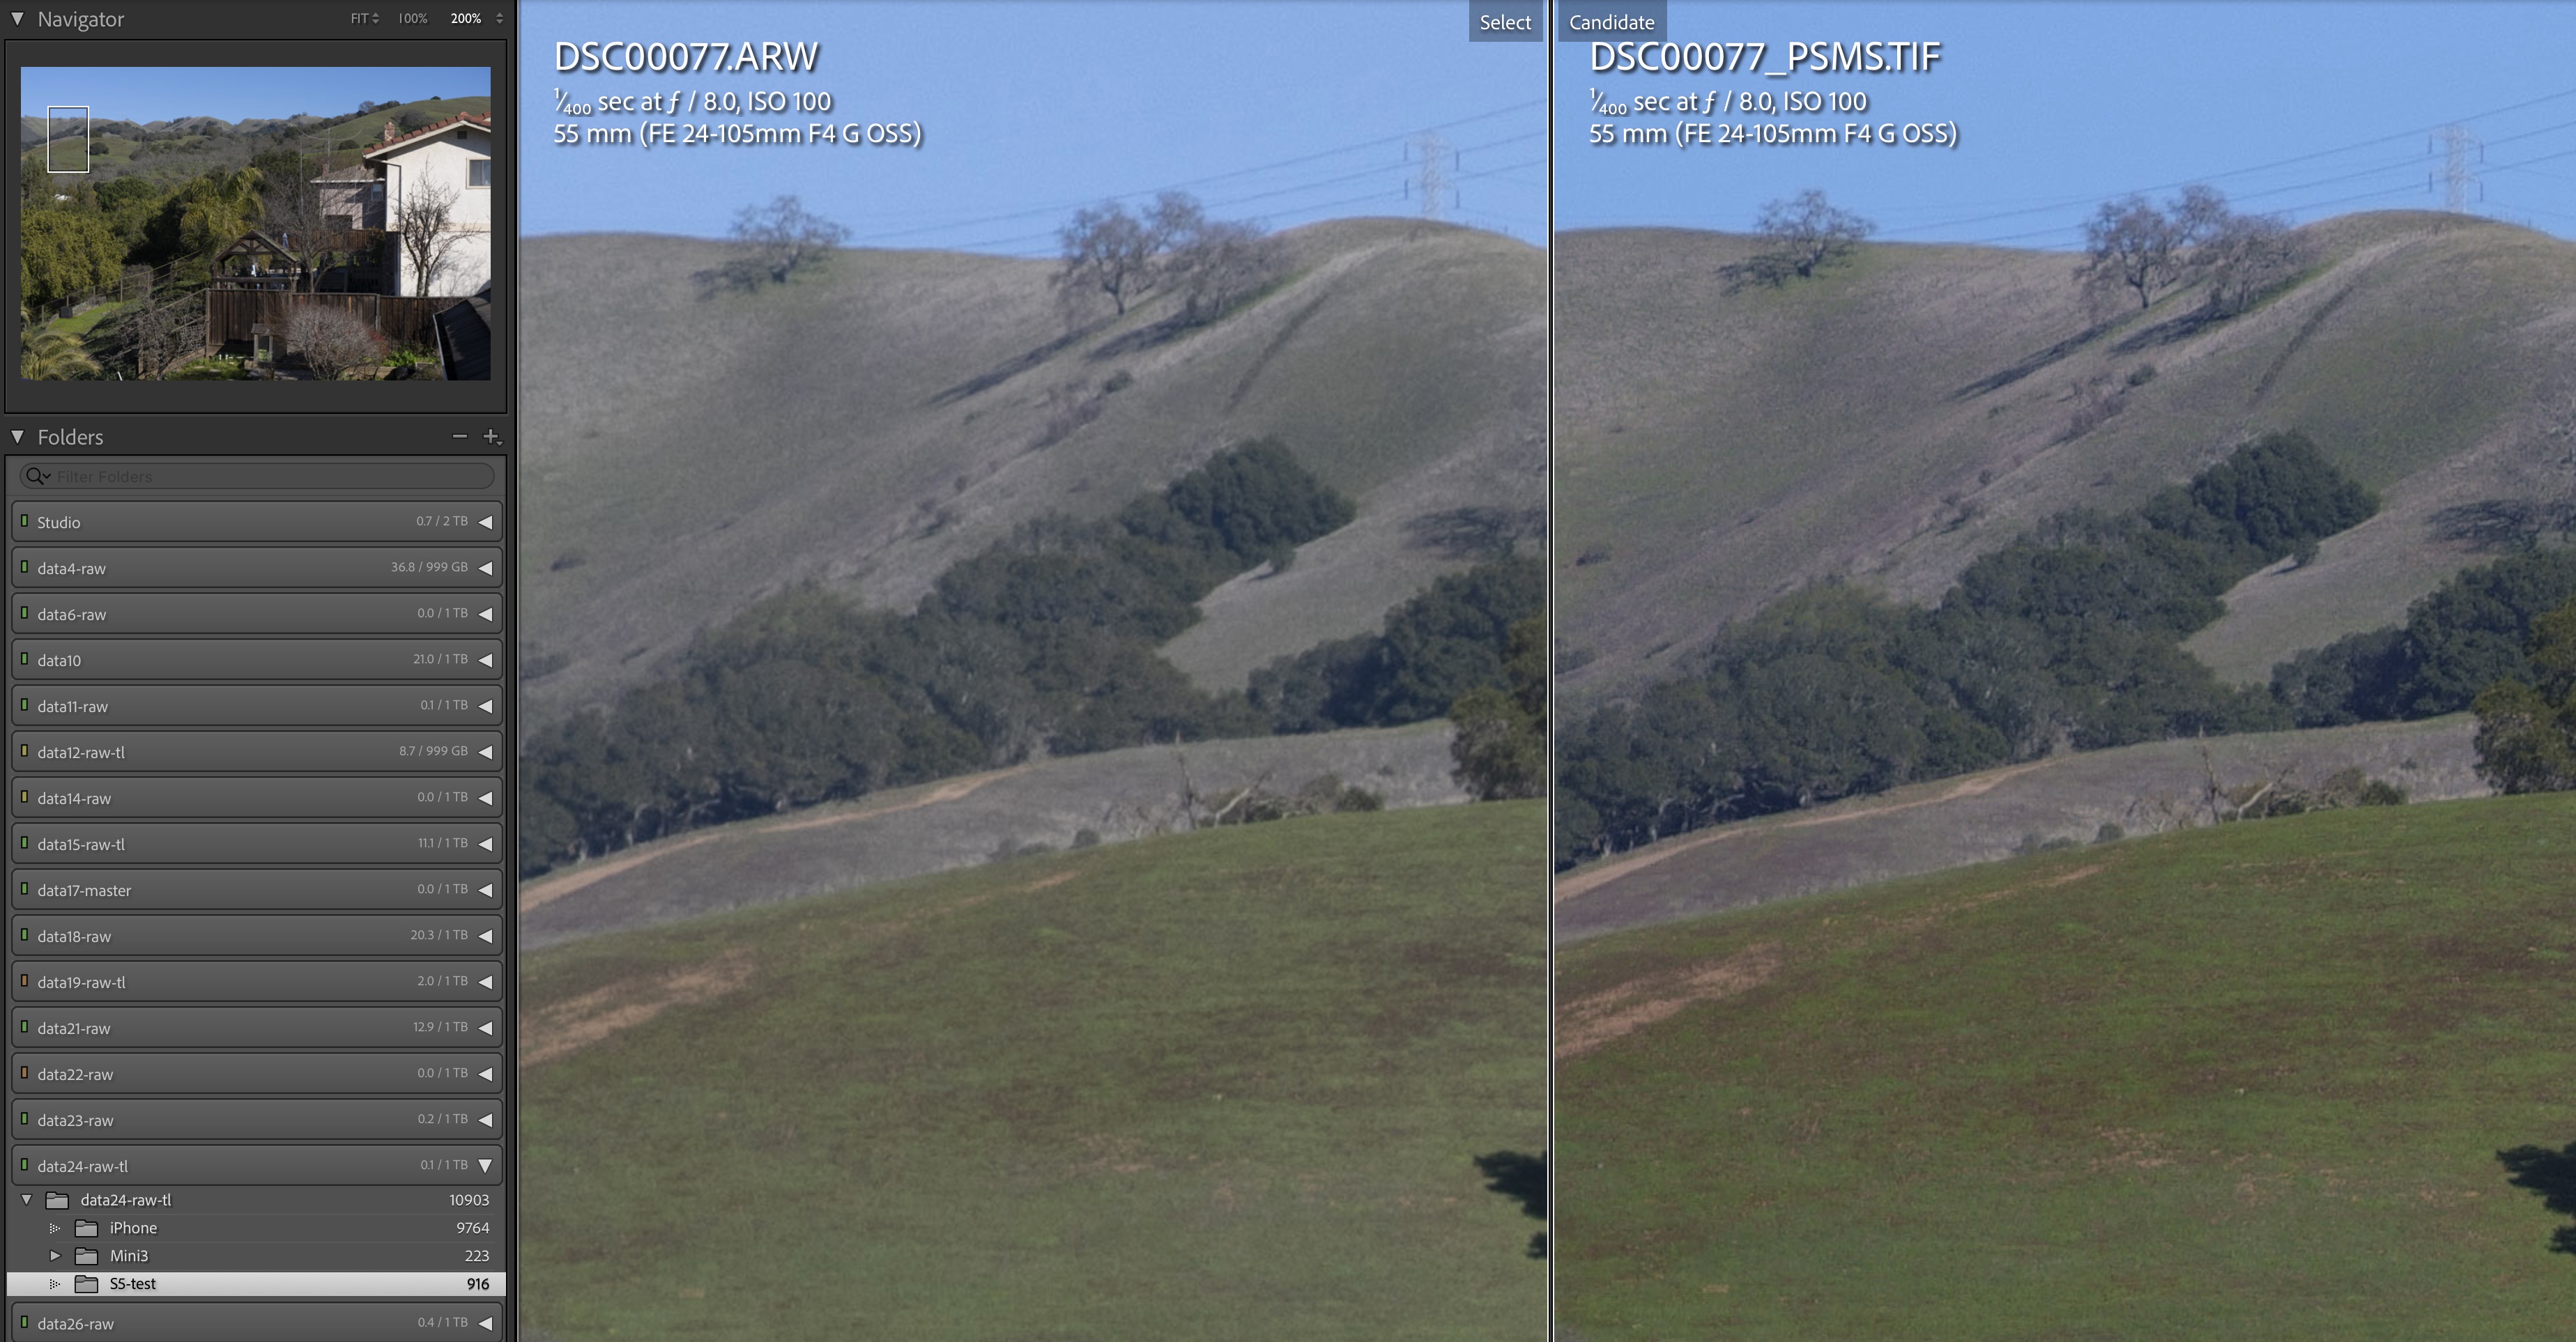
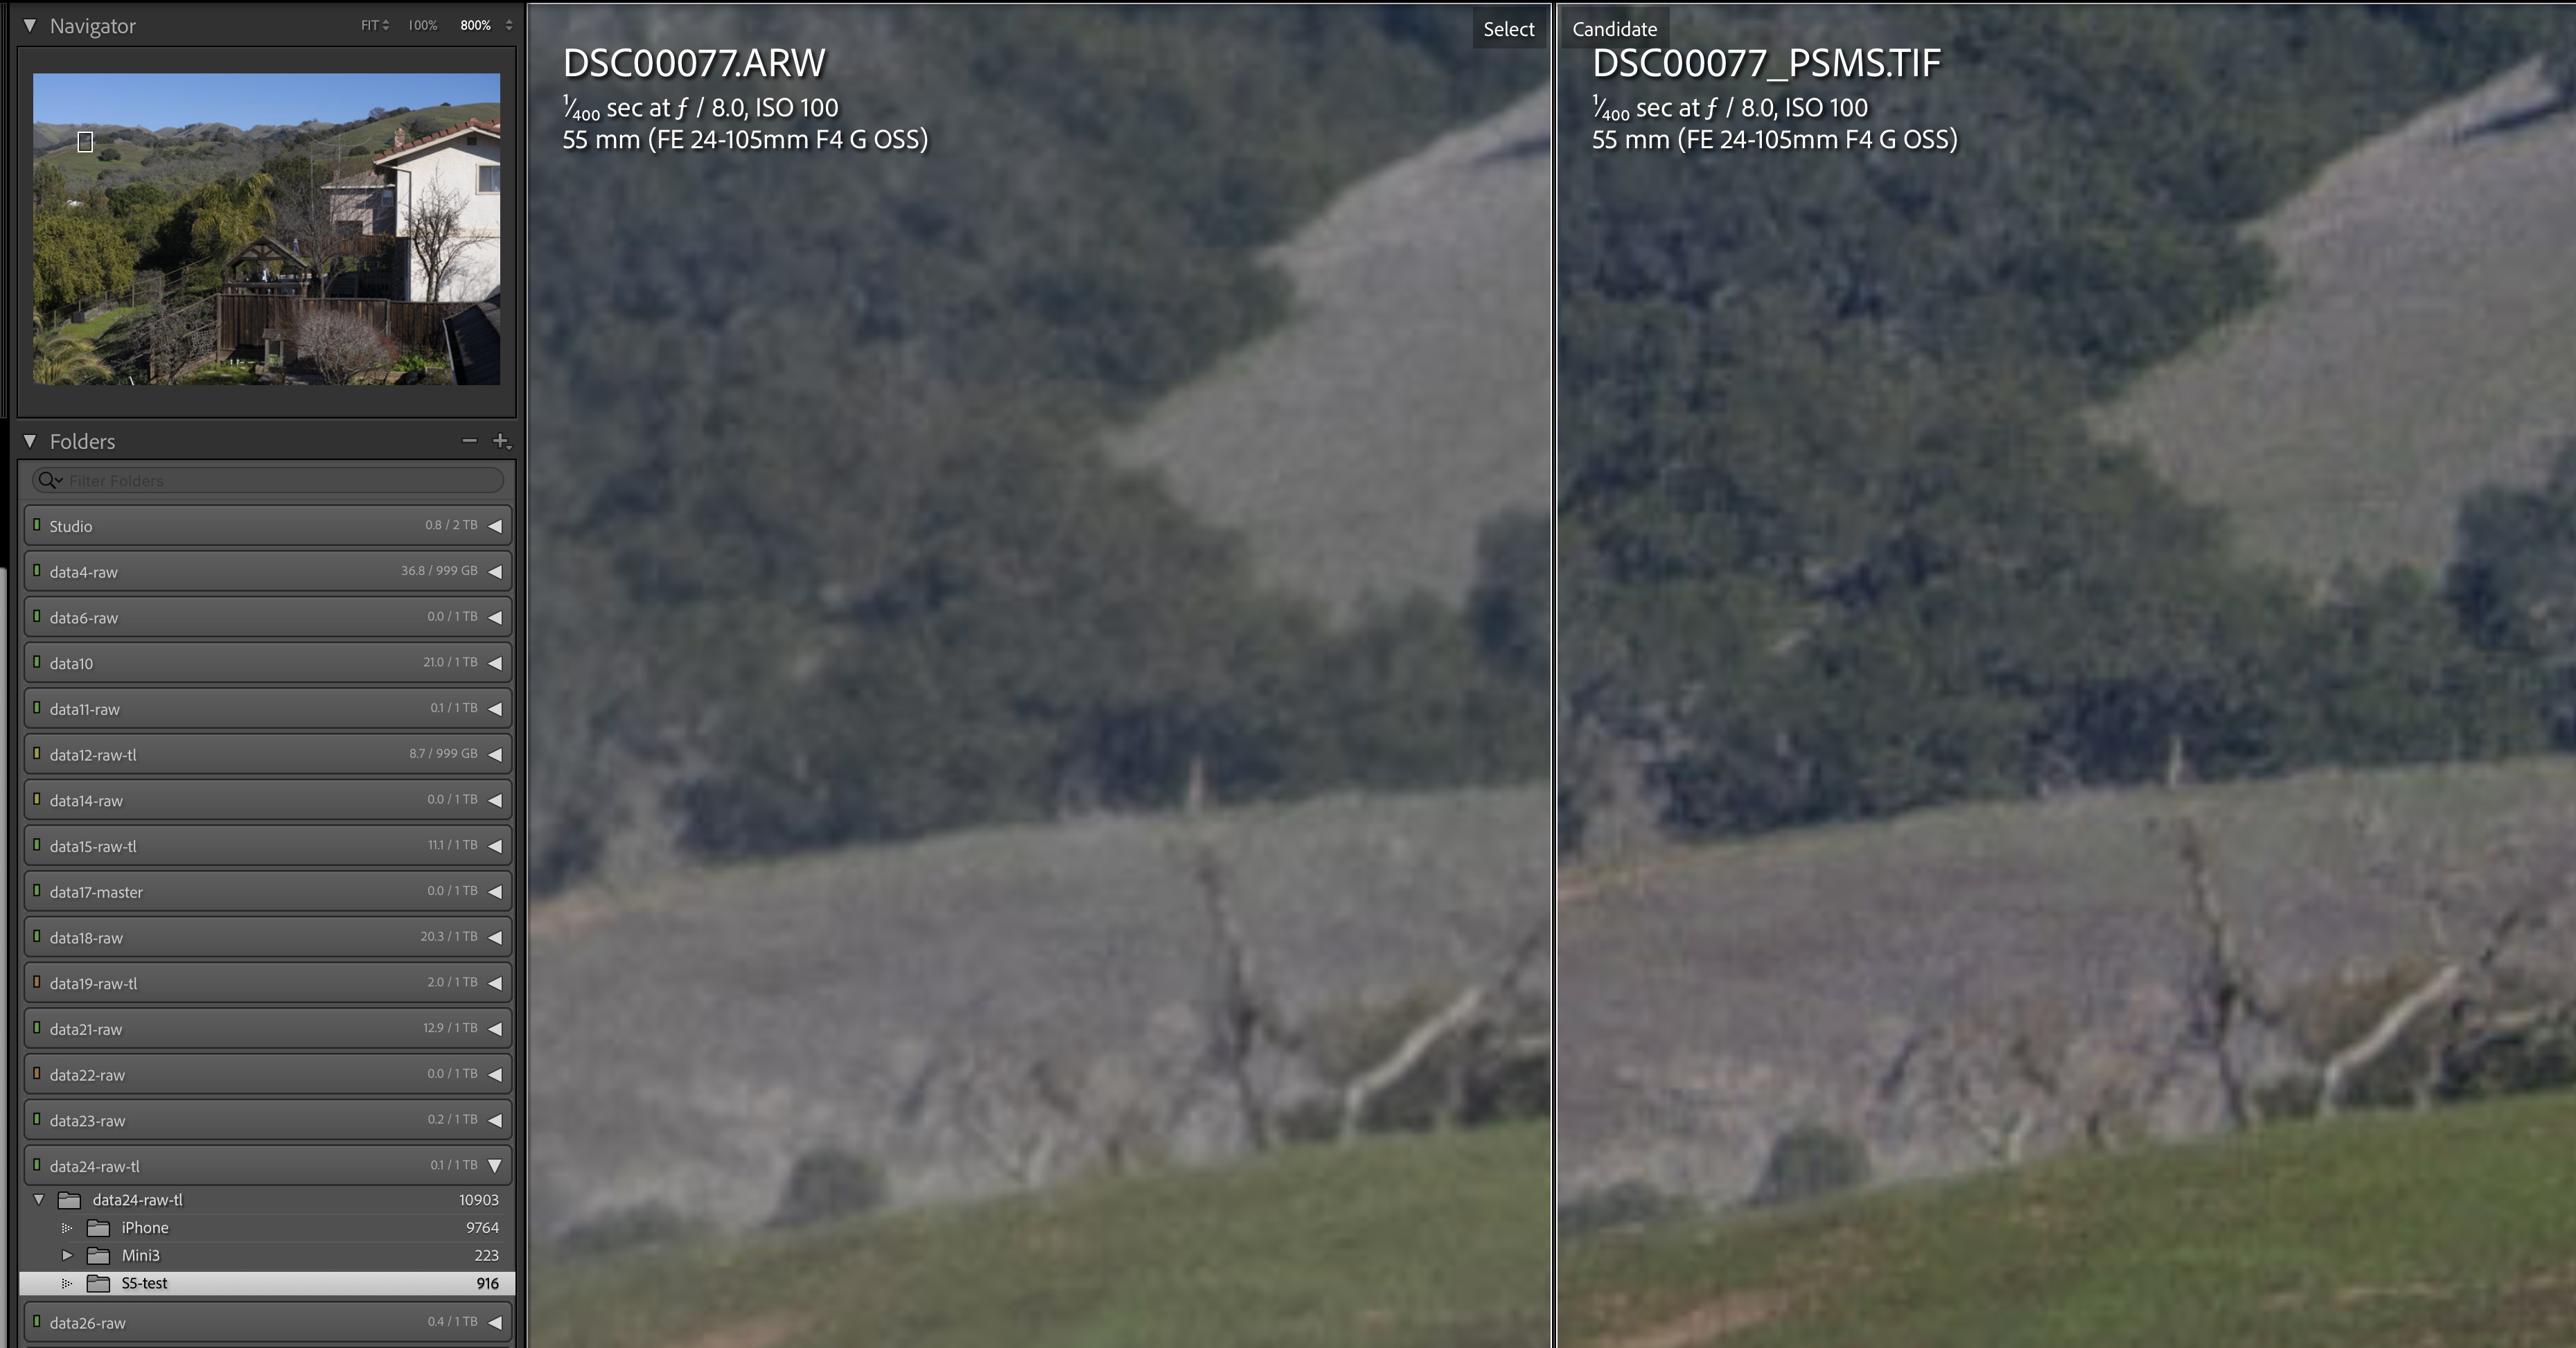
Sony A7R5, 24-105mm, left: single frame, right: pixel shift composite of four images (click to enlarge)
Even with the zoom, there are subtle but visible improvements. I also tried another scenario with less than optimal imaging: high ISO. In the indoor scene below captured at ISO 4000, you can see that not only the pixel shift composite has better resolution (see how the label “Harmonia Mundi” of the Monteverdi CD becomes legible), the noise is also significantly reduced.
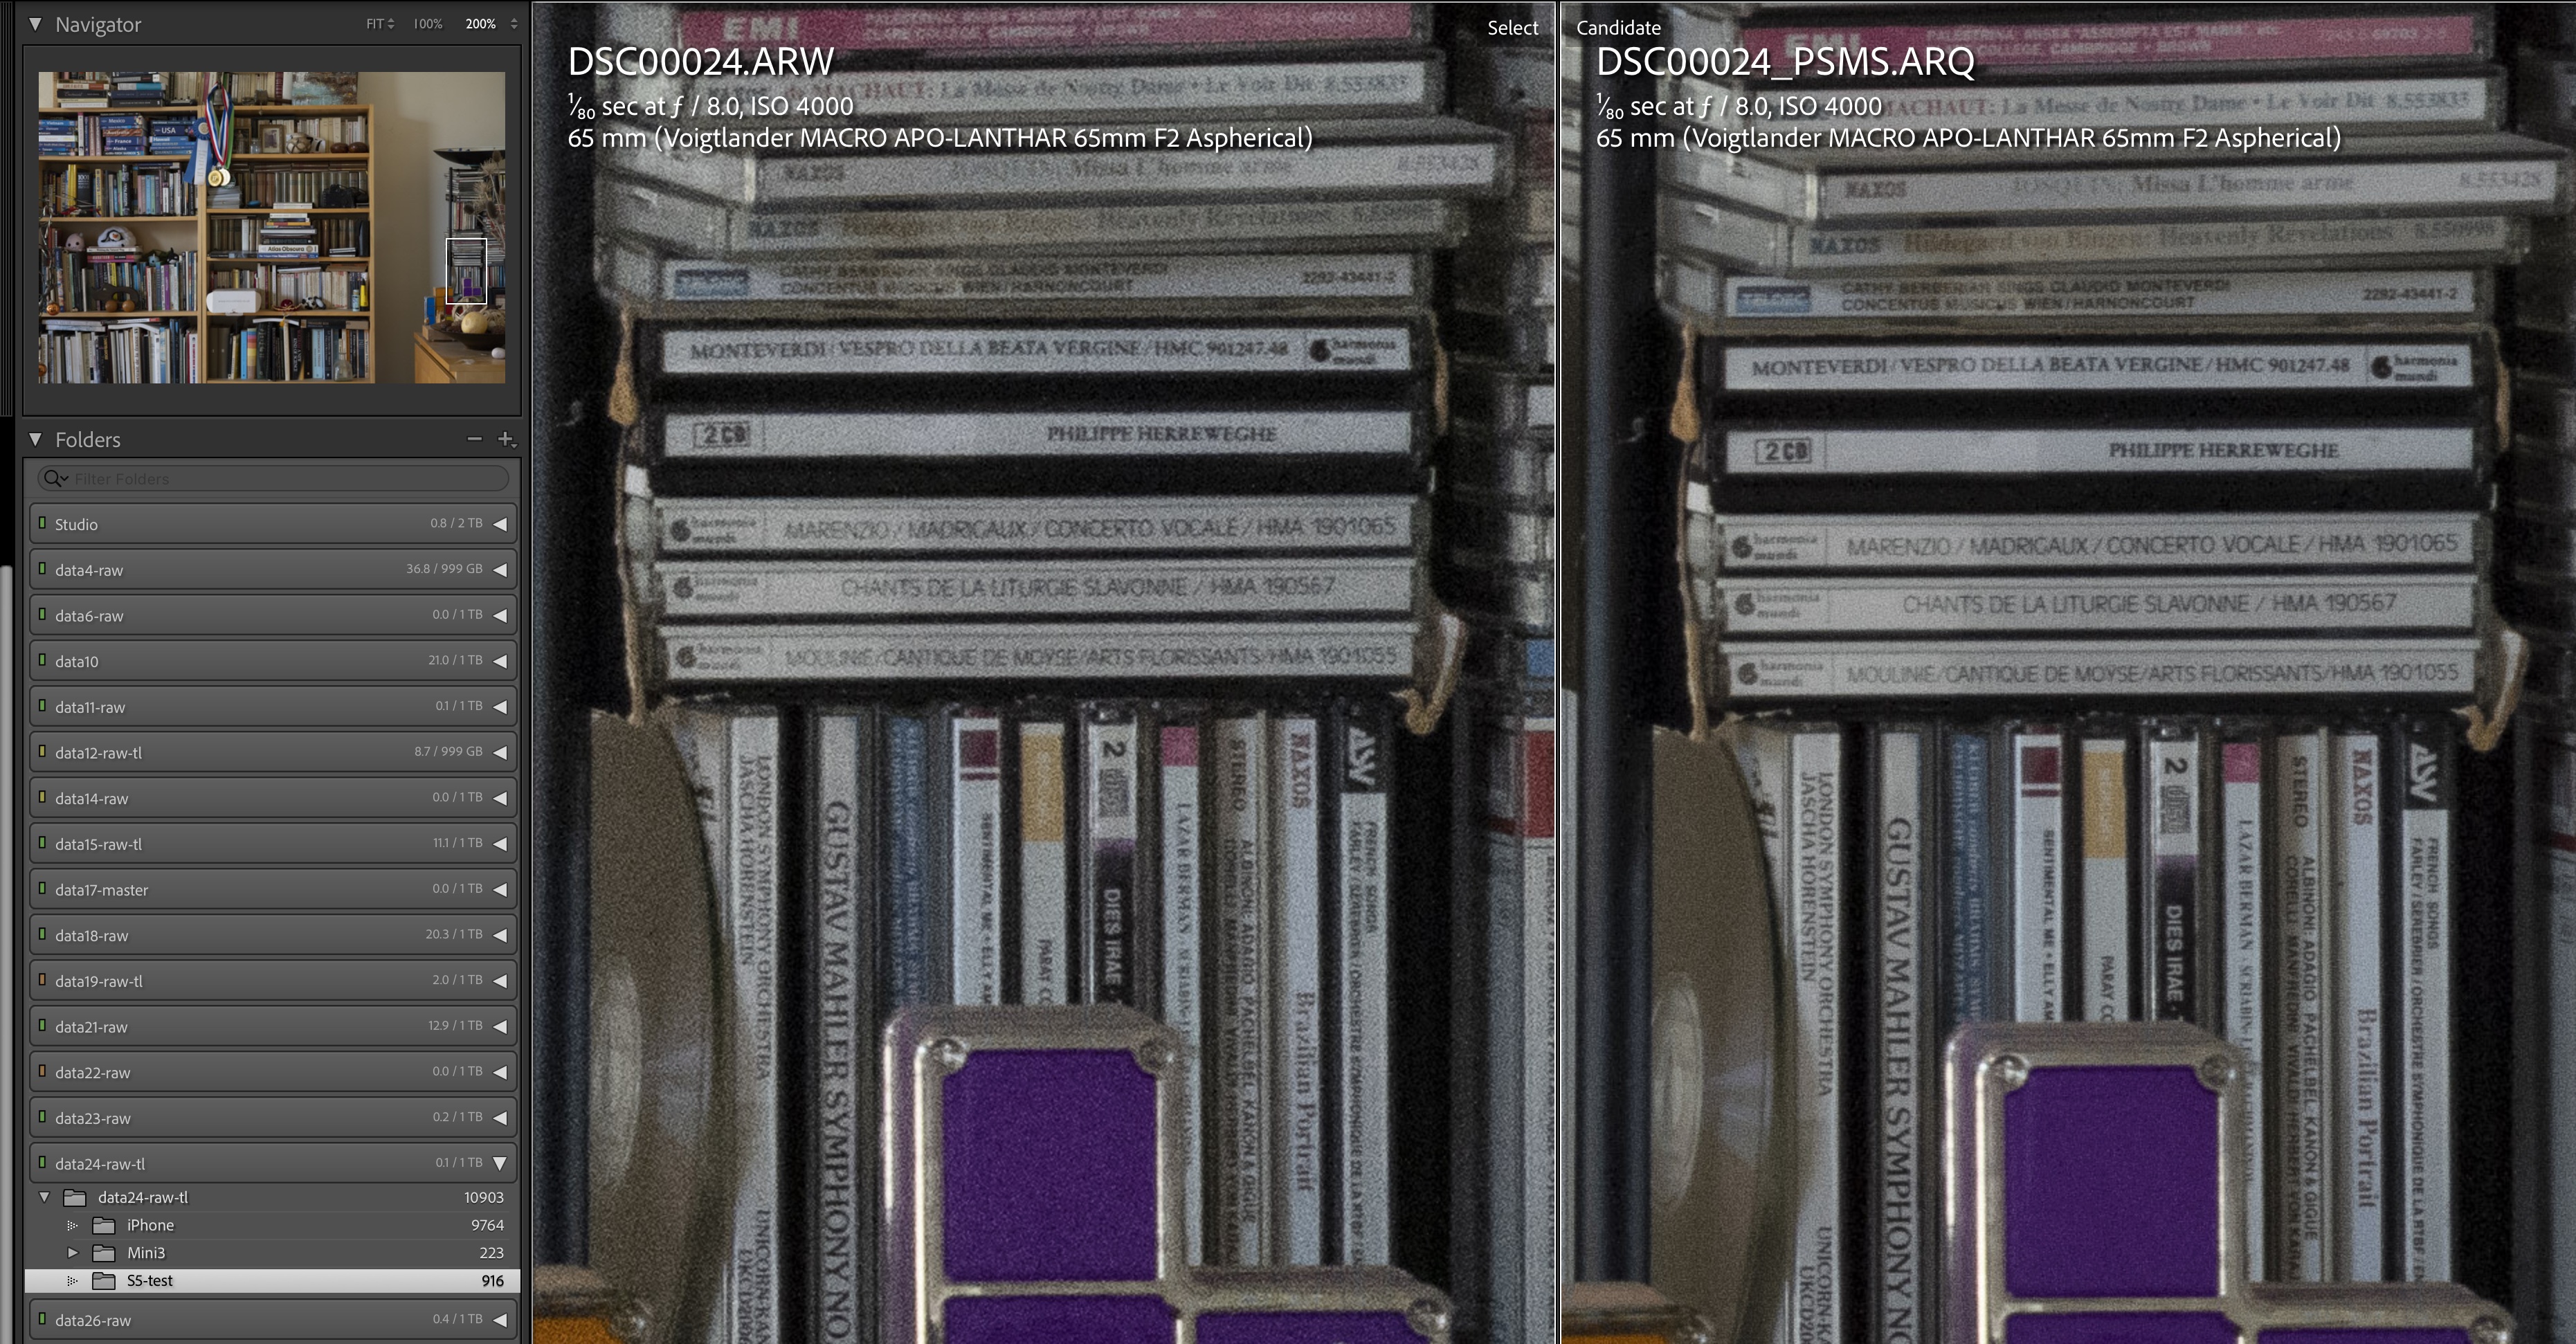
Sony A7R5, Voigtländer Macro Apo-Lanthar 65mm, left: single frame, right: pixel shift composite of four images (click to enlarge)
The gain in resolution obtained by making a panoramic composite seem larger and that approach more straightforward, however with pixel shift, you simply use a different drive mode and press the shutter once. Until you decide to create the pixel shift composite, no additional work is involved over a single-frame image. The drawback is having to use the clunky Sony Imaging Edge software and manage much additional data. Unfortunately, when activating pixel shift mode, the RAWs have to be recorded uncompressed. Why this is the case is puzzling given that pixel shift images are captured at a modest 2 frames per second. Another inconvenience is that pixel-shift RAWs generated by Sony Imaging Edge are stored in a proprietary .ARQ format file (fortunately supported by Adobe Lightroom) that is close to 500MB each, which appears unnecessarily large. Pixel-shift TIFFs are 180MB like single-frame TIFFs but lose the flexibility of RAW files. I’d use the ARQs at an intermediate stage for applying corrections that benefit from the RAW controls such as white balance or highlight recovery. Unlike panoramic composites, with pixel shift composites, there is no need to recompose, deal with parallax, or with motion.
Motion? With the A7R3 & A7R4, even minute pixel-size motion in the scene (such as leaves on a tree) caused artifacts. That made pixel shift largely unpractical for outdoor scenes, to the point that I never bothered with the feature. All of this totally changed with the A7R5 as the 3.5 version of Imaging Edge software now has the game-changing option “Stabilize a composite image if it contains a moving object”. Since the processing takes place on the desktop, it is unclear why the software cannot perform this option for A7R4 images, but that is a fact prominently stated. Besides the A7R5, the only other eligible camera is currently the A1. Given how well it works, I hope that in the future Sony will offer an option to have pixel-shift images merged in-camera like the Panasonic S1R or Olympus E-M1. If that is not possible, at least Imaging Edge could have an option to create pixel shift composites in batch. Automatic detection within a folder (like Autopano does) should be easy to implement since the meta-data already identifies pixel shift component images.

“Deghosting” would be a more precise term than “stabilization”: it appears as if when the software identifies an area with motion between the component images, instead of attempting to composite RGB values, it corrects the motion simply by using the pixels of a single frame (with Bayer interpolation). If the camera moved, even by a few pixels, then the composite defaults to the first frame. The process works very well. Compare those two images taken from my window, the first with the motion correction turned off, and the second with the correction option turned on. On this windy day, there is no need to enlarge the image to see what happened without motion correction. On the other hand, less obvious, and therefore harder-to-spot artifacts show up at pixel level as cross-hatching. Even with close inspection I did not see any of those in the image with motion correction.
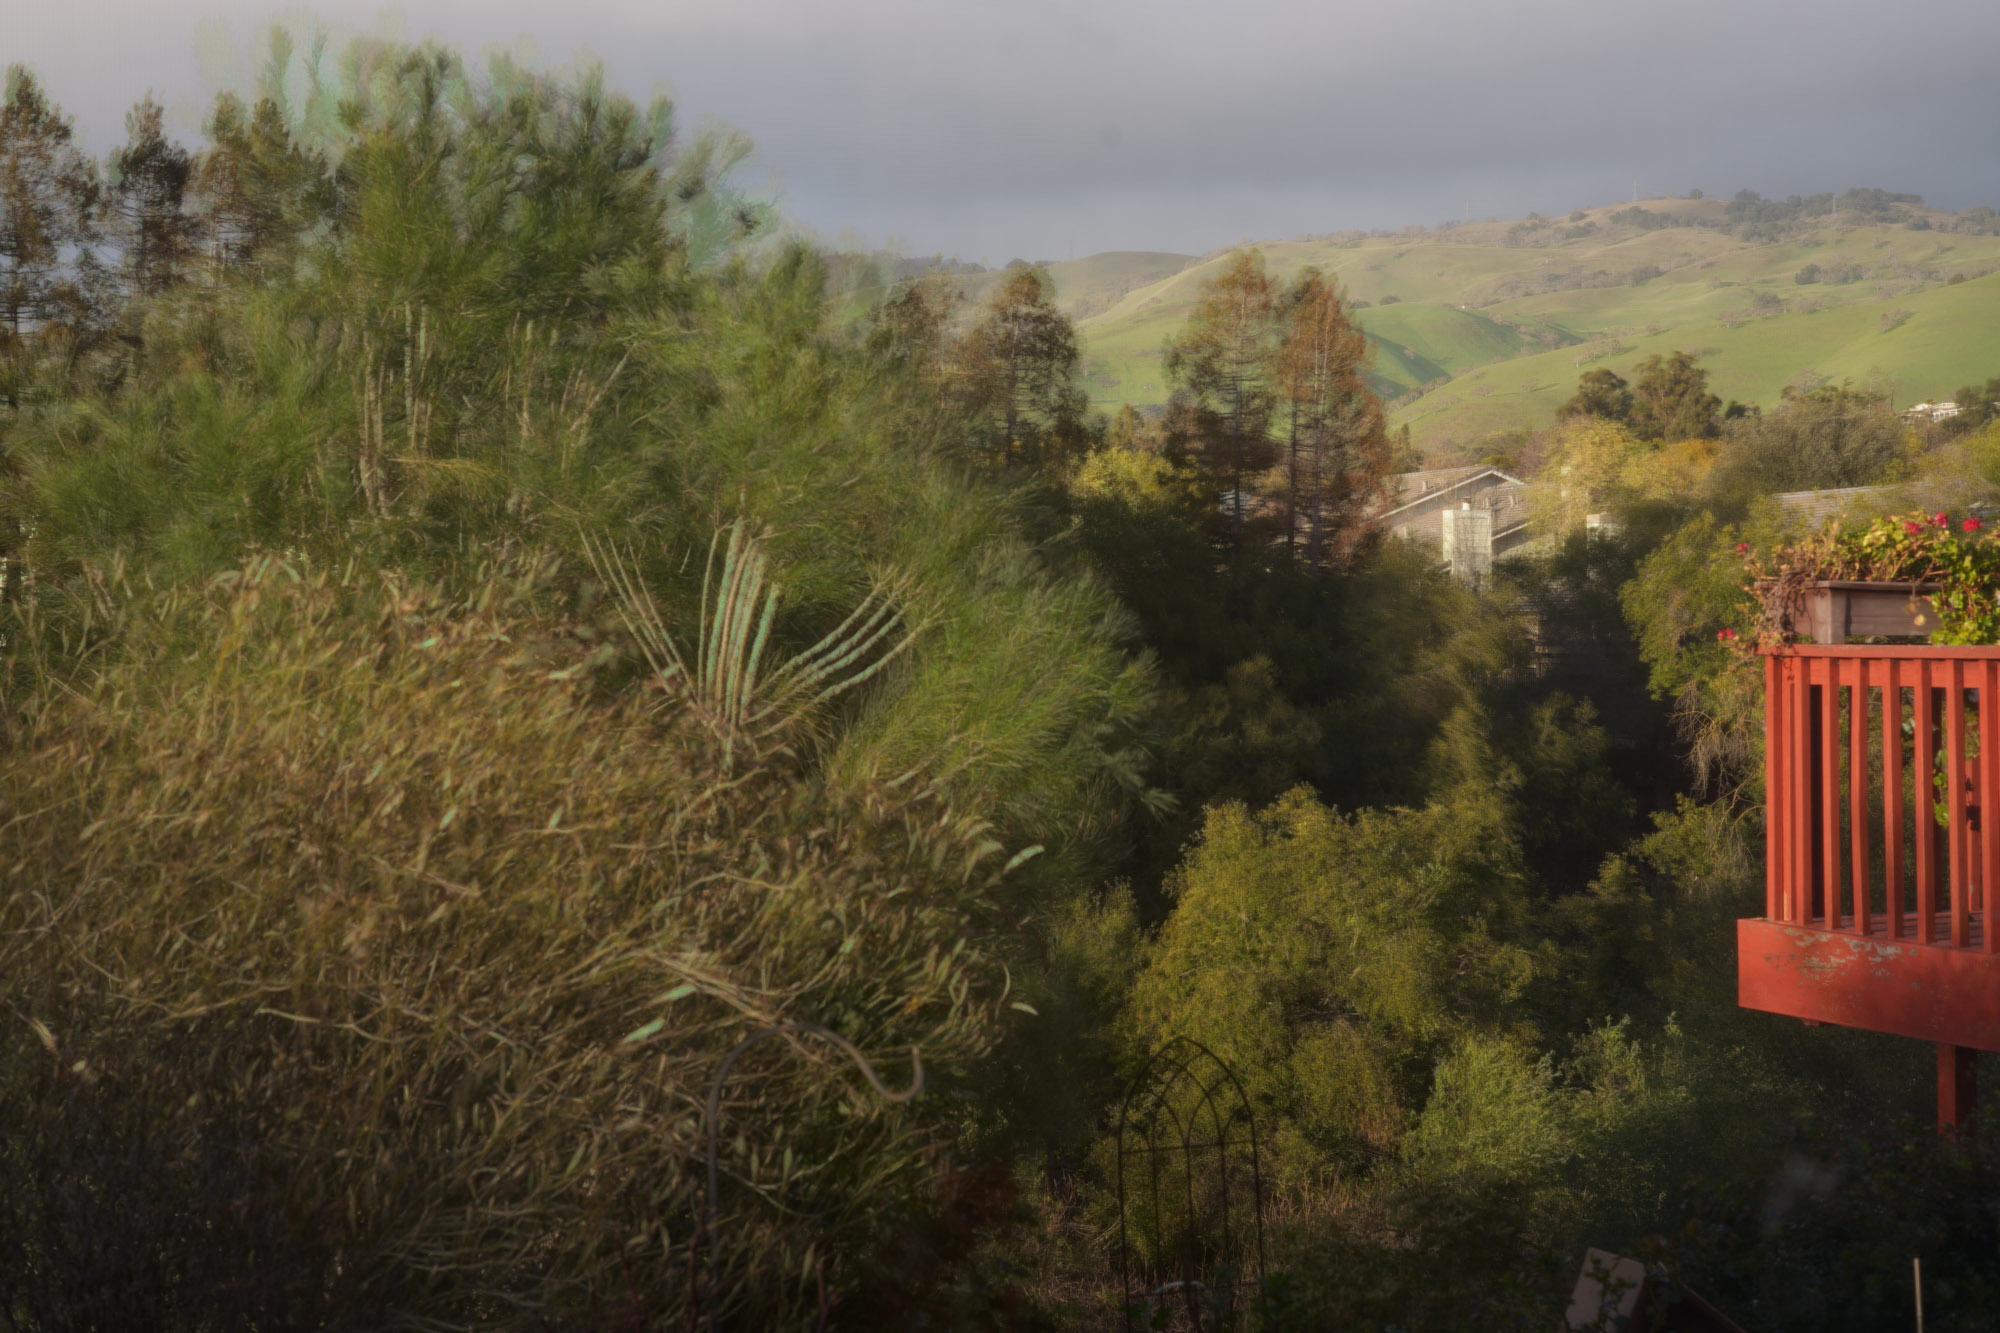
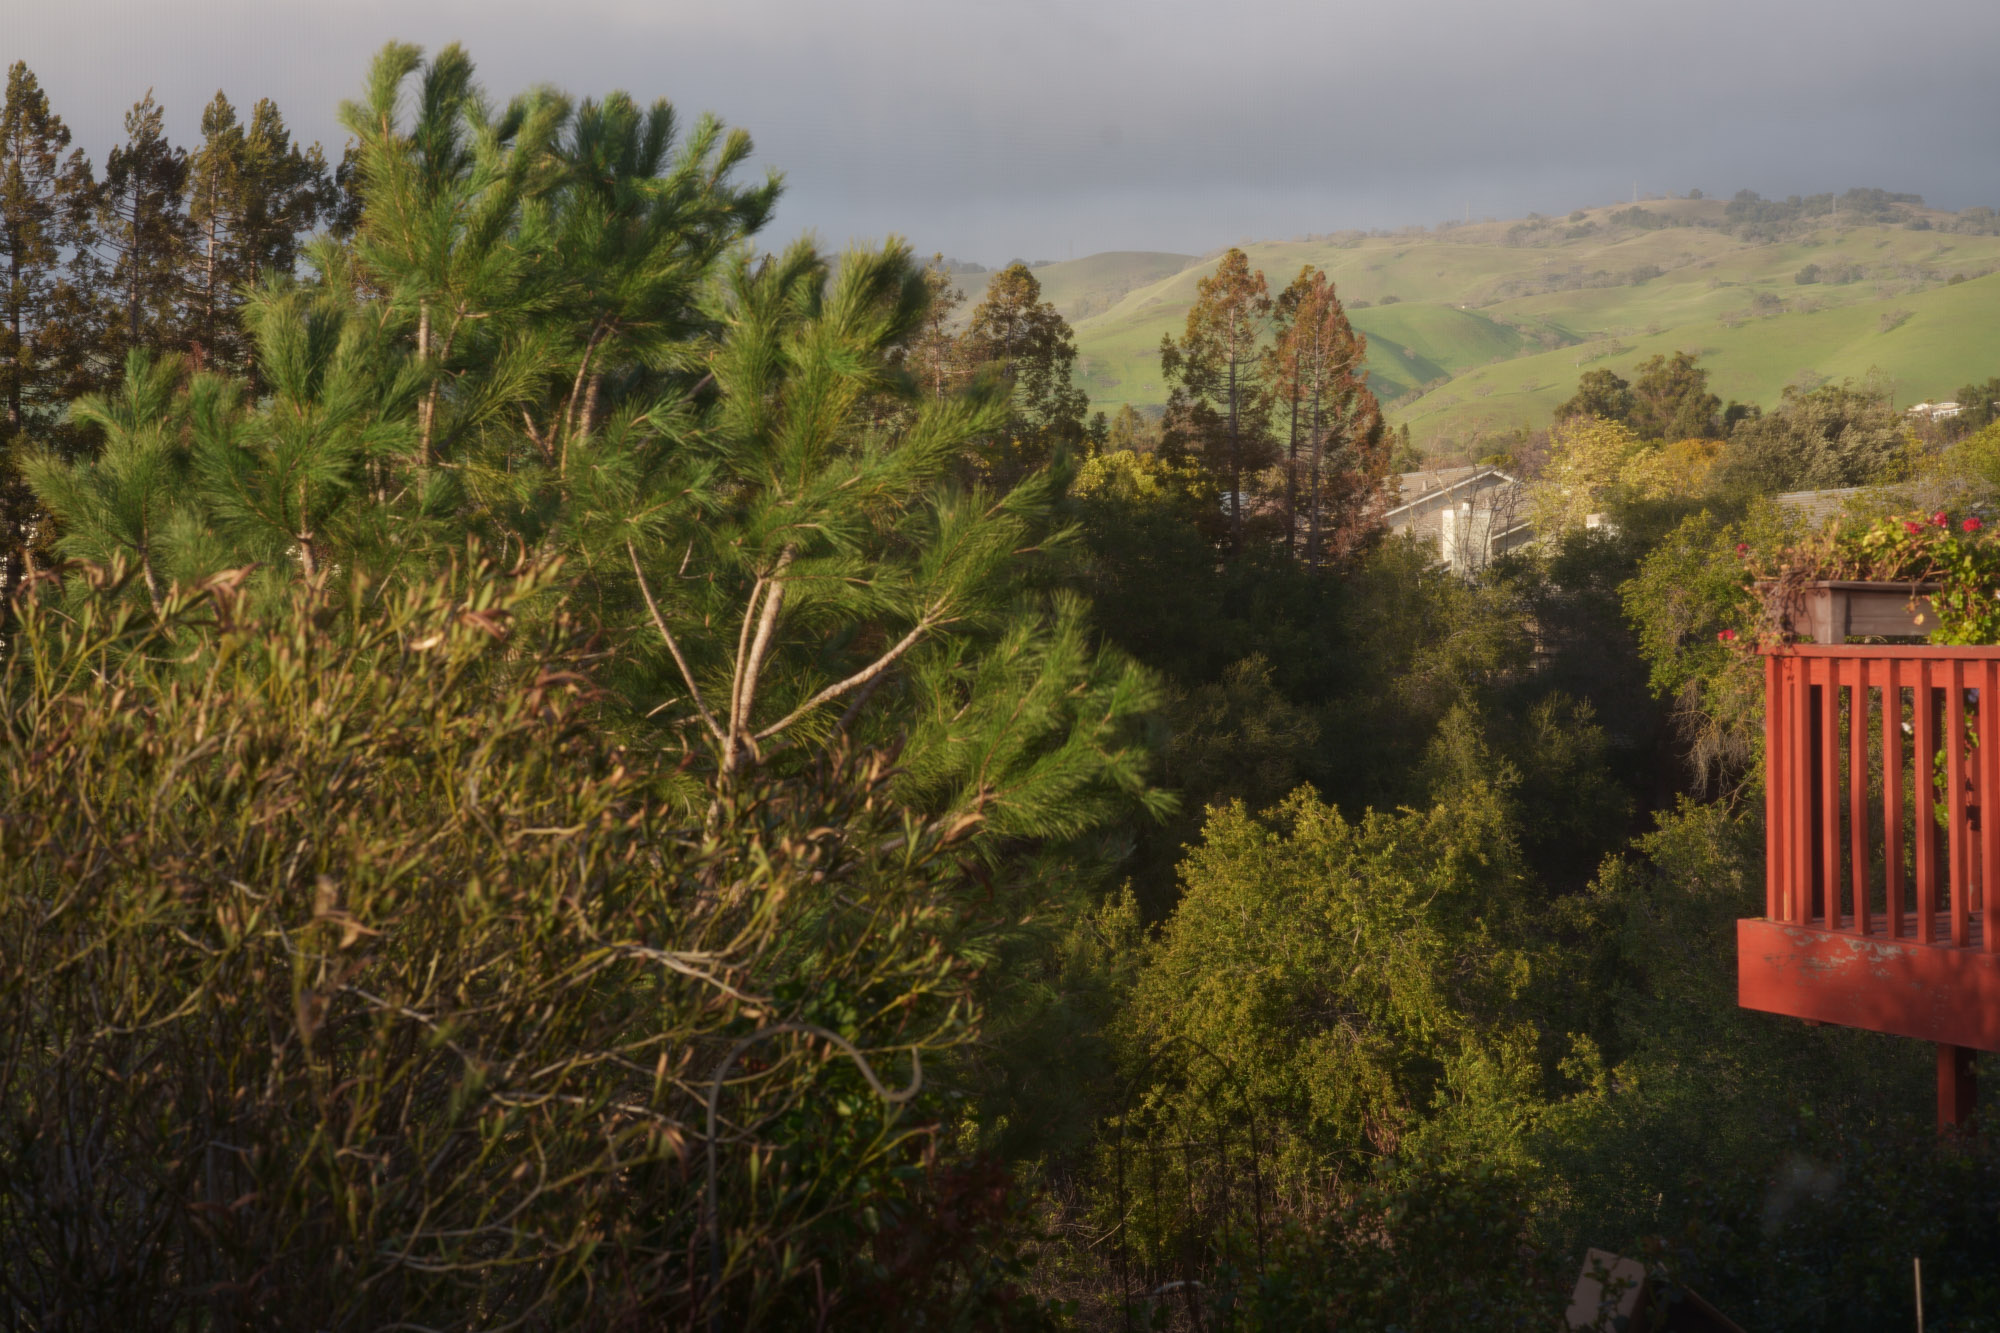
San Jose CA, 2023. Sony A7R5, Voigtländer Macro Apo-Lanthar 65mm, pixel shift composite of four images (click to enlarge). Top: motion correction off, Bottom: motion correction on
A second, more ambitious pixel shift mode is present. Its idea is to achieve sub-pixel accuracy by shifting the sensor by half a pixel to all four half-pixel positions within a pixel, quadrupling the file size and resolution. For each of the four positions, an intermediate full-RGB image is created using the 4-pixel shift method, so in total 16 images are captured. Like with the 4-pixel shift method, this is all activated by a single shutter press. However, capture time and storage are quadrupled to a whopping 2.2 GB for the 16 component images, and 723 MB for the composite image. The benefits are less obvious: achieving the full benefits of sub-pixel sampling requires everything in the imaging chain to work at a sub-pixel accuracy. Although there is sometimes an improvement over the 4-pixel shift, I found it difficult to assess, partly because it is tricky to directly compare images of vastly different sizes. Since this article is already quite long, I will spare you more pixel peeping.
Little Things
Timed Bulb. Like many digital cameras, the A7R4’s longest timed shutter speed was 30 seconds. To time a longer exposure, you needed to use remote control. The A7R5 brings longer timed exposures. If you use the BULB setting from the M mode as before, a stopwatch runs in viewfinder or monitor. If you turn Exposure>BULB Time Settings to On, you can program the length of the exposure from 2 seconds to 15 minutes (but why not longer, for example for star trails?). Note that this works only in mechanical shutter mode (Shooting > Shutter/Silent > Shutter Type). However, I wish Sony would have simply extended the shutter speed dials by 1/3 stops increments beyond 30 seconds.Full-time DMF Sony has supported in all Alpha cameras a DMF (Direct Manual Focus) mode where both AF and the focus ring are active, however, in that mode some important functions were disabled. With the option Focus > AF/MF > Full Time DMF, the focus ring is always active regardless of the focusing mode (this was one of the selling points of the Canon EF Mount!).
White balance sensor With the addition of a new front-facing external light sensor (already present in early Nikon DSLRS), automatic white balance is more accurate than before. Even if you are using RAW, this can save time on color correction.
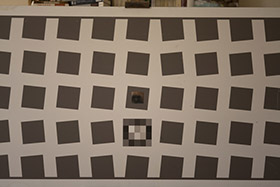
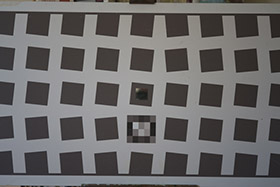
Greyscale Imatest SFR target, photographed with auto white balance. Left: A7R4. Right: A7R5
Dust control With small film cameras, dust wasn’t much of an issue because each frame was a new piece of film. Because of their sensors, DSLRs were much more vulnerable to dust, but at least there were a mirror and a shutter to stand between the lens mount and the sensor. In the Sony Alpha cameras, the absence of a mirror and a short flange distance left the sensor very vulnerable to dust. Using a brand A7R2 in 2015, I was shocked to see more than a dozen dust spots in each frame after a two-day architectural assignment mostly indoors. Olympus invented an apparatus with a piezo crystal ultrasonic vibration of the filter in from of the sensor around 35-50K Hz. The Canon 5Dmk3 adopted this system, automatically activating ultrasonic at every power cycle. This almost alleviated the need for sensor cleaning compared to the 5Dmk2. By contrast, the Sony cameras from the A7R2 to the A7R4 used the IBIS system to shake the entire sensor assembly on demand, at about 100 Hz. I wondered if Sony did not make that automatic because they wanted to minimize an action which is mechanically quite violent, like a cell phone vibrating. The A7R5 has adopted the ultrasonic approach, where only the filter glass vibrates to shake off the dust. Time will tell if this works better, but there is a second improvement, one that I had been calling for since the A7R2: if you turn the option Setup > Setup Option > Anti-Dust Function > Shutter When Pwr OFF, when you switch the camera power switch to off (which I always do when changing lenses), the shutter will close to cover the sensor. It is probably a good idea to clean the shutter with air from time to time before the dust can make it onto the sensor.
Conclusion
The A7R4 already had the best resolution and dynamic range of any digital camera, short of medium-format. Testing showed no change in still image quality in the A7R5 – if anything, an increase in noise was measurable but insignificant. The A7R5 adds many new or improved features. Although several of them are mostly aimed at action and video shooters, and outside the scope of this partial review, there are a number of other improvements that matter to landscape photographers. While none of them in itself is a breakthrough, except maybe usable pixel-shift for those who wish to achieve medium-format quality through computational photography, together they add up to a fully matured camera which has remedied the weaknesses of earlier Sony cameras. For this reason, I felt that the A7R5 was a worthwhile upgrade. If this review was useful to you, please consider buying the A7R5 from my affiliate links at Amazon or B&H.


As a Nikon shooter the review of the Sony A7R5 was of limited interest. But I did find the part regarding image stabilization quite interesting, especially the linked article regarding the effect of Earth’s rotation. I would never have imagined that such rotation could play a role in imposing at least a theoretical limit on the amount of image stabilization possible. The article was quite interesting and did a good job explaining the concept.
Yes, it’s too bad that the author moved on from thecentercolumn.com since his scientific approach to camera support was insightful.
I think the 500MB size of a 4 shot pixel shift image is 60Mpixel x 4 samples of 2 bytes per pixel = 480 million bytes plus the extras around the edges of the sensor. Uncompressed, as you said.
You may or may not know that the motion compensation is not limited to the A7RV, but also works with A1 pixel shift images (but not earlier models).
Maybe the Sony engineers saw a reason for preserving the data from the 4 component shots, but to me it seems unnecessary, especially since currently no software makes use of it.
Thanks for taking the time to share your review of the A7RV. I really enjoyed seeing a review by a dedicated landscape photographer. So many online reviews are from generalists that spend too much time talking about features and use situations that just don’t apply to most landscape photographers.
My only hesitation with the A7RIV and now the A7RV is the increase in noise from this sensor compared to the 42mp sensor in the A&RII and III. I am an 7RIII user and am a bit reluctant to upgrade to the V and then have to deal with more noise. However if the image quality improves along with hopefully better weather sealing, I would be interested.
Any thoughts that you can share would be greatly appreciated.
Noise isn’t much of an issue at lower ISOs. Nowadays, there is excellent noise reduction software, and while it is often possible to mitigate noise issues, one cannot create more resolution out of nothing. I don’t have a 42MP camera to compare noise anymore. In a quick test, the A7R5 did not improve in terms of noise over the A7R4, if anything, it was a little worse by an amount that was not significant, but measurable. However, I’ll have to try to repeat it to confirm.
A.I. Software such as Topaz Megapixel can create more resolution “out of nothing”
It doesn’t always work, as the additional detail can look artificial, as pointed out in my
write up on Topaz Gigapixel AI. Moreover, applying Topaz Gigapixel AI to a 60 MP image will produce more detail than applying Topaz Gigapixel AI to a 42 MP image.
In the paragraph on dust control, do you mean to say “With the A7R5, it appears that only the filter glass vibrates”?
From my reading of Sony’s info, it seems that the cleaning cycle is now ultrasonic rather than just IBIS based… time will tell if this is really a noticeable improvement.
BTW, I too have been frustrated by the fact that focus bracketing usually fails to reach infinity. Sony really needs a firmware fix for this problem!
Yes, thanks for catching the typo. I’ve rewritten the sentence a bit more clearly. Yes, it is disappointing that nine months out, Sony has not attempted to fix the issue.