Photographing landscapes with stars as points of light: a primer and survey of state-of-the-art tools
5 Comments
In terms of facilitating the creation of landscape photographs not possible before, high-sensitivity digital sensors rank high among other technological advances, as they have facilitated a new field sometimes called “astro-landscape photography”: photographs of landscapes with stars captured as points of light as the eye sees it. This article details all the technical knowledge that you need to pull out such images with general-purpose equipment consisting of no more than a tripod and a wide-angle lens. In the process, it brings you up to date with the current best practices and software tools developed in the past half-decade.

Petrified Forest National Park closes at sunset, but having obtained a backcountry permit, I was able to roam in the South Wilderness at night to make photographs of the petrified logs under the stars. Read the story behind this image. Sony A7R3, Nikon 14-24 lens. 10s at f/2.8, ISO 12800.
Exposure time for photographing stars as points
The technical challenge in capturing the stars as points is that they are dim and in relatively fast (relative) motion in the sky. How dim? My usual base exposure is f/2.8 – 30 sec – ISO 6400. Too long of an exposure time records stars as streaks rather than circles. With lower ISO, too short of an exposure misses faint stars, whereas higher ISO reduces resolution and increases noise.The main factor in determining an exposure time that maintains stars as points is the focal length. The wider the lens, the smaller the magnification, and therefore the apparent motion of the stars. A long-established way to determine the length of the exposure in seconds is the “500 rule”: 500 divided by the focal length. For example, with a 16mm lens, the widest that many own, you’d use 31s = 500/16 (rounded to 30s in practice). Since that rule was designed in the film area when high-ISO film had sizable grains, it doesn’t hold up well with current digital cameras which are capable of resolving much finer details at high ISO. I found star streaking quite prominent even in medium-sized prints. Instead, I used a “300 rule” based on the same idea, which would give with the same lens an exposure time of 19s = 300/16.
Yet, such a rule does not take explicitly into account the imaging system’s ability to resolve details, and therefore distinguish a point from a streak. It depends on the pixel pitch and aperture, which determines the diffraction limits. Another consideration is that stars in the night sky are moving at different speeds. Stars closer to the celestial equator move faster, whereas a start near the celestial pole (Polaris in the Northern Hemisphere) hardly moves. This is accounted for by declination, which is the distance of a star measured from the celestial equator: it is zero at the celestial equator, and 90 degrees at the celestial pole.
In 2010, Frédéric Michaud developed a set of formulas called the NPF rule based on rigorous consideration of all those parameters (links in French – French education in mathematics is strong!). In 2017, Aaron Priest provided a write-up in English with a spreadsheet that brought more attention to this approach, and caused it to be implemented in several apps, including the popular PhotoPills, which is now the easiest way to use the NPF rule. As can be seen in the table below, NPF prescribes a shorter exposure time than even the “300 rule”. Photopill’s Default mode produces “Barely noticeable trails”, whereas the Accurate mode is “Useful for large prints” by roughly dividing the exposure time by two.
| Lens | 500 Rule | 300 Rule | NPF Default | NPF Accurate |
| 12mm f/2.8 | 42s | 25s | 18s | 9s |
| 12mm f/4 | 42s | 25s | 22s | 11s |
| 14mm f/1.8 | 36s | 22s | 13s | 7s |
| 14mm f/2.8 | 36s | 22s | 16s | 8s |
| 14mm f/4 | 36s | 22s | 19s | 9s |
| 16mm f/2.8 | 31s | 19s | 14s | 7s |
| 16mm f/4 | 31s | 19s | 16s | 8s |
| 20mm f/1.4 | 25s | 15s | 9s | 4s |
| 20mm f/2.8 | 25s | 15s | 11s | 6s |
| 20mm f/4 | 25s | 15s | 13s | 7s |
| 24mm f/1.4 | 21s | 13s | 7s | 4s |
| 24mm f/2.8 | 21s | 13s | 9s | 5s |
| 24mm f/4 | 21s | 13s | 11s | 6s |
Those values assume a declination of zero, which is safe as it accounts for the fastest possible star motion. Photopills provides an elegant way to account for the actual declination. Tap on the button “AR” in the lower corner, point your phone in the same direction as your camera, and the NPF values will be updated accordingly in the AR display. Notice how the exposure time increases as you point your phone toward the celestial pole.
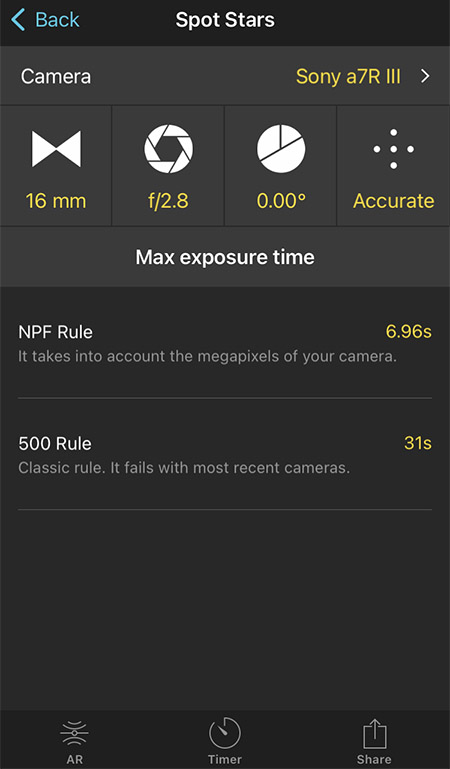
Photopills “Spot Stars” screen
Even though those explanations may appear overly technical, in practice there are just a few values to remember, or you can use an app. If you didn’t get enough exposure, you can also brighten in processing at the expense of a bit of additional noise. It’s not an exact science! Once you have determined an appropriate exposure time, then you use the lowest ISO that provides enough exposure for the stars, again something within 1 f-stop of f/2.8 – 30 sec – ISO 6400, or its equivalents such as f/2.8 – 15 sec – ISO 12800, f/1.4 – 30s – ISO 1600, etc..
Noise reduction
To be able to reach those shorter exposure times, there are only two possibilities in a single capture. You can use a faster lens. However, there are not many wide-angle lenses faster than f/2.8 and even with the fastest of them (f/1.4), you’d gain only two f-stops. Alternatively, you can increase the ISO, but this results in an image with less detail and more noise.
With earlier digital cameras, even ISO 1600 was a stretch, but recent cameras such as the Sony A7R3 make ISO 12800 quite usable once noise reduction is applied – even when the unprocessed image looks very noisy. One could think of luminance noise reduction and color noise reduction as two separate processes. In this example, processed in Lightroom, applying 25% of color noise reduction was enough to suppress most of the color noise. It could be cranked up to 100% without adverse effects on detail, but you’d lose some of the subtle color differentiation in the stars. On the other hand, increasing luminance noise reduction results in the loss of fine details. Besides an overall smoothness, notice how the faint stars disappear and how shadows turn to pure black as luminance noise reduction is increased. The result is still quite good, considering that we are looking at a 1,000-pixel-wide section of a 8,000-pixel-wide image.
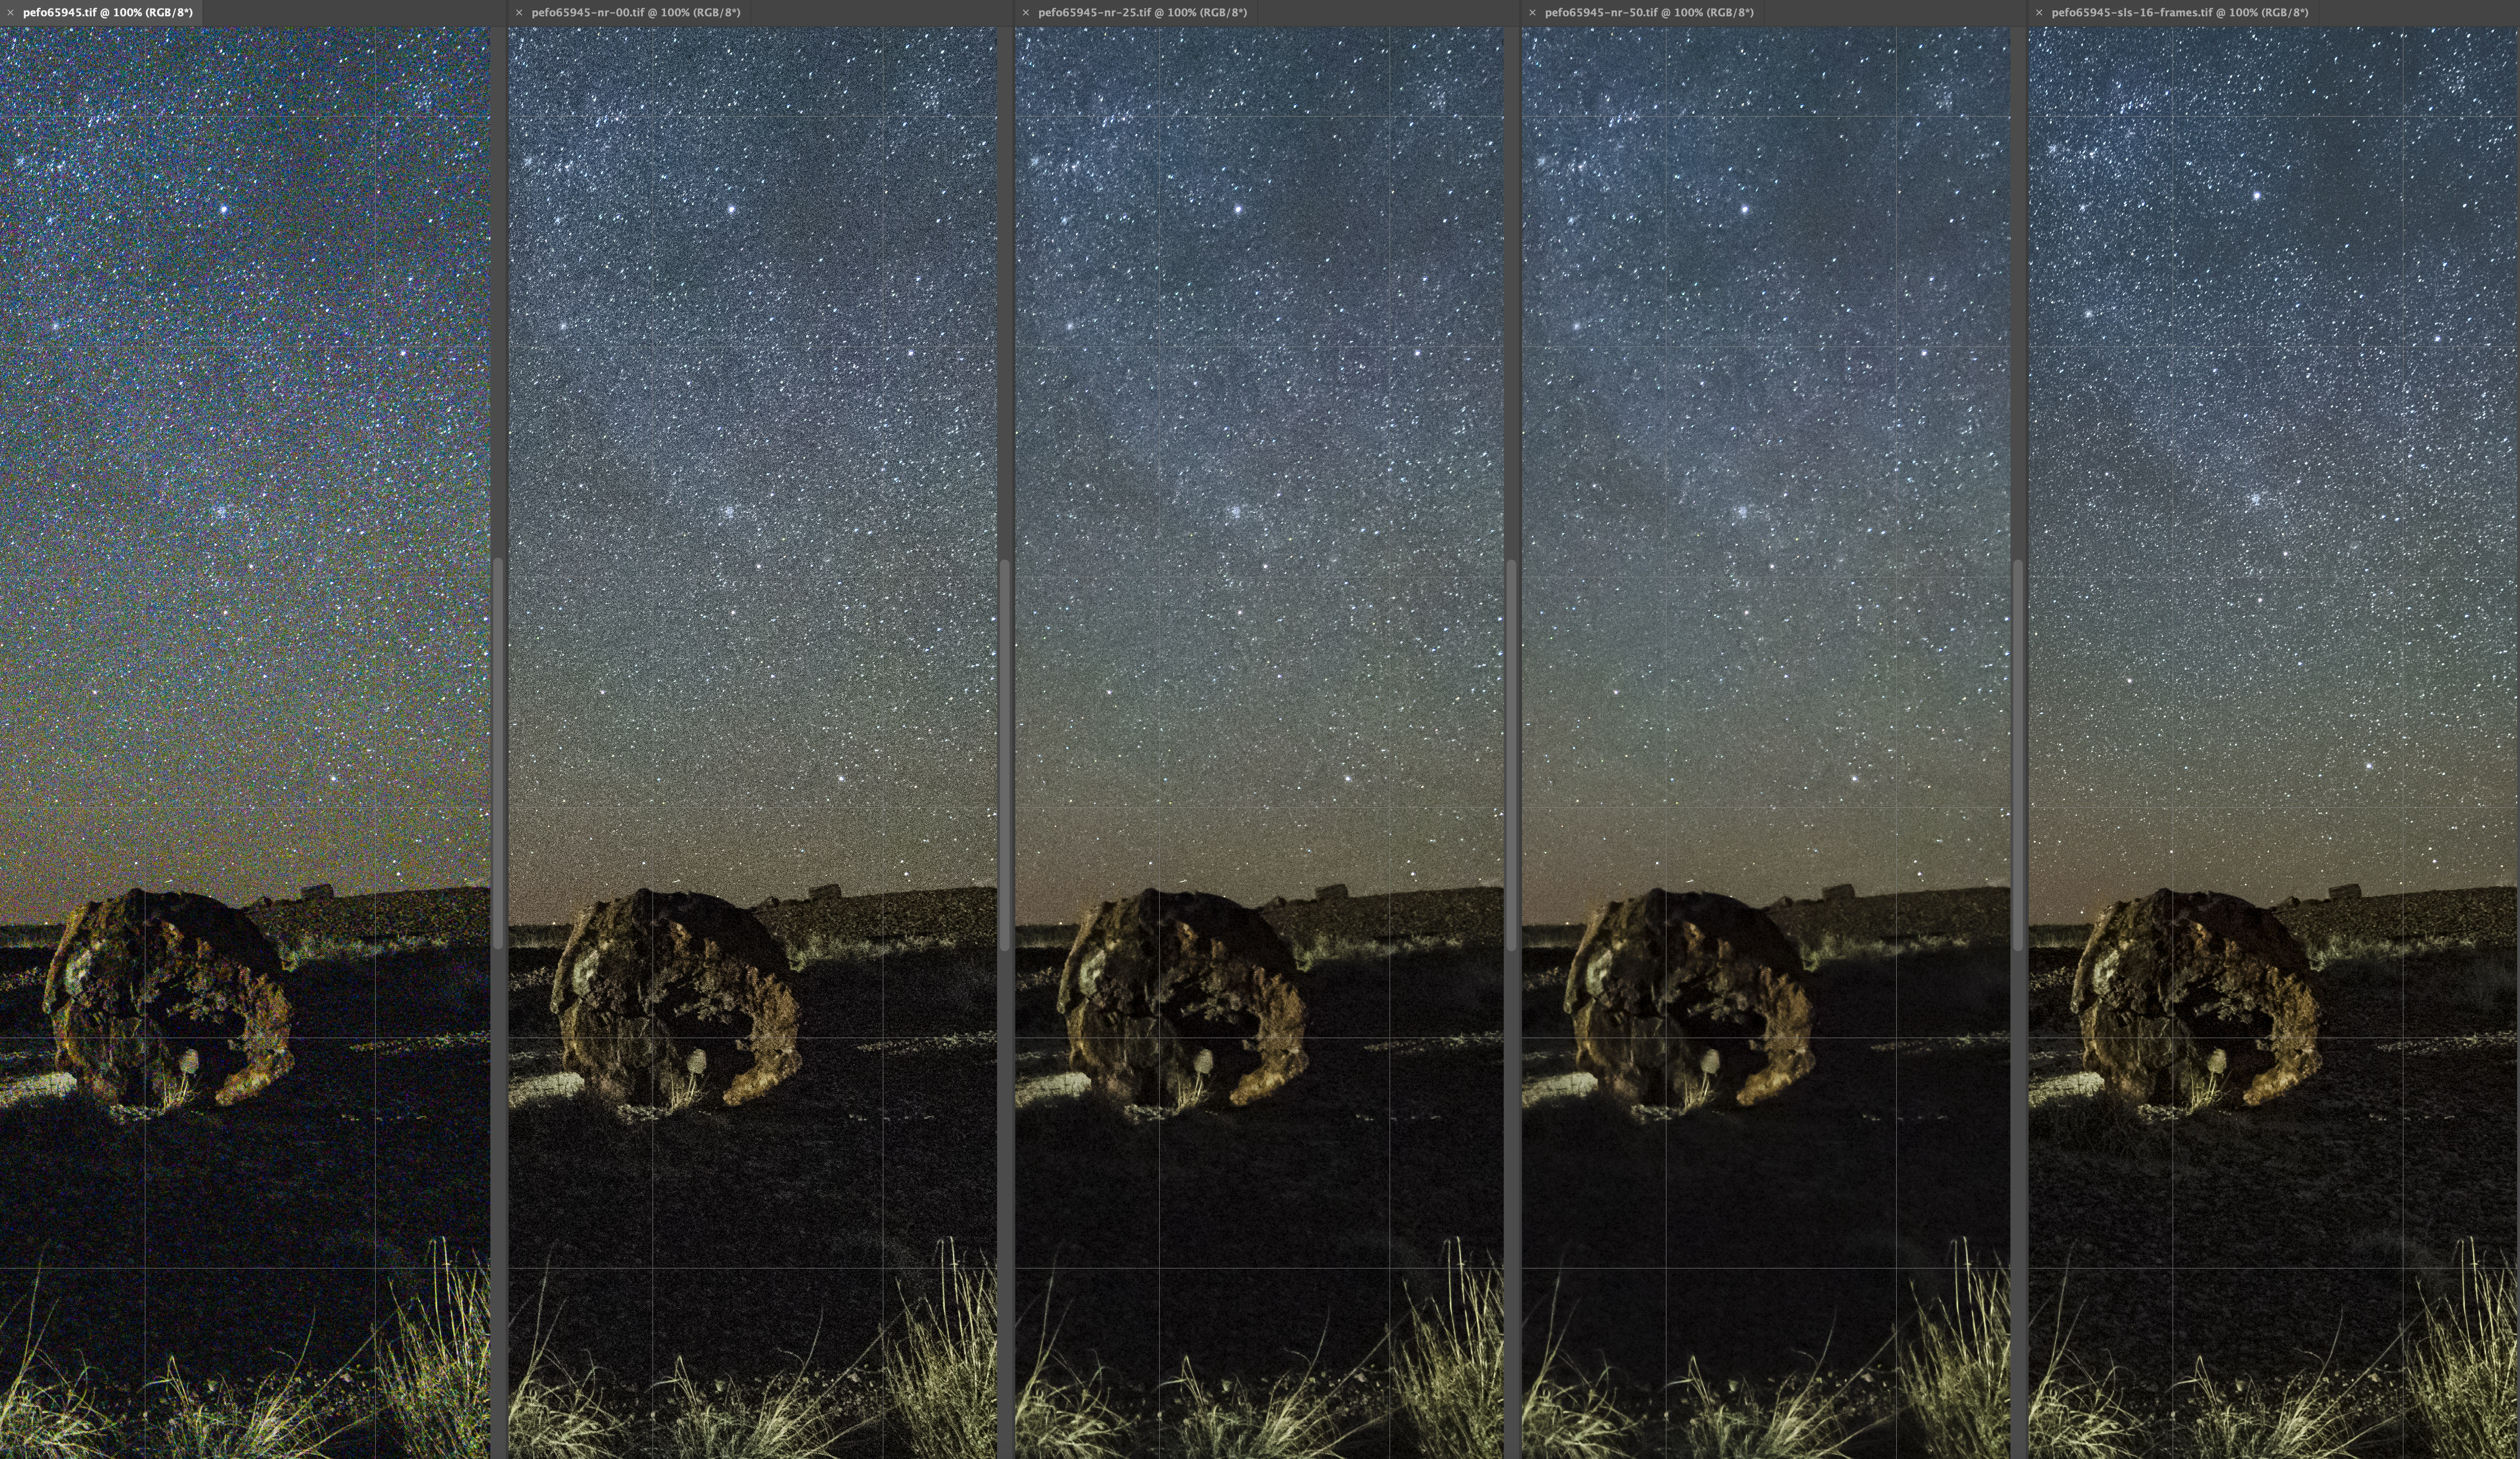
Noise reduction with Lightroom. From left to right (1) original image; (2) Luminance NR 0, Color NR 25%; (3) Luminance NR 25%, Color NR 25%; (4) Luminance NR 50%, Color NR 25%; (5) Image stack. Click on image for full-resolution.
In recent years, Topaz Labs has introduced AI-based image-processing apps, sometimes with impressive results in sharpening and upsizing. Let see how Topaz Labs DeNoise AI compares to the noise reduction algorithms in Lightroom, which are quite good. DeNoise AI offers quite a few controls, including sharpening and color noise reduction, but for the sake of the comparison, they have been set to zero. There are also three different modes, and in this example “Low light” seems the most appropriate.
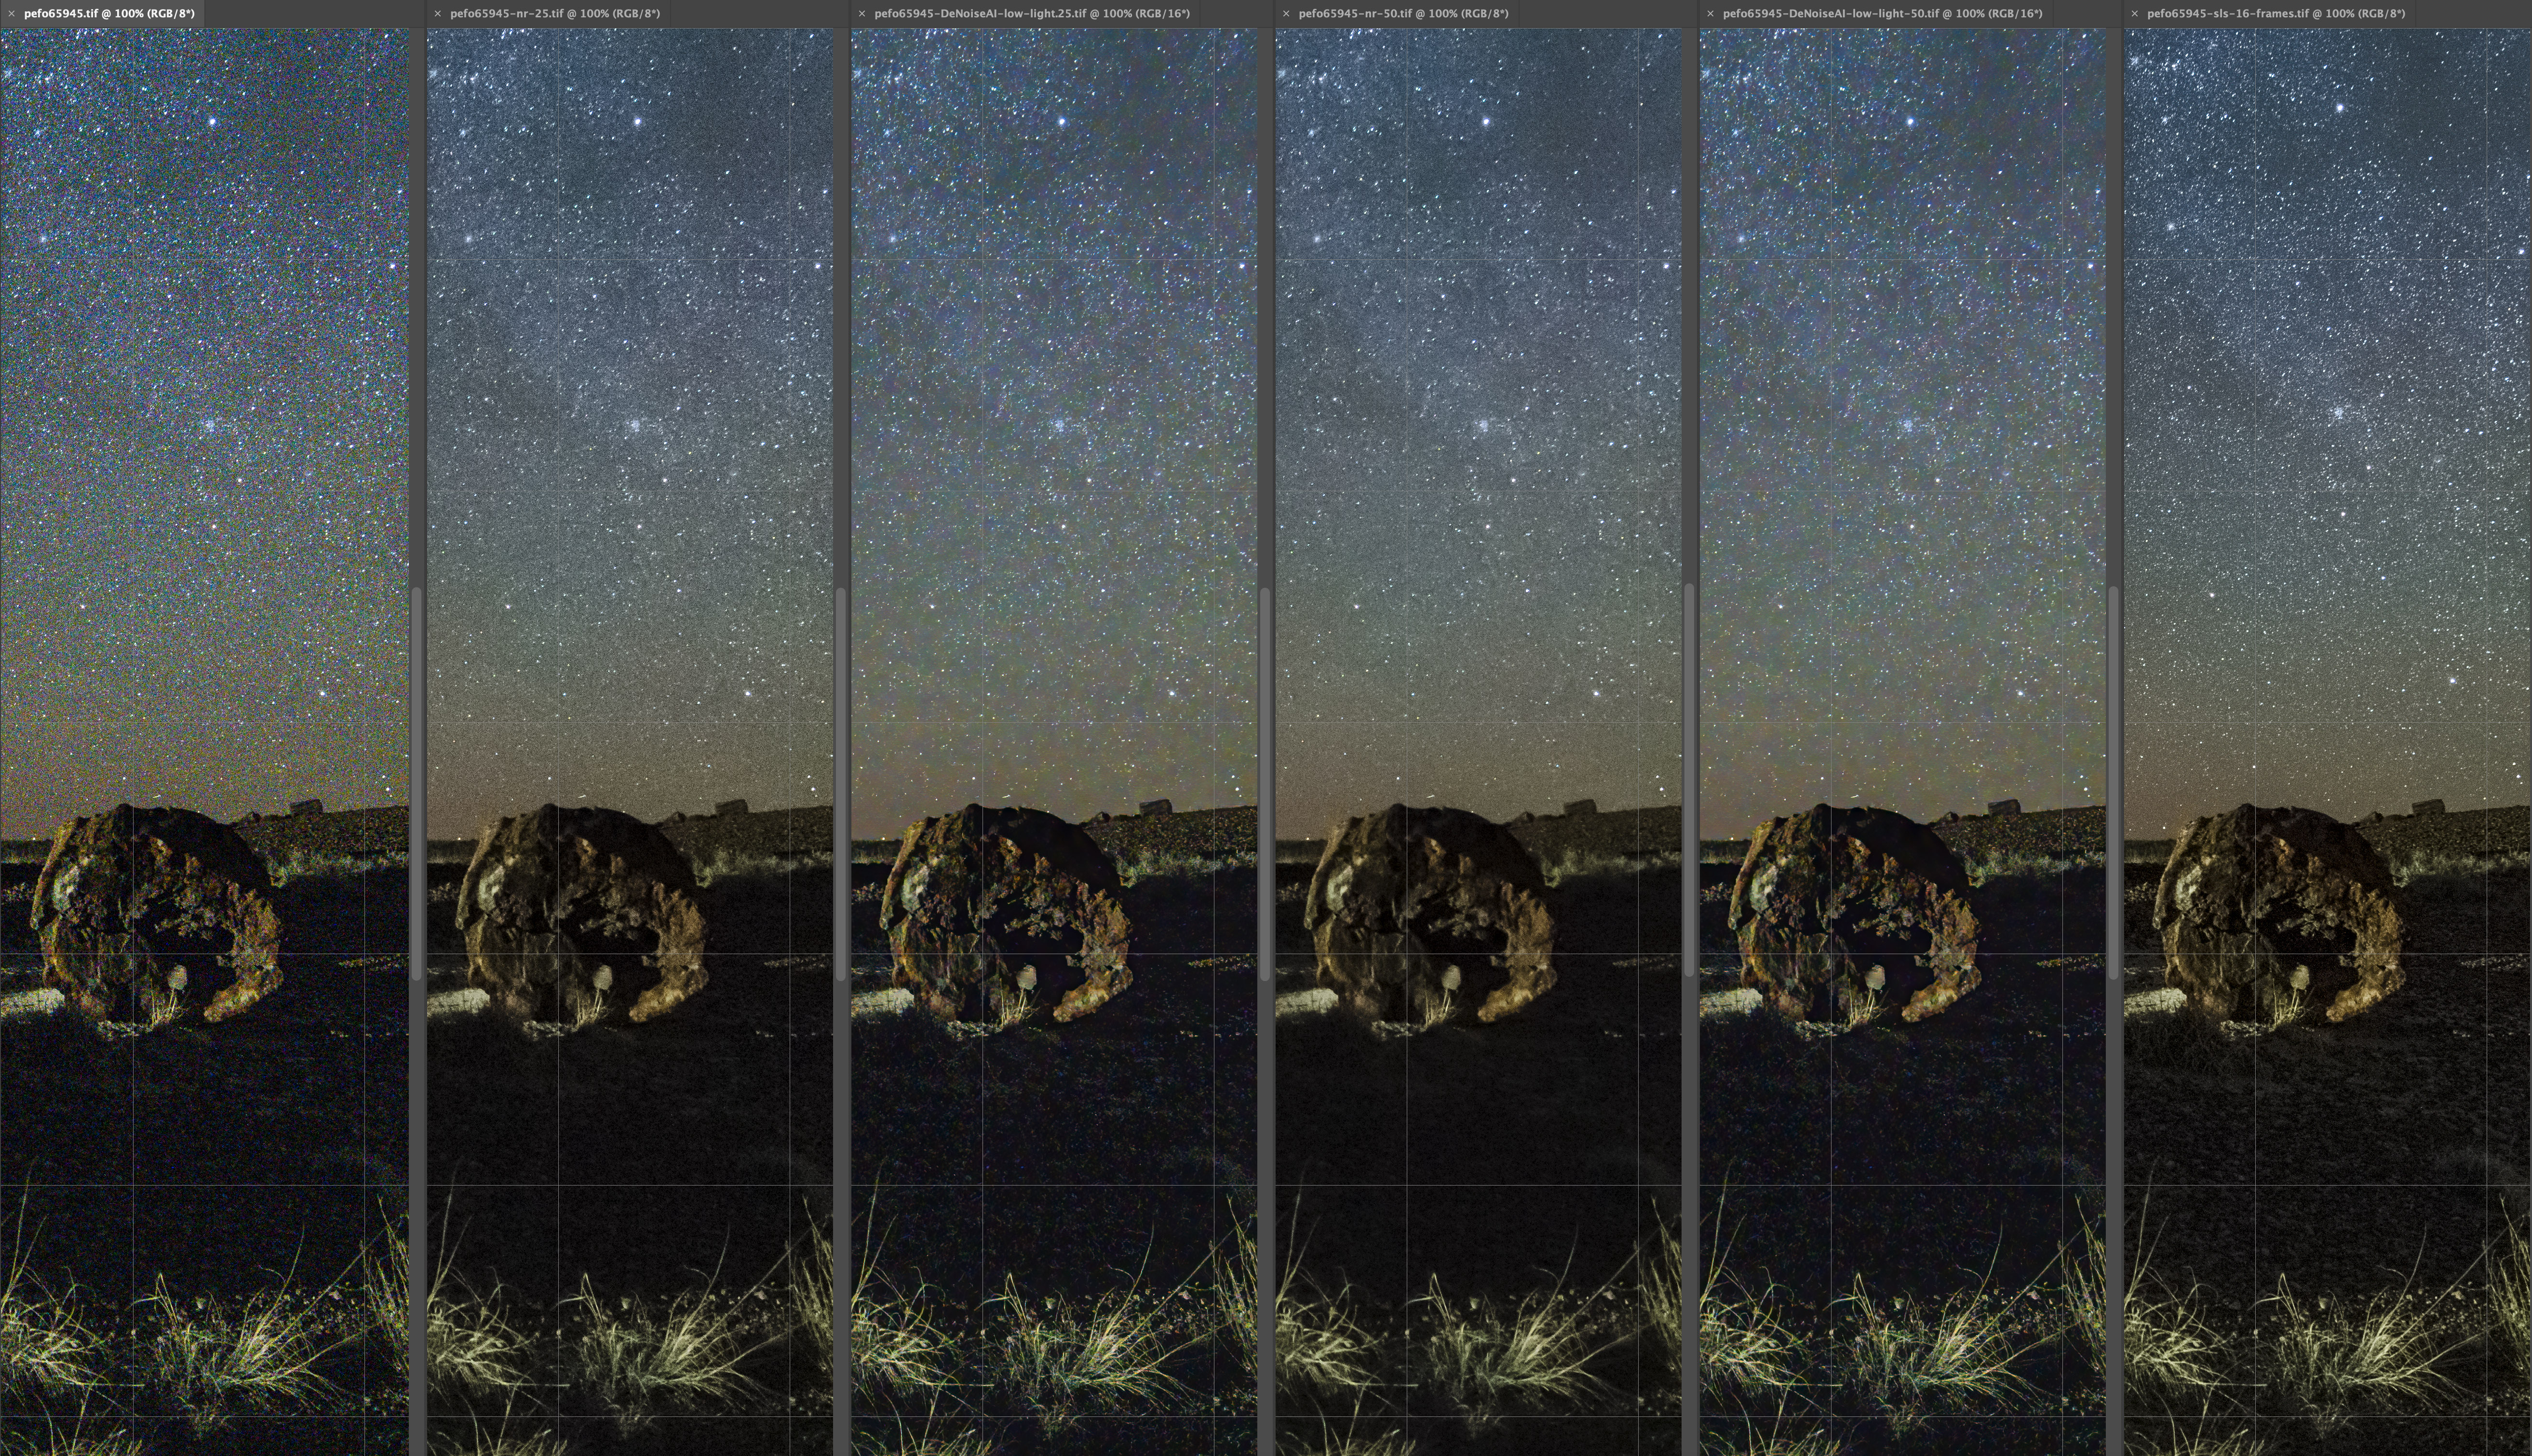
Noise reduction: Lightroom vs. Topaz DeNoise AI. From left to right (1) original image; (2) Lightroom Luminance NR 25%; (3) Denoise NR 25%; (4) Lightroom Luminance NR 50%; (5) Denoise NR 50%; (6) Image stack. Click on image for full-resolution.
Topaz DeNoise AI is an improvement over Lightroom, however there are still loss of stars. Wouldn’t it be nice to able to keep the level of detail of the original image, with the noise level of the image processed with noise reduction? Image stacking makes this possible.
Image stacking
There are few technical image quality issues that cannot be solved by combining multiple images. The idea behind image stacking is to average a set of multiple images of the same scene taken without moving the camera. When you do so with a large enough number of images, the difference between images, which is due to noise, is cancelled out. Trying out this technique with Photoshop is simple: first load the images with “File > Scripts > Load Files into Stack” with both the options “Auto-Align” and “Convert to Smart Object” checked. Then select the resulting Smart Object layer, and activate “Layer > Smart Objects > Stack Mode > Median”. “Mean” also works but is less robust, meaning that it can be thrown off by outliers, for instance airplane light trails.
More frames result in more noise reduction at the expense of your time and storage. How many frames should you stack? A stack of n averaged frames has the inverse square root of the noise of the original frames, resulting in the following table:
| Number of frames | Noise compared to original | Noise reduction |
| 4 | 1/2 | 50% |
| 8 | 1/2.8 | 64% |
| 16 | 1/4 | 75% |
| 32 | 1/5.6 | 82% |
| 64 | 1/8 | 88% |
I like 16 frames as a reasonable compromise, but if I have time, 64 frames are useful as they could also be used for a time-lapse clip of a few seconds.
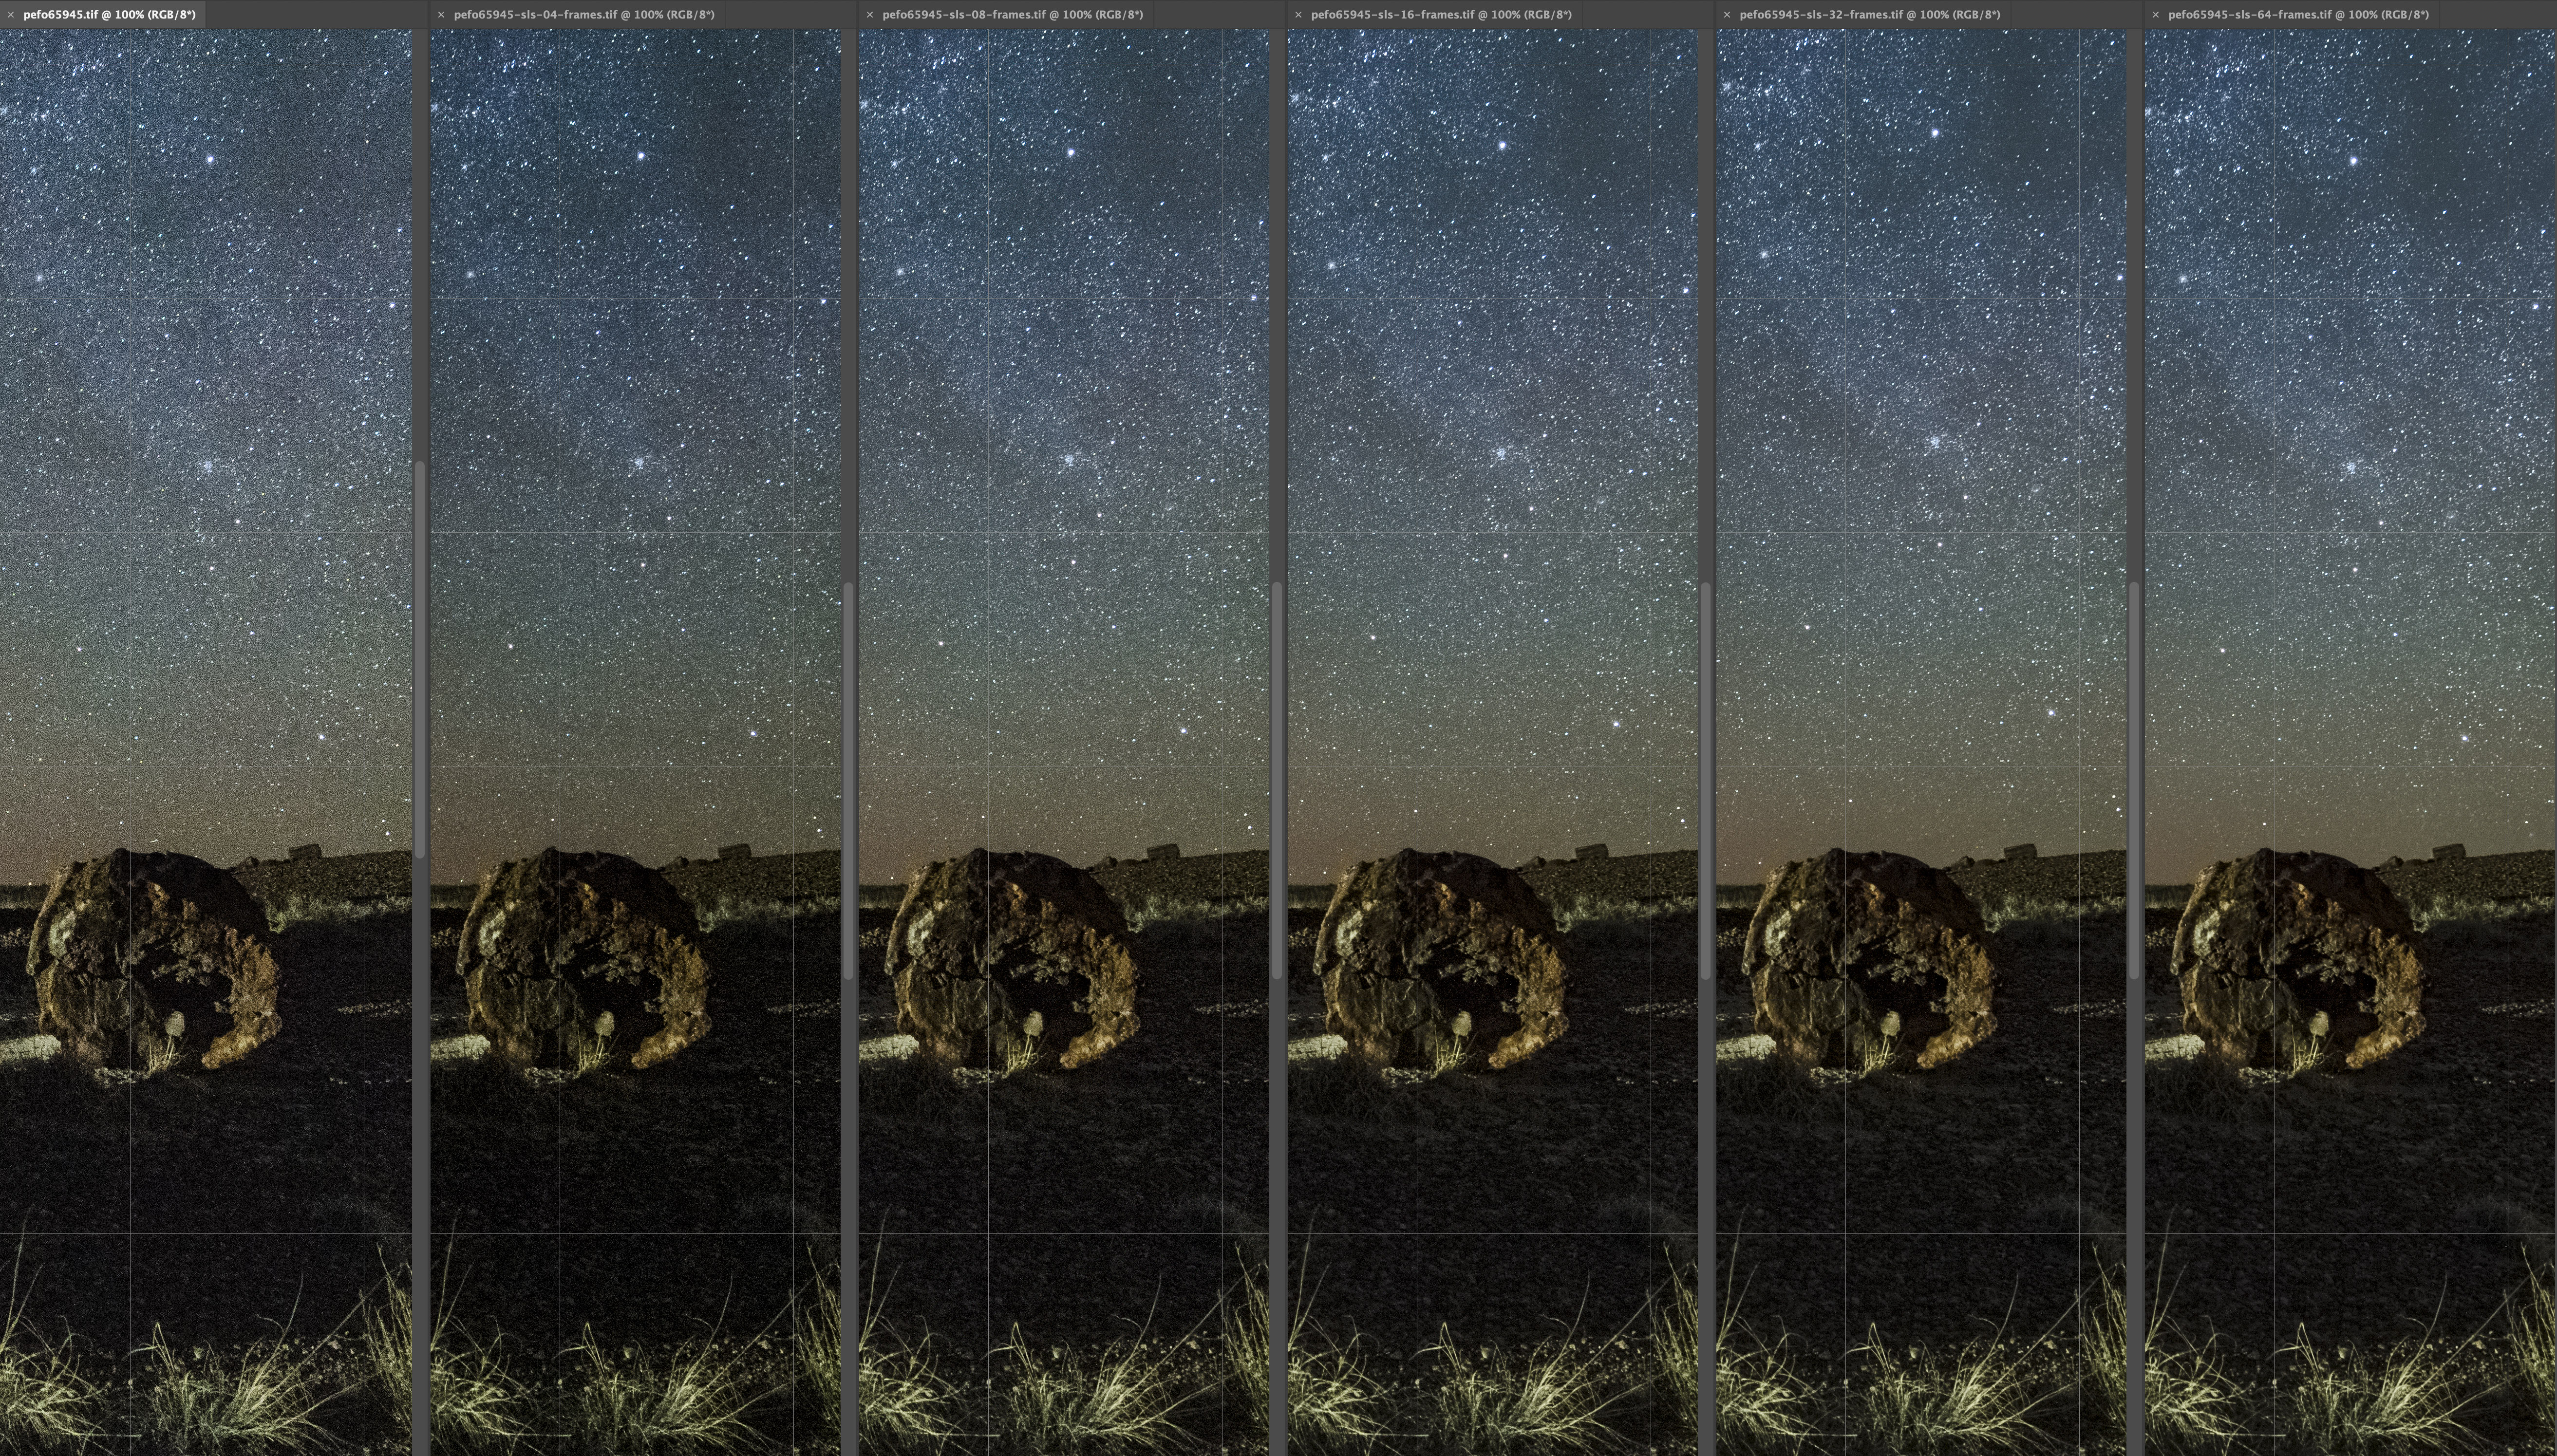
Image stacking with SLS. From left to right (1) original image with luminance NR 0 and color NR 25%; (2) 4 frames; (3) 8 frames; (4) 16 frames; (5) 32 frames. (6) 64 frames. Click on image for full-resolution.
Stacking can be used to reduce noise in multiple situations when only shorter exposures are possible: windy conditions, hand-held cameras (use a rapid burst mode to minimize the difference between images), drone photography. Even when a longer exposure would be possible, stacking provides more flexibility as you can exclude some frames, for instance those containing a car shining its headlights towards the camera – an occurrence that would have ruined a longer exposure.
Apps for star stacking
When you try to stack landscapes with stars, the problem is that as the stars move, the scene is different with each image. Therefore, before proceeding with stacking, it is necessary to realign the stars to a reference image while leaving the landscape untouched. That would be very time-consuming to do manually, but fortunately, there are several apps to automate this task.
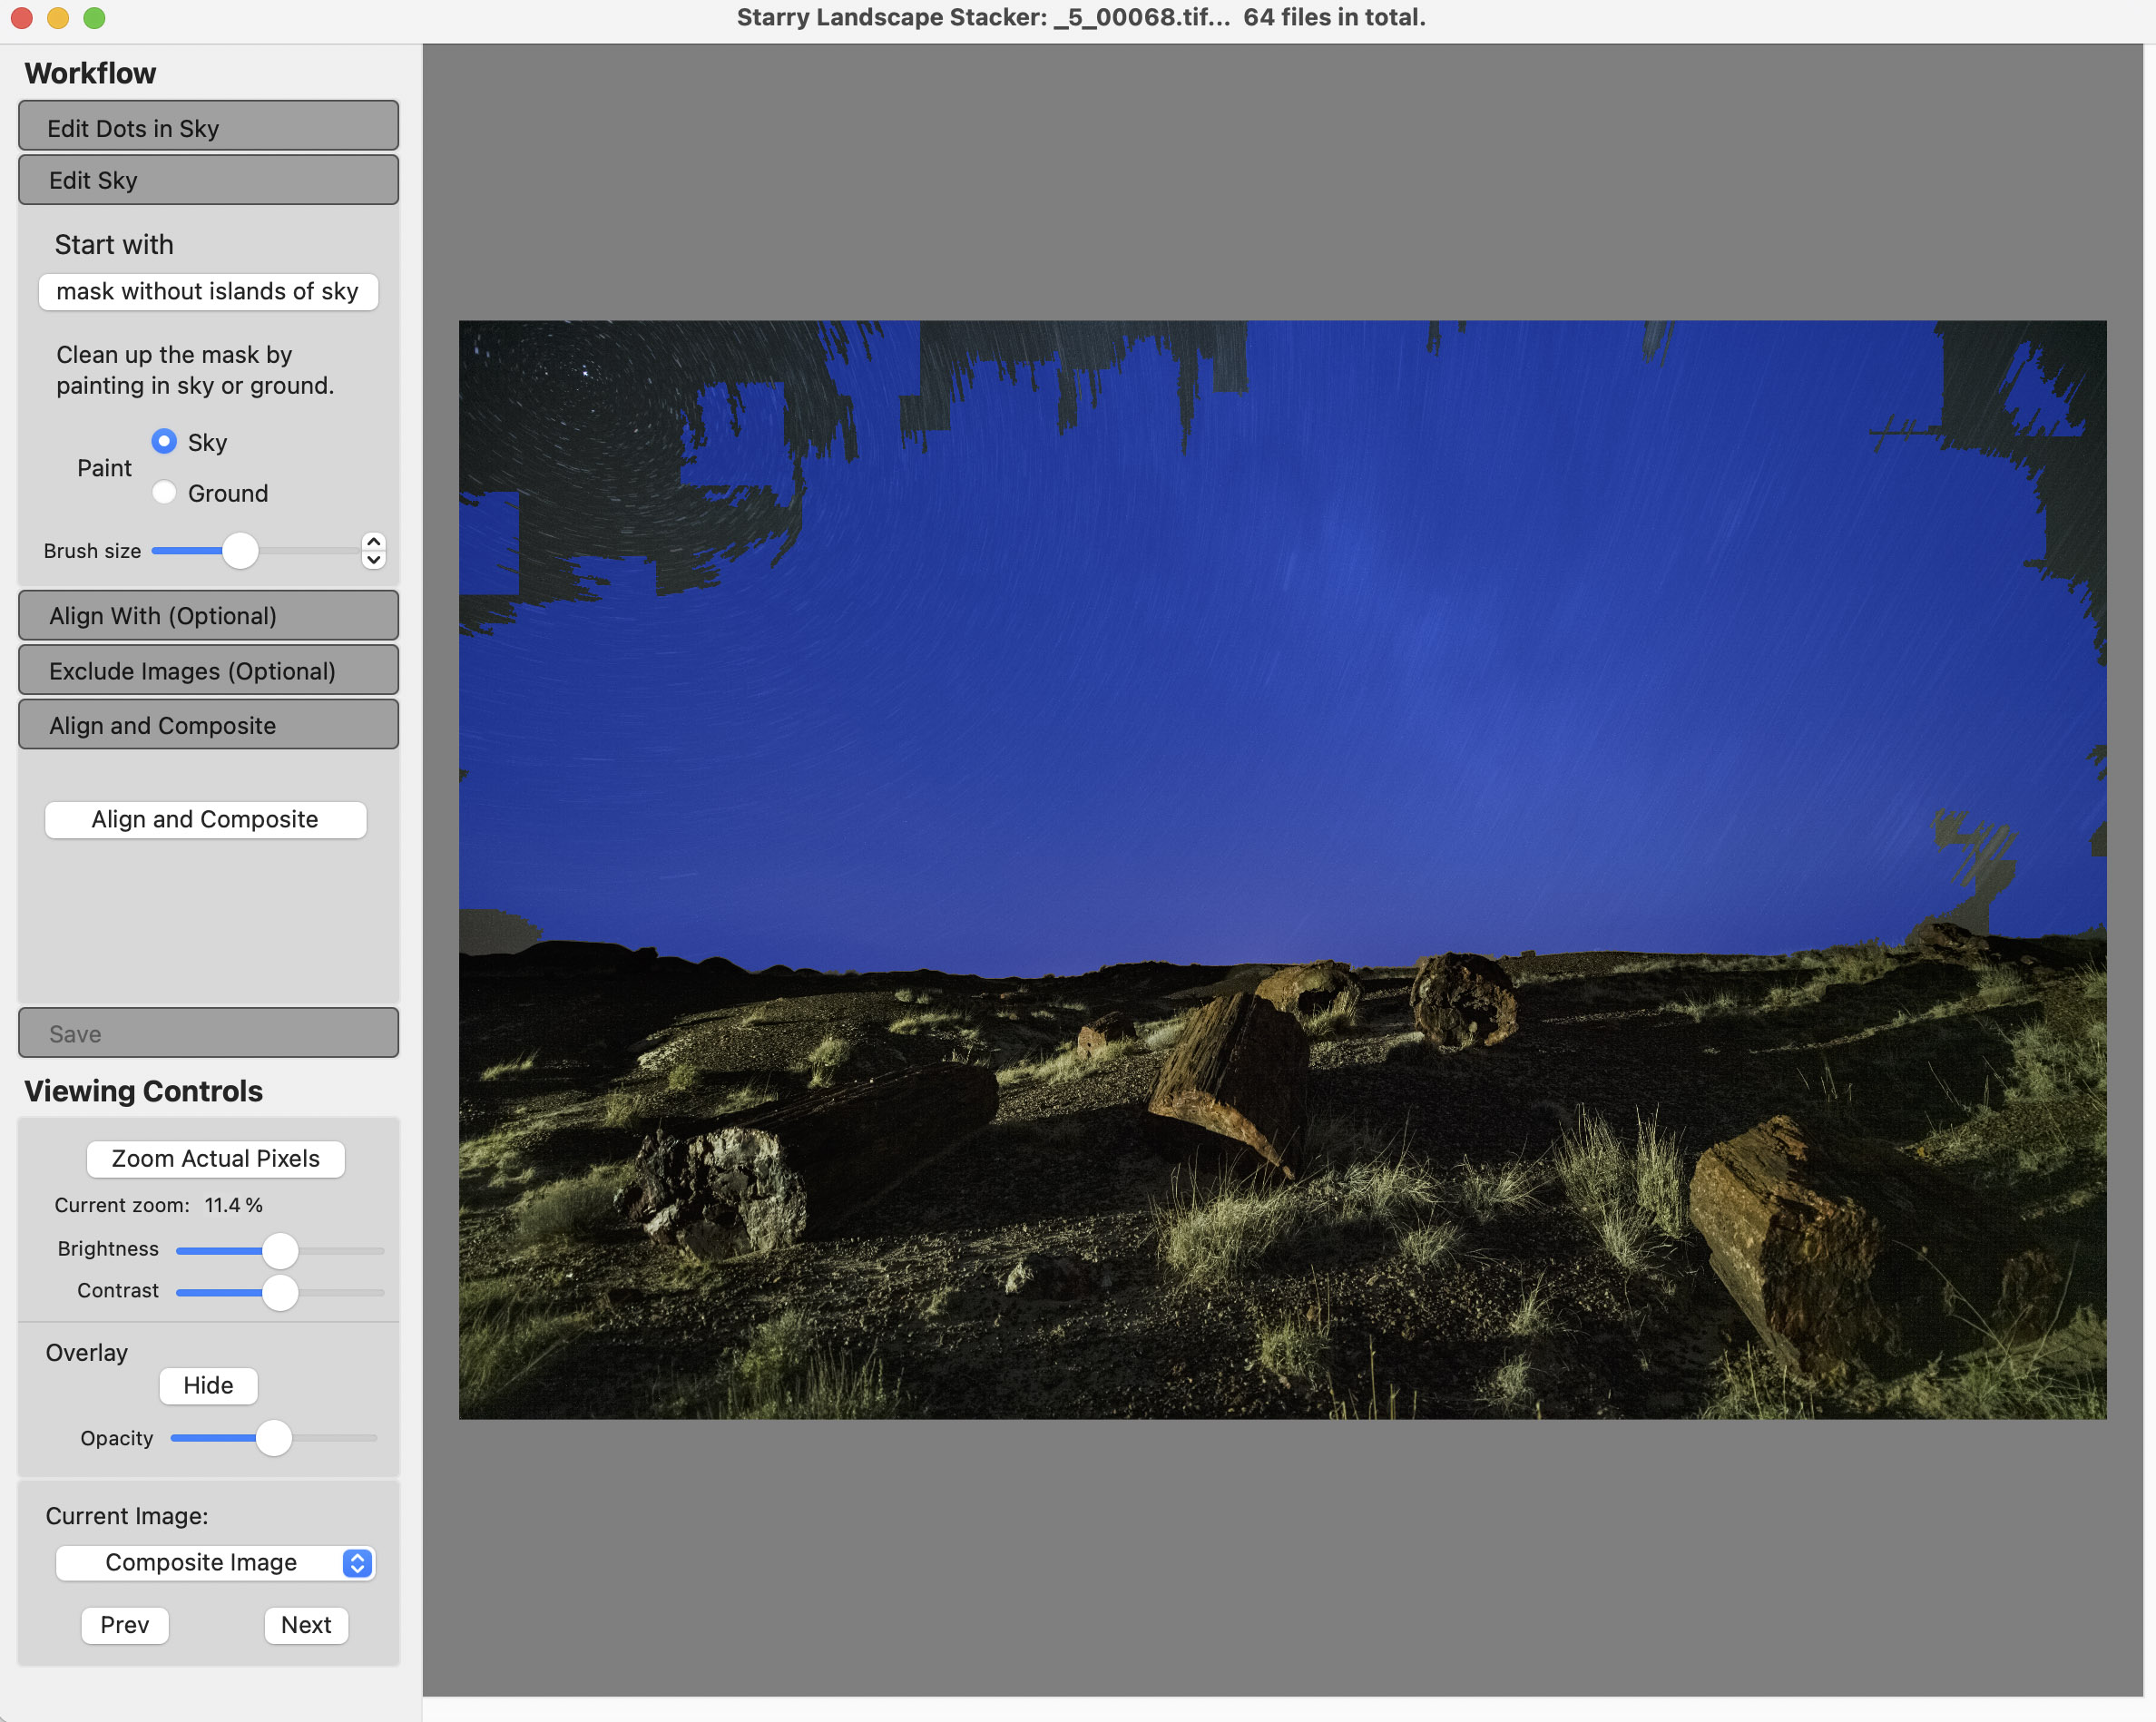
Starry Landscape Stacker screen for selecting the sky
The most proven app is Starry Landscape Stacker (MacOs only, $40). Although not as good at that task as the latest Adobe apps, SLS does a decent job at guessing where the sky is. All you have to do is complete that task using a brush – with the usual Adobe keyboard shortcuts! I have found that SLS is more effective at suppressing luminance noise than color noise, so when preparing images for stacking, I leave luminance NR at 0, but apply color NR at 25%. The app author recommends to make only the other following changes: exposure, contrast, white balance, chromatic aberration. Export has to be 16-bit TIFF. After the compositing is done, SLS offers a choice of six different combining methods, of which the first four all produce good results. I normally use “Min Horizon Noise” or “Mean Min Horizon Noise” (which often results in a slightly brighter image).
On Windows, the closest app is Sequator (free). The main difference is that you have to select the sky without assistance. The more recent Kandao Raw+ app (MacOS & Windows, free) is also worth trying. On my new 2022 Mac Studio, it always crashes while processing the stack, but it worked fine on my 2013 Mac Pro. The app is a general-purpose stacker offered as a bonus to users of Kanda imaging devices, but if you feed it a stack of starry landscapes, it magically works just like a starry landscape stacker. The app’s computational sophistication is belied by the basic user interface. Using it couldn’t be simpler: all you have to do is load up to 16 images and optionally designate a reference image, and the rest is entirely automatic. On images I have tried, including the Petrified Forest image, it compares well to Starry Landscape Stacker, except that some of the large stars have noise amplified around, and it doesn’t eliminate plane light trails, so I still favor Starry Landscape Stacker.
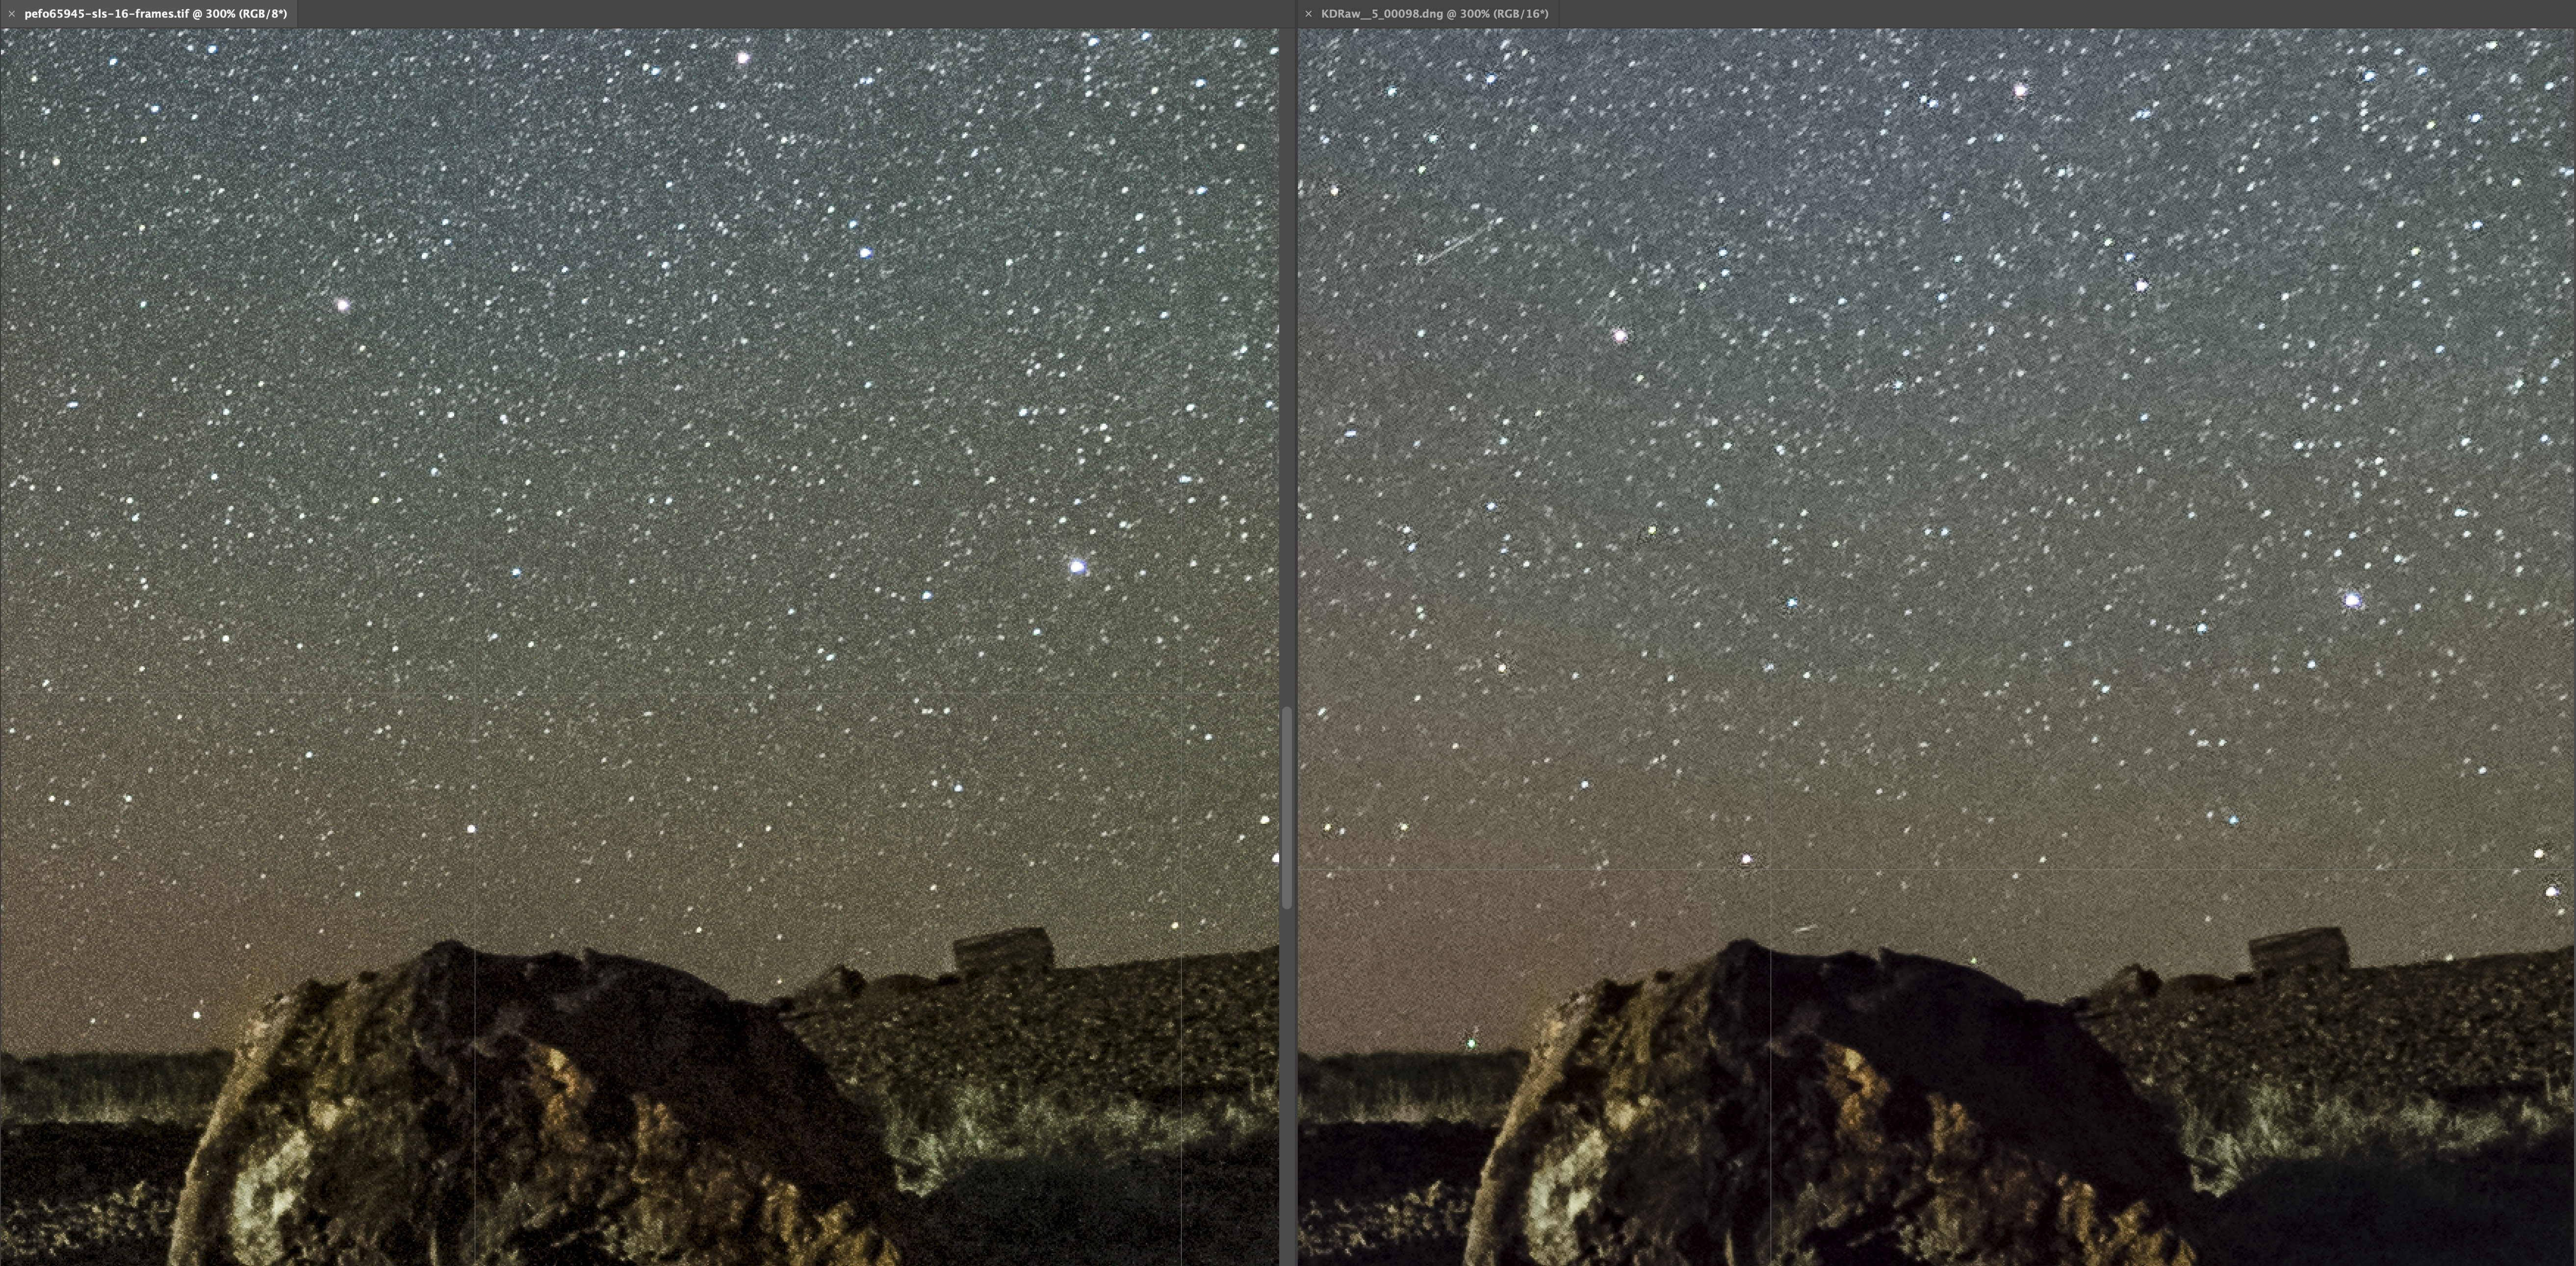
SLS (left) v. Kandao Rao+ (right). Click on image for full-resolution.
Stephen Bay, from whom I learned about Kandao Raw+, reports that it does a better job than Starry Landscape Stacker when there are foreground objects such as tree branches that both move and occlude the sky, so that is a use scenario to keep in mind, especially since the app is free and easy to use.
Standing under the night sky and seeing an uncountable number of stars has always brought a sense of awe. Modern cameras and software have now given us the tools to finally convey a bit of this impression in photographs.
P.S. The alternative to Image Stacking is tracking, where you mount the camera on a star tracker, which is a device that rotates the camera to counteract the Earth’s rotation so that an arbitrarily long exposure can be used to photograph stars. Tracking can produce even higher-quality results than stacking. However, the process is considerably more fiddly both in the field and in processing. The setup is more complicated, time-consuming, and prone to errors. If the goal is an astro-landscape (as opposed to an astronomical photograph of celestial objects only), since the landscape is blurred by camera rotation, sophisticated compositing is required.


Interesting and useful article about photographing the night sky. I’ve wanted to make a Milky Way photo for some time, and recently made an attempt on a remote stretch of Vasco Road near Livermore. Alas, there was too much light pollution, resulting in just the slightest hint of the Milky Way. I am thinking of making an evening drive to Mount Hamilton, near the Lick observatory, but am not sure if even there will prove sufficiently dark. Nonetheless, a helpful article!
Hello Mark, check the map at https://www.darkskymap.com/nightSkyBrightness or similar sites. They seem to indicate that the Mines Road towards Mt Hamilton is darker than Vasco Road. For the Milky Way, not only where you are matter, but also the direction in which you photograph. From Mines Road if you aim towards the SE it gets pretty dark. Pacheco State Park would be a good choice too.
Hi QT, thanks for including the link to the dark sky map. It looks as if Pacheco State Park may be even better than Mount Hamilton based on the color coding of the map. And may be a slightly easier drive than the twisty rode up to the Lick Observatory. I will certainly consider it during this winter with the sun setting early. A long drive for a 20-30 second exposure, but that’s half the fun!
QT – I’ve enjoyed all of the presentations you have given that I have attended. However, it would help if you looked at DXO Raw Prime. It does noise reduction on the RAW image and is objectively better than anything else out there, It’s kind of a cumbersome workflow to use though. First, import your file into LR and decide which ones you want to process. Then import those files(the original RAWs) into DXO. . The resulting file can be saved as a sort of DNG, which, when reimported into LR, can be processed like a RAW file. I reprocessed my aurora shots from 2015, and the difference was marked.
Thanks Alan for the suggestion. My lab mate from grad school used to work at DXO. In the past, and for a number of years, I have used DXO Optics Pro with exactly the workflow you describe for RAW processing. Was it “objectively better”? At the beginning, I thought it was worth the extra effort, but as ACR/LR improved, at one point it wasn’t clear anymore. I have not tried the new (?) DXO Raw Prime, but I do not think at this point the weak link in my image capture chain is the RAW processing.