How to photograph through windows: my top 12 tips
6 Comments
The only way to get some of the most striking cityscapes and city skylines is to shoot through windows, often from high-rise hotels. The techniques described in this post will let you overcome the obstacle posed by the glass to get a technically perfect image.

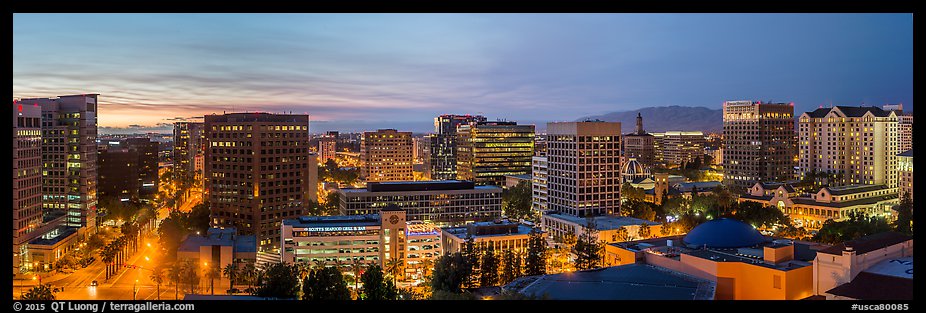
The day after I returned from a trip during which I hiked and scrambled all over the place through canyons in Zion National Park, I sprained my ankle on a sidewalk while running our Chihuahua. Not being able to travel in the great outdoors opened up some time for a few architectural and urban assignments, one of which consisted of photographing the skyline of San Jose, CA for a client.
The San Jose skyline is low because downtown is directly in the approach path to San Jose International Airport. Nevertheless, it includes a number of landmark buildings. After identifying the Hilton hotel as the spot from which most of those buildings could be captured in a single shot, I booked an upper floor room – although I live in San Jose! I had photographed many times before through windows, so I came well prepared for the shot, and was confident that I would be able to produce usable images. So will you after you read this post.

The two main issues when photographing through windows are glare and reflexions. Those can be used to artistic effect (I have a whole project about window reflexions), however this post is about eliminating them. Newly published research details an algorithm able to separate reflections, but while we are waiting for those results to make it into a product, manual post-processing is extremely difficult, so for now the best is to take care of them while shooting.
1. Look for single-glass windows
Modern hotels often have double or even triple glass windows. With them, there is a reflection from the inner pane and another reflection from the outer pane. The additional glare and internal reflections sometimes cannot be totally eliminated even with the tips below. If possible, try to avoid them.2. Clean the window
It’s easy to forget, but it’s worth to take time to inspect the window carefully. If necessary, wipe down a large portion of the window, not just the area in front of the lens. If you can also clean the outside, be sure to do it. However, even if some dirt remains outside, take heart that it will not show up in the image when applying tips #4 and $5. However, it will reduce contrast.3. Time your shoot so that the window is not lit
When the sun strikes a window, not only it creates glare, but any defects and dirt become more visible. Try to time the shoot when the window is in the shade. If the building casts shade on parts of the window, position yourself to shoot through that part. That’s just not the sun, though. Be careful that windows can be illuminated from outside at night. The darker it gets, the more problematic it is, especially with double glass windows.4. Use a large aperture
Shallow depth of field minimizes the effect of window glare and defects by reducing depth of field. In fact, with a wide open lens, you can even shoot through a fine grid – such as mosquito net – without it showing in the picture when it rests against the lens.5. Shoot from as close as possible to the window
Besides helping reduce reflections, this reduces the effect of window glare and dirt by pushing them out of the depth of field area (see #5). The closer you get to the window, the more its surface gets out of focus.6. Beware of vibration if touching the glass
If shooting straight (see #7), resting the lens against the glass creates enough of a seal to eliminate reflections. However, if using an SLR, the contact against the glass amplifies the vibration caused by the mirror. In that case, use live view.7. Shoot as straight as possible
The more directly you look through the glass, the fewer reflections you get. At a large angle, you get light that bouncing inside the window glass, causing a displaced ghost image, more noticeable with double-glass windows. A lens with shift is ideal because it let you shoot with the lens straight on, while varying the composition. Also, note that wide-angle lenses capture more reflections than longer lenses.8. Beware of using a polarizing filter
One of the main uses of polarizing filters is to reduce reflections and glare on surfaces, however polarizing filters can create undesirable patterns while shooting through transparent materials. Shooting through the windows of an airliner with a polarizing filter almost always create weird color shifts. Some high-rise hotels use polarizing glass in their windows which result in a similar effect. The effect is strong in the image below, but it can be subtle enough that you will notice it only when processing the image on the computer, when it is too late!

9. Turn lights off and move away bright objects
To avoid reflections, the key is to make the interior as dark as possible. Naturally, you’ll want to turn off all the lights if you can. Also move away from the window bright objects such as lamps, and cover white sheets. In order to make the room darker, you might be tempted to draw the curtains, leaving only an opening for shooting, but this is counter-productive. Most curtains have a light-colored lining to reflect the heat, which will also bounce light back onto the glass.10. Wear dark clothing
You will be standing close to the camera, so make sure to wear something that doesn’t bounce light back to the glass!11. Bring a rubber hood
Although major camera and lens manufacturers provide only rigid hoods, you can find third-party lens hoods made of rubber. Their intent was to make the hood collapsible and adaptable to various lenses. However, in this case, their point is to make a seal keeping light from getting in between the window and the lens if you place the hood onto the glass window. The flexibility of the hood allows you to angle the lens a bit if needed.12. Bring a dark cloth
If you need more flexibility than a rubber hood can offer, the solution that often works when everything else fails is to use a dark cloth over the camera so that you create your own dark space. For the San Jose shot, I brought a large black cloth that I used to focus my large format camera. I affixed it to the glass using gaffer tape – which does not leave marks unlike some duct tape. Although the space was large enough for my head and the camera, after composing, I got out of the dark cloth to make sure the seal was perfect. When traveling, I don’t always pack the dark cloth, but I always make sure to have a jacket lined with black fabric (Marmot’s Dryclime shirt is great). If I do not have tape, after composing, I put the camera on self-timer and hold the jacket against the glass with both hands (note #6, though). In a pinch, draping a dark T-shirt around the lens can work, but it can be difficult control its intrusion into the picture.
Using those techniques, I was able to photograph the images that illustrate this post. If you’ve made nice photographs through windows, please share them! Are there other tips you’ve found useful for shooting through windows ?


Great tips!!!
An awesome article about clicking snaps through windows! One of the best I have ever come across! For those who want to take the journey of being a professional photographer from an amateur one, this blog might come handy!
http://blog.showflipper.com/62-post/The-Essence-of-Digital-Art-and-Abstract-Photography
My name is Michael.
Great article – Thanks for publishing it!
I have an office at work with west-facing windows.
I am blessed with a great view of some awesome sunsets.
The challenge are the dual panes in the windows.
I tried your black cloth recommendation, but and the sunlight is so bright that the cloth did not matter… the sunlight reflects right off my iPhone onto the outer pane, and then back into the iPhone’s lens… the CPL / circular polarizing lens doesn’t do anything.
I had wondered about having a hood, like the photographers in the late 1800s used, and your article prompted me to try it… THANKS!
I suspect I am stuck with the laws of physics… there are no real options to remove the glare from my photos.
Do you agree?
And as much as I would like the glass to “bend and let me move the iPhone and part of my arm outside, take the photo, and then return inside, that’s still fantasy, too.”
; )
Any input you have will be welcomed.
Thanks,
Michael
Ballwin, MO (St. Louis)
Michael, you are right there isn’t much you can do. If there are light sources (sun, bright lights at night) in the frame, even a single-glass window is very prone to flare, not to mention a double-glass one.
Any advice for taking wide pictures through a store front window? We may take a trip to NYC and I would like to photograph some of the window displays. The windows are much wider than 1 photo (even with a wide angle lens), so I was thinking about turning the camera vertical and taking a series of photos and then stitching them. Any advice?
Dave, I don’t have any experience with your scenario, but it looks like your idea could work if the depth of the display is shallow enough, otherwise you’d be running into parallax problems while stitching. That two reasons to shoot from as far to the window as you can: reduce the need for a wide field of view, and reduce parallax. One thing I have done while photographing windows is to use a shift lens in order to prevent getting my own reflection in the window. If you don’t have one, you can shoot slightly obliquely and correct the distortion in processing.