Deblurring a film image with AI-based apps
9 Comments
Located north of Arctic Circle, Gates of the Arctic National Park and Preserve is the ultimate wilderness park in the country. Absent any facilities such as trails, signs, or campsites, it is often possible to feel that you are the first human ever to set foot in the park. No roads lead into the park. You could trek from the Dalton Highway, but it is a long way to the more scenic areas. Most visitors charter a bush plane to fly into the park, choosing either a floatplane for landing on lakes or a plane equipped with oversized tires for landing on gravel bars. The main gateway is Bettles, which can be reached in summer only by air, usually via Fairbanks, the closest major city, 200 miles south. So on that very long day, it was San Francisco to Anchorage, Anchorage to Fairbanks, Fairbanks to Bettles (via mail plane), and then Bettles to Circle Lake, after waiting for the clouds to lift.
The capture
During the bush flight, propeller noise prevented any talking. Once we landed my friend’s first reaction was “awful”, as she was constantly battling air sickness from the bumpy flight. My first reaction was “beautiful”. Taking off in a weather break and flying within a rainstorm, we were treated to double rainbows alternating with clear views over meandering rivers in vast mountain valleys. But the flight was indeed bumpy. With the plane swinging wildly, I tried to time my shots for the endpoints of each swing, like the high points with zero velocity reached by a pendulum. My camera was loaded with 100 ISO slide film (Fuji Provia) and since we had taken off after 9 PM, the sun was not at its brightest, although you wouldn’t guess it from the photographs. Even at maximum aperture, and despite using one of the first image stabilized lenses (the Canon 28-135 IS that was introduced two years before), many of the images showed some blur. I tried to correct them with several pieces of software, including the filters built in Photoshop, and Blurity, but had no success.
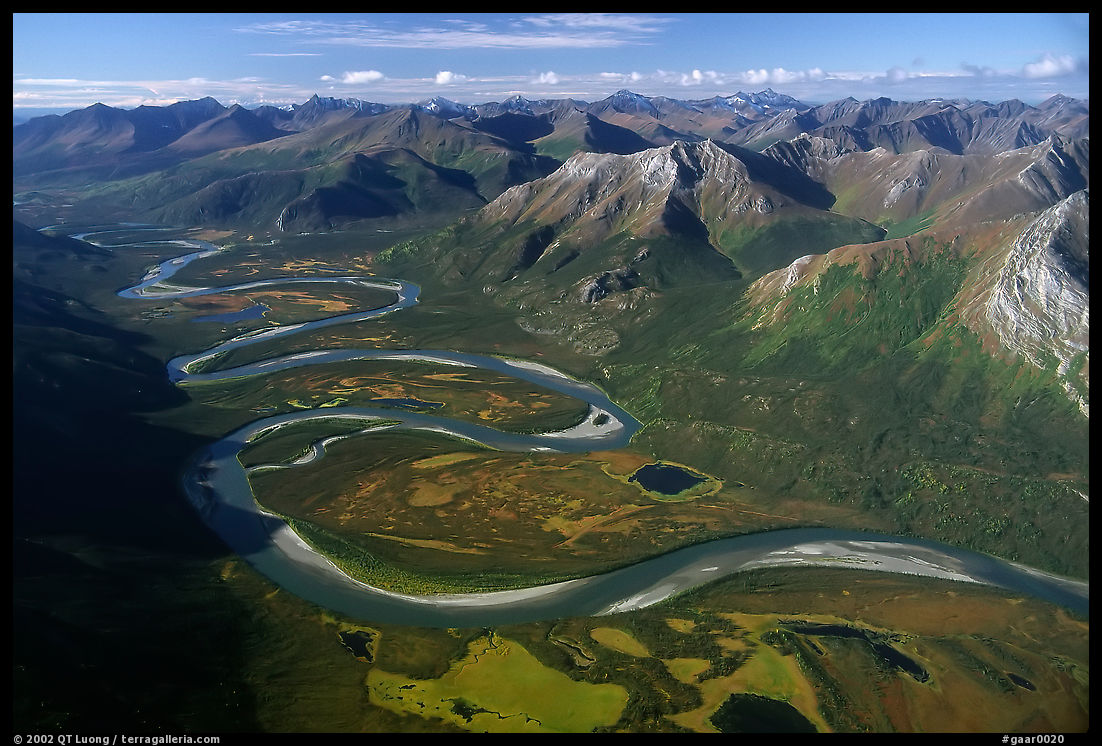
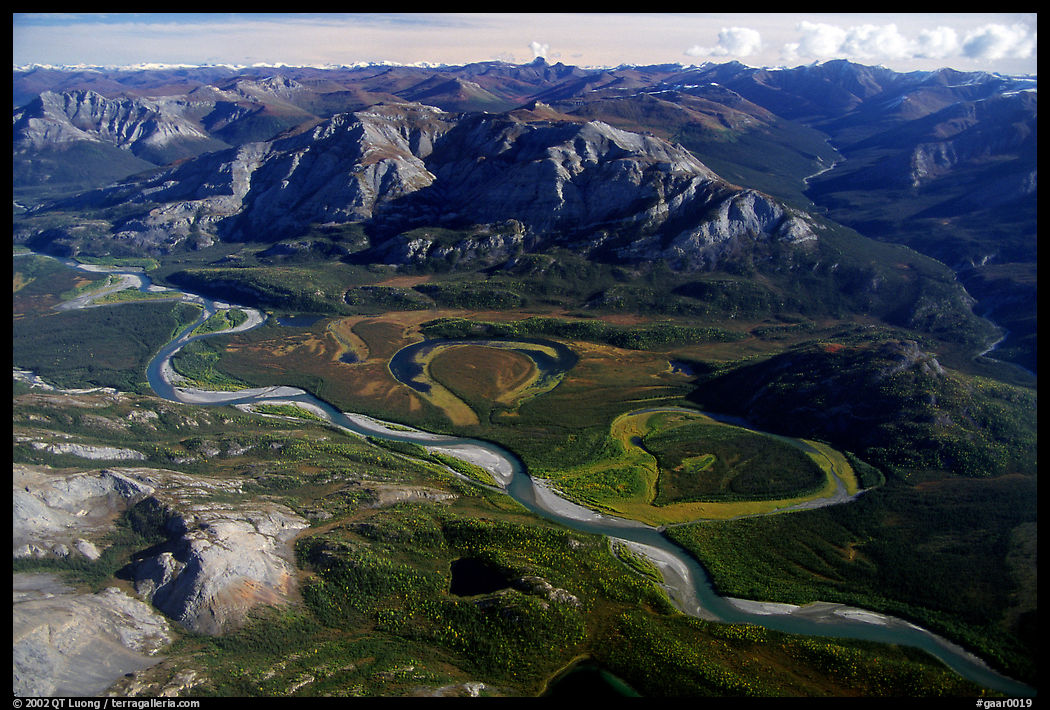
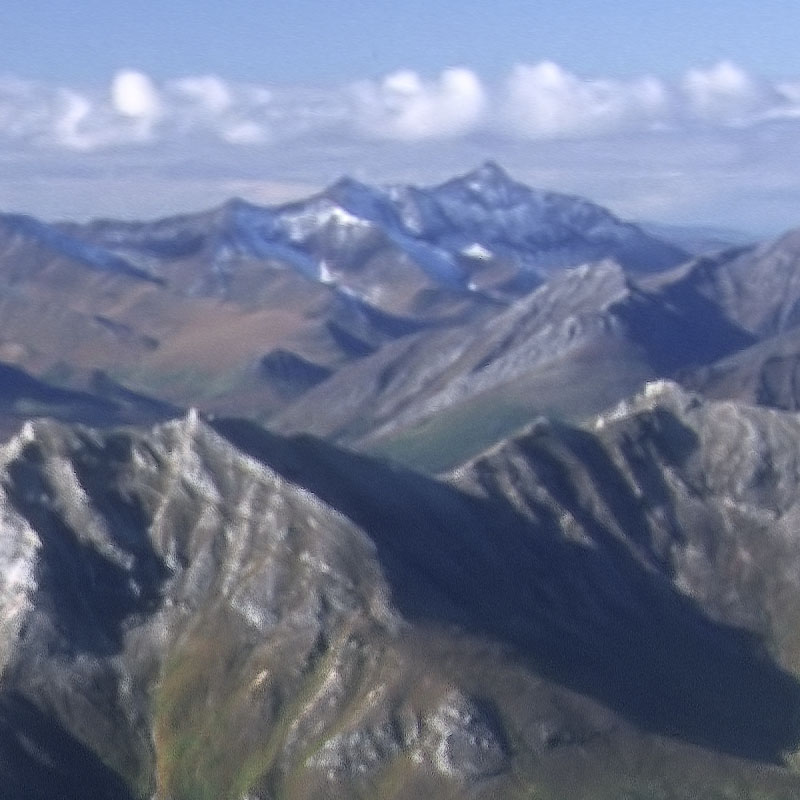
My preferred image from the flight was the Alatna River Valley above. I liked the way it boldly featured the meanders in a diagonal composition. Since their real width is about the same, their diminishing size in the image give a perspective clue that creates a sense of depth. Five years ago, after making a test print at the actual full-page size for Treasured Lands, I concluded that even at 12×10 inch size, its softness was noticeable, and instead used the following image, that is not as strong but was sharp.
Applying Topaz AI Sharpener
However, this spring, Outdoor Photographer requested again the Alatna River Valley image for a feature I’ll write about in the next post. I could have proposed the alternative image instead or advised them not to print it too large, but this would have meant infringing on their creative decisions and also admitting I failed at producing a technically sound image. So instead, now armed with AI-based image processing apps that were not available five years ago, I tried to reconstruct a sharper image. First, here is a 100% pixels crop of the original image, taken from the horizon, about one third from the right image edge.
I applied Topaz AI Sharpener in “stabilize” mode, where the app performs deblurring rather than what is normally called sharpening (the default mode). The app had been successful on all images I had processed before, and it did deblur the edges, but the result is way too noisy with the default settings.

Pushing the noise reduction slider all the way to the right helps, but there is still a lot of noise.
What went wrong? All the other images processed before were photographed on digital cameras, whereas this one is a scan from film. I can only assume that since the AI network was not trained using film images, it had no way of knowing that grain was not an image element and therefore amplified it. Since grain was what caused the sharpening to fail, the next idea is to try to remove, or at least reduce grain before trying to apply sharpening.
Pre-processing with Neatimage
Neatimage is an app that I had been using for a decade and half to reduce grain when making large prints from 35mm film, and I kept getting better results with it than with more recent noise reduction apps. It works by analyzing the image to create a noise profile, and has many options to fine-tune the result. The following two crops show the result of applying Neatimage, and then Topaz AI Sharpener.
Pre-processing with Topaz DeNoise AI
Topaz Labs has a recent AI-based noise reduction app, called Topaz DeNoise AI, so let see how it compares to the venerable Neatimage with the default settings. The following two crops show the result of applying Topaz DeNoise AI, and then Topaz AI Sharpener.

DeNoise reduced the grain quite a bit, but when Topaz AI Sharpener is applied what little grain is left is considerably amplified. However, pushing the noise reduction slider all the way to the right (100%) in Topaz DeNoise AI did totally remove the grain, even though, unlike Neatimage, Topaz DeNoise is meant to combat digital noise. This was a bit of a surprise since the noise slider in Topaz AI Sharpener was not particularly effective. The following two crops show the result of applying Topaz DeNoise AI, and then Topaz AI Sharpener.

Even though the controls in the Topaz apps are limited, there are still a few sliders to tweak, and one could spend quite a bit of time doing so. One should certainly not reject an app based on its default settings. I also experimented with a third Topaz Lab app, Gigapixel AI, but we’ve seen enough apps in this post, so that’s something I may write about in the future.
Final Results
Both images pre-processed with Neatimage or Denoise AI at 100% and then with Topaz AI Sharpener are grain-free and reasonably sharp-looking. However, the strong grain removal necessary for Topaz AI Sharpener results in a lack of texture in smooth areas that make them look a bit artificial. After adding 3% of Gaussian noise in Photoshop, the results look more natural. Here are the original crop, sharpened Neatimage and sharpened DeNoise AI with noise added.


There are subtle differences, but both look appear a significant improvement. I was glad that I took the time to reconstruct the image, since Outdoor Photographer ran it as a double spread. Expect a change in the 6th printing of Treasured Lands…
Update: What about DeNoise’s sharpening?
Topaz DeNoise AI has its own sharpening slider, however, it is meant to counteract the loss of detail caused by noise reduction rather than address the sources of blur like motion or defocus. So while it does help a bit, it is not a substitute for applying AI Sharpener. For a change, I will use a second example, Stanford University.
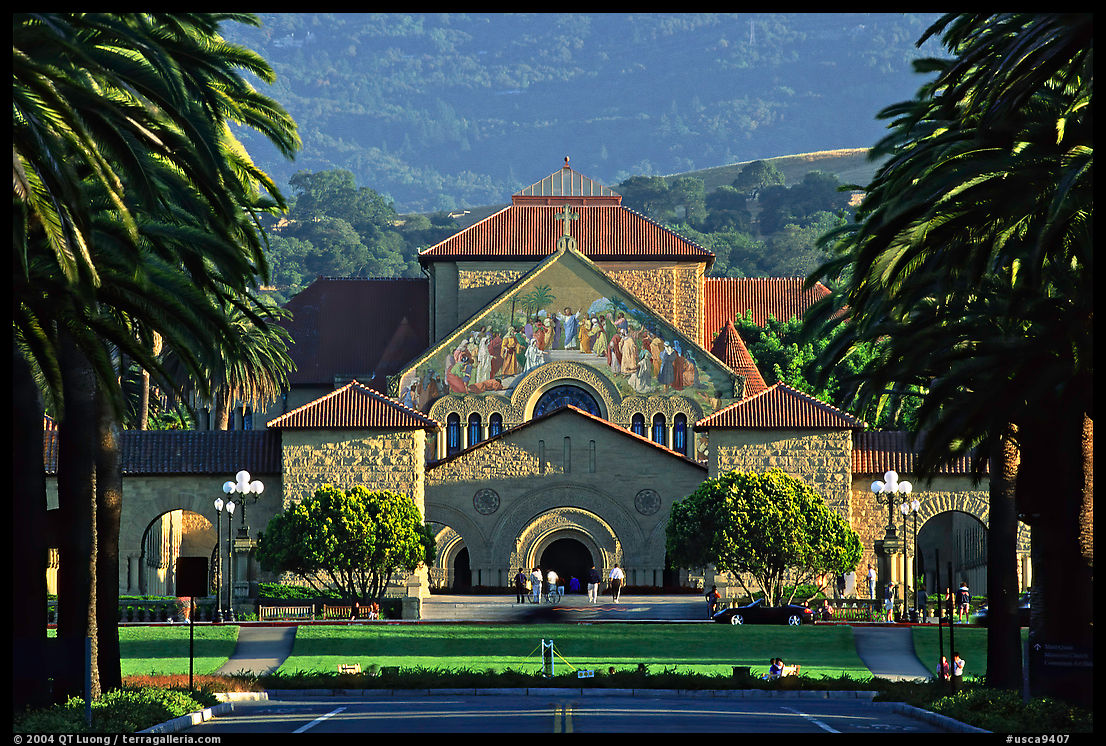
To compress the perspective and include all of the palm trees, the Quad, Stanford Memorial Chapel, and the hills, I used a telephoto lens, standing in the middle of the road with a tripod during the brief interval when the traffic lights were red. This is not a situation amenable to very careful technique. The photograph was made less than an hour before sunset as the buildings are north facing and in the shade for most of the day, so shutter speed was slow. While examined under a 4x loupe, the slide looked fine. Even after scanning it and posting images on the web, I did not notice any issues. However, after making a 12×18 print, I saw a bit of softness. Prints are a more demanding medium than a computer screen, and will ruthlessly reveal defects. I re-processed the image with visible improvement in the print. In the comparison below: left is the original image, middle is sharpening with Topaz DeNoise AI, right is sharpening with Topaz AI Sharpener after Topaz DeNoise AI.
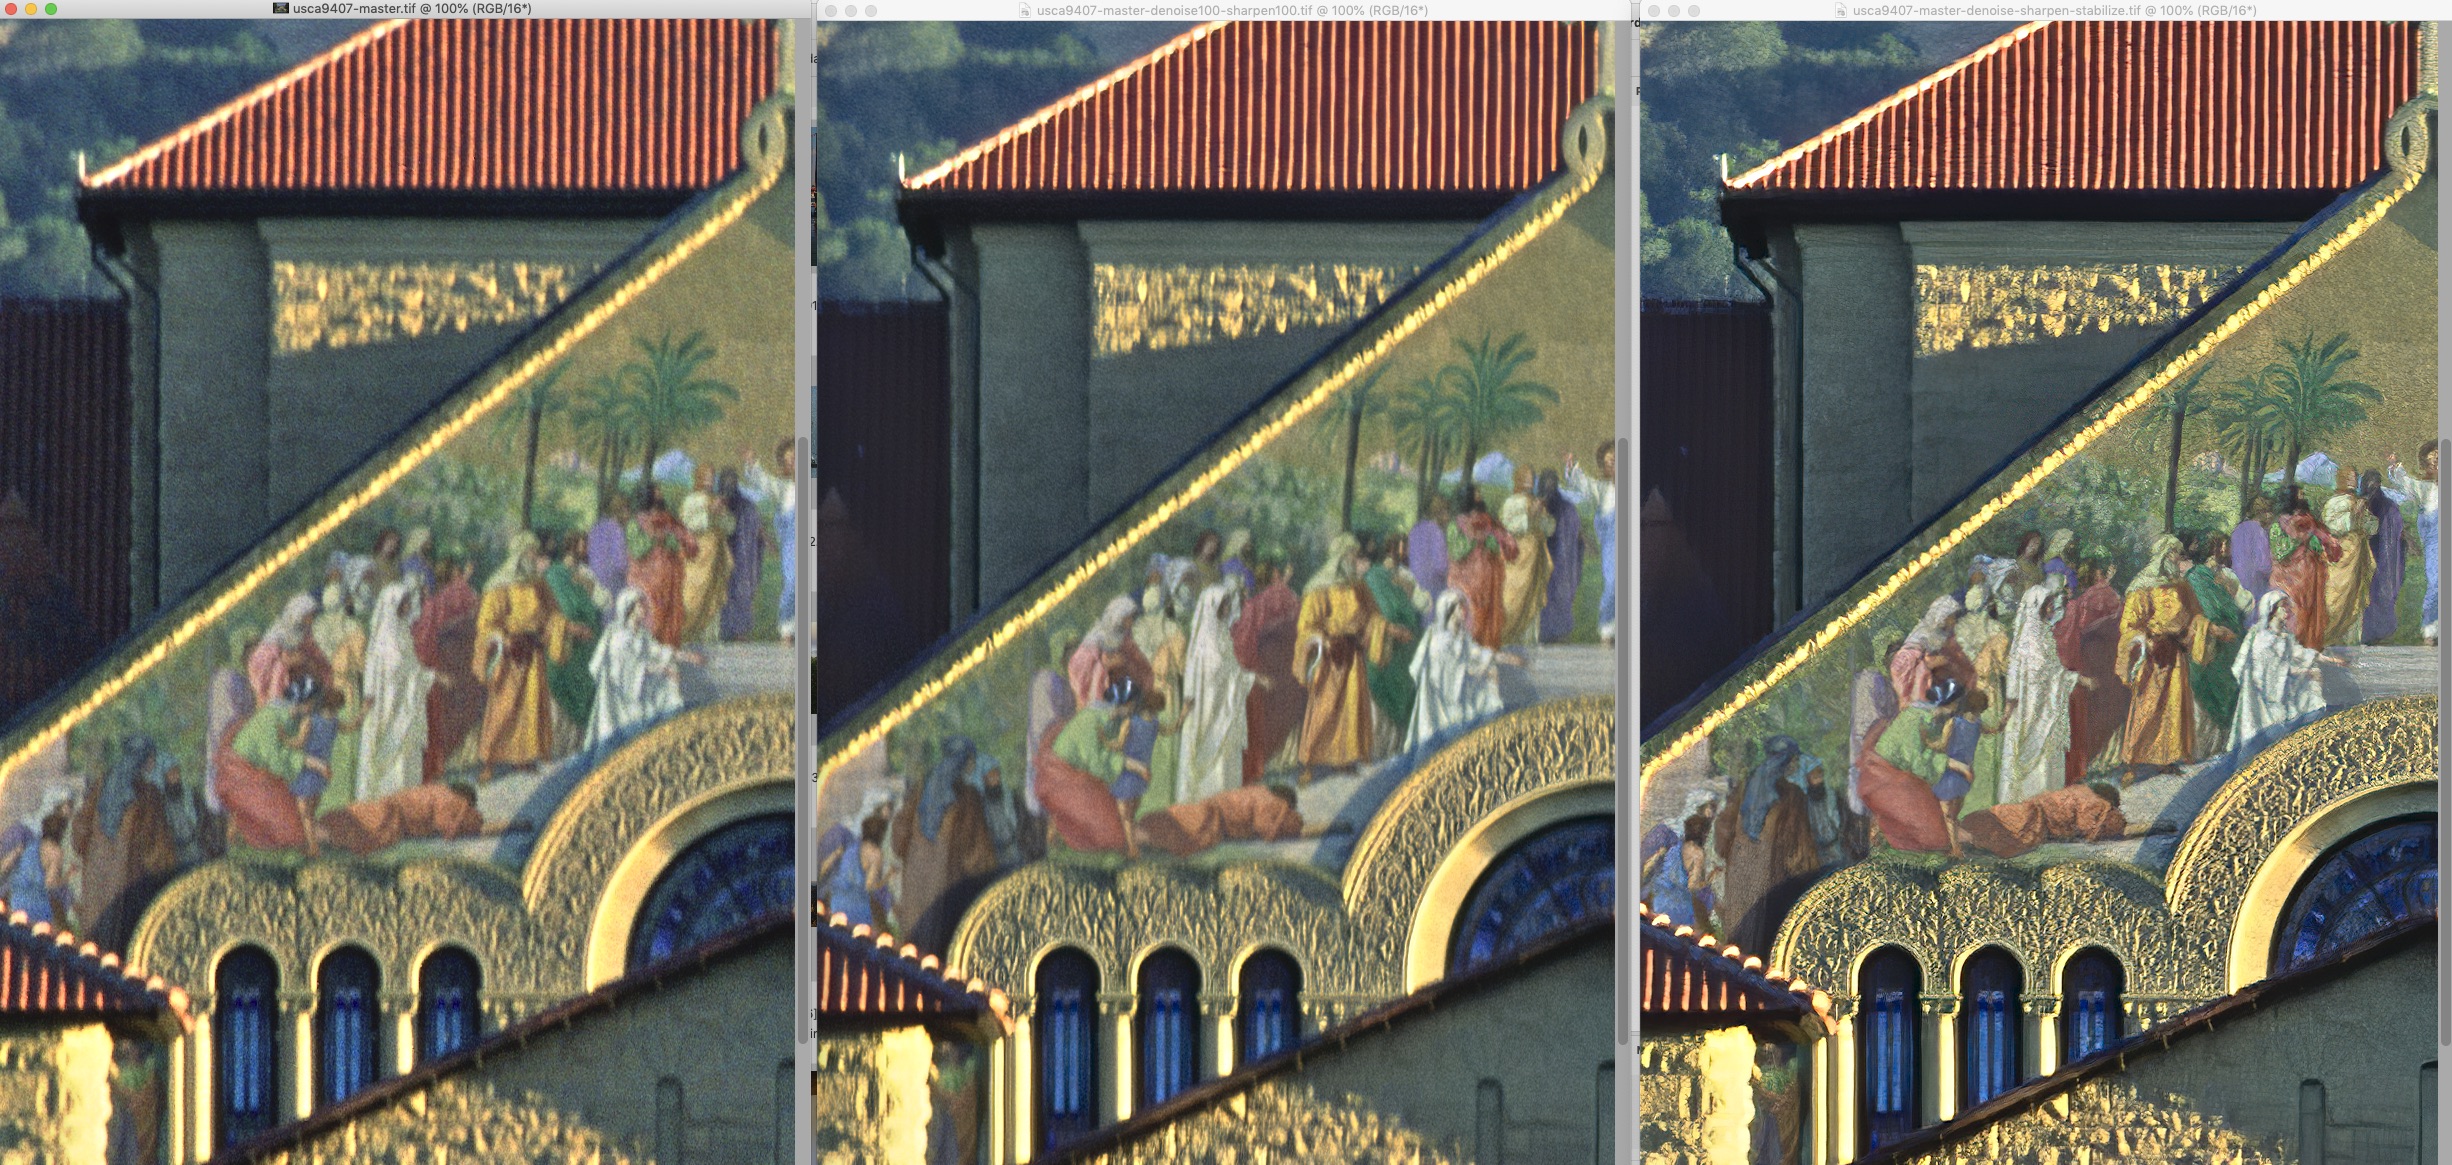
Click on image for a pixel-level view.
Update 2: A worst case
In the two examples, the motion blur was rather light. Here is an example with more severe blur, again from an aerial photography scenario. I’ve learned the hard way that one needs seriously fast shutter speeds, in the 1/500s to 1/1000s. On my second trip to Dry Tortugas National Park, in January 1998, I chose to go by seaplane instead of ferry so that I would be able to make an aerial photo, which best captures the unique position of Fort Jefferson covering most of tiny Garden Island in the middle of the ocean. The pilot agreed to circle the island once. As foolish I as it may now sound, my primary goal was actually to photograph with my large format camera. Suffice it to say, this did not work out well. Afterward, I still grabbed a quick photo with the 35mm camera, just in case, but it was still set up with aperture priority at f8, and with the polarizing filter, even midday, the shutter speed wasn’t as high as it should have been. Way to mess up what should have been a straightforward shot!
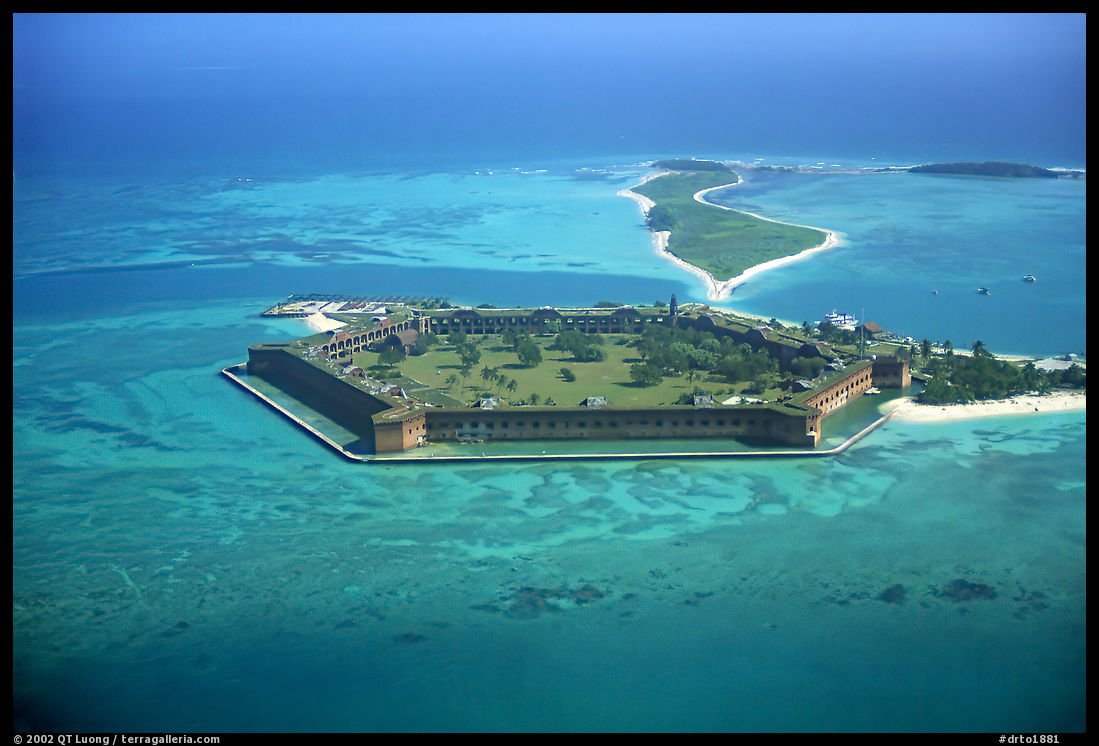
You can see in the comparison below, even at a small size, how blurry the image before processing (left) is. About fifteen years ago, a customer ordered a print. At 12×18 size, it was awfully blurry. Having made the print, I felt bad signing it, but I sent it nevertheless, thinking that the worse that may happen is that the customer would return it (all of my prints are covered by a one-year 100% money back warranty), I’d apologize and pay shipping both ways. I was surprised she didn’t. Maybe the technical standards of photographers are too high?

Click on image for a pixel-level view.


Thanks, QT! Invaluable information, thanks for sharing. I have a lot of old 35mm film scans, now I have some info on things to try to improve the top selects. Best, Paul
I generally try to retire the 35mm film scans, but even when there are little changes over time, there are some circumstances that are not easy to personally repeat, like that Bettles-Circle Lake flight.
Thank you, that’s a wonderful test… and a wonderful image!
Topaz DeNoise AI has its own “Sharpen” slider. Wondering how it compares to Topaz AI Sharpener?
Excellent question, I have added an update to the article to address it.
Thanks, great article! I bought 3 Topaz products in the last 6 months basically based on a few photographers experience with them. I find the results quite impressive especially the new Low Light option in DeNoise. It is interesting to see an example of how you used the programs to achieve the results you wanted. Thanks much for sharing. It’s a beautiful image.
In the two cases you posted, the blurring was relatively mild. You even wrote that the second image looked fine to you before you made a print. Is there any evidence that the app would be able to rescue more seriously blurred images?
I am happy to oblige. See update to the article.
Excellent QT and very useful for me
I live vicariously in your adventures!