Adobe Super Resolution vs Topaz Gigapixel
10 Comments
Usually, I hardly pay any attention to Photoshop updates, since I use only a small subset of features that have been around for a while. However, when the new release was announced a few days ago, headlines mentioned a new “super-resolution” feature. This caught my attention since I was in the midst of delivering files to a client for a rather prestigious installation where images are to be printed up to 10 meters (almost 400 inches) high.
Naturally, most of the images are from large format film, scanned to a file size of 2GB, or 30,000 pixels in the longest dimension. However, as a large format camera cannot do everything, some images were digital captures. I had already provided to the client original digital files, as well as files resized by Topaz Gigapixel AI, but thought it would be worth it to try the new Adobe resizing on its release day. Other digital images in the set were underwater where shooting via a dome limits sharpness, and a night sky with northern lights and stars shot at high ISO, but one of them, taken from a boat, lent itself to testing.
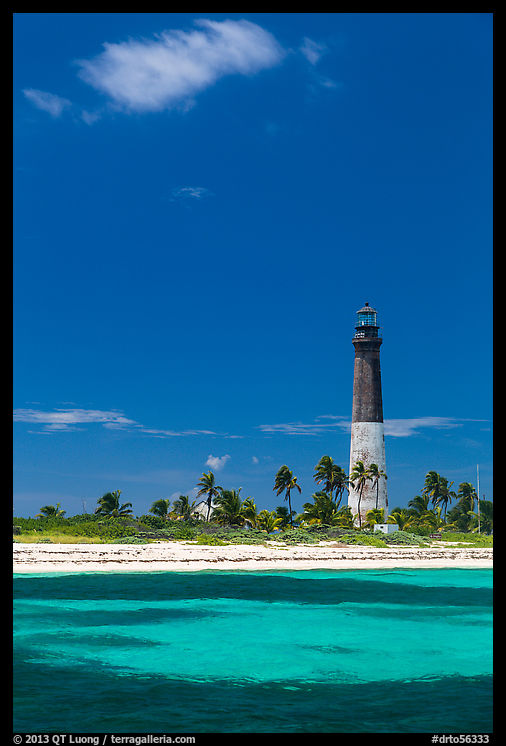
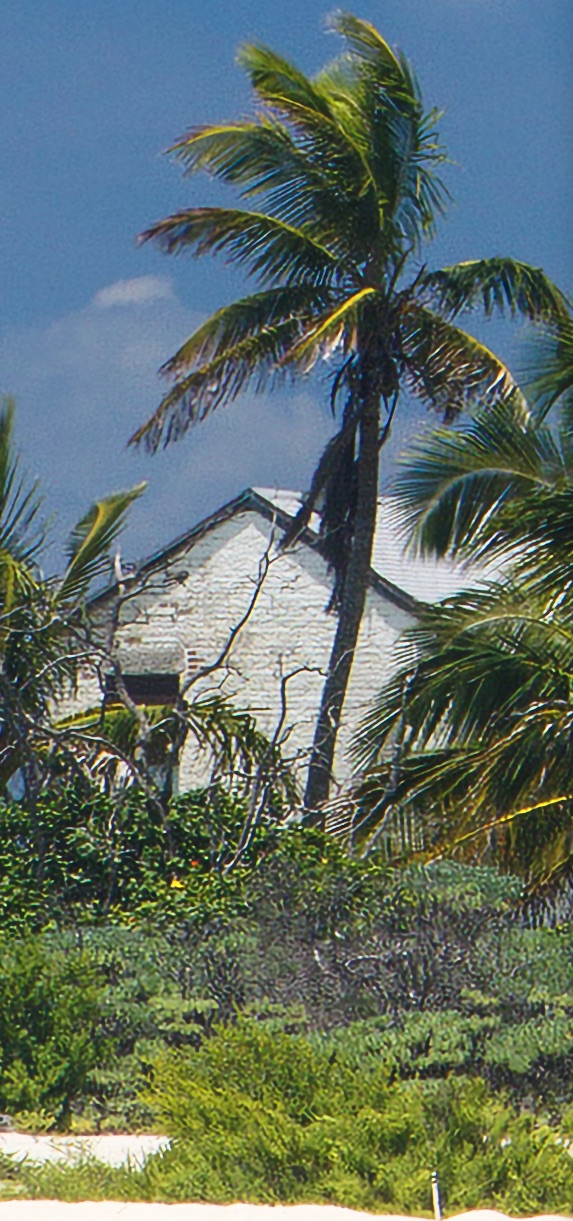
The image is of the Loggerhead Key Lighthouse in Dry Tortugas National Park, which is now inactive but once featured the brightest light in America. Dry Tortugas National Park is a lightly visited national park because the park consists of a set of islets 70 miles from Key West, Florida. Visiting requires either an all-day excursion by boat for a few hours on land, or hiring a floatplane. There is a quota of 24 visitors allowed each day on Loggerhead Key, but this number is almost never reached, since three miles of open ocean separate Loggerhead Key from the main islet, Garden Key, where all publicly available transportation land. You can read the story of my visit here. The image was photographed on a Canon EOS 5D Mark III with 24-105 lens at 75mm, f8, 1/125s, ISO 160.
Adobe Enhance Details
Super Resolution isn’t the first attempt from Adobe to use AI for image enhancing. In 2019, Adobe had discreetly introduced Enhance Details as an improvement to regular demosaic (conversion) of RAW files. Enhance Details did not change the file resolution but instead provided a superior RAW conversion method that was supposed to yield more fine details. In my tests, the improvements were subtle, often requiring viewing at 200% enlargement to discern. They were only noticeable in reducing moire and color aliasing. The drawback is that to use the feature, you have to generate a new DNG file, open that file to do the final RAW conversion, and generally delete the DNG afterward in order not to waste disk space – for the Canon RAW file of 25MB in this example, the DNG is 93MB. Because of that, I did not find worth it to integrate Enhance Details into my regular workflow, but kept open the option to use it on a case-by-case basis for demanding uses. A pixel-peeper with devoted followers was so enthusiastic about Enhance Details that he called it the “most significant feature introduced in Photoshop/Lightroom in a long time, possibly ever”, but then after subsequently noticing artifacts declared it a “a no-go garbage feature”. I hope to keep this blog devoid of this type of hyperbole.Were you aware of Enhance Details, and if so, how did it work for you?
Using Super Resolution
Unlike Enhance Details, Super Resolution doubles the linear resolution of the image, quadrupling the number of pixels. It also works with any type of file, not just RAW files. The first challenge in using Super Resolution is to find it. Super Resolution will eventually be available in Lightroom, but currently, to use it, you have to invoke Adobe Camera RAW (ACR). If you open a RAW file in Photoshop, ACR will automatically start. For a non-RAW file, navigate to the file in Adobe Bridge, right click, and select “Open in Camera Raw” (on the third line of the menu). In ACR, right click on the image, and you should see “Enhance…” as the second to last line of the menu. You can then check either “Raw Details” (to activate Enhance Details) or “Super Resolution”. The result is written in a DNG file called Filename-Enhanced.dng. There are absolutely no parameters to choose, so you’ll certainly don’t have to tinker around – but note two pitfalls be avoid below.Comparison
If you have a large computer screen, you may find the side-by-side display useful. Click on the image below to enlarge.
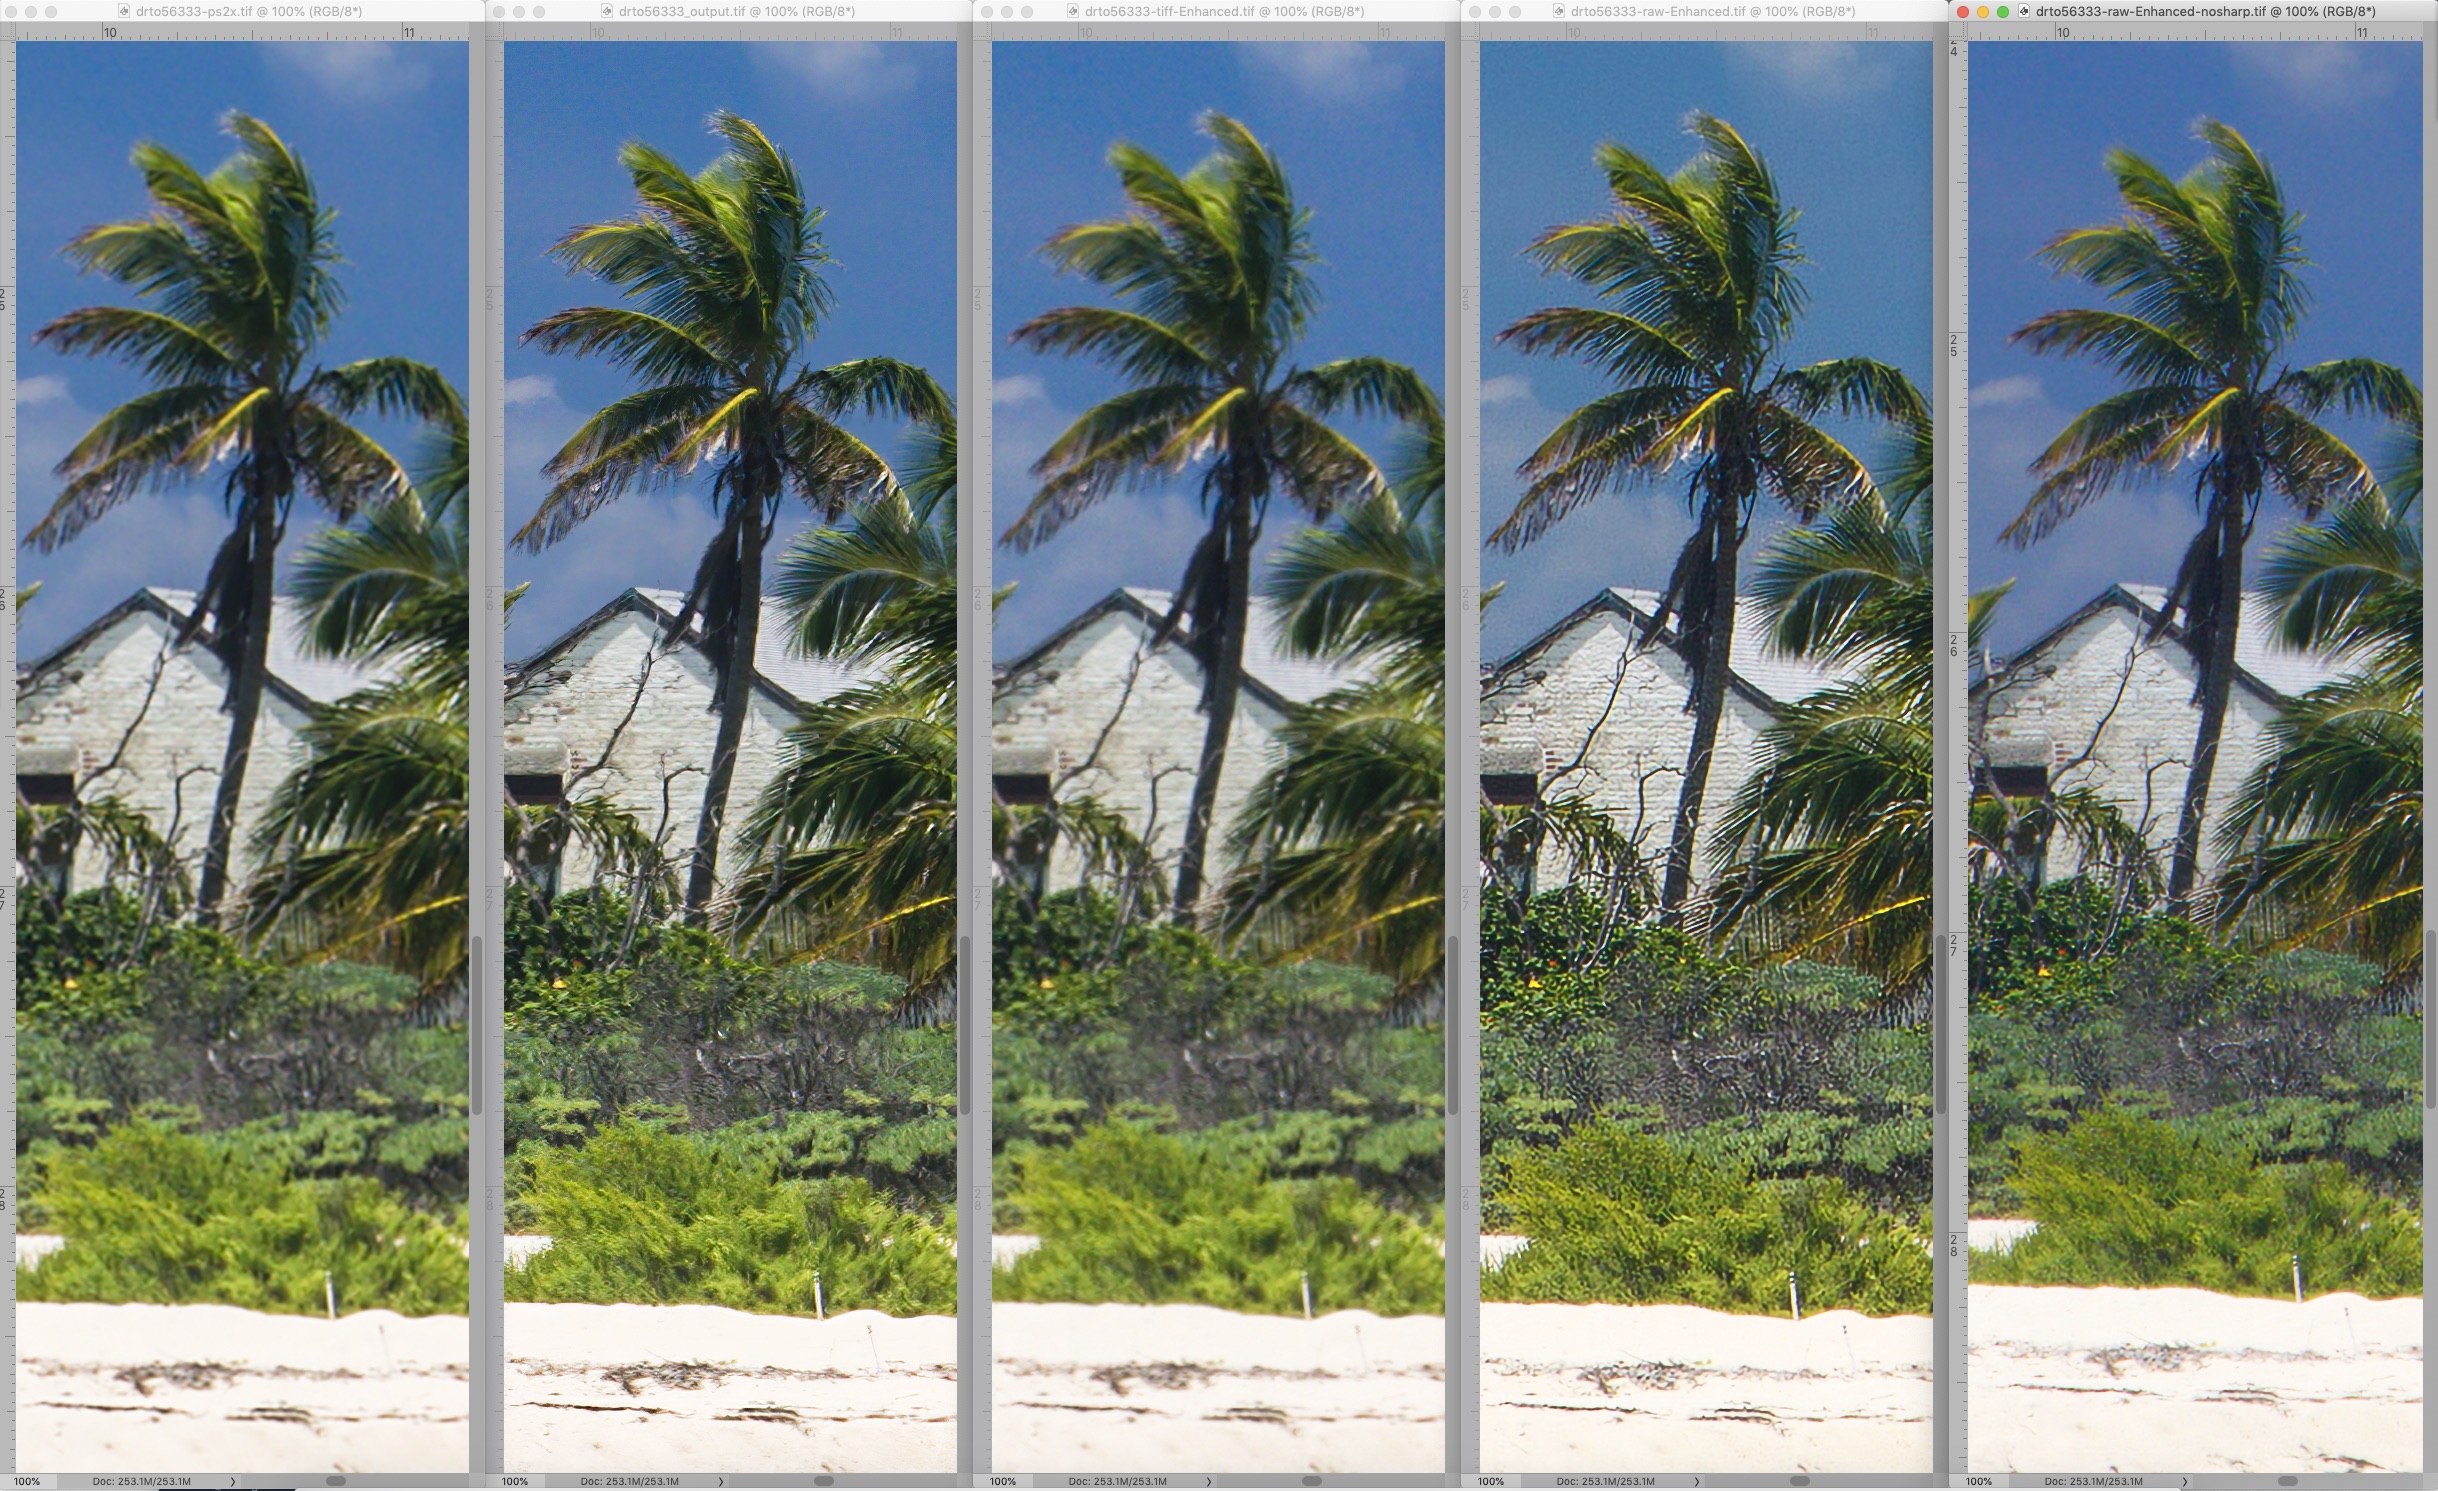
When using Super Resolution the preview window said “Estimated completion time: 5 min”. However, the computation took only 45 seconds (Mac Pro 2013 3.5 Ghz 6-core). By contrast, Topaz Gigapixel AI took 25 minutes. There are reasons for such a difference, as the nature of those neural computations make them very intensive, and I was skeptical.
 The image above is a 100% pixel view of the TIFF file enlarged 2 times via Photoshop Image Size (set to automatic), which is the reference for this comparison.
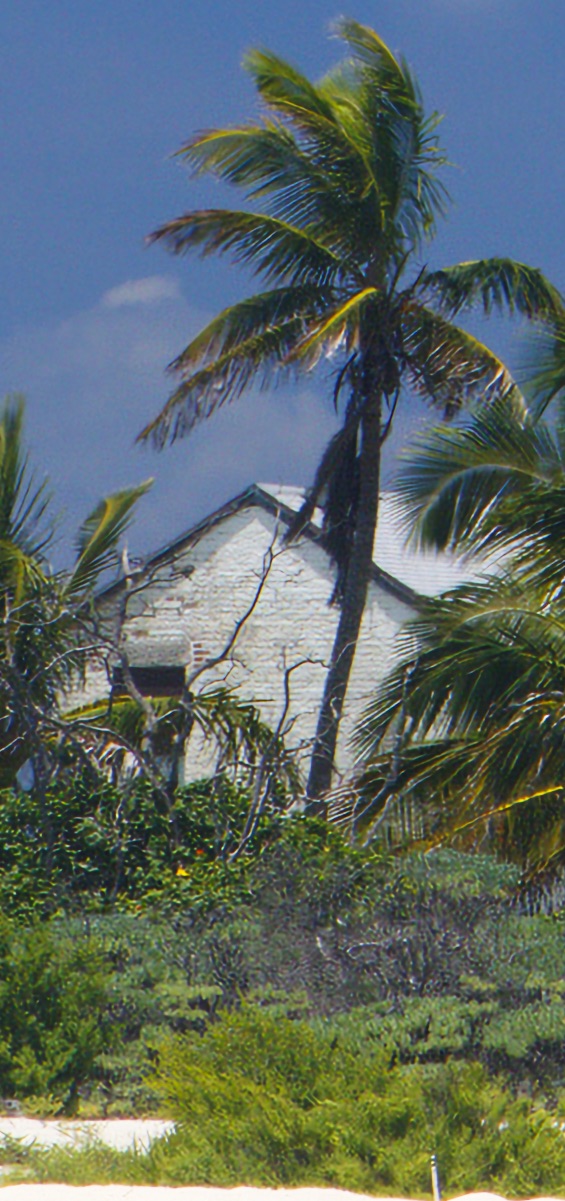
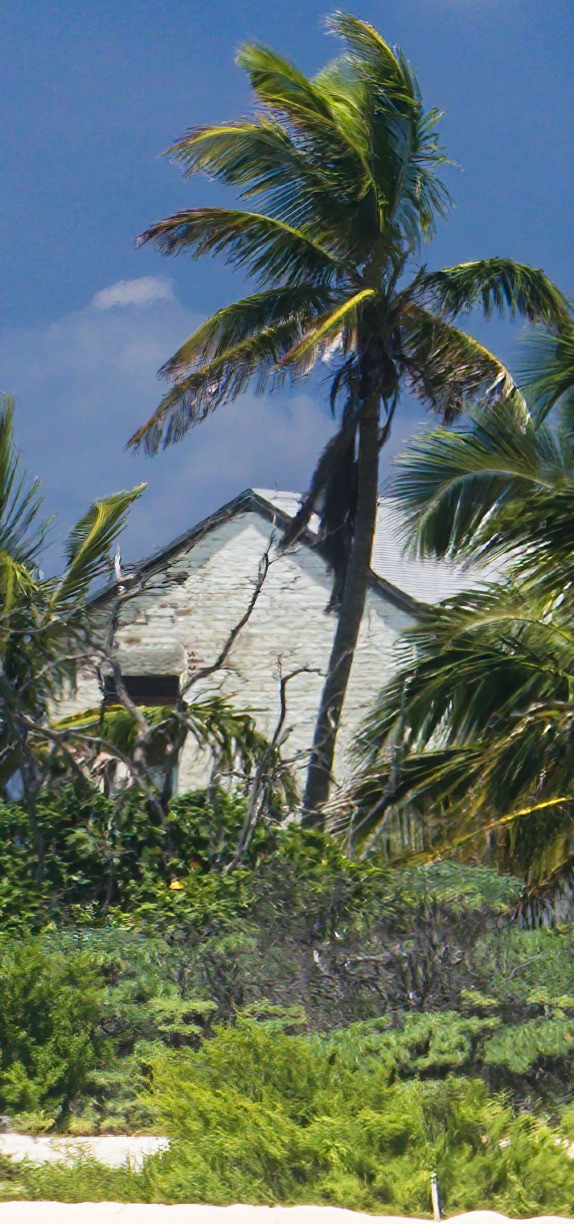 As is often the case, Topaz Gigapixel AI creates a file full of details from the TIFF, although some of them may look more artificial (the bushes) than others (the palm tree).
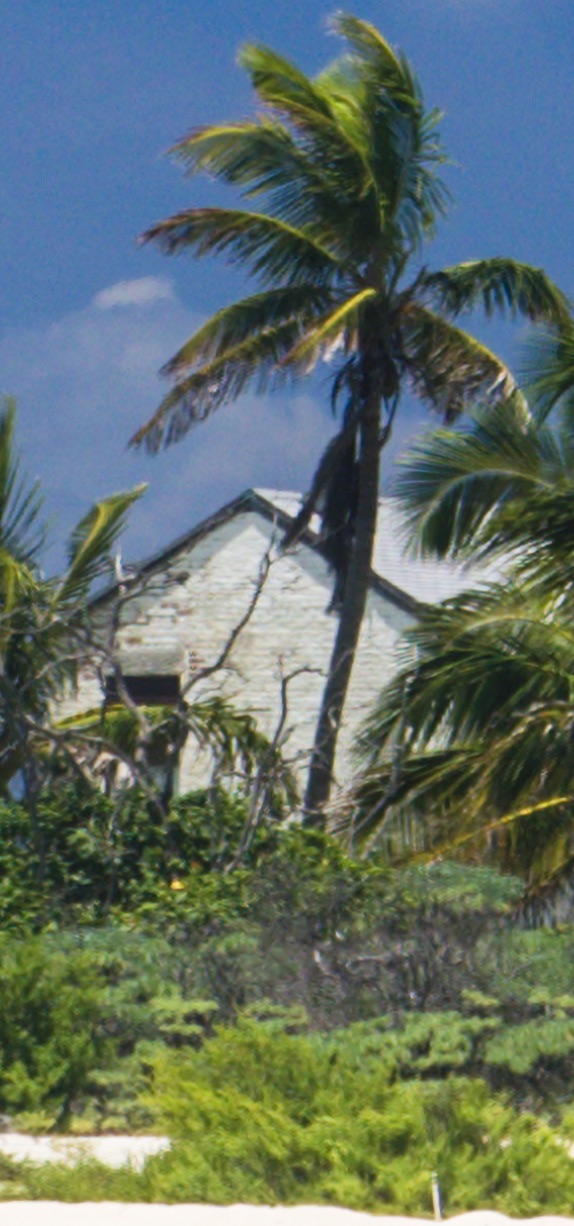 When applied to the TIFF file, Adobe Super Resolution doesn’t do much better than Photoshop’s resizing.
 Results are entirely different when applied to the RAW file. However, the sky is rendered with unacceptable pixelation. To deploy super-resolution, one currently needs to use Camera Raw, that has a slew of default settings. One of them is sharpening, which is not visible unless you expand the “detail” panel. I tried again after zeroing the sharpening slider.
 Much better, which shows how careful one has to be about hidden settings! However, there are still artifacts, and the detail level doesn’t match Topaz Gigapixel. On the other hand, Topaz Gigapixel can create some unnatural-looking detail, is more complex to use because of its options and sliders, and considerably slower.
Based this, and other images, I am not terribly impressed, however its less aggressive approach is less likely to produce unnatural results. Since it comes for free with Photoshop – once you’ve paid the “Adobe tax” – does improve on basic Image Size, it is still worth to give it a careful try if needed. Some reviewers (fstoppers, Petapixel) seem to find it amazing that Super Resolution doubles the pixel size, but are they aware that Image Size does that too?
Update
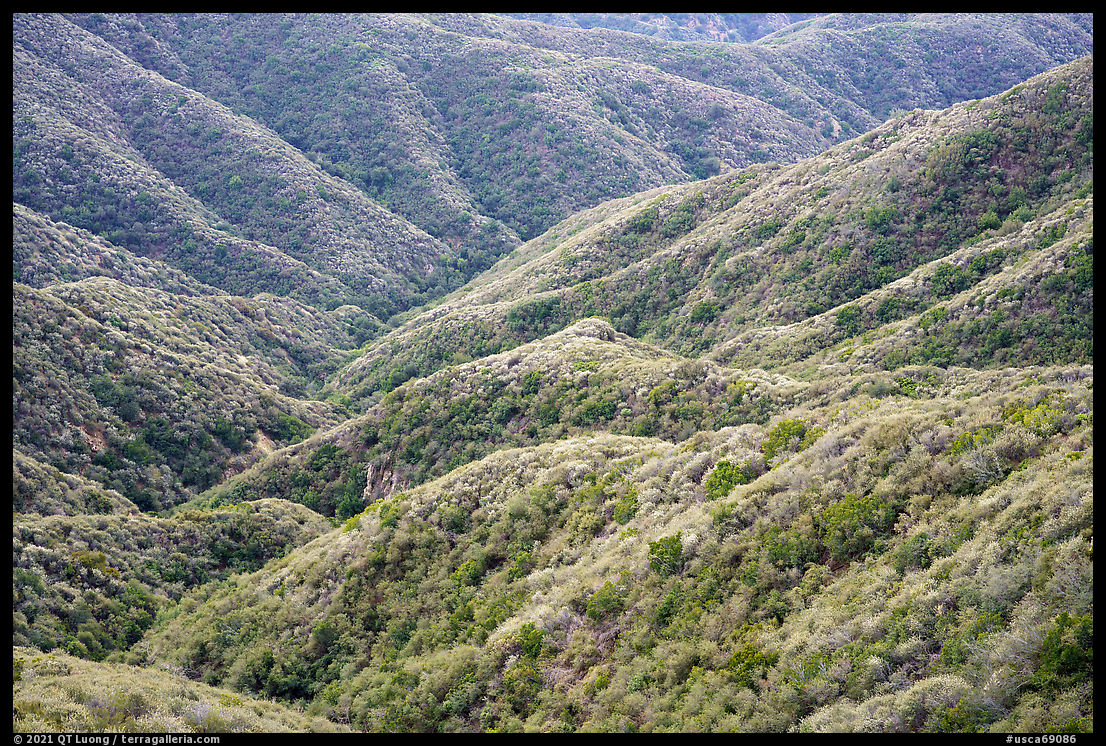
After writing this post, I wondered why others seem to observe better results from Adobe Super Resolution than I did, even if by failing to compare directly with basic Image Size, they make the gains unclear. The second review linked above mentioned that Super Resolution works better with cameras that do not use an anti-aliasing filter. The topic deserves a more thorough investigation, but I am in the middle of writing a book, so I only did an additional test, this time using a file from the Sony A7R4 that has no anti-aliasing filter. So that there is zero doubt about the resolution of the file, I used an image shot with the Voigtlander 65mm Apo-Lanthar, maybe the sharpest lens in 35mm photography.
A photographer had posted an example with better results from Lanczos interpolation than from both Adobe Super Resolution and Topaz Gigapixel, so I have included that method in the test. From left to right: Photoshop Image Resize (bicubic), RawTherapee Lanczos, Adobe Super Resolution, Topaz Gigapixel. Click on images for 100% pixel views of the center and four corners.
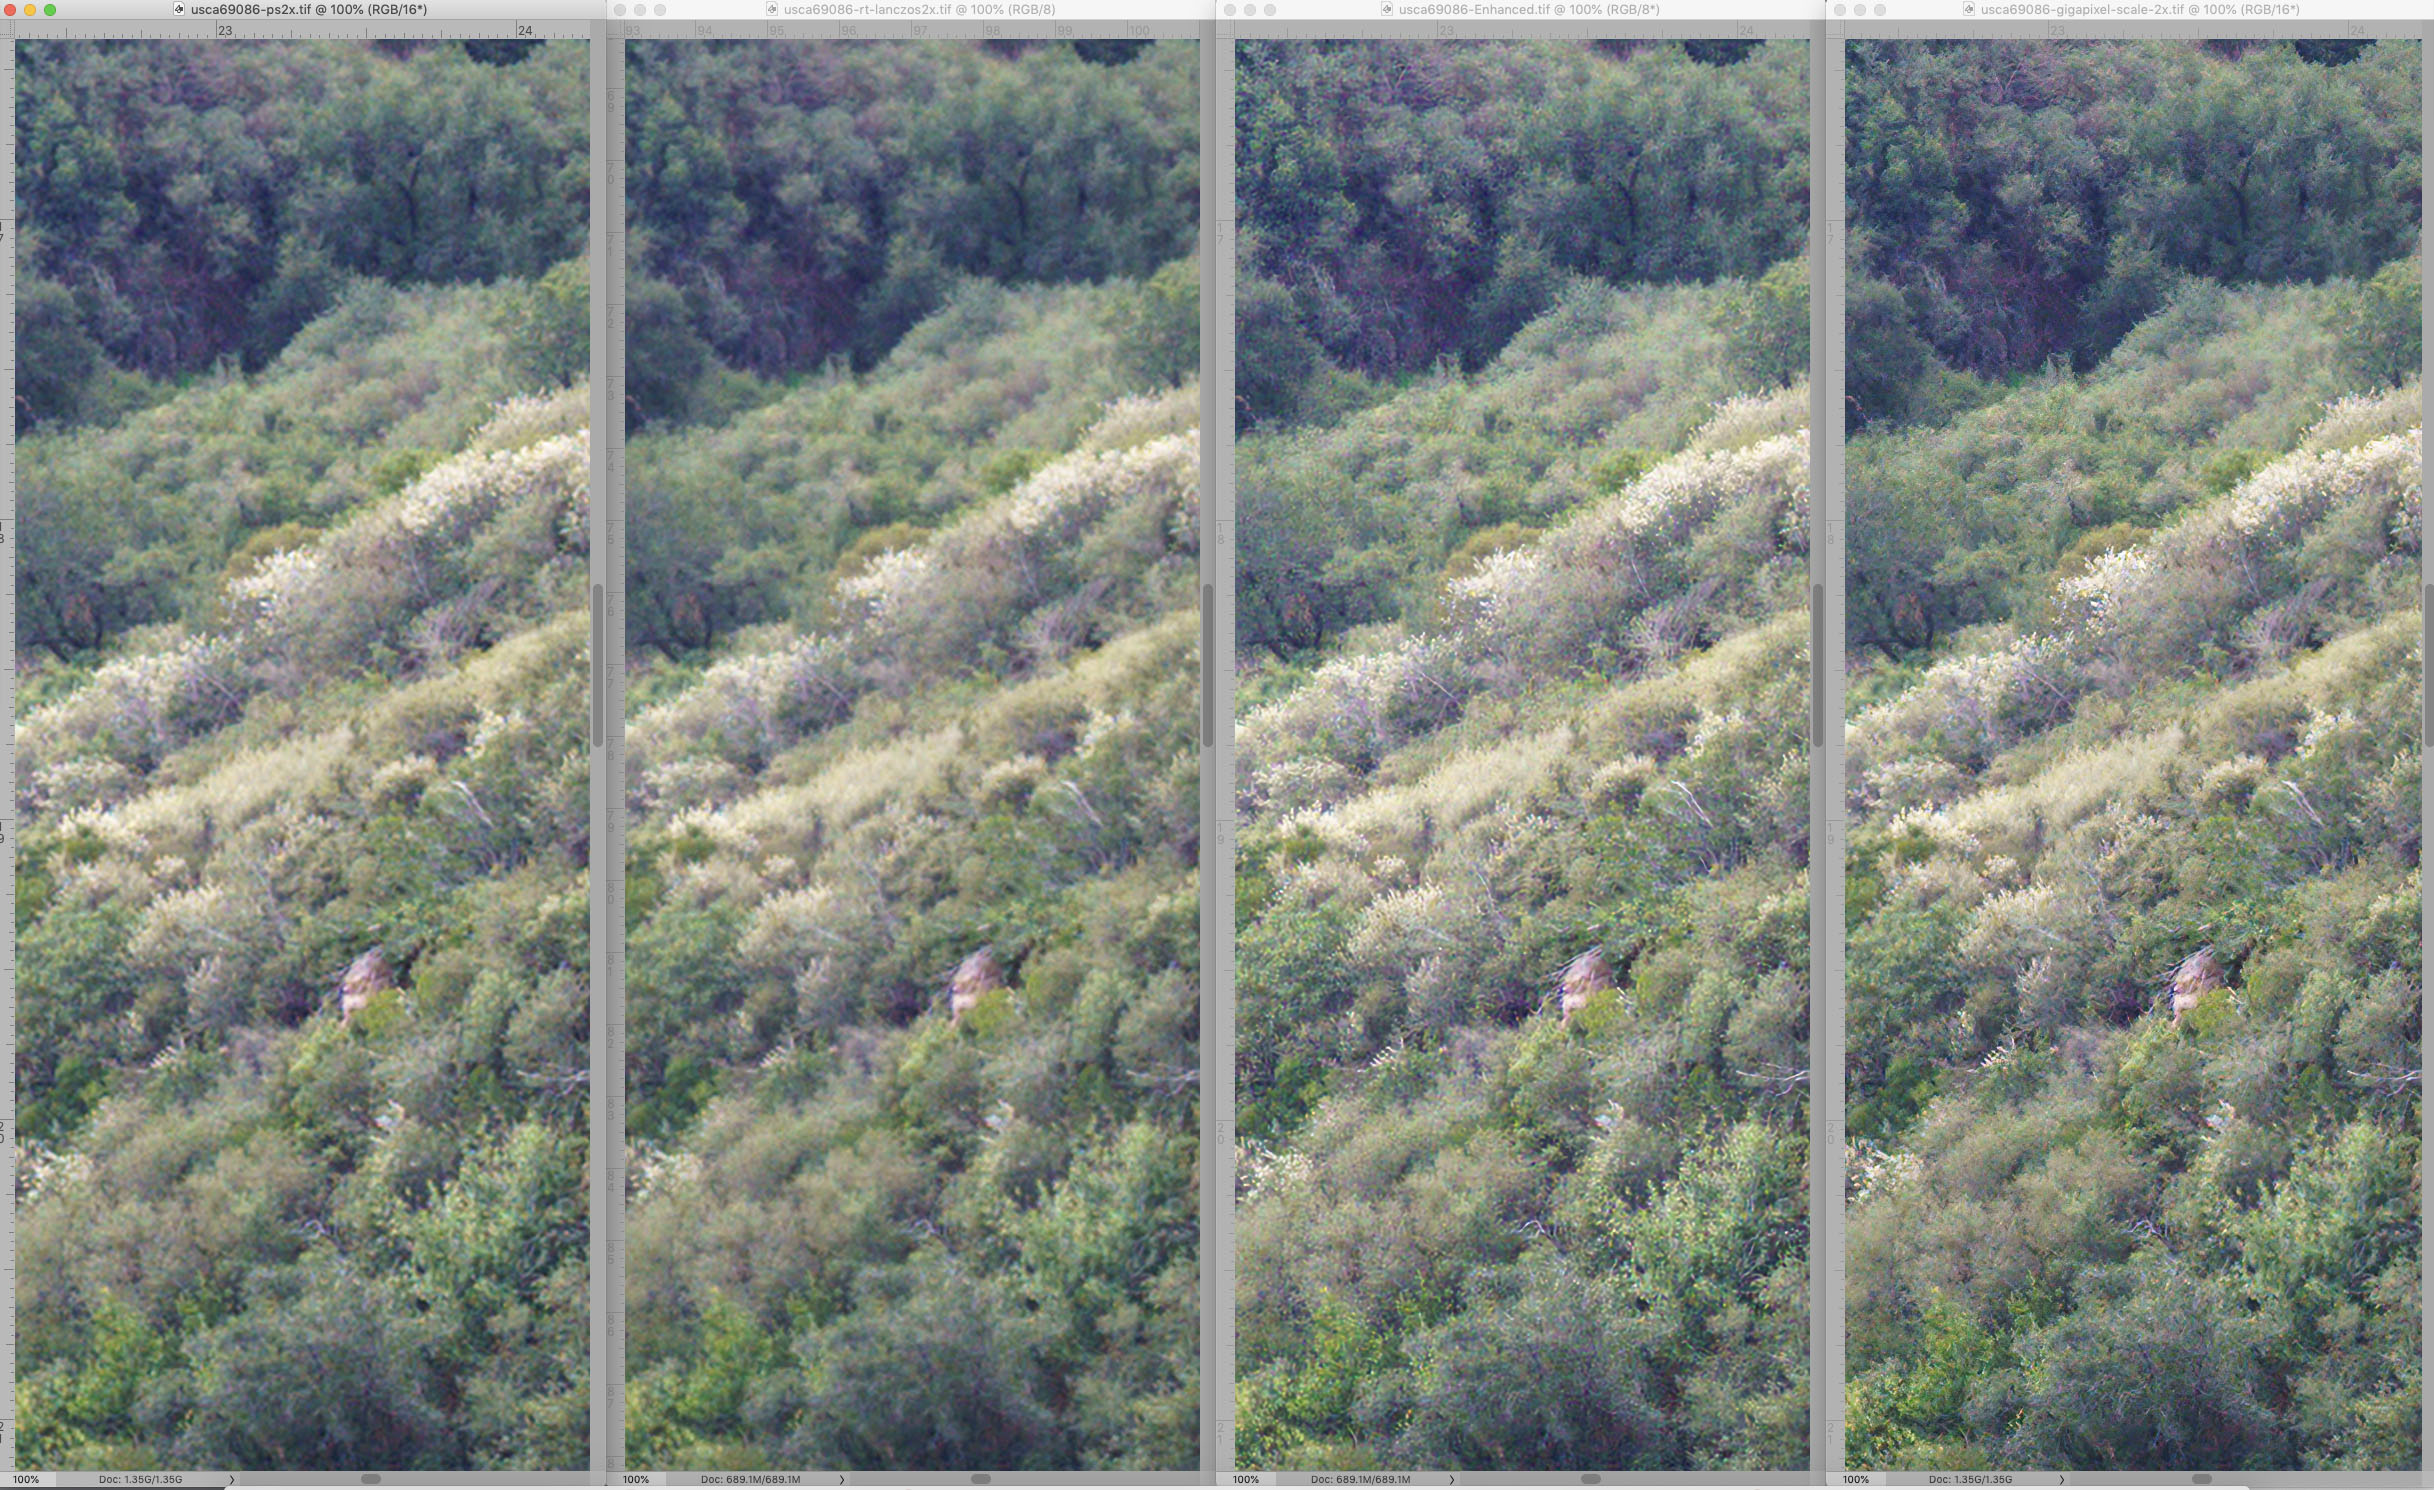
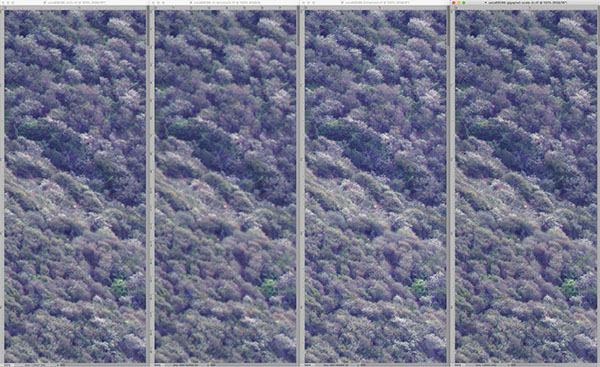
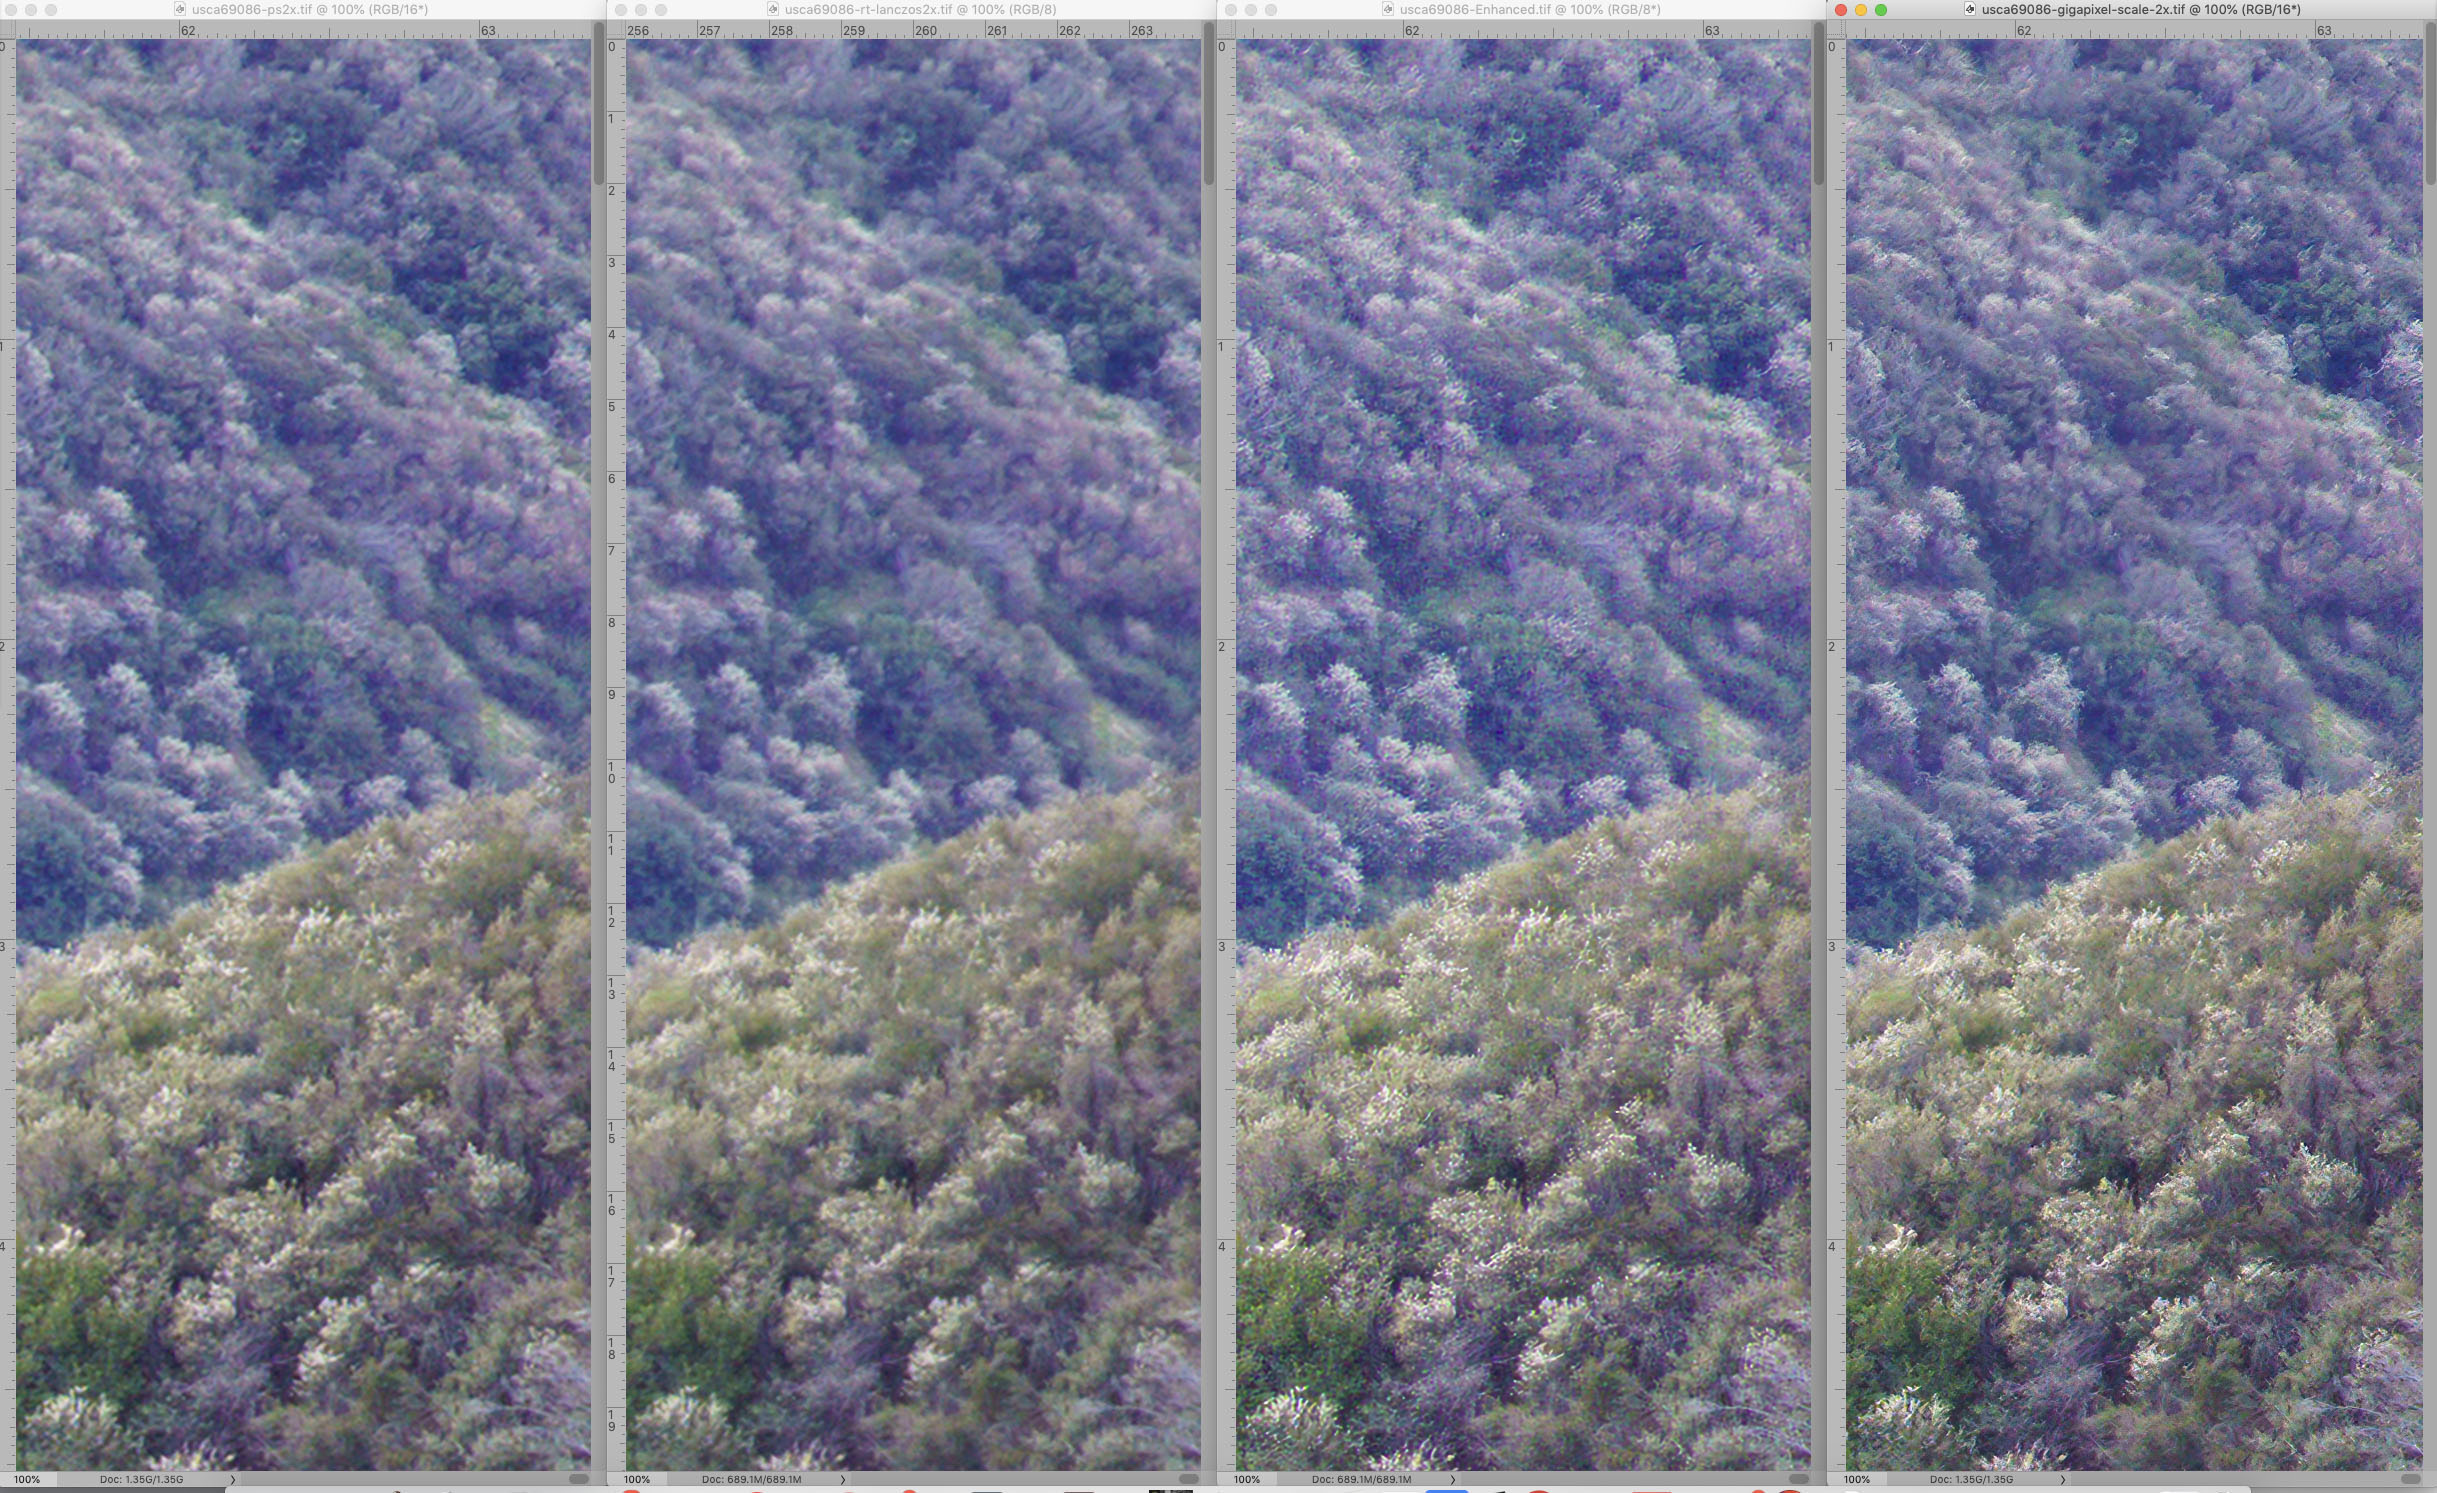

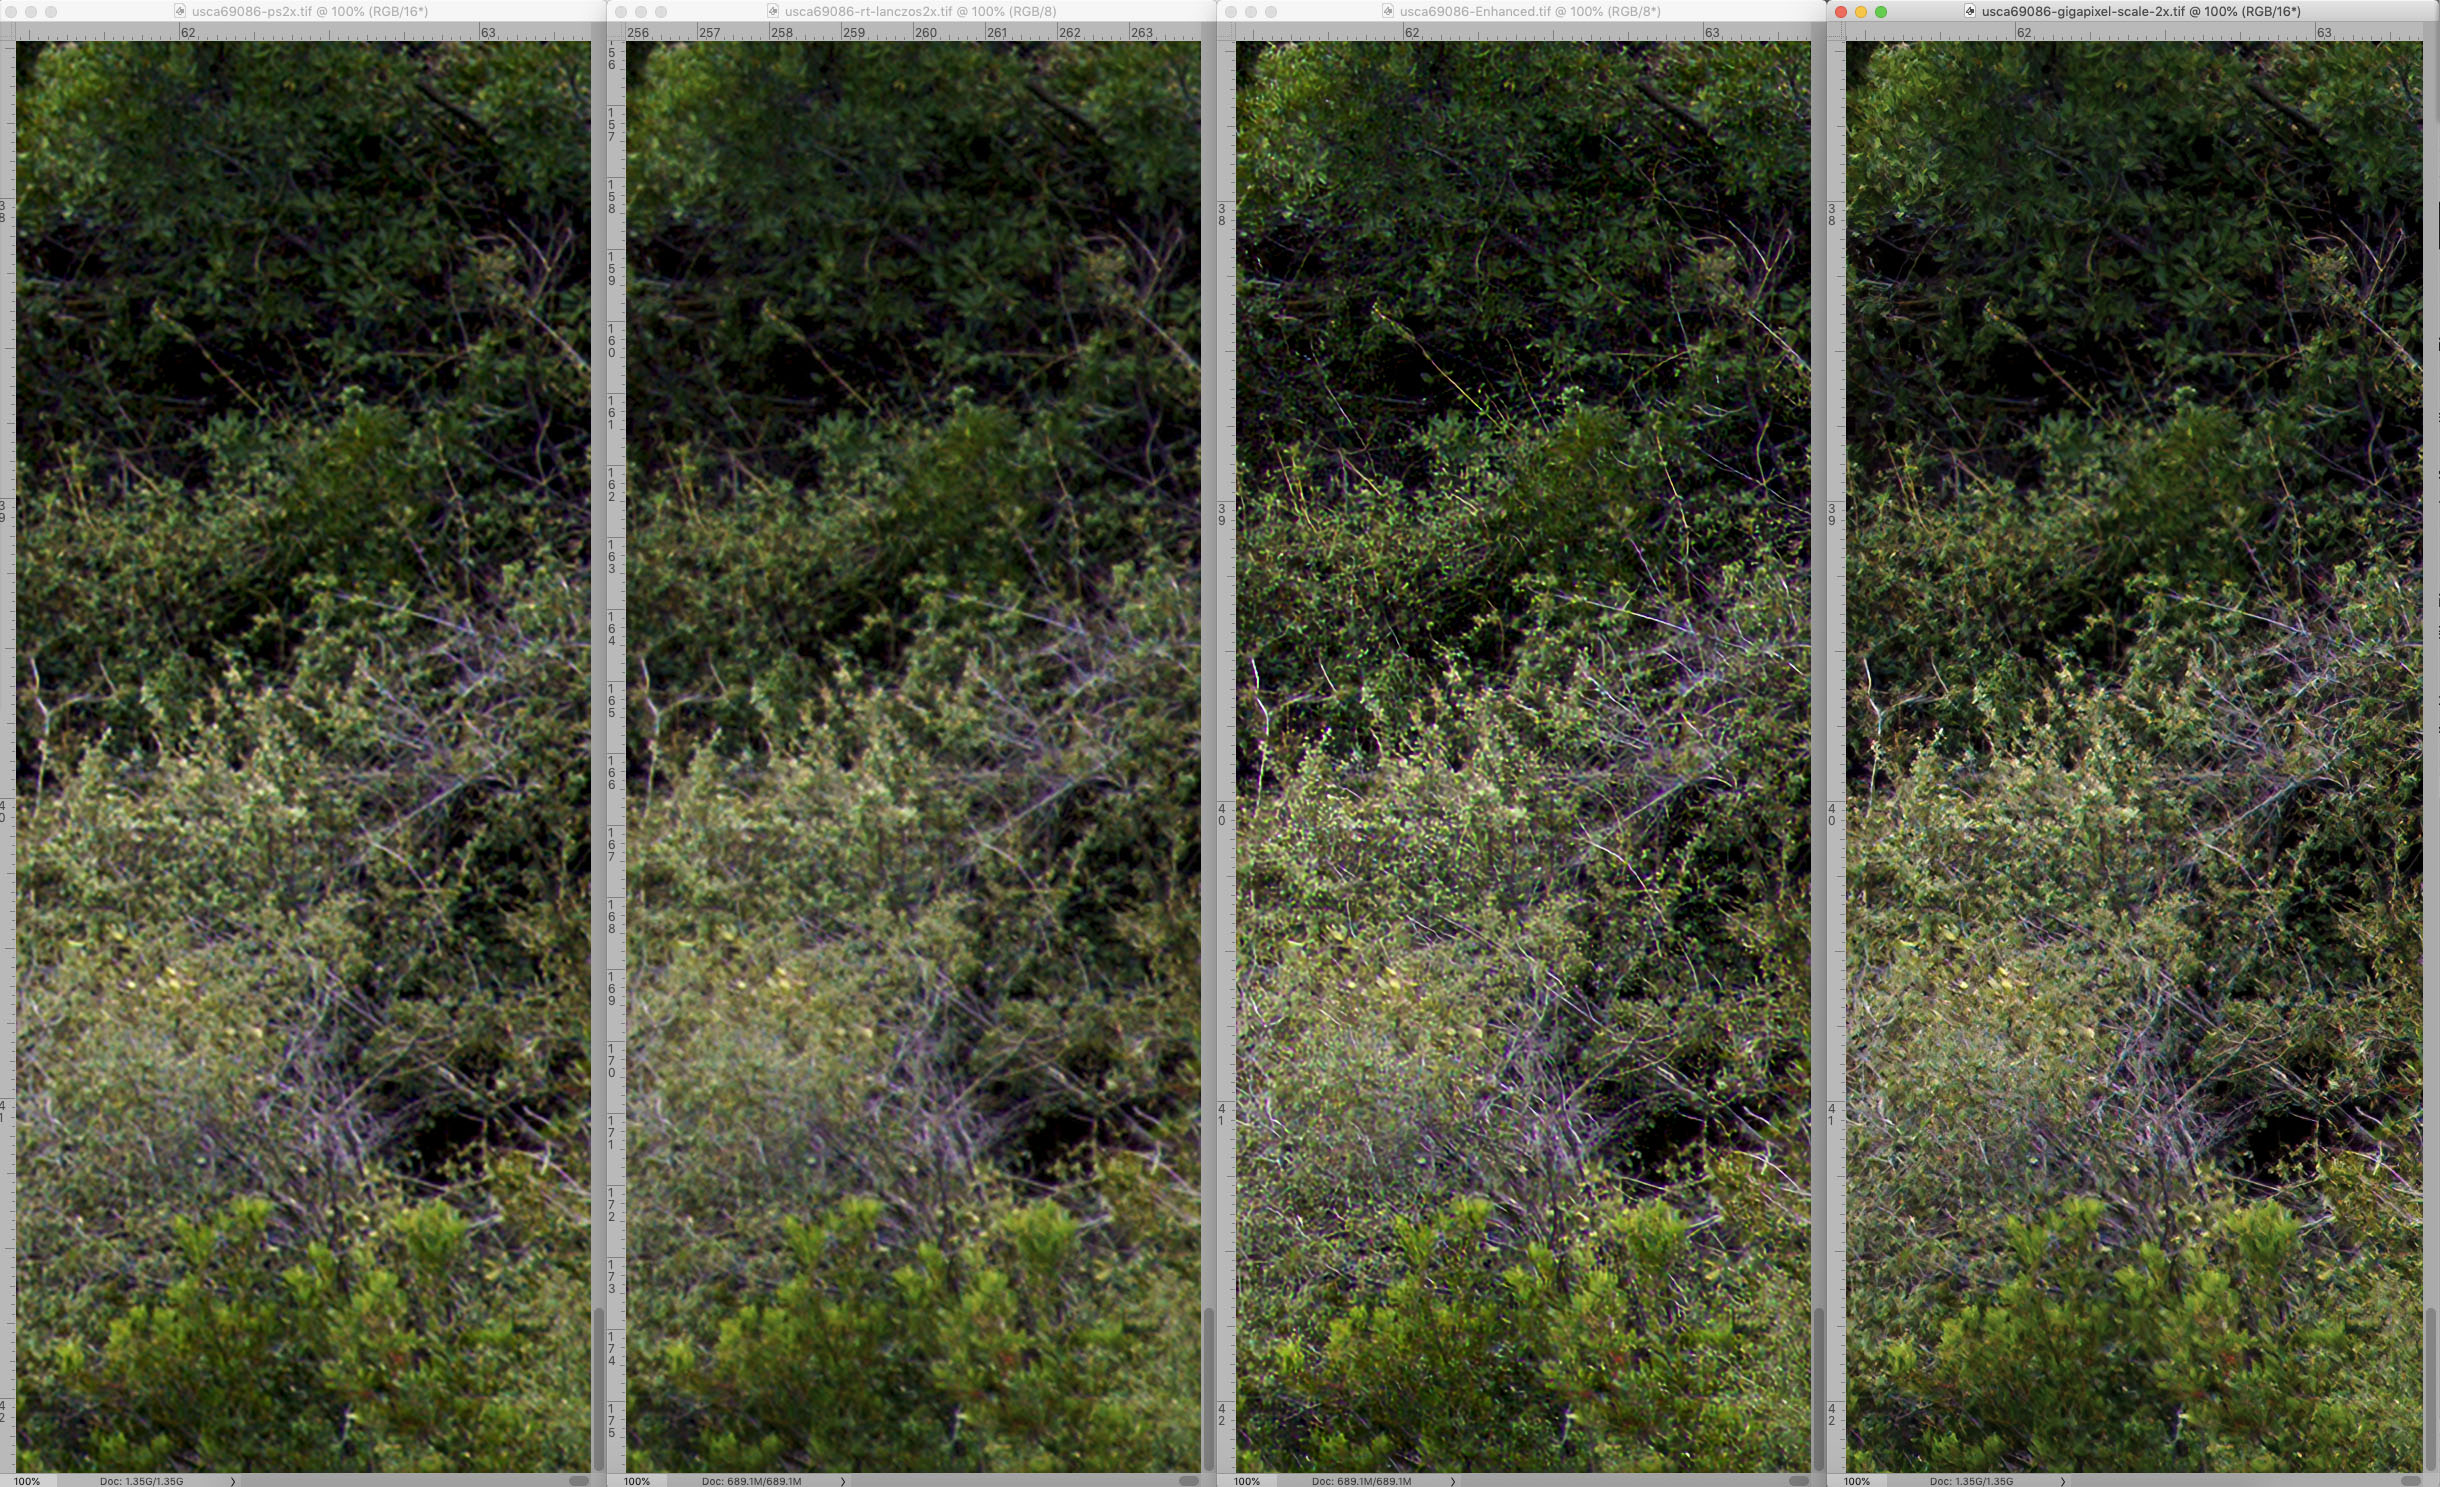
On that image, the two interpolation methods (bicubic and Lancszos) yield comparable results – consistent with what I’ve seen before. Adobe Super Resolution and Topaz Gigapixel both provide noticeable improvements. They are quite close, but the latter still looks better to me.


Very informative and helpful post. Thanks a lot!
I would love to meet you and sit down and discuss Photography.
I too transitioned from large format film to digital.
I still love my Cibichromes from Velvia 50.
kind regards,
kevin Mc.
Great review, thank you. I came across an interesting review by Alex Nain which suggests using both the Enhance Detail and the new Super Resolution in separate layers to overcome some of the problems of the Super Resolution function. He also compares it to Topaz Gigapixel. Best, Erik
https://www.youtube.com/watch?v=g97mFhS3fBU
Very informative, thank you very much>
Francesco
Thanks QT! Always appreciate you technical testing.
Sometimes i feel that enhancement makes images too sharp and fake looking.
Depending on the subject, softer is usually more to my liking.
I totally agree with you. Sharper is not necessarily better. Many of the most significant photographs in the history of photography were rather soft. But sometimes, you want a large sharp photograph.
Thanks so much! Nice to see what Gigapixel does to the jpegs. I understand Adobe Super Resolution focuses on the RAW enhancer, which implies it enhances raw format file resolution.
You are right that this is focused on RAW conversion, however, since they made it operational on other images as well (kind of like the LR controls like WB and highlight recovery), I thought it would be interesting to see what it does for them.
Thank you for sharing the ideas and tips. Nice work you have done here.