Posted
on November 10, 2017, 11:37 pm,
by QT Luong,
under Locations.
Lombard Street in San Francisco has a one-block section with eight hairpin turns known as the “crookedest street in the world”. Although one of the most famous sights in the city, it is also one of the most difficult to photograph.
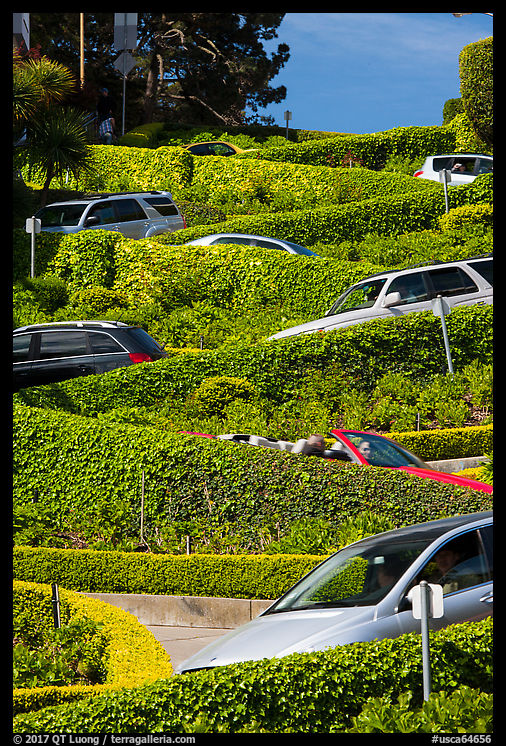
Other subjects are open to a wide range of interpretation, but there is no mystery about what a good photograph of Lombard Street should do: depict how crooked the street is. That is not an easy task because there is no publicly available high vantage point from which to do so. Most postcards were shot from a private residence. From the bottom, the best one can do is to stand on a driveway just off Leavenworth, in the NE corner, and this is too low to show the red-brick street.
Canon 1Ds3, EF24-105mm @ 65mm, 1/80s at f/9.0, ISO 200
My favorite image from the bottom was made with a telephoto lens. Although the street is not in view, the cars heading down at various angles form an odd graphic motif that suggests the underlying street geometry.
Canon 1Ds3, EF100-400mm @ 235mm, 1/60s at f/13.0, ISO 200
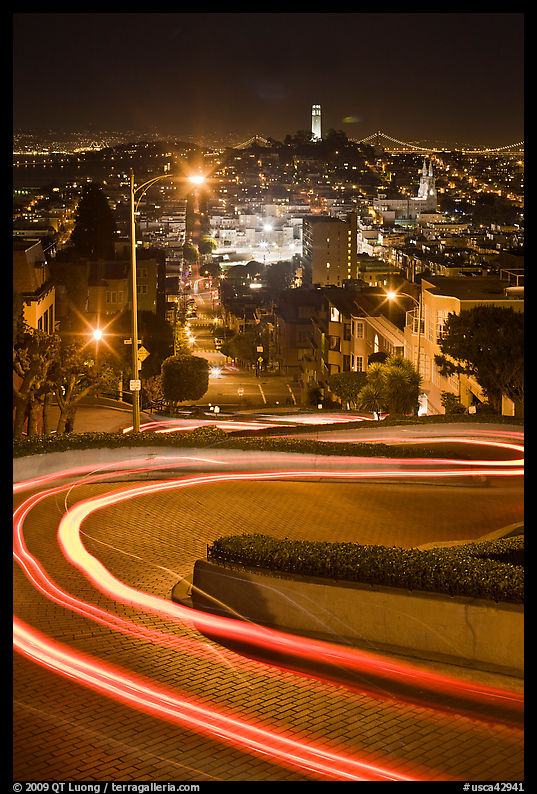
By daytime, the view from the top is rather unsatisfying, because the street’s geometry is not legible, but this changes at night, with the light trails of car tail lights materializing the curves in a long exposure.
Canon 1Ds3, TS-EF45mm, 25s and 5s at f/1.4, ISO 200
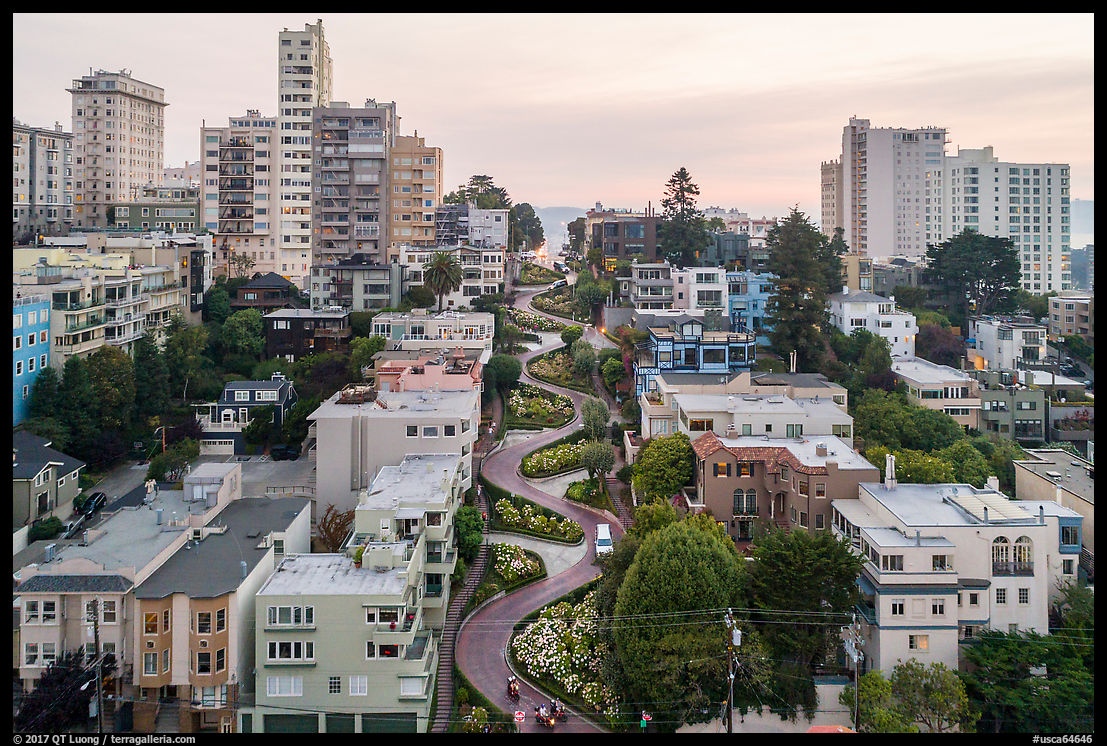
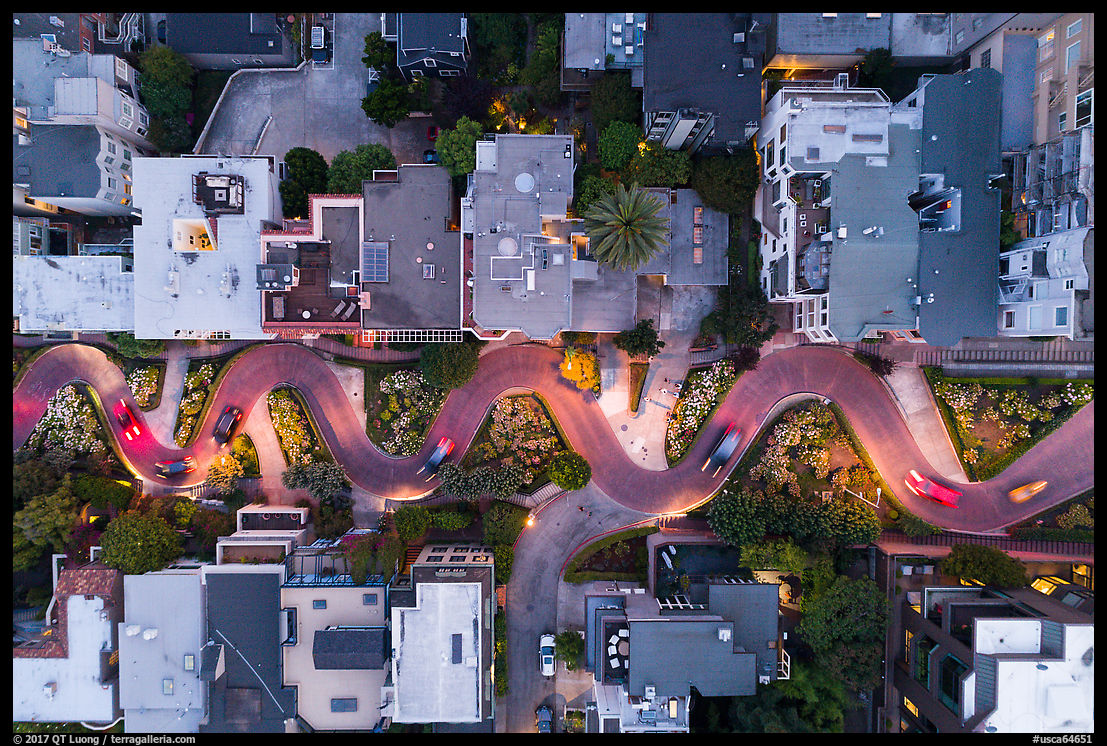
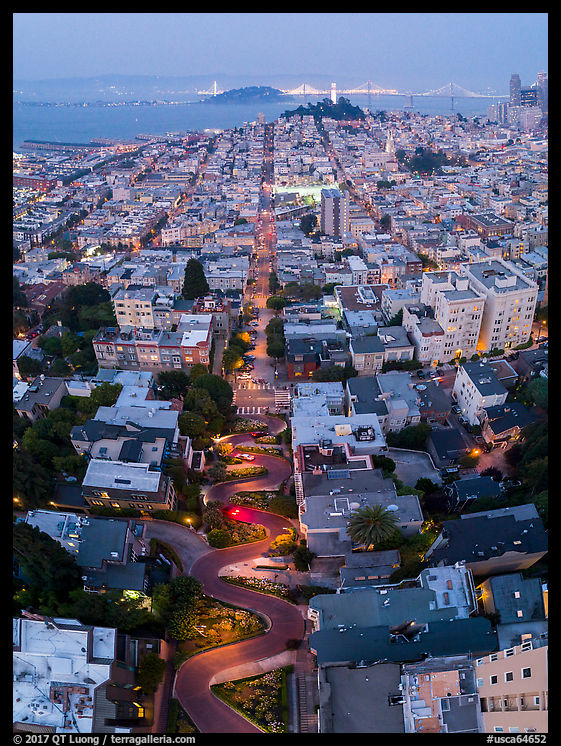
Several years later, aerial photography naturally provides the high viewpoint needed to reveal the hairpin curves, with drone technology making it affordable and easy to deploy at the spur of a moment.
DJI P4P, 24mm, 1/30s at f/4.0, ISO 400
At dusk, light from the car headlights, and a bit of motion blur enliven the image. The straight-down composition provides the graphic abstraction of an unusual perspective. This was made possible by the amazing stability of the latest generation of drones with 3-axis gimbal-mounted cameras, which can shoot sharp exposures at a one-second shutter speed, at which one would be hard-pressed to get a sharp handheld image.
DJI P4P, 24mm, 0.5s at f/4.0, ISO 100
The drone camera cannot be turned sideways, so to make this vertical image I tilted the camera and assembled the three resulting shots in Lightroom, creating a very wide vertical field of view that shows well the street in the context of the city and bay.
DJI P4P, 24mm, 1/6s at f/4.0, ISO 1600
When I made a comparable picture just three years ago, high-quality drone photography was still a pioneering activity requiring DIY equipment, but in that short period of time, easy-to-use off-the-shelf equipment has made it accessible to everybody. Exciting times!
Posted
on October 27, 2017, 11:17 pm,
by QT Luong,
under Locations.
Easily missed, but aptly named Fairyland Point offers quiet, a great view, and the trailhead for one of the best hikes under the rim of Bryce Canyon National Park.
On the way to the renown viewpoints over the Bryce Amphitheater such as Sunrise Point, Sunset Point, and Inspiration Point, most visitors miss a turnoff in the forest on the left side of the road, just past the park entrance. The turnoff is located before the fee station, so you can visit for free. That turnoff leads to a 1-mile road ending at Fairyland Point. The overlook is 100 feet away from the parking lot. It is the easiest to access of all the viewpoints in the park, except in winter when the side road leading to it is closed.
Fairyland Point is a small overlook, and there is parking room for only about twenty cars. It is so easy to miss that I had no problem to park and almost had the place for myself at sunrise, with no other photographers around.
Fairyland Point
The view from the Fairyland Point Overlook is characterized by a combination of densely packed and well-detached hoodoos which lie below the overlook, but not so low as to appear distant. From the overlook, you are looking directly East. Right at first light, the backlit hoodoos appear dark. Five minutes later, there is a bit of light to illuminate them with reflected light, but lens flare is unavoidable.
The secret to many of the great photographs of the Southwest canyons resides in reflected light, and Bryce Canyon in no exception. Fifteen minutes after sunrise, there is enough reflected light to make the hoodoos seemingly glow from within. In order to avoid lens flare while shooting directly towards the low-angle sun, I first photographed with a telephoto lens. With its narrow field of view, I was able to shade the lens with my hand without it showing up in the picture.
About one hour after sunrise, with the sun higher, I was able to use a normal lens to frame the entire canyon. Note that although Fairyland Point Overlook is small, you can hike down the first quarter-mile of the Fairyland Loop Trail for different angles on that dense section of hoodoos.
Fairyland Loop Trail
As wonderful as the views from the rim are, they are only a small part of the experience that Bryce Canyon National Park offers. Hiking under the rim allows you to get close to the hoodoos, see them from a different perspective, and appreciate their scale.
The Fairyland Loop hike totals 8 miles, for an elevation difference of about 1,000 feet. The trail is well-maintained and easy to follow even without a map. Its first part consists of the Fairyland Loop Trail (5.3 miles) which winds its way under the rim, offering a different perspective on the hoodoos, mixed with an abundant amount of green trees.
At about mid-way the loop, a spur trail leads to the base of a slope topped by Tower Bridge, named so because its boxy shape is reminiscent of the famous Londonian landmark.
I scrambled on the steep and very slippery slope to reach the arch. Framing the landscape via the opening was quite precarious because I needed to back away and lower the viewpoint to detach the arch’s span from the mesa, but the other side was even steeper.
Before going back on the spur trail, I walked a bit off trail along a mostly dry creek with just a trickle of water. The creek supported a more diverse vegetation than the conifers that dominate this high-elevation park, and I was delighted to add a few images to my quest for
fall foliage in national parks.
The second part of the loop consists of the northernmost 2.7 miles of the Rim Trail, which like its name indicates, follows the canyon’s rim. The hoodoos there are not as dense as in other parts of the Rim Trail, especially along the Bryce Amphitheater, but the rabbitbrush made for a foreground not usually associated with Bryce Canyon.
Like Fairy Point, the Fairyland Loop sees less traffic than other below-the-rim trails. Athough with the exception of the start of the trail, the hoodoos are not as dense as along the Sunset Point trails, the Fairyland Loop made for an excellent day hike with a great diversity of scenery.
Posted
on October 20, 2017, 7:18 pm,
by QT Luong,
under Announcements.
Upcoming Exhibit
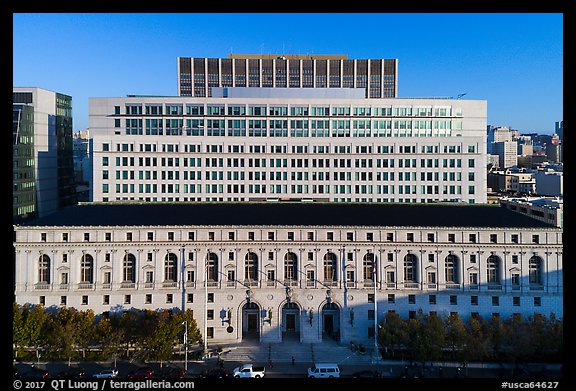
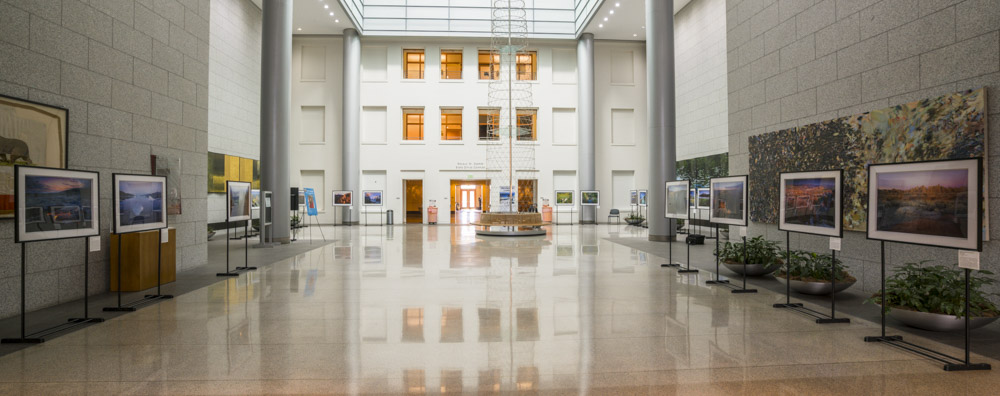
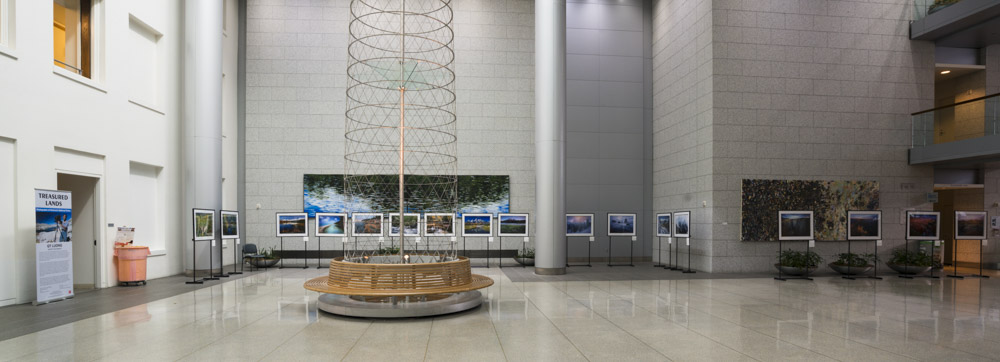
I am honored that photographs from Treasured Lands will be on display during November at the California State Building in San Francisco. The State Building is located on Civic Center Plaza, next to the San Francisco City Hall, and is the seat of several state institutions, including the Supreme Court of California. The exhibit is open to everyone, but please leave your weapons at home 🙂 since like many government buildings there is a security check at the entrance. I hope to see you at the reception.
Hiram W. Johnson State Building
455 Golden Gate Ave,
Great Hall (Lobby)
San Francisco, CA 94102
Dates: November 01, 2017 to Nov. 30, 2017
9 AM-5 PM
(Closed on Saturday and Sunday)
Reception and Press Conference: November 1, 2017, 3:30 PM -4:30 PM
I am very grateful to the honorable chairwoman Fiona Ma for sponsoring the exhibit and to Herby Lam for organizing it.
Speaking
Except for NANPA, I didn’t plan any presentations, but I kept getting invitations and ended up delivering quite a few of them. I really enjoyed inspiring attendees through a direct connection. Instead of making occasional announcements in this blog, now have a dedicated Speaking Page where upcoming events are listed. I hope that at some point you’ll find one near you live. If not, please feel free to contact me if you’d like to organize one!
Palo Alto Art Center, photo by Xavier Cohen
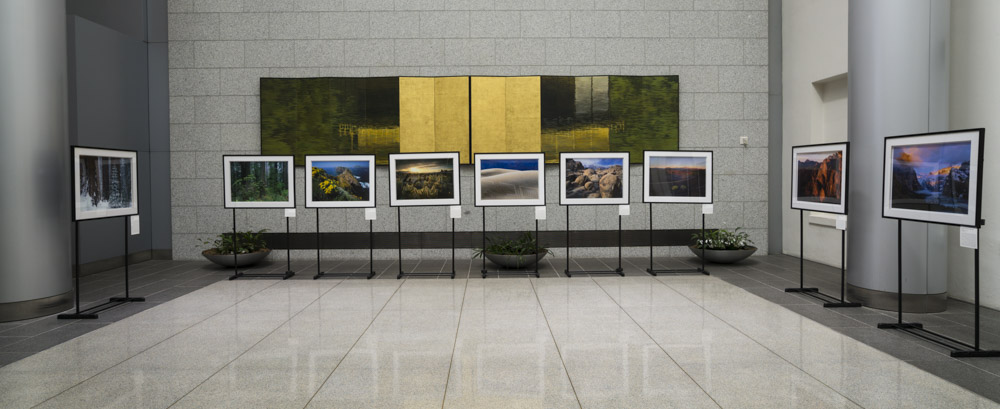
Exhibit Tip
Almost all my exhibits have been in galleries and museums, but other places have walls not designed to support prints, like the marble walls in the California State Building. The traditional solution is to use easels – like at the Palo Alto Art Center above. However, there is an alternative method with the following advantages:
easier to break down and store,
look more contemporary than easels (which are associated with paintings),
display prints straight vertical, whereas with easels they are at an angle,
display prints on both sides if in middle of room.
The idea is from my wife Lanchi, and I haven’t seen it used by anybody else. Here are wide installation views from the California State Building.
Closer views:
What is the hardware? Garment racks! They are inexpensive. By reader’s request, here is the back:
Posted
on October 13, 2017, 6:10 pm,
by QT Luong,
under Resources.
I have seen quite a bit of confusion about how many national parks there are in America, and what distinguishes them from other public lands, including state parks, national forests, wildlife refuges, and other units managed by the National Park Service. In this article, I break down the names of the public lands and examine the significance of the designation for the 59 national parks.
The national parks and other public lands
The Yosemite Grant (1864) marked the first time a nation had set aside a large tract of pristine land for all people and for all time. Even though the notion of public land and its preservation dates back further, the national parks would be their first tangible embodiment. Yosemite was initially administered by the state of California and became a national park in 1890. Yellowstone (1872) happened to be the first national park because at that time, Wyoming was a territory and not a state, so Wyoming could not administer Yellowstone.
The creation of national parks set up in motion a vast movement to preserve public lands. State parks are similar to national parks, but the main difference is that they are under state rather than federal administration. The first state park, Niagara Falls State Park was established in 1885 in New York. As of today, there are more than 10,000 state park units in each of the 50 states. In addition, parks are also maintained by local government entities. All those parks are quite clearly named “state park”, “regional park”, “county park”, etc..
America’s federal public lands, owned equally by all Americans, have expended well beyond the national parks. They now cover about a quarter of the U.S. land (618M acres) and encompass many types of lands all with the word “national” within their name. They fall mostly into four systems, depending on the agency that manages them.
The National Park Service (NPS) manages the National Park System (84M acres), with 417 units, including 59 national parks. Although it is the most well-known land management agency, responsible for some of the country’s most famous landmarks, the NPS manages the smallest amount of land. The NPS mandate is both to keep landscapes unimpaired for future generations and to offer recreation. NPS lands are at the same time more regulated and more developed than others. They are discussed in more detail in the rest of the article.
The U.S. Fish and Wildlife Service (FWS) manages the National Wildlife Refuge System (150M acres), which consists of 562 national wildlife refuges and 38 wetland management districts.
Like the NPS, the focus is both on conservation and recreation, with both being more wildlife-centered than NPS lands. 86% of FWS land is Alaska. In the continental U.S., FWS land consists mostly of wetlands, and are often closer to cities than other public lands. 37% of FWS areas are located in the Pacific Ocean in four marine national monuments.
The U.S. Forest Service (USFS) manages the
National Forest System (193M acres), which comprises 154 national forests and 20 national grasslands. The USFS has a multiple-use mission, and their lands allow extractive activities such as logging, grazing, and mining, as well as a wider range of recreational activities. Many national forests are located near national parks. Unlike the other three federal land agencies, the USFS manages a significant amount of land in the eastern U.S.
The Bureau of Land Management (BLM) manages the National System of Public Lands (245M acres). Most of BLM lands were not set aside but inherited, are nameless, arid, and intended for multiple use, like USFS lands. However, a small subset of “flagship” BLM lands are designated by Congress and intended for conservation and recreation, forming the National Landscape Conservation System (32M acres) that includes 873 federally recognized areas, including national conservation areas. BLM lands are situated almost exclusively in western states.
Any of the lands above can also become a wilderness area (“designated wilderness” or simply “wilderness”) by congressional designation. This provides for an additional layer of protection on top of their current status. Wildernesses are managed to preserve primeval character without permanent improvements (such as roads) or human habitation. wilderness study areas are set aside by the BLM as part of the National Landscape Conservation System while awaiting for their confirmation or dismissal as designated wilderness.
Eldorado National Forest
The National Park System
As of this post, the National Park Service (NPS) manages a total of 417 units, including both natural, cultural and historic resources of national significance. Here is the complete list by designation type. Each of them is officially called a “National Park System unit“, or any combination obtained by replacing “System” with “Service” and “unit” with “area” or “site”, but since all sounds a bit long, some refer to them as “national park” for simplicity and brevity. A more precise abbreviation – with fewer characters too – would be “park unit” or “NPS unit” because in the strict sense, “national park” refers to a specific designation. Yet the rather unspecific “park” is even shorter and has also been in use. Some say that “park” really means “national park”, but it could equally refer to “park unit”.
It is not a matter of capitalization (eg: “417 national parks v. 59 National Parks”) since, per all major style guides – including the Chicago Manual of Style, U.S. Government Publishing Office Style Manual, AP Stylebook – the correct usage is that “national park” is capitalized only when it is a proper noun, part of a formal name (eg: “Acadia National Park”).
It is understandable that some NPS officials favor the simpler term, especially when communicating with the public since, as will see shortly, the official designations are confusing. Others have explicitly stated to me that they do not. The point is that there is no consensus in the NPS that all NPS units should be called “national parks”. If you look at the National Park Service website, the terms they use are all over the place, which supports the idea that “national parks” is just a shortcut rather than a systemic use. If all the units were “national parks” as some argue, why wouldn’t the NPS always use the term “national park” to refer to them? Compare the NPS text:
How many areas are in the National Park System?
The system includes 417 areas
What is the largest national park site? Smallest?
Current information on acreage for units across the National Park System
What is the most-visited national park?
View a list of the most-visited sites in the National Park Service
with:
How many national parks are there?
The system includes 417 national parks
What is the largest national park? Smallest?
Current information on acreage for national parks
What is the most-visited national park?
View a list of the most-visited national parks
National Park System units include a total about 25-40 designations, depending on how you count them. The designation is in the full name of an area, for instance Yellowstone National Park or Devils Tower National Monument.
Besides “National Park”, those include but are not limited to:
National Monument
National Preserve
National Historic Park
National Historic Site
National Memorial
National Recreation Area
National Seashore
National Lakeshore
National River
National Battlefield
National Battlefield Park
National Battlefield Site
National Military Park
There are many variations, but none of them are “national parks”. If Devils Tower was a national park, it would be called Devils Tower National Park, but it is not.
Just looking at the four types of military sites give you an idea of how confusing the nomenclature is. Personally, I’d favor three designations, one for primarily natural resources (maybe national scenic site),
one for primarily cultural resources (maybe national historic site), and national park.
National monumentsare different because they can originate from presidential proclamation, and they can be managed by other land agencies than the NPS. A national monument ran by the NPS should be either a national scenic site or national historic site, while non-NPS national monuments could keep that designation.
Point Reyes National Seashore
National Parks: the name matters
Amongst the 417 park units, there are currently 59 national parks. Those who call the park units “national parks” sometimes refer to those 59 national parks as “named national park”, “full national park”, “full-fledged national park”, or “national park with full status”. This in itself is an admission that there is a difference between them and the other types of units. That difference is the name.
In theory, since the National Park Service General Authorities Act of 1970, all park units have the same legal status and protection. The collection of 417 park units is a system of equals. This makes sense because they do not want to put a hierarchy between Yellowstone or Gettysburg – they are simply different in nature. However, as Yogi Berra would say “In theory, there is no difference between theory and practice. In practice there is.” If the designation name did not matter because “all park units are national parks” like some argue, why did so many national monuments saw their initial designation changed to national park? This started with the Grand Canyon (national monument: 1908, national park: 1919), and since then a total of 25 national monuments have been redesignated as national parks. And if the designation name did not matter, why are there
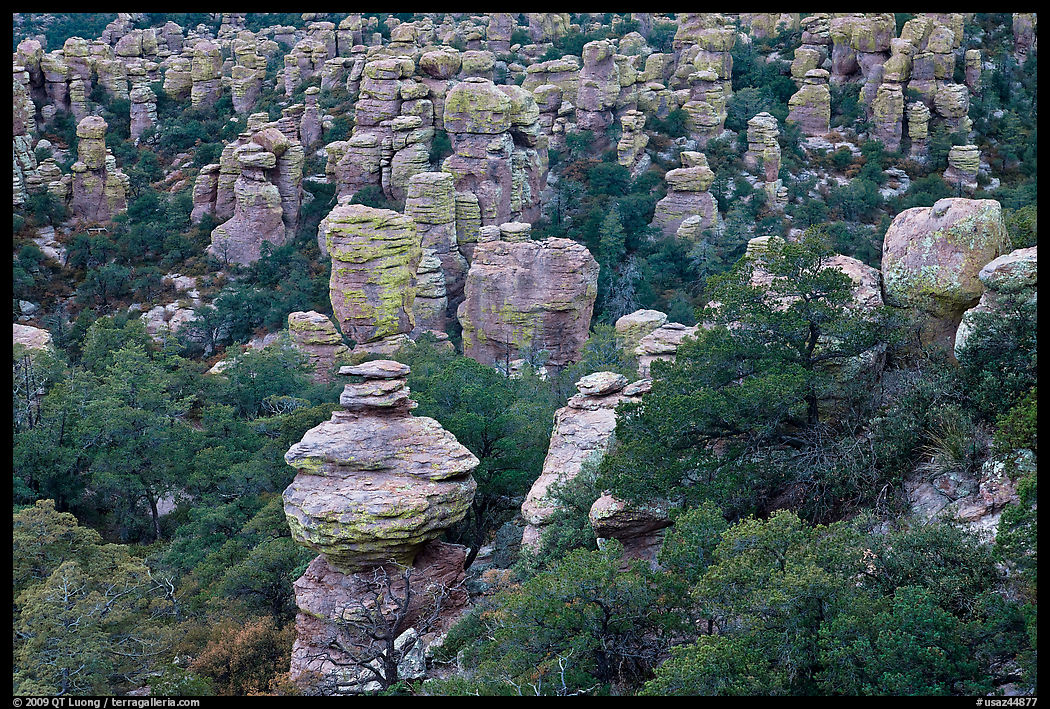
several campaigns underway to upgrade the designation of Chiricahua National Monument, Craters of the Moon National Monument, and Indiana Dunes National Lakeshore, amongst others? The effort needed is not insignificant, as it requires clearing legislation in Congress, no easy taks in a climate of increasing partisanship and legislative gridlock. Only Congress (House and Senate) can designate a national park.
A U.S. House committee has advanced a plan to change the name of Indiana Dunes National Lakeshore so that it reflects the reality that it is a “national park.” … The Indiana Dunes already is a national park. This measure would make that clearer to tourists and local visitors by renaming it Indiana Dunes National Park … “I hope that the full House considers this important legislation as soon as possible, so that we can quickly begin to harness this national recognition of the Indiana Dunes…”
First, note that Indiana Dunes National Lakeshore already has “National” in it, so it is the “national park” label that brings recognition. Second, the idea that “Indiana Dunes is already a national park” would be self-defeating. It applies to other units as well. By that logic, all of them should all be renamed “national park”, not just Indiana Dunes. But if all the 417 units are renamed national parks, then how is that going to increase the recognition of Indiana Dune amongst them? If you look at H.R.1488 – Indiana Dunes National Park Act, a long list of specific reasons is given why Indiana Dunes deserves to renamed a national park. The author of the bill recognizes that the national parks form a select group and intends for Indiana Dunes to join them based on its merits.
Chiricahua National Monument
National Parks: How do they differ from other units?
Since the very start of the National Park Service, the national parks were recognized as the crown jewels. Stephen Mather’s National Parks Portfolio (1916) included 8 national parks plus the Grand Canyon – which at that time was a national monument only because legislation to establish it as a national park had failed to pass. Subsequent NPS-sponsored editions of the National Parks Portfolio illustrated most national parks extensively on several pages, while only a paragraph was devoted to each national monument. Prior to WWII, the NPS issued one set of visitor guides and maps for the national parks, and another for their other units (essentially national monuments at that time) with much lower production values. A careful examination of NPS documents shows that up to the mid 20th century, the NPS had no qualms stating that the national park designation should be reserved only for the most special areas, those meeting high standards – a position also supported by the National Park Conservation Association. In doing so, the NPS was comfortable with some park units being more equal than others. As recently as 1976, after a half-century of misgivings and efforts to disestablish Platt National Park because it did not meet the standards for the designation, the NPS eventually merged the 70-year old national park (the 7th) into a recreation area. More recently, Ken Burns and Dayton Duncan, who as historians have certainly a deep understanding of the National Park System, told its story mostly through the national parks, at the exclusion of other park units. In the companion book to the film, they made sure to include one landscape photograph (by me) for each of the 59 national parks, and none for the other park units. Although the recent official position of the NPS is that all units are equal, this hasn’t been always the case. The perception from the public and media has been that the national parks form a select group, and it continues to this day.
What sets the national parks apart? According to the
NPS nomenclature, “Generally, a national park contains a variety of resources and encompasses large land or water areas.” By contrast, for instance, “a national monument is intended to preserve at least one nationally significant resource. It is usually smaller than a national park and lacks its diversity of attractions.” This official explanation implies that national parks, being larger and more diverse, are more valuable. The NPS at one point argued against redesigning Pinnacles as a national park because the park unit did not “include the full range of resources usually found in national parks” (source). In other words, not worthy of the “national park” designation. The same reservations are even more valid regarding Indiana Dunes.
At the same time, the explanation allows for the inevitable exceptions (note “generally” and “usually”). Some of the exceptions stem from the way national monuments are established. Some of them stem from regional differences, for instance one would not expect a Midwest national park to match the natural resources of one located in Alaska, yet as a system representative of America’s nature, one would like to have a national park in the Midwest. There will also be exceptions that result from the whims of history, including personnal preferences of key players.
While from an administrative point of view, all parks units are equal, this is not the public perception.
The prestige of the national park designation attracts more public attention. There are quite a few books about the national parks, but only one covers all the NPS units. This prestige has been earned by the fact that historically, almost all national parks are large and diverse areas where international visitors could spend a week, something which could not be said of most of the NPS units. However, the recent renaming efforts were meant to bring more tourism to the local communities. I think this is a questionable reason for designating a national park. The mission of the NPS is to preserve the most unique sites in the country, not to increase tourism to particular areas, which is by definition a concern of local political interest, not national interest. Moreover, economic development should be viewed as a benefit of protecting beautiful lands, not the reason for doing so.
There is no evidence that a national park unit would receive more funding just for being designated a national park – rather than for the reasons that led it to being designated a national park. Although there is nothing in legislation which says explicitly so, in practice, national parks are subject to more regulations. Activities that consume resources such as extraction, hunting or off-road vehicle use are generally prohibited in national parks while authorized in other park units. Many of the Alaska national parks consist actually of a “national park and preserve” with the national preserve explicitly created to allow resource-intensive activities. Hunting is allowed in a number of NPS units, but it is prohibited in national parks with one exception, Grand Teton, because of a special Elk reduction program.
I mentioned before that “national park” is often used for brevity instead of “National Park System unit”. Some favor the term not only for brevity, but also to emphasize the equal status of all park units. To follow this logic to its natural conclusion would mean dropping all the confusing designations altogether and call all units “national park”. Are you ready for a Thaddeus Kosciuszko National Park (the townhouse where the wounded Polish freedom fighter lived, 0.02 acres) alongside Yellowstone National Park? Would that bother you that a townhouse without trees nor vegetation be incidentally called a “park”? How about a President William Jefferson Clinton Birthplace Home National Park? Would such a designation elevate the home, or devaluate Yellowstone, the national park “brand”, and eventually all its properties, including the home, and even the entire conservation movement? Does anybody seriously believe all park sites have the same significance? In any system of equals some entities are more equal than others. The national park idea, as embodied by the first national parks, inspired an entire conservation movement worldwide. Countries identified their most outstanding natural areas. Some park units are clearly international attractions, and some are not. Although from an administrative point of view, all units are equals, most would recognize that some are more valuable than others. If so, is unreasonable to distinguish them with a name? Calling all units national parks would dilute the significance of our most special places. An award doesn’t change any person, nor does it confer any special rights to them, besides calling themselves an award-winner, but that does not make it an insignificant nor useless label. With the “national park” label, when used properly, we are recognizing with a name what is a reality on the ground.
Yellowstone National Park
Would you agree that “national park” should be reserved for a selected group, or should all NPS units be called that way?
Posted
on October 6, 2017, 6:11 pm,
by QT Luong,
under Locations.
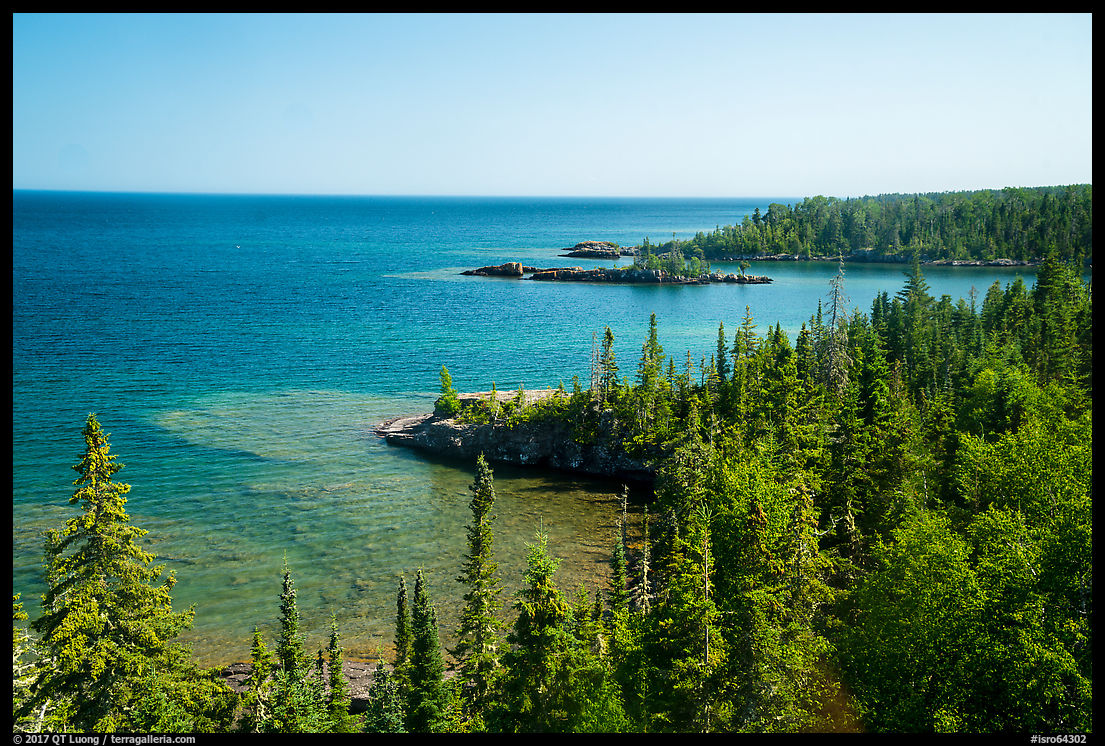
Isle Royale is a roadless national park more than forty miles long, and exploring it in depth on foot requires backpacking or long hiking days, which contributes to its reputation as an involved place to visit. A little known alternative way to explore the park is by water, which allows you to make short work of destinations that are quite far to hike to or to get to locations inaccessible to hikers. In this post, I will describe the options available from Rock Harbor, which is the most popular and scenic of the two entry points into the park.
Canoeing & Kayaking
Ferries can transport canoes and kayaks for a fee. With your own kayak, you can go wherever you please, but the hazards presented by open waters make it an endeavor for experienced paddlers only. Lake Superior is almost like an ocean with a rocky coastline, cold water temperatures, sudden squalls, and possible large waves.
If you don’t have your own, the Rock Harbor Marina rents canoes and kayaks. They are stored at the floatplane dock on Tobin Harbor, and their use restricted to safe Tobin Harbor, which is only about 4 miles long from Three Mile to Scoville Point. I found a canoe most useful for going to Lookout Louise. Since we were carrying photography backpacks, we found their canoes to better choices than their kayaks for keeping gear dry.
Boating
To go further than Tobin Harbor, I rented a aluminum 14 feet long fishing boat with a 15 HP motor from the Rock Harbor Marina. Like with their canoes and kayaks, there are restrictions on where you can go. You have to stay in Rock Harbor, between Moskey and Scoville Point (12 miles), and you cannot go around Scoville Point into Tobin Harbor. The landings have to be at a dock, and those are marked with the letter “D” on the NPS map.
Within those limitations, here are the three most rewarding destinations I have found.
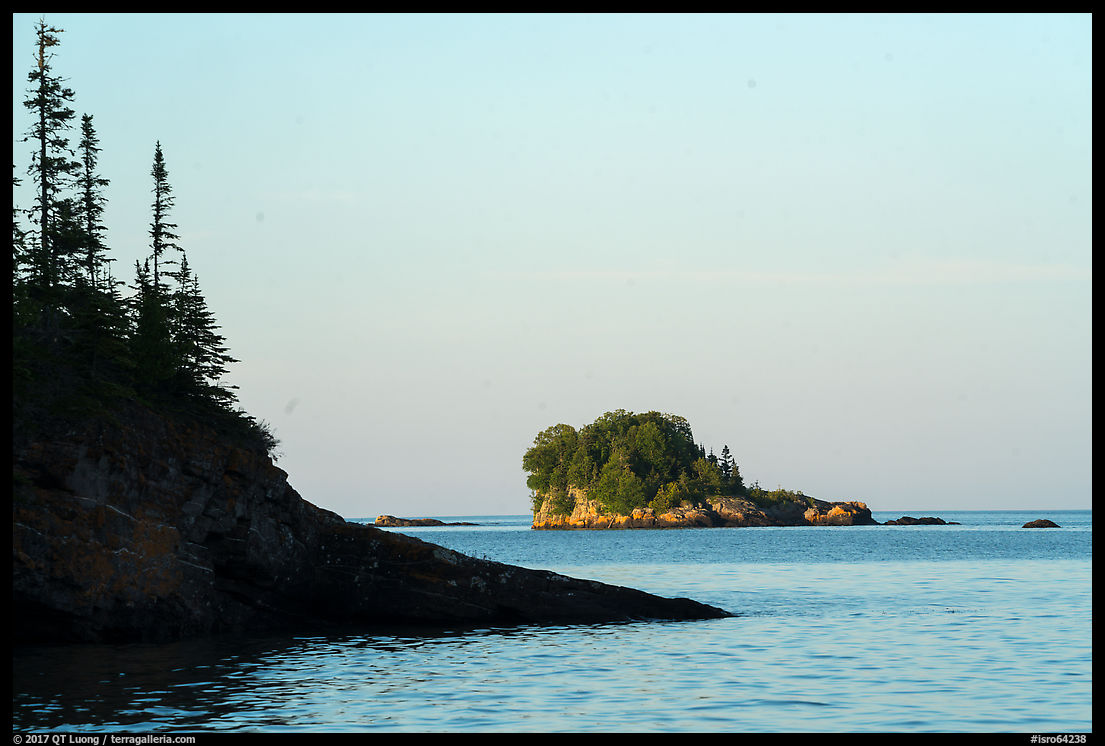
Tookers Island is a very small island, however, it has two camping shelters from which you can catch sunsets and sunrises with a few steps. The small size allows easily photography in each direction over water, with neighboring islands adding interest to the compositions. This makes Tookers Island maybe the most scenic place to camp in the entire park. Isle Royale’s campgrounds are unique in the National Park system in that 19 out of the 32 campgrounds are equipped with shelters which make camping unusually comfortable. They consist of three-sided wooden structures with a roof, the fourth side being an insect screen with a door. All shelters are available on a first-come, first-serve basis, and we found out the hard way that Tookers Island is quite popular with boaters. They had claimed all the two shelters by the time we arrived.
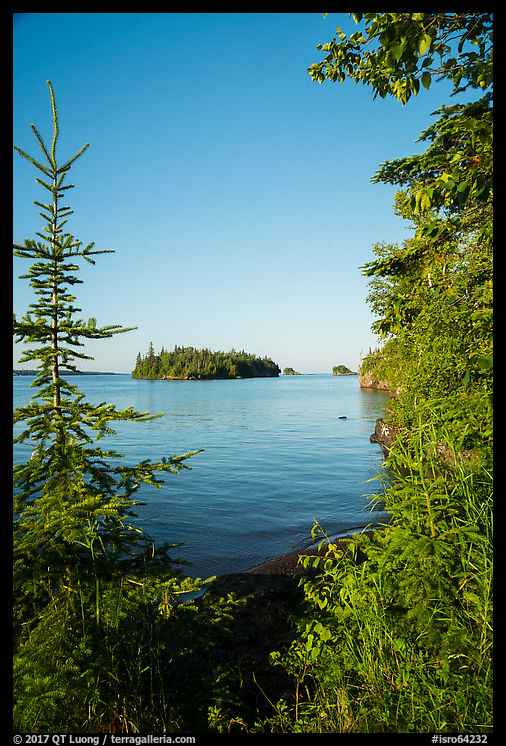
The Edisen Fishery dock gives access to three diverse day-use sites, and although it is on Isle Royale, there is no access from the trail system. The historic commercial fishery is situated right from the dock.
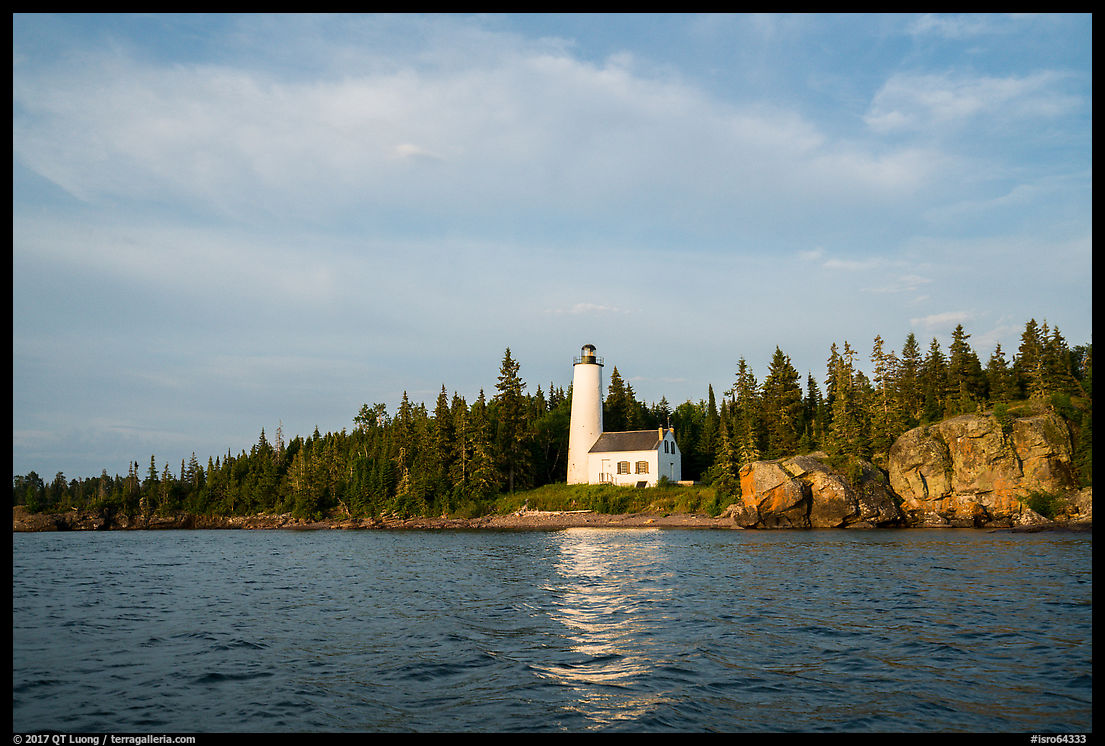
The left trail leads in 0.25 miles to the Rock Harbor Lighthouse, oldest on the island (1855). The first floor features a museum, and I climbed the staircase to the room that used to house the light for a relatively rare high view of the coastline.
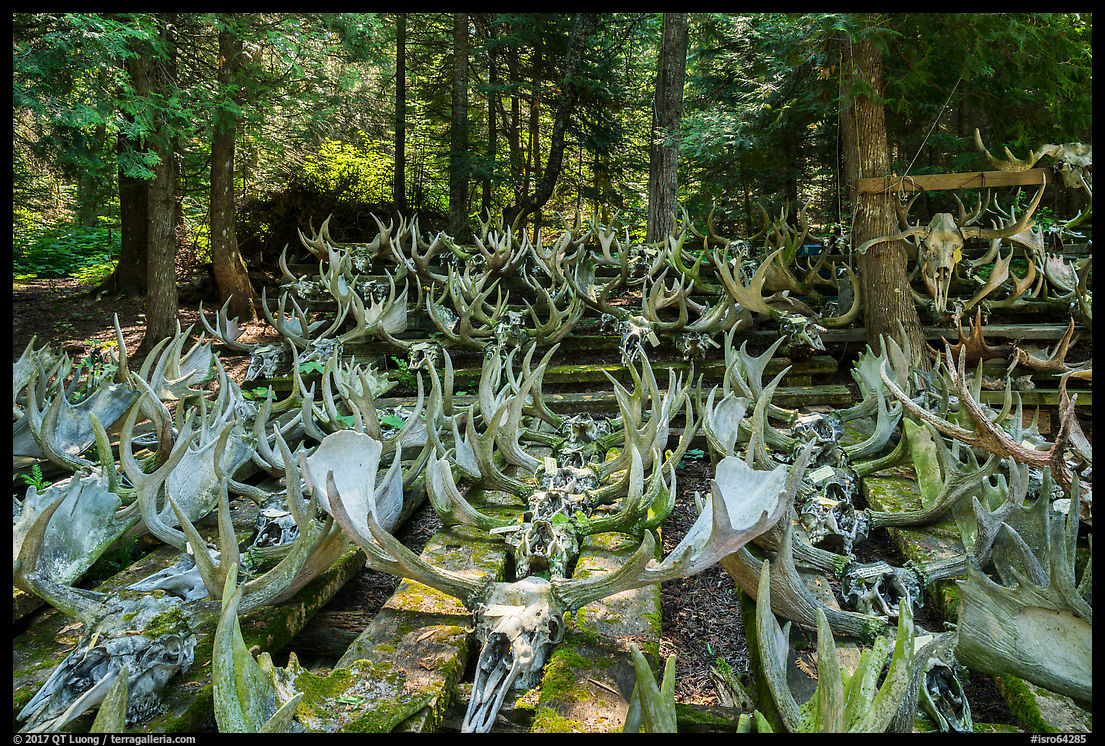
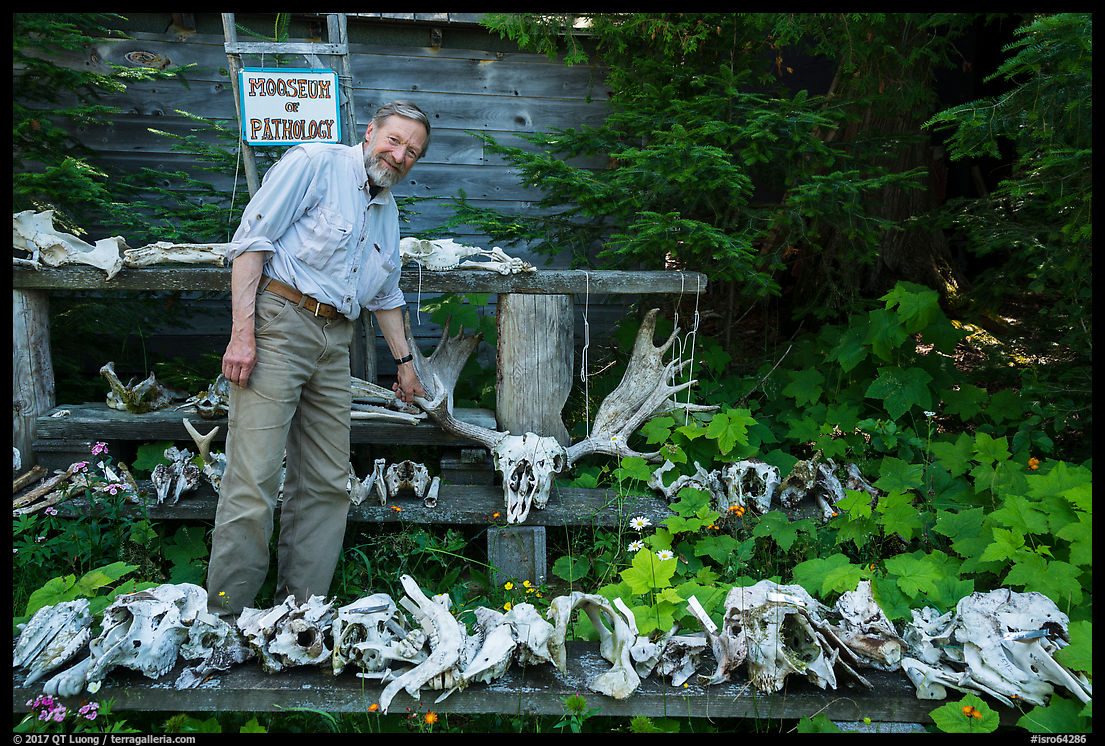
Following the right trail for about 0.4 miles, we arrived at the historic Bangsund Cabin, which is the base for the longest continuous wildlife study in the world. That study of the predator-prey population interaction of the wolves and moose has been going on for more than five decades. The population variation is well captured by a system of differential equations. Back in college I first heard of Isle Royale in math class
through those equations. At that time, I had no idea where the place was located. The study is currently carried on by Rolf Peterson, with help from his wife Carolyn (Candy) Peterson. Both proved to be gracious hosts. Rolf enjoys showing visitors their vast collection of moose antlers and skulls, and both welcomed us into their home to discuss Rolf’s research and other moose-related topics.
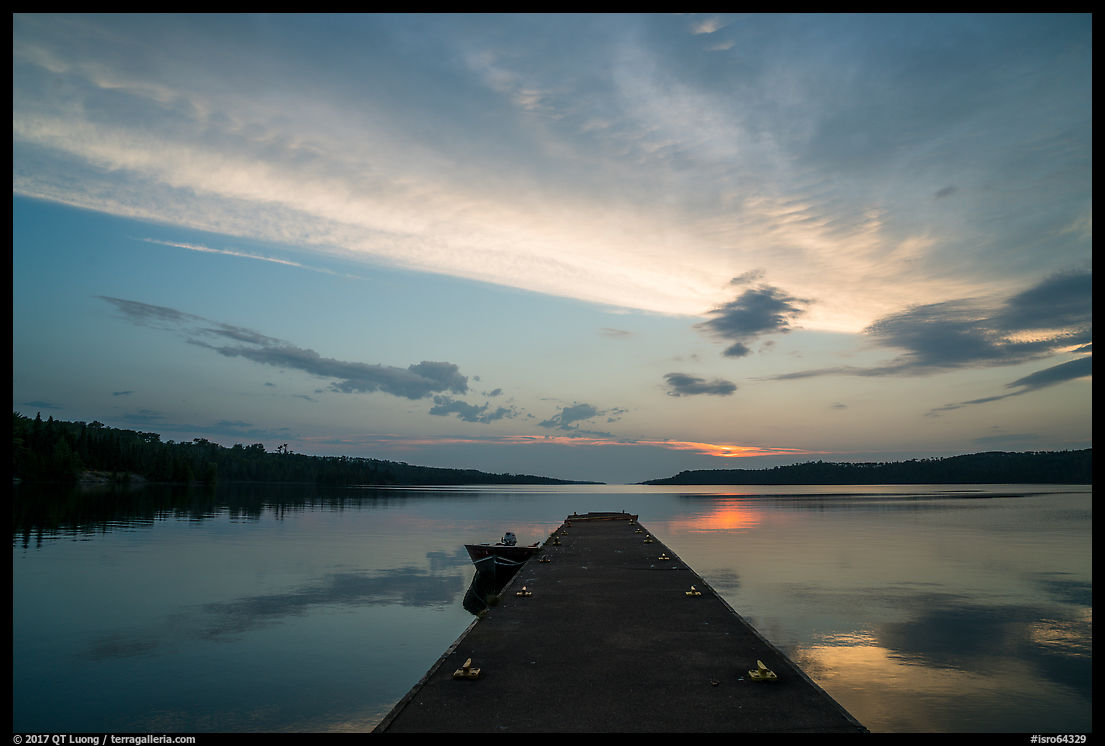
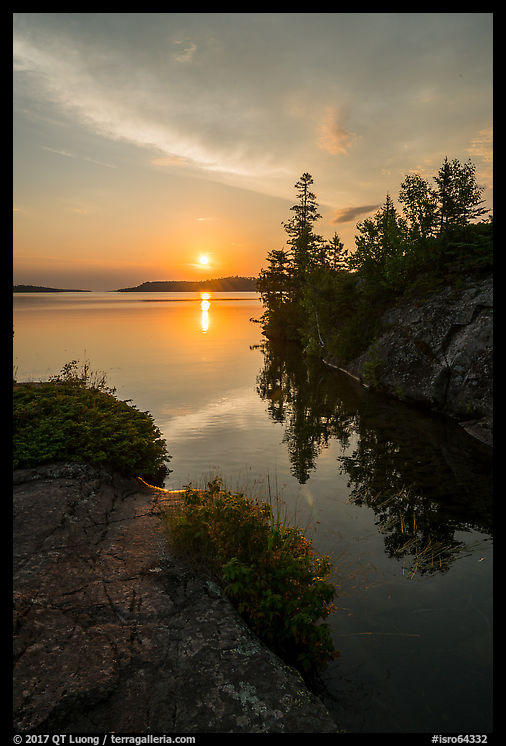
At the end of Moskey Basin, next to the dock, a small peninsula provides a scenic location to catch a sunrise. Some of the shelters in the nearby campgrounds face directly the water. It took about one hour by motorboat to go from Moskey Basin to Rock Harbor Marina, and this is because of two no-wake areas. This was followed by a 30 min floatplane flight, a 6-hour drive, a 5-hour flight, and a 1-hour ride, and I got home in San Jose in the late evening!
Tours
Isle Royale National Park comprises more than 450 surrounding islands, and the most remote of them is Passage Island, separated from Isle Royale by several miles of Lake Superior waters, enough to accommodate a commercial shipping lane. Passage Island is not grazed by moose, so its denser vegetation makes for an interesting comparison with Isle Royale’s. To travel the open waters off limits to rental boats, we booked a guided excursion on the tour boat M.V. Sandy, operated by the Rock Harbor Lodge. For families and anybody who would rather not operate their own watercraft, guided excursions on the boat M.V. Sandy includes trips to Lookout Louise and the Edisen Fishery, with a schedule that varies according to the day of the week.
If you add the availability of the lodge, campground shelters, and water transportation, with a bit of planning, you can explore quite a bit of Isle Royale with less effort than its reputation as difficult-to-visit wilderness would lead you to expect.
Posted
on September 29, 2017, 9:08 am,
by QT Luong,
under Locations.
Carolyn and Rolf Peterson, who together have raised a family on remote Isle Royale, lamented that Ken Burns didn’t roam the national park, but instead just zeroed in on a single overlook. Which one did he choose? Lookout Louise.
Expansive elevated views do not come easily on Isle Royale because of a combination of gentle peaks and dense forest cover. The position near the tip of the island atop a cliff sets apart Lookout Louise from the few other high points available along the Greenstone Ridge Trail, which forms the backbone of Isle Royale. On previous trips, I had hiked a large part of the 40-mile trail, however, I had missed Lookout Louise, which forms its northeast terminus.
The reason becomes clear when you look at the map. If traveling on foot, you’d be coming from Mount Franklin, and then you’d have to backtrack for 5 miles along the section of the trail between Mount Frankin and Lookout Louise. Visiting as a day trip from Rock Harbor would entail a hike of almost 20 miles round-trip.
This landlubber eventually figured it out that crossing the waters of Tobin Harbor makes Lookout Louise a quick outing from Rock Harbor. The distance on water from Rock Harbor to the Hidden Lake dock is about a mile and it took us 20 minutes to paddle a canoe.
After skirting Hidden Lake (a moose habitat), the trail gains 300 feet elevation within a lush forest, and you reach Lookout Louise a mere 0.6 miles from the dock. During the summer season, you can rent canoes and kayaks at the Rock Harbor Marina, and they are conveniently stored on Tobin Harbor. The outfitter provides canoes without even a single line, but I had brought an utility cord, so we were able to tie the canoe to the dock. On some days, it is possible to visit Lookout Louise on a guided trip with the MV Sandy tour boat, but you’d be standing at Lookout Louise at midday.
The views from Lookout Louise range from west to northeast, and I had to “work” that overlook. When I arrived there in the late afternoon, at first I saw only one opening between the trees towards the west facing Duncan Bay and Five Finger Bay. I normally try wide views before looking for details. However, 3 hours before sunset, the view was strongly backlit, to the point where a good photograph didn’t seem possible. Given the difficult light and the limited size of the opening, I reached for my telephoto lens, looking to isolate a graphic image.
Shooting right towards the sun to make the most out of the backlight, I liked the high-contrast silhouettes of the multiple tree-covered ridges against the texture created by shimmer of the water. Pointing the camera just a bit more towards the west yielded a more hazy effect, with the texture of the forest barely visible.
One hour later, the sun had moved and the shimmer left the area where the ridges had the richest shapes. However, I noticed that I could now create a symmetrical wide-angle image. The trees would contribute rather than distract. I centered the sun and stopped down the lens to f/22 to create a sun star. The tree in the middle was aligned with precision to tame the brightest areas of the water. While the image below is a HDR blend, almost the same result could have been obtained with a single frame from the Sony A7R2 with its great dynamic range.
Shooting towards the northeast and the tip of the island (Locke Point), the side lighting in the late afternoon delineated the forest beautifully, however, finding a satisfying composition proved tricky, as trees were obscuring views. By bushwalking a few yards off-trail to the edge of a cliff, I found an open viewpoint, and tried to balance the composition by including a foreground tree.
However, I was not pleased that the tip of the island was hidden by a ridge of trees, which may seem unimportant until you realize that the eye naturally converges towards that point. After another half-an-hour of stepping through bushes, I eventually found the viewpoint I was happy with, one that appeared in none of the photos I’d seen from Lookout Louise. Locke Point was now well separated. Small detail, big difference as far as I am concerned. I was glad that I kept looking.
After making the previous photograph, instead of waiting for the sun to get lower, I thought I’d have enough time do a quick roundtrip to the dock to get my panoramic head that I left in the boat. On my way down, I was elated to spot a moose walking on the Greenstone Ridge Trail. It was thanks to the late hour, as they don’t like to come out during the day, and to shoot at 300mm handheld with a shutter speed of 1/320s, I increased ISO to 3200. Isle Royale is famous for its population of wolves and moose. With just two left, you’d expect the former to be elusive, but even though there are more than 1,500 moose, there are not that easy to spot. On my previous two trips, I was unable to photograph one, so I found it well worth missing the sunset to be able to stalk the magnificent animal!
Back from Lookout Louise, paddling the glassy waters in semi-darkness was a delightful and serene experience. We’ve been told that the coast guard doesn’t want people to canoe at night, and happened to reached the dock just in time before nightfall.
Posted
on September 22, 2017, 11:10 pm,
by QT Luong,
under Books.
I received the following question by email: “… I was wondering about the level of photography tips you offer in this book. I am primarily interested in learning some of your techniques (both while capturing the shot & post), and so that content to me is perhaps more important than the final photographs themselves (as I can always enjoy those through your website / Google+)…”
Photography tips
The photography tips in Treasured Lands are ideas and principles rather than technical details. With a few exceptions, such as exposure for the Milky Way which doesn’t vary much, I do not provide camera settings. I think their usefulness is greatly exaggerated since they vary with equipment and environment, not to mention that modern cameras will often deliver a usable image in automated modes.
The work of some photographers derives its distinction mostly from digital post-processing. I am not part of them. My post-processing can refine an image, but the work is essentially done in camera. Processing is always secondary to timing and composition. In the big picture of things, I do not think it is that important in my photography. Since the photography commentary in the book is a “big picture” view, I have entirely omitted post-processing. In the case of images captured on film, which make a large proportion of the book, the goal of that post-processing has been simply to match the transparency – a task not as trivial as it sounds since we are translating a transmissive medium into a reflective medium, but that would be irrelevant for readers.
One easily missed aspect of Treasured Lands is that if you read the book cover-to-cover, which I doubt anybody does, you could get a decent education in landscape photography. The notes are the sum of my experience, of which photography is part, so I’ve laced them with musings on a number of photography topics (see image below). In theory, it would be possible to learn quite a bit by reading the notes, possibly even more than by taking a workshop with me.
However, the educational material is not readily found unlike in a technique book because the focus is not on photography how-to. Besides technical considerations picking up the best time of the day and of the year and getting there have also to be considered as part of what goes into a picture.
Part of the Index for Treasured Lands, showing the the “photography” entry
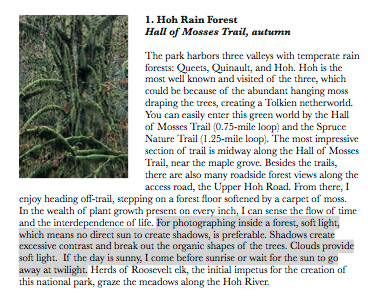
In a book with 500 images, if I had commented on the light, technique, and composition for each of them, this would have quickly become tedious, since a great deal of repetition would have taken place. My approach has been to elaborate on each idea only once. For instance, on page 30, under the “Hoh Rain Forest” entry, I define “soft light” and explain how to find it and why it is generally favorable for forest photography:
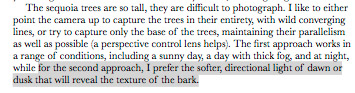
In the rest of the book, there are many other forest photographs. However, although “soft light” is occasionally mentioned, the explanations above are never repeated. Rather, the book builds upon them with additional considerations, for instance about on page 95, under the “Giant Forest” entry:
This succinct, but informative treatment fits in with the fact that Treasured Lands is several books in one.
The physical book
I do not agree that the “final photographs” are best enjoyed via the internet – anyways, how could they be final in electronic form, when their ultimate realization is the gallery wall and the printed page? If you are used to viewing photos on a computer screen, I think you will be surprised by the experience of leafing through the book.
First, there is the level of detail available in print. Until the next software update, terragalleria.com displays images at a size of 550 pixels. At 350 dpi, the printing resolution for Treasured Lands, this represents a printed size of 1.57 inches. For comparison, the thumbnails on the pages of photography notes in the book are 1.6 inches across. One reviewer has complained that those thumbnails are too small to represent a location, but in fact they offer the same amount of information as the web images! In the book, many images are printed full bleed. That is 12.25 inches across, about an order of magnitude larger than the thumbnails. There is a non-obvious way (for now) to view them on terragalleria.com at double the resolution, and those images are provided by default to Google+ followers, but the difference in resolution with the printed image is still consequential.
Second, although the photos on terragalleria.com can sometimes be
sequenced with great care, you view them one after another. Treasured Lands embraces a design with multiple images per spread, in which the interplay between the images add to the individual strength of each of them. Although design was a collaborative process, many of the ideas have to be credited to the great art director Iain Morris.
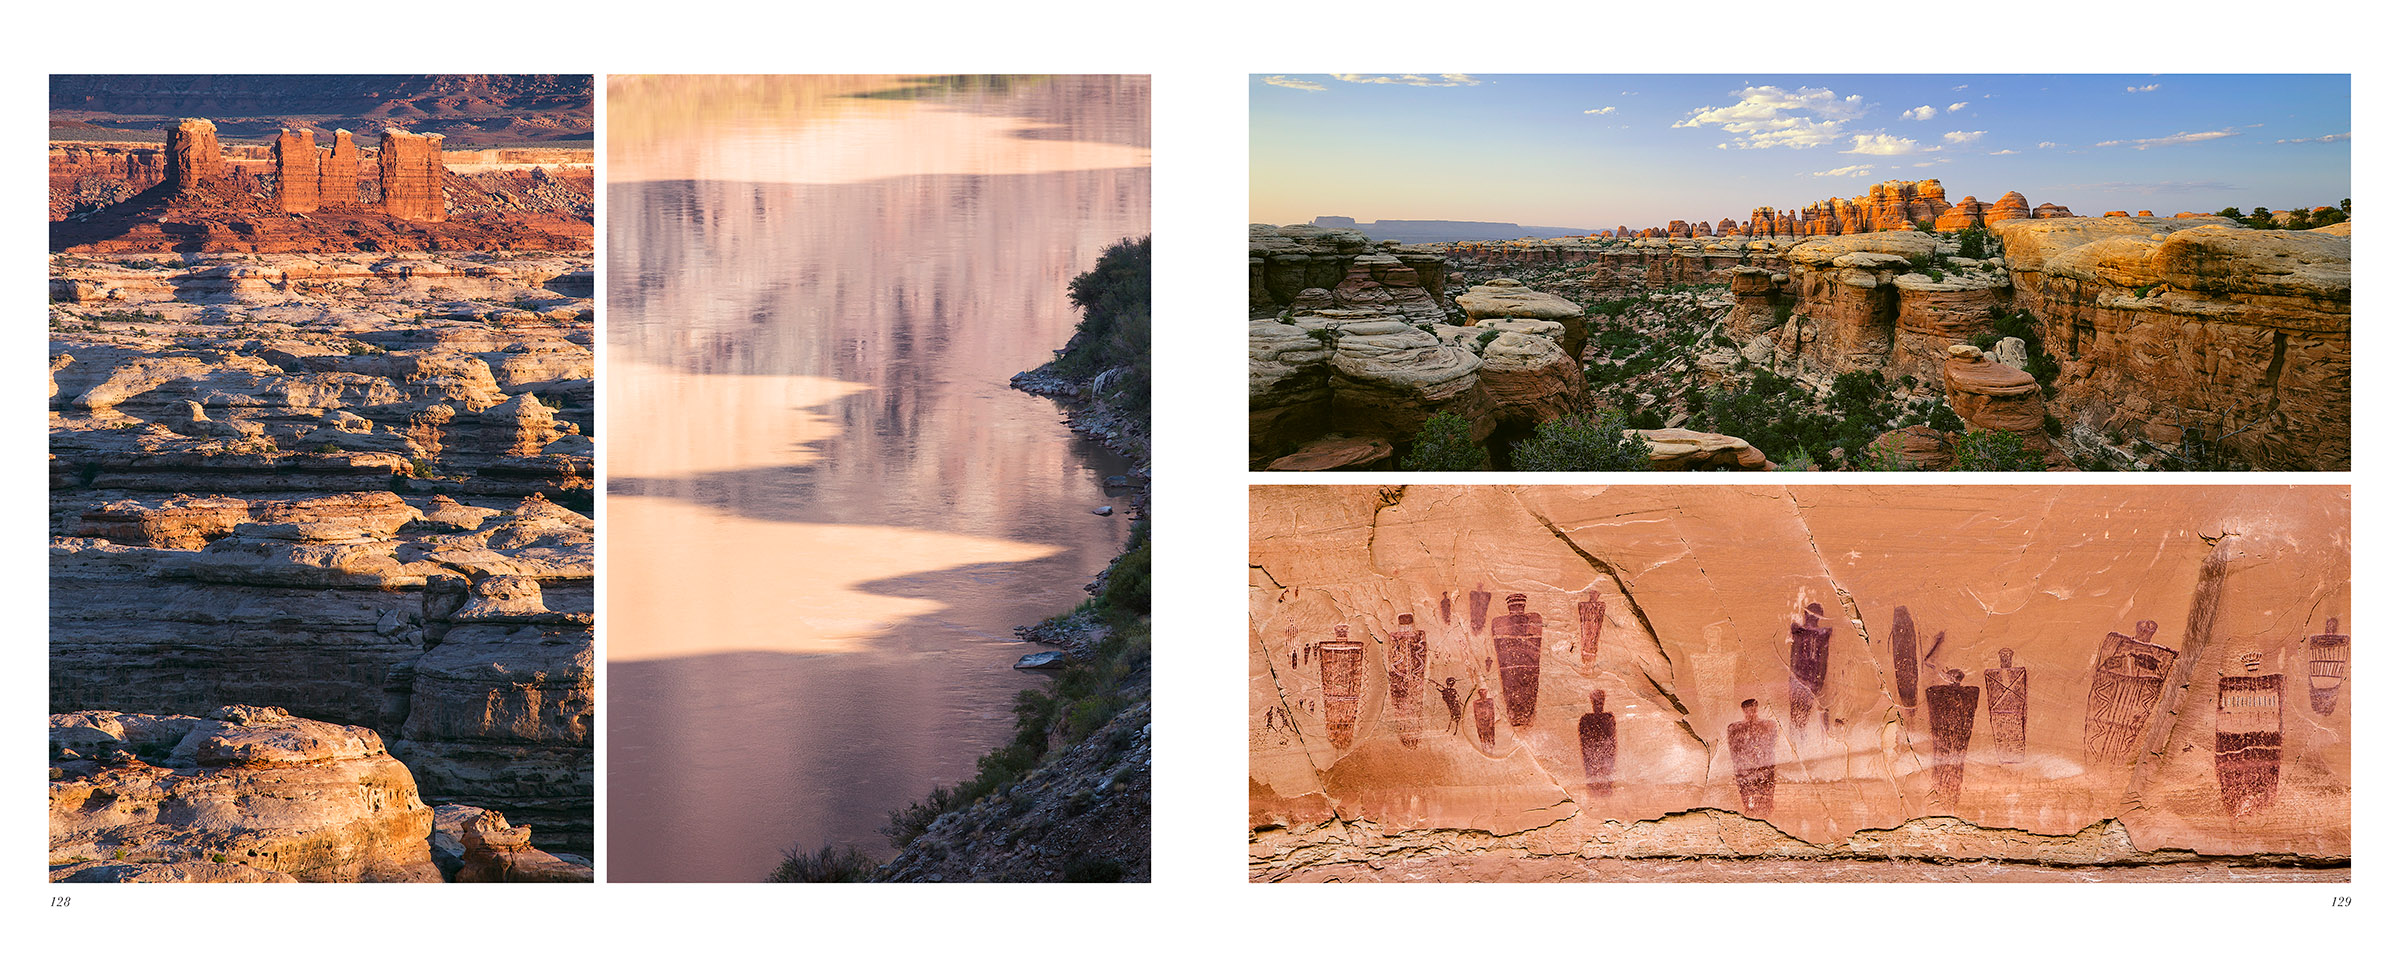
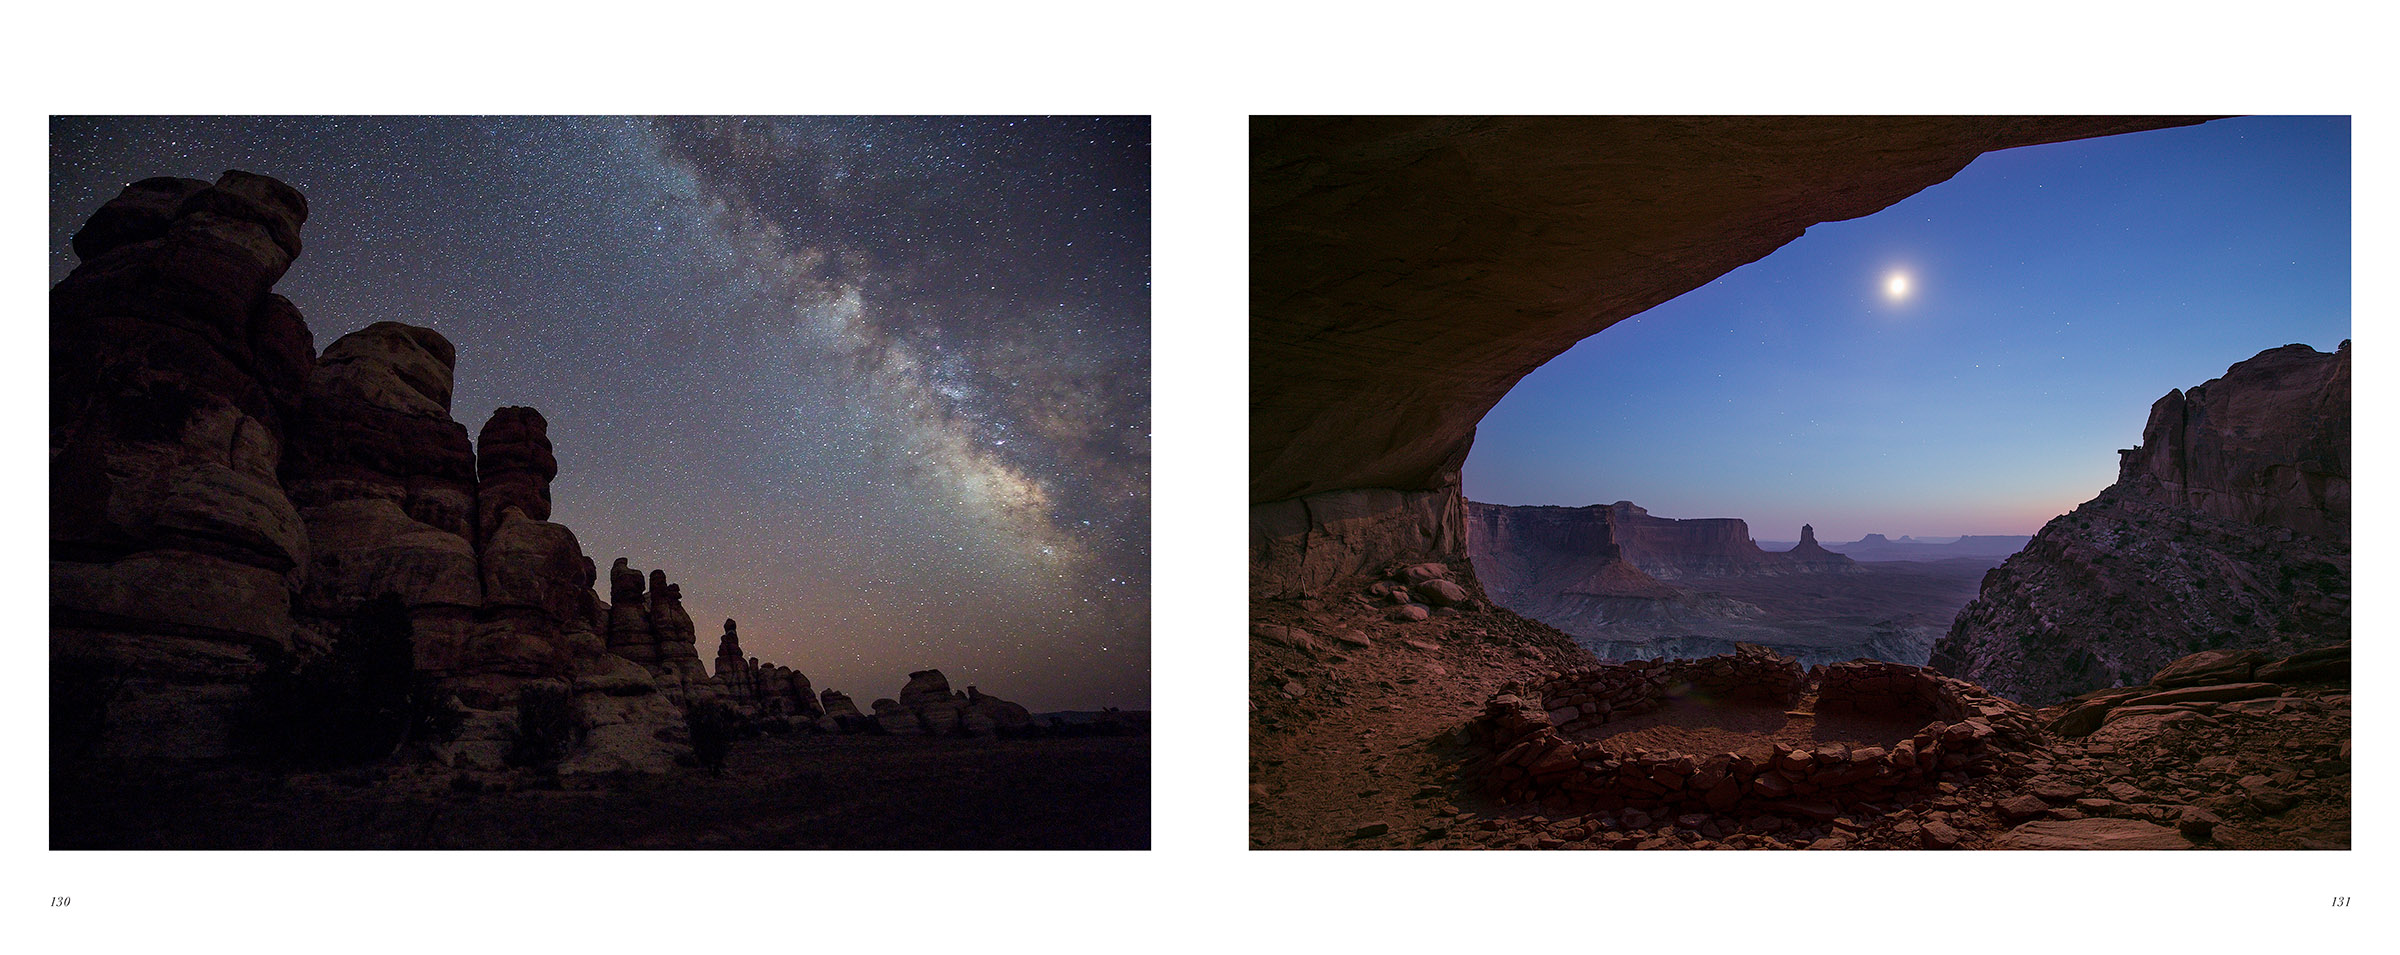
Two of the spreads for Canyonlands National Park. Horizontal shadows echo each other on the two vertical images, and the Needles and the human figures of the Great Gallery do likewise on the panoramic images. Stars and moon contrast, while diagonals create a symmetry.
There are less easily quantified, but no less important differences that result in a different level of engagement with a book as opposed to a screen. Books are physical objects with weight and, yes, smell, that of the paper and of the ink. Speaking of which, there is quite a bit of ink: the weight of the dummy is 3,160g and the finished book is 3,295g which means that 135 grams of ink (4.7 oz or 2/3 cup) were used. You hold a book in your hands and turn the pages. The materiality of a well-printed book is a great part of the joy of reading and viewing. Books have been and remain vehicles for civilization. Some of my most prized possessions are books, especially if signed. I don’t think anybody would say the same of a PDF!
Posted
on September 15, 2017, 5:40 pm,
by QT Luong,
under Locations.
Mountaineering led me to photography and
rock climbing brought me to California. About twenty years ago, my friend from France visited me and we went climbing in Yosemite, tackling the classic “Central Pillar of Frenzy” on Middle Cathedral. Like many in Yosemite, that climb follows cracks in the rock. Instead of pulling on holds, you’d jam your fingers or hands in the cracks. The next day, both of my wrists hurt, and instead of climbing, we hiked. Back in the Bay Area, I was still in pain and saw a doctor. The diagnostic was devastating. I was told that I could not climb cracks again. The initial culprit wasn’t even rock climbing, rather improper keyboarding technique that had led over the years to repetitive stress injury (RSI), but climbing made it worse. For the next twenty years, I did not do a single multi-pitch rock climb.
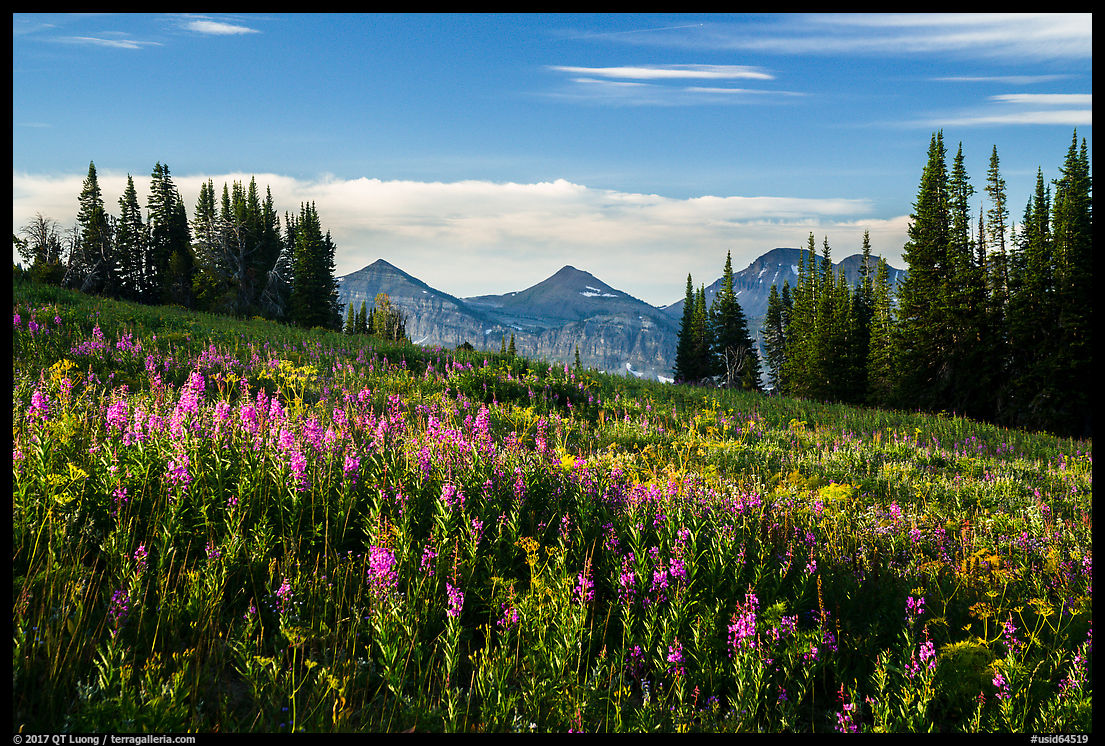
Contributing to keep me away from the rock, I married a self-described acrophobic and started a family. The forced retirement focussed my efforts on the national parks photography project. Over the next two decades, I would visit Grand Teton National Park five times, the average number of visits for each national park. Each time, I would photograph the striking Grand Teton peak from afar, as if the mountain now belonged to a different plane, within sighting distance, yet now inaccessible. As the years passed, I became more curious about what the view from the iconic summit would look like.
This year, as I was planning a
Grand Teton trip to view the eclipse with my brother-in-law Nhon, it occurred that since he’s become such a strong climber, even though we had never climbed together in the mountains, we could team up to climb the Grand Teton. If the world was going to end after the eclipse, at least I would have stood on the “Grand” before I died!
The Plan
The Grand Teton is one of the classics of American mountaineering. As can be guessed from its sharp profile, there is no hiking route to the summit. Even the two easiest and most popular routes, the Owen-Spalding and Upper Exum Ridge,
require technical rock climbing with ropes. We set our sights on the Direct Exum Ridge because the route, which combines the Lower Exum Ridge with the Upper Exum Ridge is listed in the historic book Fifty Classic Climbs of North America.
Since the 7,000 feet of elevation gain from the trailhead to the summit seemed to be a bit too much to handle round-trip in a single day, the first step was to secure a backcountry camping permit. Most of them are provided on a first-come, first served basis, and competition is fierce as only 18 people are allowed to camp at our preferred site, the Lower Saddle. When we showed up at 5:30 am at the Jenny Lake Ranger Station, 10 people were ahead of us, but by the time it opened, at 8 am, more than 50 were behind us. The process was efficient and we were happy to walk out permit in hand.
The Garnet Canyon Trail
We started at the Lupine Meadows Trailhead (6,650 feet) in the early afternoon. From there, we followed the trail up Garnet Canyon for 5,000 feet elevation gain in 7 miles. Since it is such a steep hike, I didn’t expect it to be that popular, but when the views opened up above the forest, I began to see why it was the case. The scenery along the trail was rewarding in itself and with such an elevation gain, the scenery changed from forest, to subalpine meadows, then rocky terrain with glaciers. As the impressive peaks got closer, we were grateful to be able to easily refill bottles with the sweet water of the cascading mountain stream. From Jackson Hole, the mountains are only a backdrop, but on the trail, they are surrounding you. I felt I was coming home.
The last photo is of Chris and Aleksandra completing a single-day ascent and descend of the Grand. I had climbed with Chris two decades ago while he was working at Stanford on the first of his two PhDs. I had not seen him since, but he invited us to a prized campsite in the park around the eclipse time (Thanks!), for which he started planning seven years ago. Fittingly, our reunion was below the Lower Saddle. A few days later, Chris and Aleksandra would be back on the Grand to view the eclipse.
The Lower Saddle Camp
Our objective for the afternoon was the Lower Saddle (11,650 Feet), which is the pass between Middle Teton (12,805 feet) and Grand Teton (13,776 feet), and the highest campsite that can be used to climb the Grand Teton. Besides the superlative views both on the Wyoming and Idaho side at sunset, we had a good look at our route for the next day, which follows the prominent ridge in the center of the Grand Teton. I felt a mixture of apprehension and anticipation. Winds can be howling at the Lower Saddle, so we were glad to have found a campsite protected by rock piles.
The sunrise
We set up the alarm for 4 am and started towards the mountain, made more mysterious by the night. While scrambling in the dark resulted in some wandering off-route into unstable talus – and a bit of cursing when the slopes gave way underfoot, it was wonderful to witness the arrival of the dawn and sun during the approach to the climb. At such high elevations, the alpenglow takes on a magical quality that I had missed by watching from below on all those years. I could now clearly grasp the structure of the mountains from a high perspective. Because it was a demanding climb for me, I had taken only a 24-70mm lens. In retrospect, the 16-35mm might have been a better choice, but multi-image panoramas worked fine for the scenery. The camera was the mirorless Sony A7R2, and that was one time when I fully appreciated its smaller size and lighter weight compared to the DSLRs!
The Exum Ridge climb
We roped up at sunrise. The route turned out to offer excellent climbing, with the sheer walls more intimidating than difficult thanks to positive holds. It had been two decades since I climbed with a pack on my back and I was glad to be following. The sun did not visit us until the junction with the Upper Exum route, and the wind contributed the chill. Although it might sound unpleasant, I relished the memories brought by having fingers numbed by the cold to the point of not feeling the rock. I tried to warm them up with my breath. I was elated by the exposure and the privilege of being in a place where man normally doesn’t belong. After completing the difficult climbing parts of the route, we coiled the rope so that we could move faster towards the summit – which is always further than one thinks.
The higher we got, the better the view, as seas of peaks began to unfold. However, this doesn’t necessarily translate to more compelling pictures, and in the hazy midday, I hardly felt like photographing from the summit. It is so difficult to succeed as a mountaineer and a photographer at the same time! However, even if the images from lower are better, it is eventually the experience and memories that make it worth the effort. Although I slowed down our party by running out of gas on the hike down the Garnet Canyon Trail – we would not return to the Lupine Meadows Trailhead until midnight -, I was happy to be able to steer my aging body towards a bit of youth.
As with the eclipse, the top remains etched in my mind and I know that I will not look at the mountain the same way as I did before the climb.
Posted
on August 28, 2017, 1:07 pm,
by QT Luong,
under Locations.
Summary: For the total solar eclipse of August 21, 2017 in Grand Teton National Park I chose a backcountry location discovered by William Henry Jackson. My shooting plan to capture this iconic shot did not involve straight photography, but rather a timelapse and a 360-degrees panorama.
Attending or not attending ? That is the question
I am a landscape photographer. Without the connection to the land,
photographing a celestial event doesn’t get me that excited. Don’t get me wrong, I understand the difficulty and admire well-crafted close-ups of celestial objects. However, those astronomy pictures lack the sense of “being there” which defines most of my work. They could have been made in a wide range of locations – and are best shot with telescopes. Tens of millions were expected to see the 2017 eclipse, the
most accessible ever in America during our lifetime, and therefore the most viewed ever. Most of their successful close-up images would be similar, whereas I am striving for the distinctive.
The last total eclipse in America happened 38 years ago. The next best thing to a total eclipse is an annular eclipse, which occurred in May 2012 in America. To photograph it, I traveled to West Texas because the sun would be low on the horizon at eclipse time
(story and photos here).
When I learned of the 2017 eclipse, I was initially disappointed that it would happen at
midday in summer. The sun would be overhead, high above terrestrial features. To include both the sun and the
landscape, one would have to use a very wide-angle lens, which would make the sun tiny in the picture.
I initially thought about sitting this one out. But I read that a total eclipse is something else, to which a partial eclipse barely compares, and this made me curious.
Even if I would not come back with a great picture, I’d be able to witness a total eclipse with my own eyes without having to travel
to the ends of the earth. Sometimes, the experience must supersede the photograph.
The most spectacular location ?
Since the eclipse is a natural event, I wanted to experience its power
in the midst of a pristine landscape rather than in the city. Looking
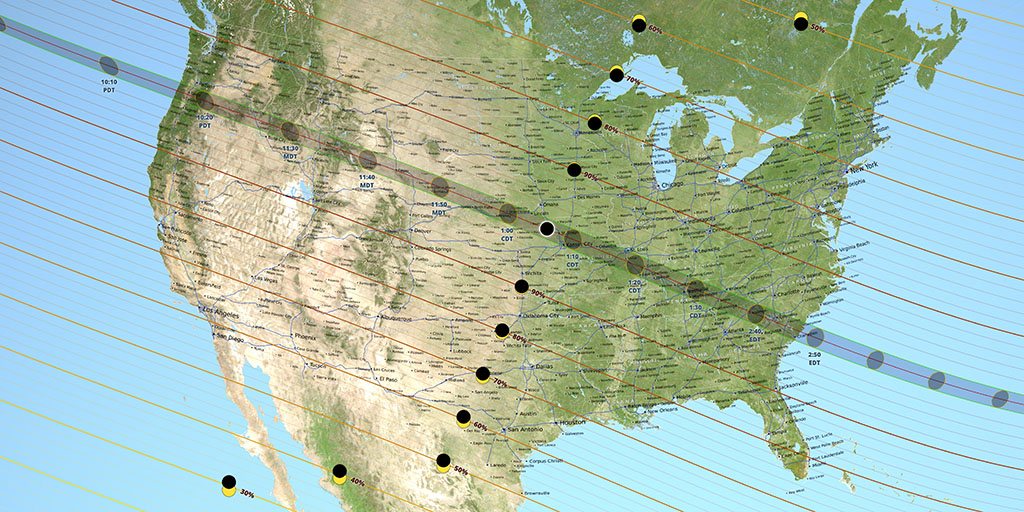
at the coast-to-coast 70-mile wide path, there were a number of national parks
traversed. However, it was pretty clear to me that the most spectacular
location would be Grand Teton National Park, home to one of
the most striking mountains – if not the most striking – in the country. Would you agree?
This sit well with me, since I am mostly known as a national parks photographer, and many readers have asked me for a followup to
Treasured Lands. Experiencing a spectacular natural event at a spectacular location appealed to others as well. If monetary value is an indicator of desirability for a location, note that the Washington Post article Airfares
to solar eclipse destinations soar to astronomical levels mentions
Jackson WY as the airport topping the charts of overpriced flights.
Pursuing the iconic shot
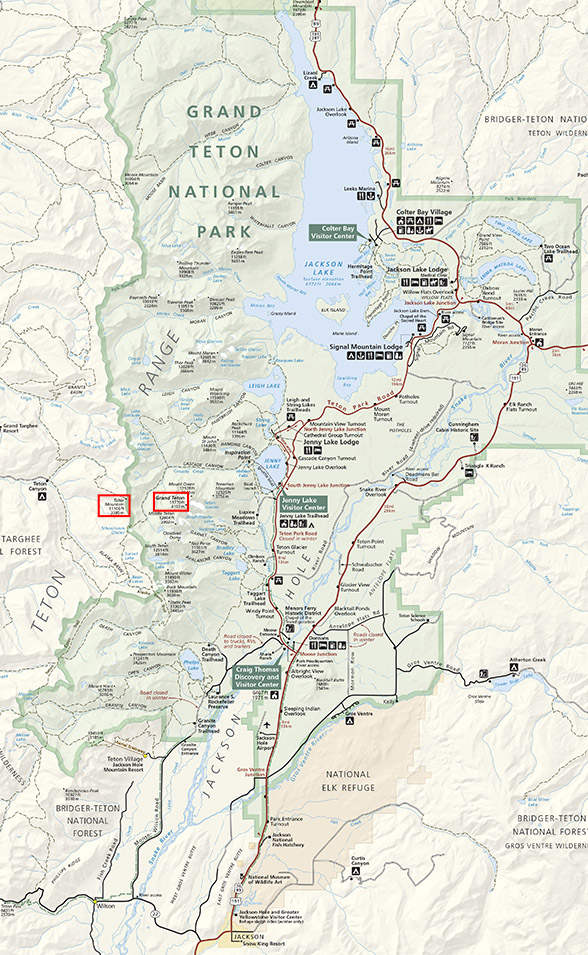
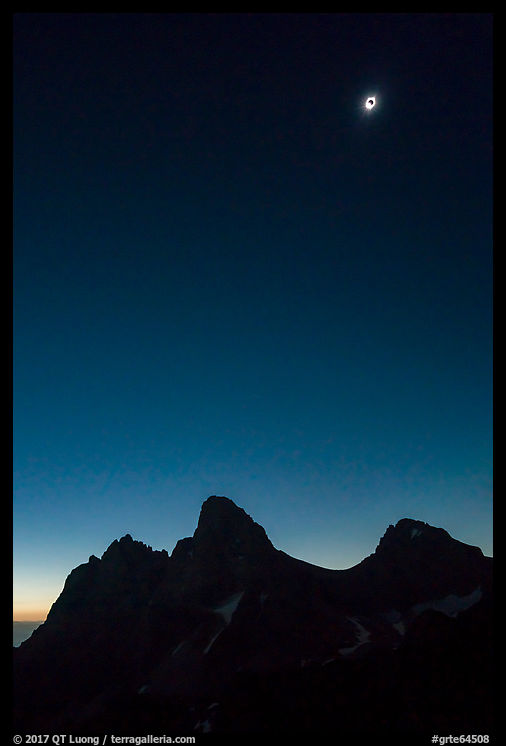
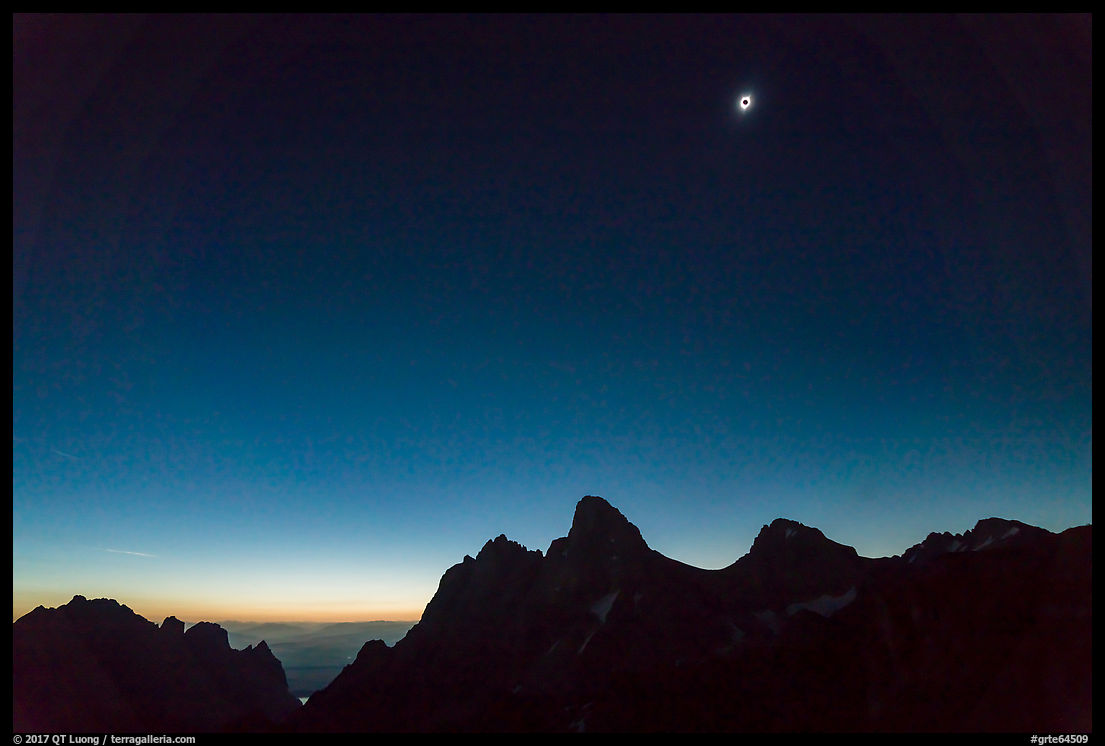
Map of Grand Teton National Park. In red boxes: Grand Teton and Table Mountain. All front country areas are east of the Teton Range.
There was just was a slight problem. Standing in any of the park’s
easy-to-access front country areas, the Tetons would be west of you, but at the
11:36 am totality time, the sun would be coming from the Southeast
(133.3 degrees azimuth). To me, choosing Grand Teton National Park to photograph the eclipse and not including the Grand Teton in the picture meant missing what would be a defining shot.
Others recognized that this was the iconic shot of the event. Astrophotographer Alan Dyer, in his
excellent 296-page ebook How to Photograph the Solar Eclipse
presciently writes “How many hours will it be after the eclipse before
images like this begin to pepper the internet, garnering thousands of
hits and likes”. The image in question was a composite of a large sun
in the western sky over the Grand Tetons superimposed with a
wide-angle image taken from the Wyoming side. What I didn’t expect was that despite their usually strict standards, even the venerable National Geographic didn’t resist the temptation, displaying on their Instagram an image even more outrageous than Alan Dyer’s example of what not to do (see image and read commentary on the controversy).
Although I strive for truthfulness, I admit having done my share of digital alterations. However, I’ve always tried to honor reality by not publishing such images of something that could never exist, even if labeled as “photo illustration”. Nature photographs derive much of their power from the assumed connection with reality.
Following the footsteps of William Henry Jackson
In this case, the solution to the problem was pretty simple: find a backcountry location northwest of the Grand Teton to photograph from.
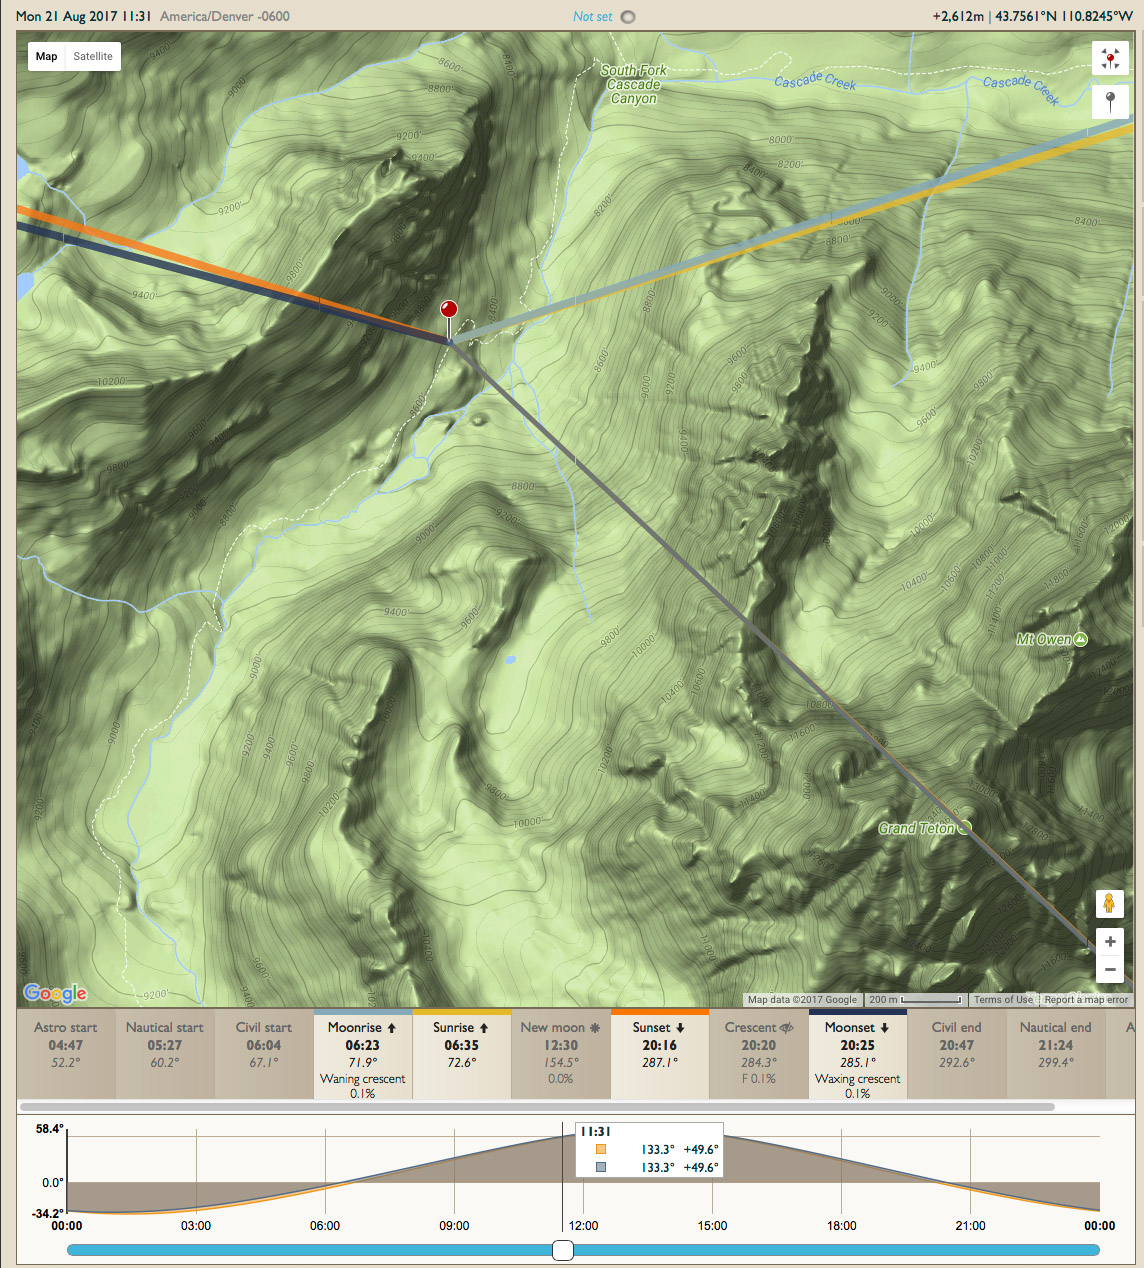
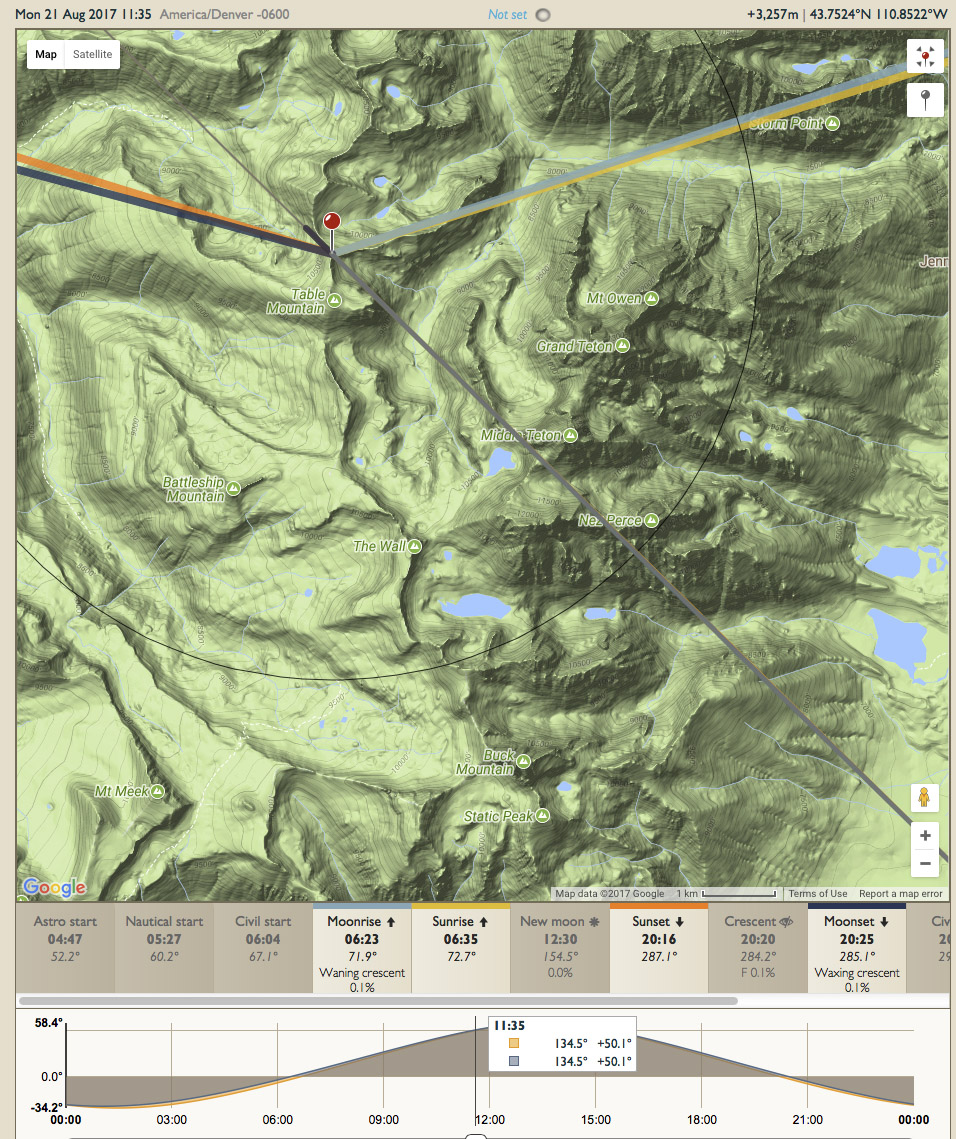
Photographer’s Ephemeris screenshot with South Fork position aligning sun and Grand Teton
Tracing the position of the Grand Teton at a 133.3 degrees azimuth with the Photographer’s Ephemeris
yields a location on a trail in the South Fork of Cascade Canyon. The
hike from the South String Lake Trailhead is 13 miles RT and only 1,700 feet elevation gain. However,
having been at Cascade Canyon Forks before, I remembered that from that location the shape of
the Tetons appeared quite distorted and indistinct because you are
standing so close and low. This was confirmed by a
photo from my friend Mike Cavaroc, a nature photographer and hiker living near the Tetons. In addition, the position in a deep canyon would not provide any view of the horizon. I had read that the sight of the land from a mountain top was special during an eclipse, and was as interested in the light on the land as in observing the sky.
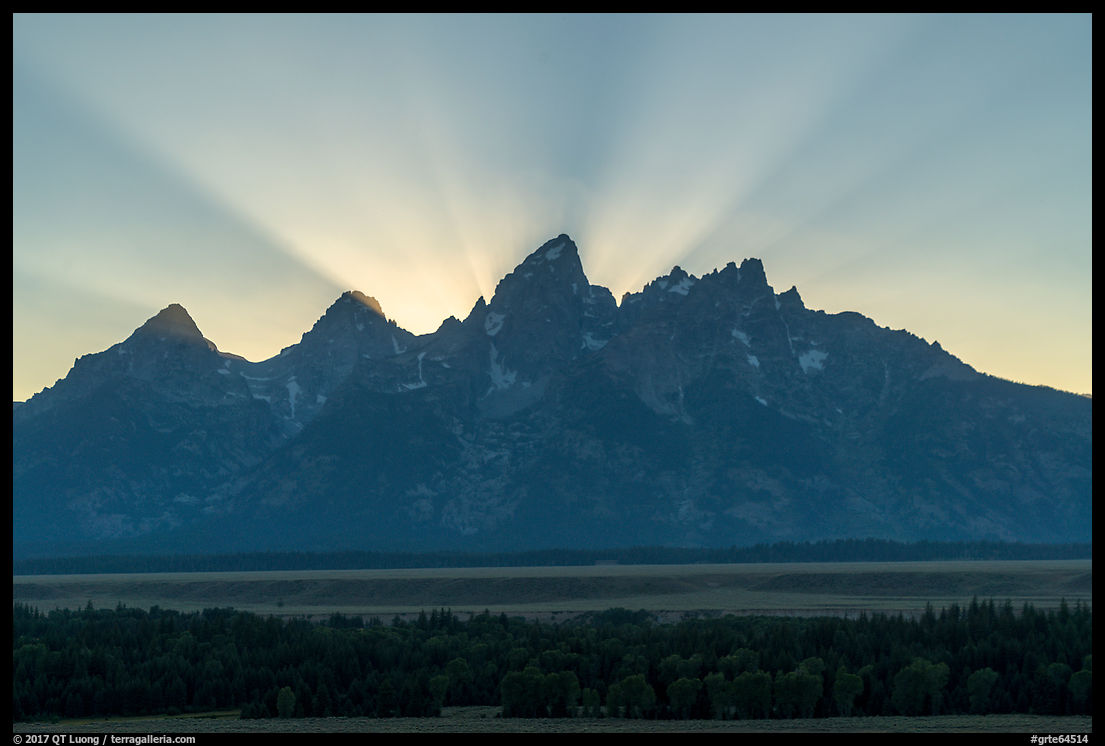
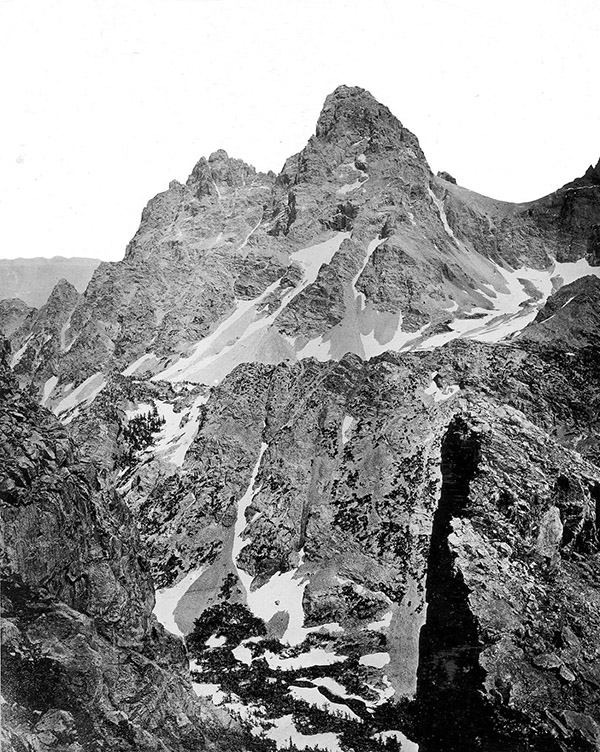
Grand Teton by William Henry Jackson, 1872
I looked for a higher vantage point on the west side of the Tetons that would preserve its iconic shape and allow a view of the horizon. The flat-topped,
11,106-foot peak called Table Mountain sits just at the border of
Grand Teton National Park. Although nowadays the immense majority of photographs of the
Tetons are from its Wyoming side, the first ever photographs of the Tetons were made from Table Mountain in 1872. Or more precisely from near Table Mountain. The photographer was none other than William Henry Jackson, whose photographs were instrumental in establishing
Yellowstone National Park, and on that occasion he and his party happened to have made the first ascent of Table Mountain.
Talk about standing on the shoulders of giants!
Read about Jackson’s efforts.
The only reason why the view isn’t photographed more often is that
the effort to reach Table Mountain, from the Teton Canyon Trailhead, is even more substantial
than to reach the South Fork, since it involves a 11.5-mile RT hike with 4,000
feet of elevation gain. But if Jackson did it in the 19th century, is it too much to ask of us, with our modern outdoor equipment and lightweight cameras, to hike the mountain?
Pinpointing the backcountry location
Although William Henry Jackson benefited from a “tabula rasa” (pun intended), because nowadays there is a trail to the summit of Table Mountain,
all the modern photos of the area tend to be taken from that summit. Such are the effects of a beaten path. While sitting at home planning for the trip, I thought I could find a better location.
First, looking at the published photos from Table Mountain, I noticed a foreground
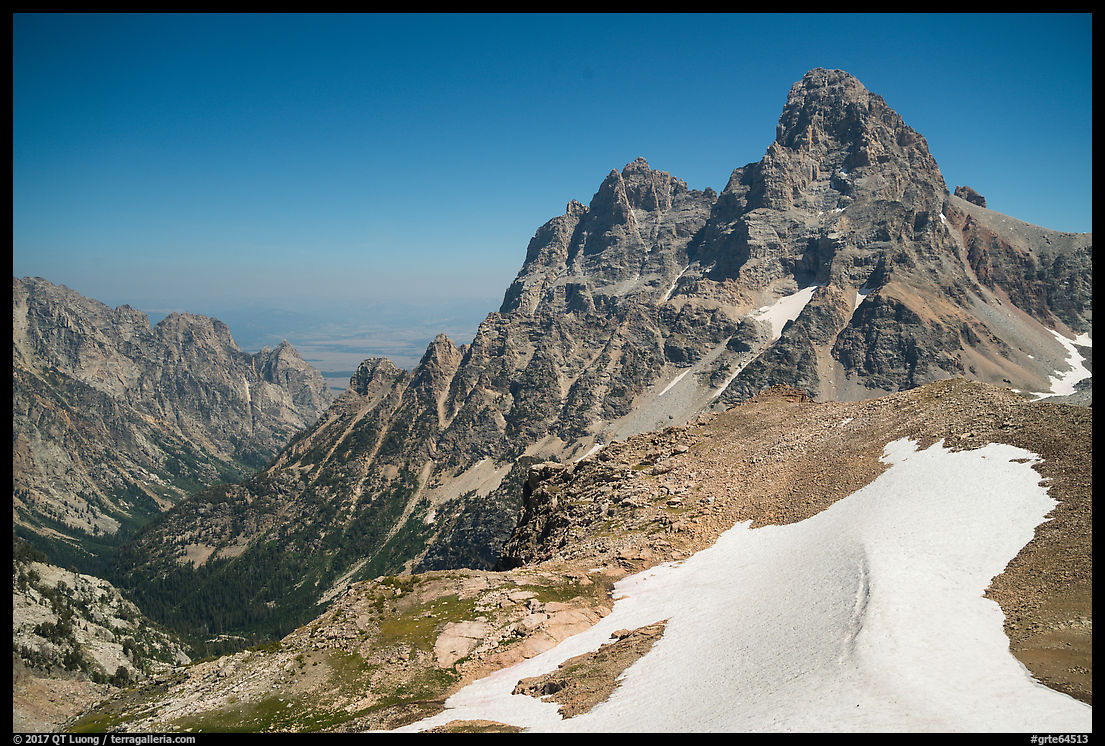
with a slope and snowfield that I found distracting. I much prefer a view that shows the
full height of the mountain from its base in the South Fork to a truncated one. So did William Henry Jackson.
Tetons from the top of Table Mountain
Second, using the Photographer’s Ephemeris, I determined that if shooting from the Table Mountain, the sun would be placed right of
the Middle Teton. Centering the sun a bit better called for moving north on a ridge adjacent to the summit. While the excursion looked good on the map, I wasn’t sure of the exact nature of the terrain. It so happened that I had the perfect opportunity for reconnaissance, as exactly two days before our hike up Table Mountain, my brother-in-law and I climbed the Grand Teton. We were able to confirm visually what the map had indicated, and pinpoint the particular spot on the ridge were we wanted to be, just before a sharp drop.
Photographer’s Ephemeris screenshot with sun direction from ridge north of Table Mountain
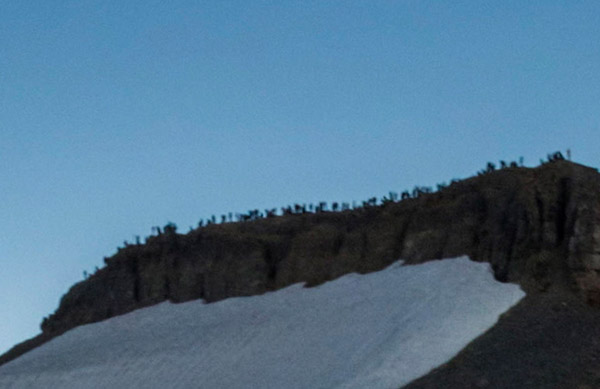
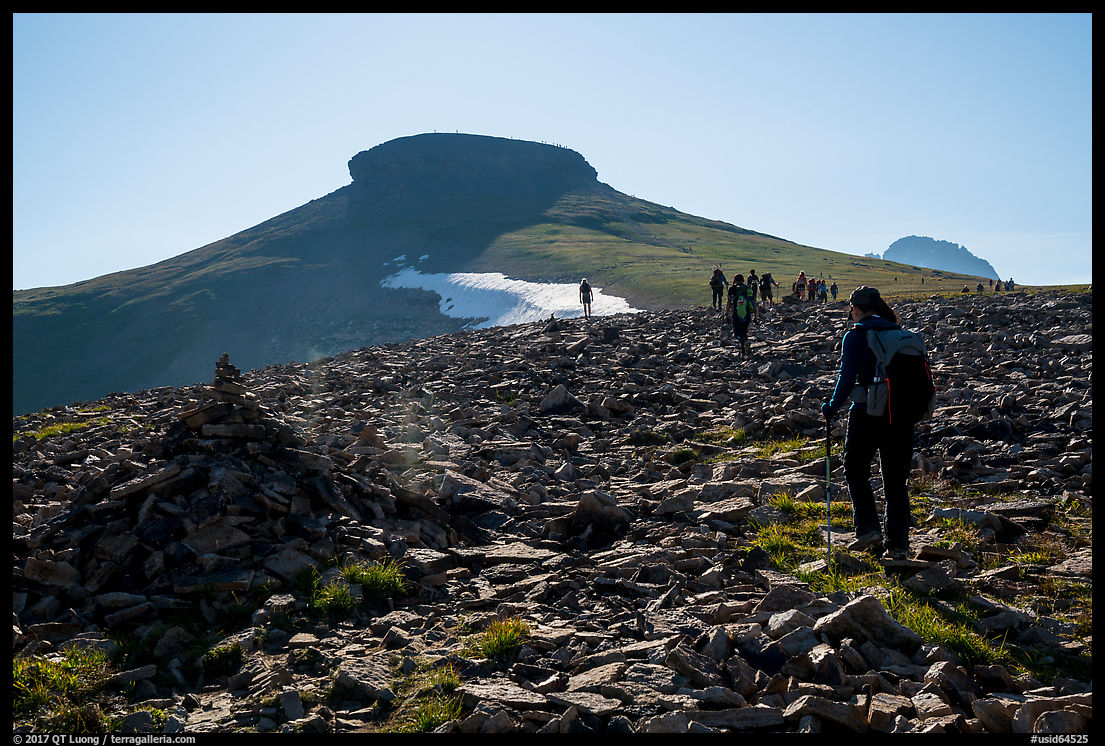
A third reason for not shooting from the summit is that Mike Cavaroc had warned me of possible overcrowding at the summit – not a good situation for photographing a 360 pano, let alone commune with nature. It turned out he was right. A headcount on Table Mountain accounted for about 250 people and 7 dogs. This is illustrated by the following crop from my 360 panorama. The distance from my viewpoint to Table Moutain was nearly half a mile. This short distance made a big difference. Don’t settle for the obvious location!
Table Mountain summit during eclipse, crop from 360 panorama
A Non-Photography Shooting Plan
The totality lasts about two minutes, but it represents the crux of the experience.
Since this was my first total eclipse, I didn’t want to spend that time looking at an electronic screen. But I still sought to capture as much of the experience as possible. Although I carried a medium telephoto zoom (70-300mm) and a square filter
made of Baader Astro solar film, I mostly planned to set up a pair of Sony A7R2 with wide-angle lenses and no filter.
The first camera would run a timelapse to capture all the temporal extent, starting from five minutes before totality to five minutes after totality, at the shortest possible interval of one second. A longer time span than the 12 minutes wouldn’t be that useful because the variation in light is rather slow farther from totality, and extended shooting of the sun without a filter isn’t the wisest thing to do. As calculated at home, framing both the sun at an elevation of 49 degrees and the Tetons in the horizontal orientation needed for video required using the 16-35mm f/4 lens at 16mm. That camera would run basically unattended once the timelapse was started.
I would use the second camera to create a high-resolution 360-degree panorama during totality to capture the spatial extent (technique explained here), and in particular as much as possible of the eerie light and 360-degree sunset-like glow that happens at totality. Since I’d forgo the time-consuming nadir, this would require me to shoot 12 frames at 14mm, which would take most of the two minutes, but since I am using a rotator with click stops, I would not have to look via the finder at any time, and could instead keep my eyes directly on the sun, sky, and landscape.
I deliberately renounced trying to make single still photographs but was hoping to be able to extract them either from the timelapse frames, or from the 360 panorama, which is about 27,000 pixels wide by 13,500 pixels high. This is quite a bit more than the trendy 360 video captures and could be used to make prints of tremendous quality. Let see how this turned out.
Eclipse day
On August 21st, it was a bit tough to wake up at a 2:30am, since the day before we had gone to bed past 1:00am after descending from the Grand Teton. My brother-in-law, sister-in-law, and I drove for two hours
from the Colter Bay Campground in Grand Teton National Park to the Teton Canyon Trailhead. Even that early in the morning, motorists were already staking out pullouts. At 5:00am, more than a hundred cars were already at the dusty Teton Canyon Trailhead. Fortunately, two deputies were there to make parking an orderly process. We began the steep ascent via the Face Trail and soon were hiking in T-shirts despite the early hours.
Late summer wildflowers on Trail to Table Mountain
The trail turned out to be spectacular, and worth hiking even without the final view of the Tetons and the eclipse. Even when the destination is the greatest, the journey can be its own reward.
Approaching Table Mountain
We bypassed the Table Mountain summit
and headed directly to the ridge. However, arriving at about 10am, we found the spot occupied by
a photographer who had camped there the night before to make sure he got it. If you have a good idea, you won’t be the only one! In order not to get in his view – and not having him in ours, we had to scramble down the ridge, which meant that I’d miss parts of the horizon in my 360-degree pano. Yet, I was able to capture more than 180 degrees of horizon. Even on the busiest day in the history of Grand Teton National Park, we secured a spot with no one else is sight for half a mile.
I had brought only one cable release, which doubles as an interval
timer for timelapse. At the last minute, I thought that if I used it
on my 360-degree camera, I would’t have to engage the self-timer as I
normally do in order to avoid vibration from pressing the
shutter. With 12 frames, and a 2-second self-timer (I normally
prefer 5 seconds), the time savings would amount to 24 seconds, almost
one quarter of the totality. Not something to be scoffed at! With the same goal, for the panorama camera, I kept a relatively short shutter speed of 0.5s, and this would also prevent the sun would not be blurred as it moved. Since I had to stop down the lens a bit for depth of field, this resulted in a ISO of 800. I am not sure what is the exact value of the f-stop, since the lens, an adapted Nikon 14-24mm, does not transmit metadata to the Sony camera.
This was possible because Sony cameras support a downloadable timelapse app that I could use to run the timelapse.
I did a short test run of the app, and it appeared to work fine. Since I was anticipating the exposure
at totality to be around ISO 100 f/4 4s, I set up the lens wide open and the ISO at 400. At five minutes
before totality, this resulted in a shutter speed of 1/400s. I anticipated that the shutter speed would slow down to 1s at totality,
which was the longest possible shutter speed that would not disturb the timelapse interval spacing.
The totality came, and it was awesome. Having seen before the northern
lights and erupting volcanoes, I can confirm that it is the most
awesome spectacle in nature. And having witnessed a partial eclipse before, I can now
say with confidence that it doesn’t even remotely approach the experience of totality. This is one occasion where I did not expect pictures to do justice to the beauty and strangeness of the experience.
The results
The 360 degrees panorama turned out to be quite difficult to assemble, due to the variation in brightness during the eclipse, and the fact that it was shot near a mountaintop. I am grateful to Jordi Navarro Isern of Spain for his expertise in putting it together.
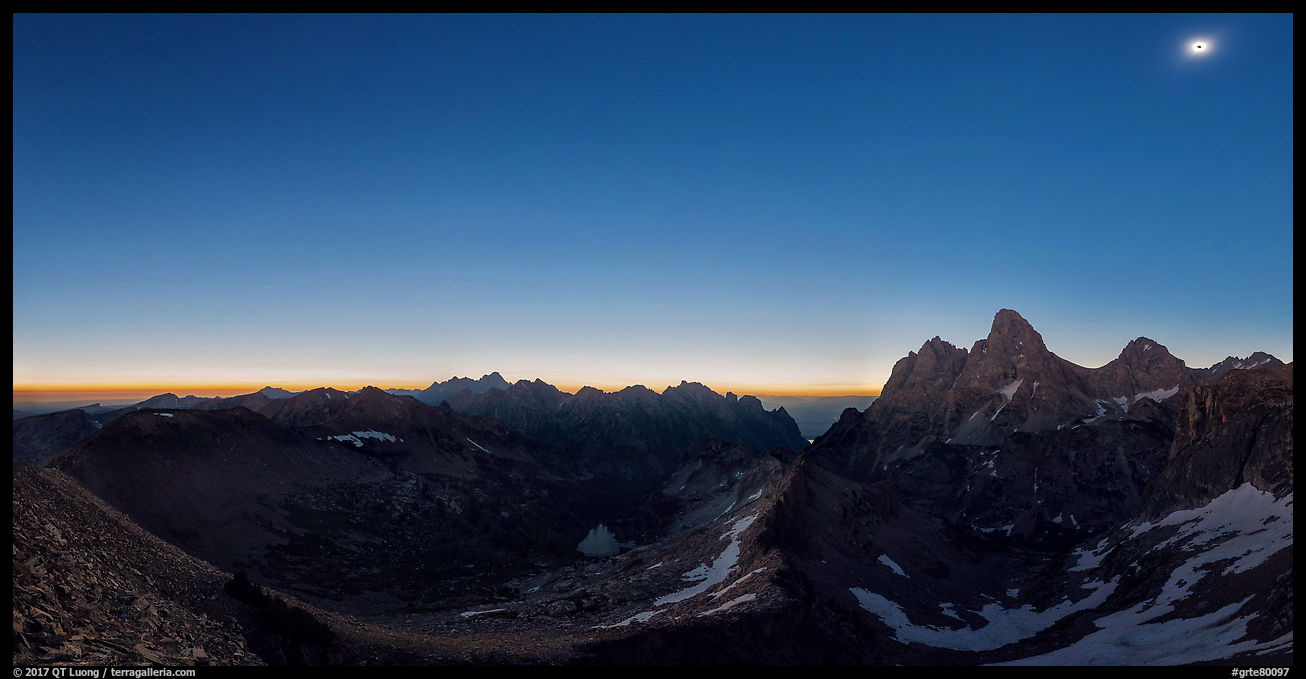
Tetons and horizon during eclipse, crop from 360 panorama (larger image)
As I was starting to shoot that 360 panorama at totality, although engrossed in
the moment, I couldn’t help notice that the shutter sound of the timelapse
camera was odd. It didn’t seem to slow down any bit. Shortly after the eclipse, a quick review confirmed my
suspicion. Although the letter “A” was displayed, the camera app had
acted as if the exposure mode was manual, and the shutter had remained
at 1/400s for the whole sequence, which represented an underexposure
of 8 f/stops! In the past, I had used the timelapse app before, but not in variable light.
Here is the raw, uncorrected time-lapse where the constant exposure captured the dramatic changes in light. (YouTube Link)
I do not know about lower in the Valley, but at 11,000 feet, it actually didn’t get dark like it did in the video, but rather like a twilight just a bit darker than the 360 panorama, maybe like 30 to 40 minutes after sunset. I noticed only one star – visible on the interactive VR 360 degrees panorama. A few years earlier, shooting with Canon cameras would have meant those frames would remain dark because brightening them would result in much noise. The combination of capabilities of the Sony sensors and Lightroom processing made it possible to salvage those shots with little effort:
Here is the result of applying the following settings: Exposure +5, Shadows + 50, Luminance noise + 70, Color noise + 100. I will post a corrected video later as well.
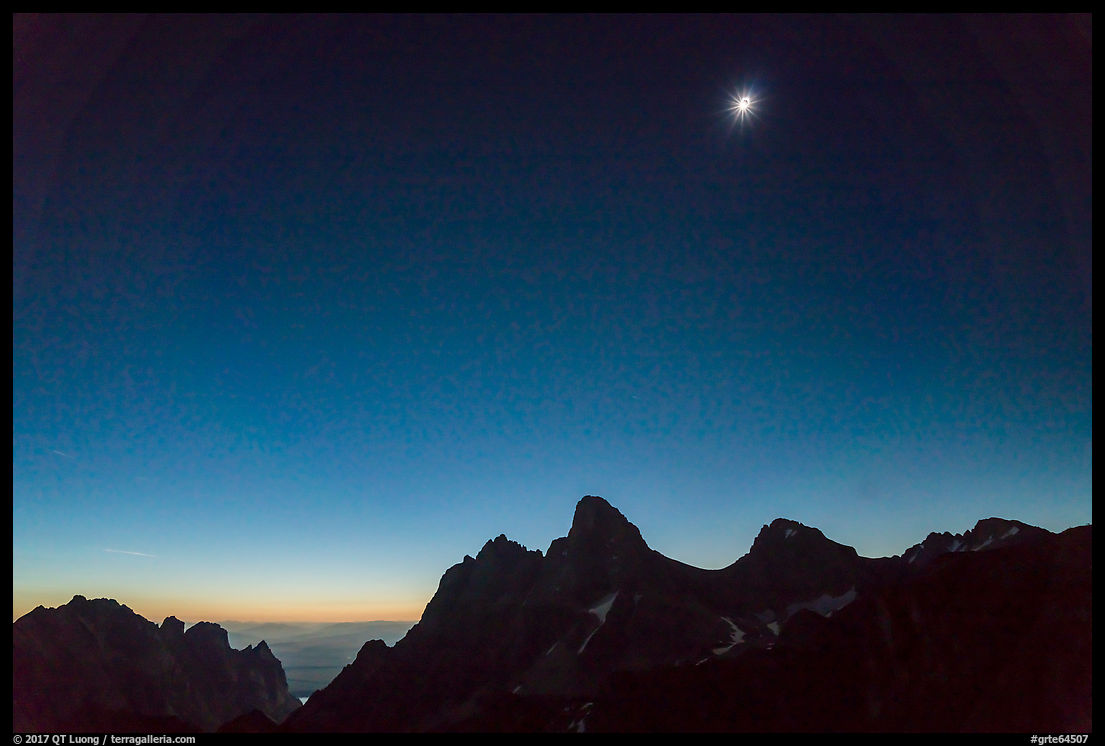
Beginning of totality
Diamond ring
Totality
Fortunately, my mistake did little to mar an awesome experience, and I am grateful that modern camera technology is so forgiving! Besides practicing and rehearsing in similar conditions before such a rare event, there are few things I would have planed differently. As for the execution of the 360 panorama,
next time, I will consider either automating it with a Gigapan or simplifying the capture by shooting a 15mm fish-eye on a single row. This will allow me to attend even more cameras, and maybe tackle the close-ups, although they are not my primary goal. The whole experience left me totally in awe, and you will see me again under the shadow of the moon. I hope that this long write-up has inspired you to plan your own future eclipse trips.
QT Luong was the first to photograph all America's 63 National Parks - in large format. He received the Ansel Adams Award for Photography from the Sierra Club, the Robin W. Winks Award for Enhancing Public Understanding of National Parks from the National Parks Conservation Association, and was featured in the film The National Parks: America's Best Idea. His photographs are extensively published and have been the subject of five books including Treasured Lands (winner of twelve national and international book awards), many newspaper and magazine feature articles, solo gallery and museum exhibits across the U.S. and abroad.
This blog, at terragalleria.com/blog, shares field notes from that long-term work in public lands along with occasional updates on newer projects. It sits alongside the main Terra Galleria archive at
terragalleria.com. For QT Luong’s current fine-art projects and a tightly curated presentation of photographs organized by series, please visit qtluong.com.