Photo Spot 33: Mammoth Cave National Park – Frozen Niagara
Over 300 miles of caves have been mapped in Mammoth Cave National Park, making it the largest known cave system in the world. Depending on the season, the National Park Service offers up to a dozen different tours into the caves.
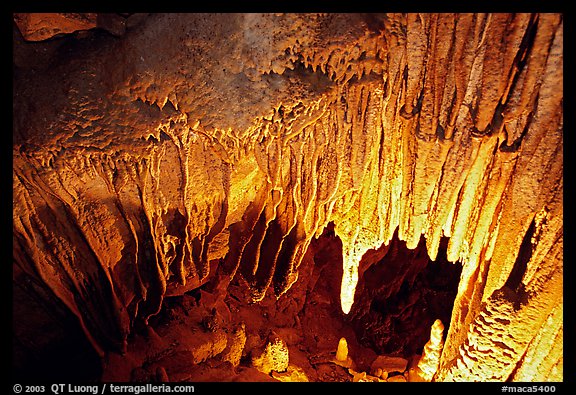
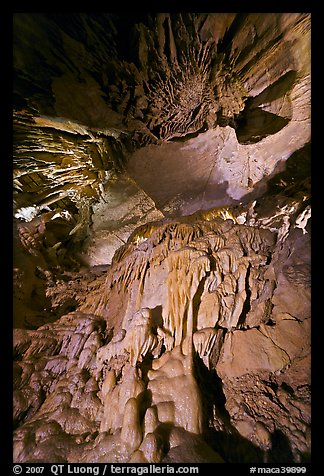
Although some of the tours can last up to 6 hours, most of the chambers do not contain intricate cave formations. The most beautiful area of the cave is the Frozen Niagara section, where stalactites and stalagmites are found in abundance. After descending a few hundred stairs, the rest of the distance is less than a mostly horizontal mile, finishing in a room heavily decorated with flowstone. On the way, you pass intriguing sights, such as Crystal Lake. Long tours visit the Frozen Niagara section only briefly. For this reason, I recommend to photographers the “Frozen Niagara” tour, which spends all of its time (total about 2 hours, including transportation by bus for a couple of miles from the visitor center to the “New” cave entrance) there. This has the additional advantage of leaving you some time to explore the surface terrain, which is quite interesting in its own right. Buy the tickets for your tours as you arrive, since tours can sell out fast during the day.
Unlike in Carslbad Caverns, Park regulations make it difficult to photograph.
First, tripods are strictly prohibited. Since the light levels are relatively low, this leaves you with few options. You can use flash, but it will be a challenge to light the cave formations in a pleasant way. The best method I have found is to bring a Bogen Super Clamp which works very well on the tubings of the cave railings. The clamp is inexpensive and very sturdy. I have used it to photograph with a large format camera in the cave, and it provided enough rigidity ! To attach your regular tripod head, you’ll find on the top a 1/4 inch threaded hole in which you can screw in a stud. Since most tripod heads have a 3/8 inch thread, you will probably need a 1/4 to 3/8 reducer bushing as well. You can walk around with the ball-head and clamp attached to your camera. I have found this set up particularly effective for photographing Crystal Lake from the shaft above.
Second, you will be in a tour group, as there are no self-guided tours. A ranger trails the group to keep stragglers moving, so it’s not possible to stop very long to photograph. The best bet would be to place yourself at the end of the group, since at the beginning of it, other visitors want to keep up with the other ranger to listen to his commentary during the half-dozen stops during the visit. More tours are offered in the summer, however the other seasons see fewer crowds (tour groups can number up to 100) and therefore tour groups that are smaller and more relaxed, with possibly more flexible rangers. Towards the end of October, the surrounding woods display beautiful fall colors.