Terra Galleria Photography

Grand Teton National Park in winter

Jackson Hole airport provides a convenient access to Grand Teton National Park. One would be hard pressed to find a closer an airport closer to a National Park, since for some reason Jackson Hole airport is within the boundaries of the park ! Without yet a replacement for my totaled trusty Subaru, I chose to fly rather than drive for days in winter conditions.

Arriving in the evening, I was disappointed to notice that Thrifty had no counter in the airport. I was told to look for their shuttle. After waiting more than fifteen minutes, I tried to call them on the courtesy phone. All I got was an answering machine, with options to connect to offices in different states. I was tempted to accept a taxi ride to my motel in town , and in the morning walk to the Thrifty office, but then I noticed that the night was clear, and remembered that snow was forecast for the next days. I rented a car from another (pricier) company and went to bed quite late.

The next morning, I nevertheless woke up an hour before sunrise. I was glad I didn’t skip this sunrise session, for despite staying there for a week, this was the last time I would see the Grand Teton.

That morning was the last of a spell of unusually warm weather (that unfortunately had melted snow from trees). By the evening, winter was back in force, with a snow blizzard blanketing the streets of Jackson in less than a quarter of an hour. For the rest of my stay, it would snow almost every day, with relentless winds that chilled me to the bone.

With the mountain out of sight, I found plenty of other subjects (see more images of Grand Teton in winter), mostly trees and hills, but also man-made elements of the landscape.

Those subjects forced me to somehow change my usual way of seeing. Because I had to rely so much on line rather than texture, and because each element of the image became so more important, I could rarely find wide-angle compositions that were well balanced. As a result, I found myself trying to photograph more minimal and intimate landscapes, seeking tighter compositions than I usually do. Do they look any different to you ?

More images of Grand Teton in winter

Spectacular Yosemite book published by Universe

Since Yosemite is one of the most famous and photographed natural sites in the world, you’d think that there are plenty of Yosemite pictorial books. Surprisingly, this is not the case. As far as I know, there are less than a dozen of books which showcase photography and feature mainly Yosemite as their subject. Some of them are diminutive in size. Most the remaining others, besides the Ansel Adams books, give an equal importance to the photographs and to the text.

This is definitively not the case with Spectacular Yosemite, just published by Universe, an imprint of the venerable art publisher Rizzoli. The book starts with a short introduction by travel writer Stuart Booth, then it is clearly all about photographs. Since the trim size of the book is 16.4 x 11.4 inches, some panoramic images, reproduced as double spreads, are 32-inch wide, larger than many of the prints that I sell. It’s a nice production, the main flaws being a few biographical errors on the dust jacket flaps – I am billed as exploring Yosemite in a variety of ways including “paddling kayaks, canoes, and scuba diving” :-). The design is fine and the quality of the printing overall good, making the book quite inexpensive ($45) for its large size.

Spectacular Yosemite is organized logically, following the geography of the park. The book starts at the Valley entrance, moves east, then on the Valley rims. It then explores the backcountry using for anchor its two main rivers, the Merced and the Tuolumne. This organization reflects the goal of the book, which is to offer a virtual tour through a visual survey of the most spectacular features found within the park, rather to present a portfolio of personal work. Because of that, the publisher has chosen mostly scenic landscapes, electing to present multiple views of the same famous sights – sometimes in different seasons or different lights – rather than a more varied selection of locations. However, there are still quite a few images from spots that I bet you haven’t visited yet. Some are described in my blog series “Yosemite Unseen” which starts here.

All the photographs in the book are from me. I even appear in a picture, together with my wife. I find it very fitting that my first monograph of a National Park is about Yosemite. Although it is difficult to pick a favorite National Park because they are so different, if I had to choose one, this would be Yosemite. Besides its beauty, and the recreational opportunities it offers, what makes it dear to me is that it was the place that drew me to California, the first National Park I had heard of and visited. Yosemite is also special to me because I have lost count of the number of days I spent there, hiking, backpacking, climbing, skiing, or just photographing. AlI I could remember is that it is well into the hundreds. The earliest image appearing in the book was shot in April 1994, while the most recent one was taken in August 2010, less than six months before the book’s official publication date. Capturing the images often required many visits to catch the right light and conditions, and sometimes hiking to remote locations. Because it was such a labor of love, I am very pleased that everything came together so well in Spectacular Yosemite.

Last but not least, the book lacked space for acknowledgments, so I’d like to extend my thanks to Simon Forty of Compendium Publishing for believing enough in this book to make it happen through his perseverance. My friends from the Cal Hiking and Outdoor Society (CHAOS) and UC Berkeley introduced me to Yosemite in 1993 at a time when I did not have a car. More recently Tom Lambert and Theresa Ho shared with me the vast knowledge of Yosemite that they have accumulated by living there, often provided me with a roof and vegetarian food, and were patient with me on the trails. Thank you.

Yellowstone in Winter 2: How to visit

More Yellowstone Winter Wildlife pictures
All Yellowstone Winter pictures

The official winter season (during which lodges and roads are open) generally lasts from mid-December to the beginning of March. If I was to return to Yellowstone in winter, I would pick mid to end January. At the beginning of winter, the Park may not have enough snow (this was the case in 2010). While the relatively warmer February temperatures make the visit more pleasant than the bitter January cold, the latter may provide for better photo opportunities, since it would magnify the winter highlights that I described in the previous post.

To get inside the heart of Yellowstone in winter, you need transportation via a special track-equipped vehicle, since the interior roads inside the park are not plowed. This means either a snowcoach or a snowmobile. Because I knew that the National Park Service had been trying to get rid of snowmobiles for a while (*), I chose transportation by snowcoach. Besides, currently all snowmobiling in the park needs to be guided, so unless you hire a private guide, you’ll be joining a tour which may not offer more flexibility than a snowcoach ride – and much less comfort. Be sure to make arrangements well in advance, as the number of snow vehicles allowed to enter the park is strictly limited.

You will also need accommodation inside the park. Two lodges open in winter, the Old Faithful Snow Lodge, and the Mammoth Hotel. If you are coming from the south, you arrive late and depart early at Old Faithful, so an absolute minimum of two nights is necessary if you want to have any time to explore the Upper Geyser Basin. The reservation website offers only options to book lodging and transportation separately, but there are a number of packages combining both which provide you with better deals. Those packages were not listed on the website, so be sure to inquire about them. Our “Frosty Fun” package included discounted prices, free breakfast, and a voucher that will pay for ski rentals or a gift. Since the rooms in the Old Faithful Snow Lodge are all doubles, the trip is most cost-effective for a party of at least two. I traveled with Mike Cavaroc, an excellent and friendly nature photographer, videographer, and web designer based in Jackson.

The Mammoth Hotel is more peripheral, and can be reached by car. However it is a 300 miles, 7 hours drive from Jackson to there. Coming from the South, to check both locations while enjoying a snowcoach ride in the northern part of the park rather than a long drive, you could add two nights at the Mammoth Hotel in the middle of the itinerary. Again, be sure to make arrangements well in advance of your stay.

The ride from the South Entrance (Flagg Ranch) departed at 12.30 and arrived at sunset. On the way, the snowcoach made short stops at the entrance sign, Moose Falls, and Lewis Falls, and a longer one (of about 45 minutes) at the West Thumb Geyser Basin. It was packed to maximum capacity (10 passengers). As there was hardly any space, I had to leave my photo backpack outside (where it was not easily accessible), clutching a smaller shoulder bag on my knees. Because I didn’t pay enough attention during loading, my tripod also ended up outside, with the rest of the baggage, which prevented me from smoothing the water with long exposures for the waterfall shots. The ride out from Old Faithful left just after breakfast, and arrived at about noon at Flagg Ranch, with just two short stops at Kepler Cascades and West Thumb. The rides, esp. the ingoing one, double as a tour (interesting narration) but contrarily to what is reported in the Photograph America newsletter, the snow coach drivers will not stop whenever you ask. They have a schedule to keep, and will remind you of this if you linger too long during the scheduled stops.

We stayed for three nights. For our first day at Old Faithful, we explored on foot the Upper Geyser Basin, up to the Morning Glory Pool. Skis are not necessary through this area, as the snow is packed on trails. On our second day, we rented cross-country skis, with the intention to travel further, although we made it only to Biscuit Basin, owing to a late start. I had originally planned to stay longer and take snowcoach tours out of Old Faithful but those tours had filled up early. I would advise making reservation for those long in advance, as they actually fill up way before the hotel itself does.

The temperature varied from single digits (F) to twenties, and did not feel that cold. In fact, I felt that the Jackson Hole valley, with its constant winds was colder than Yellowstone. To my surprise, relatively thin gloves turned out to be sufficient. Sorel Glacier snow boots were great, plenty warm and comfortable. On the first day, I wore a big down-filled parka, which was useful as we were often staying in the same spot for extended periods of time. As the second day on skis promised to be more energetic, I traded it for a small, sleeveless down vest, worn below a Goretex shell.

Prior to the trip, I was wary of about cold weather photography issues, since with the exception of the Mt McKinley summit (where the cold did cause unexpected problems) I hadn’t photographed in extremely cold weather. I did the best to prepare myself. During most of the time I was in Yellowstone, it snowed, sometimes quite heavily. However the snow was so dry that it did not stick to cameras and lenses. My lightly sealed Canon 5D mk2s had no problem. I just made sure to brush the snow off from the lens by wiping it with a piece of cloth rather than blowing on the lens, which would have caused condensation. Speaking of which, I anticipated serious condensation problems upon getting inside because of the large temperature differences (condensation occurs when moving from cold to warm) but it turned out to be not that bad. In the case of getting back onboard the snowcoach, just making sure the lens cap was on prevented problems. Upon getting back into the lodge, keeping the camera bag zipped for a while to give time to gear to warm up progressively was enough. I didn’t have to use the large plastic bags that I had brought to wrap the camera bag. The spare batteries kept in an inside pocket performed well. With a few simple precautions, I think the mid-February temperatures were not cold enough to cause any problems. I am looking forward to return at some point for a mid-January trip.

* As background information, the National Park Service, after numerous scientific studies, had concluded that snowmobiling causes significant toxic levels of air pollution, haze, pervasive engine noise, and wildlife harassment. The Clinton administration decided to phase out use of snowmobiles and provide winter access only on snowcoaches, cleaner, quieter, and carrying many passengers. However, the snowmobile industry challenged the phase-out decision in courts, and subsequently the Bush administration reverted the ban.

read Part 1 of this report.

All Yellowstone Winter pictures

Yellowstone in Winter 1: New images

In the past, I have visited Yellowstone at three different times of the year, in July, September, and late October. I have always wanted to come back in the winter, and eventually got around to doing it this February. Part of the reason it had taken me so long are the logistics, which I’ll detail in the next post. The visit didn’t disappoint. I found that visiting Yellowstone in winter is almost like visiting a different park.

Because of a continental location far from the oceans and a relatively high elevation, ranging for the most part from 7,000 to 9,000 feet, Yellowstone National Park has some of the longest and coldest winters in the US. From November to May, snow closes all roads in the park to regular traffic, except for the road between the North Entrance (Gardiner) and the North-East entrance (Cook City).

However, what is special about the winter season in Yellowstone is that unlike in other parks, the roads, although snowed in, are kept open to specialized tracked vehicles, and some visitor facilities are still operating in the heart of the park. Since the temperature sometimes drops to 40 degrees below zero, what are the rewards of visiting the park in winter ?

First of all, there is the beauty, quietness, and solitude of winter. In California, where I live, a few hours after the end of a snowstorm the sun has generally melted the snow on tree branches. The dry and extremely cold climate of Yellowstone ensures that winter landscapes look pristine and wintry. During summer, up to 30,000 people visit Yellowstone each day, often creating massive traffic jams. The winter visitation is one order of magnitude smaller. Even in the popular Upper Geyser Basin, you can be alone if you are willing to hike or ski a few miles.

The cold weather also enhances the thermal features in a spectacular collision of fire and ice. Every source of warmth produces impressive amounts of steam. The moisture carried by that steam freezes instantly on nearby trees. In the summer, Old Faithful geyser doesn’t look particularly remarkable in between eruptions. In the winter, the steam plume alone can be enough for an interesting photograph. When the geyser actually erupts, the rising cloud can fill the frame of a super-wide angle view. The snow blanketing the landscape makes the vivid color of the hot springs and pools stand out even more.

Last, but not least, the cold causes the wildlife (that have not migrated to lower locations) to move into the warmer environments of the thermal basins, where they are more concentrated and more easily approached than during summer. Herds of bison stand in vents, surrounded by steam. After they use their massive heads to push the snow looking for grasses, their faces are snow-covered, making them even more prehistoric-looking (images in next post).

During my four-day visit, it was snowing most of the time. The sun never made any real appearance, and except for one night, the sky was almost constantly cloudy. Despite the dull light, there was a special beauty to the landscapes that I tried to capture. However there was simply not enough contrast to highlight geysers, as the steam cloud would blend against the featureless sky. On the evening of the second night, the day ended with snow. However, as I was getting ready to go to bed after dinner, I realized that the clouds had cleared. Although after a full day of hiking, the warm bed appealed, I donned again the cold weather gear, and headed to Old Faithful. An eruption under the full moon awaited me. I would not see any clear sky for the rest of the trip. Best of all, my friend and are were the only people to witness that eruption, something you’d think is impossible if you’ve seen the place in summer!

Read Part 2 of this report


Yellowstone Winter Landscape pictures
All Yellowstone Winter pictures

Ten Years Ago – terragalleria.com

Ten years ago, in April 2001, I launched terragalleria.com. It wasn’t until 2002 that I became serious about turning the website into a business. Although I had high hopes then, little did I know that it would take me to where I am now.

In this post, I’ll reflect on where I was ten years ago. In following posts, I will look at the road traveled, detail what I didn’t do, and what I did to get there. Maybe the series will be interesting for those who seek to follow my path from a amateur to a full-time photographer. Some of this information was in an interview, part of John Lund’s great series of conversations with people of interest in stock photography, but I’ll go into more depth here.

In 2001, Canon launched its first professional-grade digital camera, the EOS 1D, which provided 4MP for $5,000. Despite their fragility, the best memory cards available were IBM Microdrives, since offered 1GB for less than $1,000. This was considerably more space than solid-state flash media, and also a much better space per dollar ratio. Of much more practical interest for me was the release of the Nikon Coolscan LS-4000 ED, the first affordable scanner offering 4000dpi and ICE dust/scratch removal. However, I didn’t have the scanner yet at the time I launched terragalleria.com, relying on Kodak PhotoCD scans – a format that now requires a plug-in to read into Photoshop.

In 2001, Apple released the first version of Mac OS X (which compelled me to switch to the platform, as it was UNIX-based). My Powermac “QuickSilver”, came with a 466Mhz processor, 128MB RAM, and a 30GB HDD. Photoshop was at version 6 (CS5 is 12). Suffices it to say that the scanned 110MB 16bit TIF files were painfully slow to process and archive. Six of those files would fill up a CD. There were no DVD writers.

In 2001, Flickr had yet to exist (it would launch in 2004). Istockphoto was founded the previous year, but initially distributed images for free. In 2001, it began to charge the licensing fees now known as “microstock”.

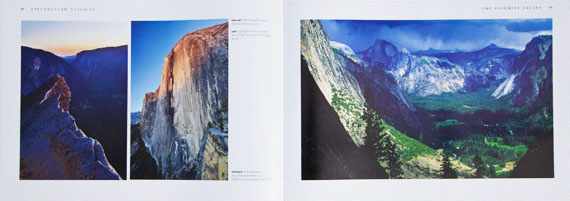
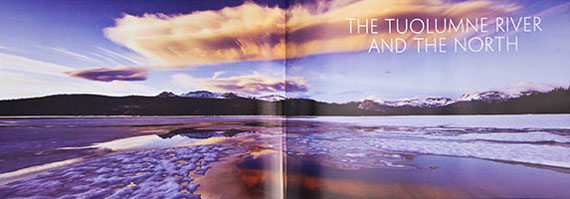
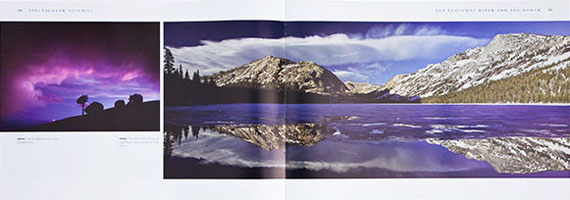
I had been shooting with a DSLR camera since 1985, and a large format camera since 1993. In the 90s, I had exposed thousands of 5×7 transparencies, including many for which I am still proud, yet up to that point I considered myself strictly an amateur photographer. In 2001, I was employed as a researcher in the Artificial Intelligence Center (AIC) of SRI International in Menlo Park. Here is my SRI web page, unchanged from the day I would leave the Institute, years latter. At SRI, I had plenty of time for photography, taking up to a few months of leave without pay per year, yet my salary was plenty to fund my travels and equipment. Prior to 2001, I had no needs nor plans to make money from photographs.

Sure, in the late 90s, my mountaineering images had appeared in various specialized magazines, but the thrill back then was more in climbing the routes and getting published than anything else. For instance, when Climbing Magazine published on a double spread my picture of the summit ridge of Mt McKinley (incidentally taken with a P&S Camera, the Yashica T4), it was the memento of being there and creating that image in difficult conditions which brought the most satisfaction. To submit images, you had to label meticulously slides (by writing or printing on the mount), stuff them into slide pages, and send them around, hoping that they wouldn’t get lost or damaged in the process. When your images would come back, weeks, or most often months later, you’d have to refile them carefully in your folders. It’s not something that you wanted to do by yourself on any large scale.

I had also sold prints to friends and to the Institute, but there again the thrill was above all in seeing the images well printed – which wasn’t that easy. In 2001, there was no large format photo-quality archival inkjet printing. The Epson RC dye prints looked reasonably good, but although they were advertised to last about ten years, I had found that to be more like ten months, in the case of sensibility to ozone. The alternative was to use third party pigment inks, but they would work only on matte papers and produce quite flat-looking prints. So there were only two digital printers of choice the Lightjet, and the Durst. Digital printing as a whole was a relatively new choice (to which I was introduced to by Mark Dubovoy): in the 90s, my prints were made on Ilfochrome using contrast masks and optical enlargers. There were no printing services (online or not) catering to consumers, all of the labs were geared towards commercial printing. Only a few had Lightjets (it is a $150,000+ machine that takes up a room). Since I did not have the required printmaking expertise – I knew enough about color management, sharpening, etc.. to understand that I wouldn’t do a good job – I would send out transparencies to the lab and let them do everything: scanning, digital work, and printing. I would charge my “clients” just enough to have two prints made, one for them, and one for myself to keep, which was actually quite a bit. At that time the cost of the process was such that I couldn’t justify having images printed if they were just for myself.

In the fall of 2001, I got married. I anticipated that this would soon change the free time and resources that I had available. I had also began to understand the potential for exposure that a website offered. It is thanks to my own mountaineering web page and a two-year old search engine popular with academics (with the odd name of Google) that I met my wife.

So far, I had been hosting my website on the SRI server. It consisted of two elements: mountaineering, and large format photography. However, the AIC webmaster had hinted to me that maybe it wasn’t entirely proper that my personal traffic would sometimes dwarf the AIC’s professional traffic. It was time to move to my own website. I chose this long and difficult-to-spell name because as a then-Frenchman of Vietnamese origin, living in California, I did not want the name to be tied to any particular modern language. I also thought that the Latin name was poetic and reflected my goals in photography to celebrate and share the beauty of the world. You can see the three first incarnations of the terragalleria.com site, as it existed in 2001 on the screen shots below, and if you are curious, we can even browse those pages on the wayback machine to see how much has changed, and how much has remained the same.

terragalleria.com started as an experiment. The goal was to see how far a photography website could take me, in the absence of any other activity than my own photography and web publishing. We’ll look at that in the next installment, and I’ll share with you some numbers which are usually quite guarded.

Part 1 of 6: 1 | 2 | 3 | 4 | 5 | 6

Singapore

After scrambling to arrange transportation in Penang, and then Melaka, things went more smoothly for Singapore. Upon arriving at the bus station in Melaka City, I promptly bought tickets for the next day from one of the many companies providing service to that major city-state.

Singapore is known for its strict laws. At the immigration check point, signs warned of the automatic death penalty for drug smugglers. The warning was also repeated in red characters on the immigration form. By contrast, the penalty for bringing in chewing gum (banned everywhere in Singapore) is a mere one year in jail. Upon arrival at the bus station, we jumped into a taxi. Although Singapore has a population of more than 4 million, thanks to the car ownership regulations, we enjoyed fluid traffic in the streets, unlike in Bangkok and Kuala Lumpur. After wandering around for a bit, we located a sign pointing upstairs to the Bugis Backpackers Hostel, where we checked in for the night. The place did not have its own wireless network, but provided guests with credentials to log onto a Singapore public network which apparently is free for residents.

Because of torrential showers, I scrapped my plans for walking around Chinatown, wandering instead the alleys of Bugis market, crowded and full of cheap goods like the other Asian markets I had seen during the trip. As the rain eased in late afternoon, I took the Mass-Rapid-Transit (MRT). It was as clean as the streets. In fact, when I pulled out a snack, before I could take a bite, an officer quickly approached me to point out that eating is prohibited. I latter saw a sign warning of a hefty S$500 fine for that offense.

Upon exiting the MRT at Raffles Square, I felt propelled to a different world. The square is totally surrounded by sleek skyscrapers. I walked around Marina Bay at sundown, rushing to take advantage of the brief moment when the sky took on a blue color, and the building lights were balanced with the ambient light. Despite the cloudy weather, at night the cityscape shone brightly. One side of the Bay was lined up with the forest of skyscrapers from the Central Business District. The recent Esplanade buildings laid on the other side. The most striking new developments were on the third side: the three towers of the Marina Bay Sands resort, topped by a 340-meter long platform. By coincidence, a few months before my visit, I had watched a TV program that highlighted the unique engineering challenges – and cost – of that project. Out of curiosity, we checked the Marina Bay Sands casino. Just to get inside, Singapore residents have to pay a steep $100 per day. I assume they can afford it, as the GDP per capita is one of the highest in the world (3rd or 4th in 2010 depending on who counts). Fortunately, we were carrying our passports, which allowed us free entry.

In that trip, which was now nearing its end, I traveled successively in Vietnam, Thailand, Malaysia, and Singapore. It is as if I was moving along time, as each of the country could be seen as the future of the previously visited one.

View more images of Singapore

Best ISO for low noise on Canon 5D mk2

What ISO should you use for lowest noise ? Everybody knows that low ISO will result in lower noise and high ISO will result in higher noise.

But is it a continuum, as one would intuitively think, or are some ISOs better than others ? In the past, I had seen advise to use only whole f-stop ISOs (100,200,400,800,1600,…) because intermediate ISOs were presumably “interpolated” and therefore worse.

I recently watched part of a DSLR Video online class given by Vincent Laforet for creativeLIVE. There was plenty to learn on the video side. As a still photographer what surprised me the most was his statement that with Canon cameras (his experience was with 1D4, 5Dmk2, and 7D), one should shoot at multiples of ISO 160 for lowest noise. For example he mentioned that there was less noise at ISO 1600 than at ISO 1250.

This piqued my interest enough that I decided to conduct a “scientific” test myself. Instead of just relying on visual estimation, I would make actual measurements using Imatest software. As readers of this blog know, in the past, I had extensively used Imatest to assess lens quality, but the software has many modules that can assess any aspect of image quality.

I photographed a Kodak Q13 greyscale with a Canon 5Dmk2, using ISO values from 50 to 6400. The images were shot in RAW, and then converted to JPG with all settings zeroed, and resized down to 2600 pixels wide. Since noise is problematic only in the shadow areas, I restricted the analysis to the 10 darkest patches of the chart, using the Imatest Stepchart module.

The following graph attempts to summarize the results with a single number, the luminance (Y) noise in pixels. For an explanation of this measurement and how it is computed, please refer to the Stepchart manual page.

Here are what we can read from the graph:

  • Lowest noise is at ISO 50, then ISO 100
  • ISO 160 is better than ISO 125, and the same (*) as ISO 100
  • ISO 320 is better than ISO 250
  • ISO 640 is the same (*) as ISO 500
  • Above ISO 640, noise increases as ISO increases
(*) a difference of 0.01% is not significant.

Conclusion: While at high ISOs (above 640) noise behaves as expected, at lower ISOs 160 multiples do provide the best results. More precisely, compared with the 1/3 lower ISO value, 160 multiples provide less noise and 1/3 higher speed. 160 may even be a better choice than 100, since it provides 2/3 higher speed and essentially the same noise. The exception is the special ISO setting of 50, which provides the less noise of all, but at the expense of less dynamic range.

What do you think ? Consistent with your observations ? (Scroll down past graphs to see comments)


For reference, I am providing below the numeral values, and then complete output of the calculations. Again please refer to the Stepchart manual page for explanations.

ISO  Noise
50   0.80
100  0.94
125  1.04
160  0.95
200  1.03
250  1.13
320  1.11
400  1.22
500  1.38
640  1.39
800  1.57
1000 1.78
1250 1.89
1600 2.14
2000 2.50
2500 2.91
3200 3.41
4000 4.02
5000 4.75
6400 5.65

Classic Vietnam in Focus – A Photo Tour with QT Luong

I may be a bit partial because of my Vietnamese background, but after visiting all the countries of continental South East Asia, and many others, I’ve found Vietnam to be one of the most diverse, enriching, exotic, and visually interesting countries in the world. Vietnam has it all: extraordinary natural landscapes, captivating historic cities, an ethnic mosaic of friendly people, and a traditional rural life that has not changed in centuries.

The coastline is highlighted by mountains dropping into the sea in Central Vietnam, and thousands of limestone karsts in Halong Bay. Soaring peaks culminate near Sapa, where colorful minority tribes make a living on impossibly steep slopes. In the mysterious Mekong Delta, all life – even public markets – centers on the water. Besides its natural beauty, Vietnam is home to a civilization dating back 4,000 years, which have produced a performance art, water puppetry, and a religion, Caodaism, not found anywhere else. Imperial palaces, citadels, temples, ancient ruined Champa cities and old trading ports, all contrast with the energy of modern Vietnam.

My images of Vietnam have been published worldwide, including on the cover (and opening spread) of a Vietnam issue of GEO magazine, and then on the cover of a dozen other brochures, magazines, and books. The very first photo gallery on this site (see site timeline) portrayed Vietnam in 2001. That same year, in order to share with other photographers some of what I’ve learned, I posted the photo.net photographer’s guide to Vietnam. It had taken me 10 weeks of travel to find the visual highlights of the country described in the guide, but Vietnam is small enough that it is possible to experience the most quintessential sights, which include all of the above and more, in a fast-paced two-week tour.

I am pleased to announce that I will be leading such a tour, Classic Vietnam in Focus, in the Fall of 2012 (Oct 25 – Nov. 10). For those who have less than 2 weeks time, the itinerary is broken down in 2 sections. The main section takes place on the plains (12 days) with an extension in the mountains (5 days) which can be taken separately.

The tour is organized by Insiders Asia tour director, Phuoc Babcock. Although her company is new, she has extensive experience in the travel industry, having led more than 30 tours. We will be traveling in style, staying at five star hotels (except in Hanoi, four star).

Our journey will take us through the whole length of the country, from Mekong Delta in the South to the border with China in the North, visiting the three main cities of the country, Ho Chi Minh City, Hue, and Hanoi. We will ride boats large and small in the busy waterways of the Mekong Delta, the famed Perfume River on our way to imperial mausoleums, the fantastic Ha Long Bay, and the Chay River bordered by mountains. Our scenic drives will include the Hai Van Pass, one of the most beautiful coastal roads in the world, and the remote route from Sapa to Can Cau. We will stroll through the architectural museum that is Hoi An bathed in the warm glow of paper lanterns during a festival, and trek to remote minority hamlets in the mountains. Our sights will range from majestic palaces and temples to colorful rural markets.

Unlike in ordinary tours, the emphasis will be on sites with the greatest photographic potential, and we will make sure we are there at the best time of the day to capture great light. Other tours may visit the same locations, but look carefully at our timings. Just to take the example of Central Vietnam, besides planning our visit for the Lantern Festival, we will leave at 5am to be for the sunrise at My Son, and then visit its fish market at sunrise the next day. We will stop in Lang Co overnight, therefore enjoying great scenic opportunities both at sunset and sunrise in this fishing village where other tours only do a quick mid-day stop (if they don’t miss altogether the Danang-Hue drive).

In the evenings, a workshop session focused on tips to improve your photography will include a group slideshow that helps us remember the day, as well as individual sessions customized for each participant’s level, where I will answer any questions related to photography, post-processing, and the photography business.

When is the best time to travel to Vietnam? Now — for tomorrow things might not be the same in this rapidly evolving country. Come and join me on this incredible journey to Vietnam. With your camera, you can capture a part of your experience that may not be there tomorrow.

Update Aug 2002: sold out

Detailed information about Classic Vietnam in Focus photo tour.

Melaka, Malaysia

Melaka being a popular tourist destination just two hours away from Kuala Lumpur, Malaysia’s capital, I expected it to be a breeze to book bus transportation, but it turned out not to be the case. First, you’d think that the area around the Jalan Petaling street would be full of travel agencies, but I managed to find only two of them, each located upstairs, away from the street. Both of them told me that I had to go to the bus station to make reservations. Given that it had taken us three hours to get here from the bus station, I had no intention to waste a great part of the day, despite the warnings in the guidebook that one should not just show up and hope to get seats. The easy option was to go on a tour, but after reviewing their schedules, I thought that they would be inadequate for photography.

We took a taxi to the bus station before the crack of dawn. As the city was still sleeping, It just took us twenty minutes to get to the bus station. As soon as the taxi arrived, a man asked us where were were heading, and directed us to a bus. I was a bit wary of bypassing the official ticket booth, but the price seemed in line with the guidebook, and when I asked the man at what time the bus would be leaving, he promised only a half-an hour wait. It turns out that there are a lot of competition from bus companies, with hourly departures, so it wasn’t a problem at all to get seats.

The bus arrived at a station a few miles out of town, and a short taxi ride took us to the Chong Hoe Hotel in Chinatown. It was facing a Hindu temple. Next was a mosque, not any mosque, the oldest functioning mosque in Malaysia (1728). Down the street, we could see a traditional Chinese temple.

Compared to Kuala Lumpur, even Penang, the historic center of Melaka city appeared much more compact and relaxed. There were many tourists in the town center, most of them from Malaysia, and having a good time.

Contributing to the vacation atmosphere, Melaka had the most kitsch collection of trishaws that I had seen anywhere. Trishaws are the local version of the fun three-wheeled, human propelled vehicle seen with regional variants in most of Asia. Modernization has caused trishaws to disappear in most places, but here, they have been revitalized by tourism. Decorated with plastic flowers, they are even equipped with a sound system blasting loud music during the rides, which often start on the historic town square.

See more images of Melaka City, Malaysia

Kuala Lumpur, Malaysia

I had initially planned to travel by sleeper train from Penang to Kuala Lumpur. Making arrangements proved surprisingly difficult. None of the travel agents in town would handle train reservations. When I called the official railway office, I was told that reservations could be made over the phone only if the planned journey was at least 72 hours away, and that economical class sleeper seats were sold out. At that time, I didn’t realize that there is a railway station on Penang Island – although no trains ever stop there as the station does not even have rail tracks – and I wasn’t eager to take the ferry to Butterworth just to make a booking, while there was so much to see in Penang. I made reservations for a bus trip instead, which was easy since a bus leaves hourly, and all the agents could make reservations for it.

A minibus picked us up at the guesthouse and dropped us at the main bus station. The trip took about 5 hours as planned, but when the bus arrived, I could not identify the surroundings. Instead of stopping in the centrally-situated Puduraya bus station, the bus dropped us far in the countryside ! As we took a taxi to central Kuala Lumpur, I realized that we were at least a dozen miles away from the city center. Later, I understood that the Puduraya bus station was closed for renovation. The highway traffic was total gridlock, one of the worse I’ve seen, making the San Francisco Bay look tame in comparison. It took us 3 hours to cover the relatively short distance. I wished I had persevered in making the train reservation. Even though we had hired a taxi, finding the Hotel China Town Inn wasn’t straightforward. It is situated on Jln Petaling street, which is taken over by the busiest street market in the city in the afternoons and evenings: no vehicle traffic, thick crowds, and a jumble of stands stood in the way as we looked for the hotel.

Past this longer than expected trip and chaotic arrival, Kuala Lumpur proved to be a vibrant city full of contrasts. We had just time to make it to Menara KL , one of the world’s tallest observation towers. We took a walk in a well-preserved tropical forest right below the futuristic tower. The observation platform at the top offered a great view of the city, revealing its surprising amount of greenery. I arrived just a bit in advance of dusk and claimed a spot facing the iconic Petronas Towers. I was able to use my tripod, but I had to shoot through glass windows. Thanks to the great Dryclime jacket from Marmot, that I was carrying in spite of the tropical heat because it has a velvet-like black liner, I was able to block reflections from the inside lights for daylight and dusk shots, however, by night, the reflections caused by the double glass could not be overcome.

The next day, below the skyscrapers, I explored the ethnic neighborhoods which offered a mix of temples, street markets and food stalls as bustling and multicultural as anywhere else in Asia. However, what struck me most in the city was the diversity of the buildings, brilliantly illuminated by night, which reflected the fascinating mix of Chinese, India, Malay and western influences making up the country.

View more images of Kuala Lumpur, Malaysia