Summary: The possibly first in-depth review of the new Sony FE 24-105mm f/4 G OSS lens comparing it for reference to the Sony FE 24-70mm f/4 and Canon EF 24-105mm f/4L lenses using precise and reliable measurements.
A much anticipated lens
When I started to photograph with the Sony A7R2 in the summer of 2015, the selection of Sony FE lenses was quite limited. You could count them on the fingers of both hands: Sony 28mm f2, Sony Zeiss 35mm f2.8, Sony Zeiss 35mm f1.4 ZA, Sony Zeiss 55mm f1.8 ZA, Sony Zeiss 16-35mm f4 ZA OSS, Sony 70-200mm f4 ISS, Sony 28-70mm f3.5-5.6 OSS, Sony Zeiss 24-240mm f3.5-6.3 OSS and Sony Zeiss 24-70mm f4 OSS. Sony has certainly made impressive progress in expending this lineup in the last two years. It now includes 28 lenses, 14 zooms lenses and 14 prime lenses.
Their latest offering, the Sony FE 24-105mm f4 G OSS Lens is the lens I have been waiting for literally since I started using the Sony Alpha system.
First, although back in 2015 the Sony Zeiss 24-70mm f4 was the better of the three trans-standard zooms on offer, it isn’t a great lens, especially for one bearing the Zeiss name. I found it a step back in optical performance compared to the equivalent Canon offerings. The blog of Pulitzer Prize-winning celebrity photographer Brian Smith is a must-follow if you want to keep up to date with the latest Sony FE developments. In his post Are Sony FE Fenses as Sharp as Canon & Nikon Glass? the sharp-eyed reader can notice that all sorts of lenses are compared using DxO Mark scores, but the category 24-70 f4 is missing.
Second, when I was shooting Canon, my go-to-lens was the 24-105 f4L. I had been using it for a decade, since it was introduced in 2005, and such an habit is hard to die. I am sure the Sony 24-70 f2.8 GM is outstanding, but having used a 24-70 f2.8 in the past, I much prefer the additional reach and lighter weight of a 24-105 f4. I almost never shoot wide-open, so I don’t care for the beautiful bokeh of a f/2.8 lens. In addition, I also prefer a 100-400 lens to a 70-200 lens, and the former pairs better with a 24-105. My photography is outdoors and often required me to carry gear all day for long distances in the wilderness, in particular for my recent Treasured Lands photography book about the 59 U.S. National Parks.
When Sony announced the FE 24-105mm f4, after Brian mentioned in a tweet that it was much improved over the FE 24-70mm f4, I promptly pre-ordered three copies to test, so this is likely the first in-depth review of this lens you’ll read. Why three copies? My past experience of
testing lenses has taught me that sometimes sample-to-sample variation is quite significant, to the point that it compares with model-to-model differences.
Specifications compared with Sony 24-70mm f/4
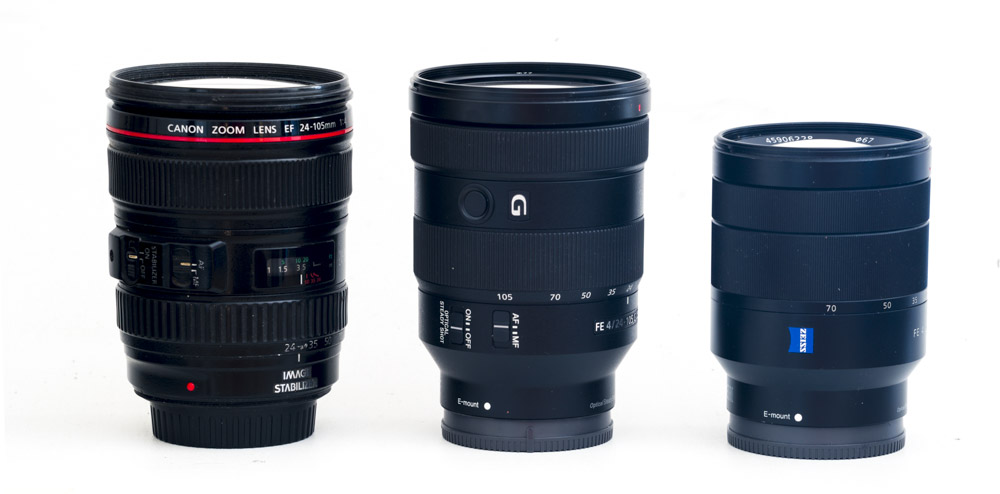
Left to right: Canon EF 24-105 f/4, Sony 24-105 f/4, Sony 24-70 f/4
The size and weight of the Sony 24-70 f/4 made it a delight to carry. The Sony 24-105 f/4 is larger and 50% heavier, but offers 75% more focal range, so that’s a reasonable trade-off, especially considering improvements in magnification, aperture (more blades result in smoother bokeh), and controls. It is extremely similar in appearance to the first version of the Canon 24-105 f/4, with almost exactly the same size, weight (664g), finish, and controls – the current version II of the Canon is quite larger and heavier (795g), though.
|
|
24-105 f/4
|
24-70 f/4
|
| Close focus |
1.25′ (38 cm), 0.31x or 1:3.2 magnification
|
1.31′ (40 cm), 0.2x or 1:5 magnification
|
| Diaphragm blades |
9
|
7
|
| Stabilization |
Switch on lens, controlled by lens
|
No switch on lens, controlled by camera
|
| AF |
Fast and silent. Switch on lens, controlled by both with priority to MF
|
Fast and silent. No switch on lens, controlled by camera
|
| Size |
3.28 x 4.46″ (83.4 x 113.3 mm)
|
2.87 x 3.72″ (73 x 94.5 mm)
|
| Filter size |
77mm
|
67mm
|
| Weight |
1.46 lb (663 g)
|
15.03 oz (426 g)
|
Construction |
Plastic barrel, rubberized rings.
|
Plastic barrel with metal finish, finely indented metal rings.
|
| Price (11/2017) |
$1,300 @ amazon
|
$1,100 @ amazon
|
Operation
Like with other Sony FE lenses, the focus ring functions like an electronic dial, not physically connected to the lens, and there is no focus markings. Focusing is internal and doesn’t extend the lens. The lens is not parfocal, which means that when you zoom, the focus changes, however that change is minimal. The lens extends when zooming in. The zoom ring is solid and doesn’t suffer from zoom creep even pointed straight up or down.
AF is quick and silent. The lens is equipped with optical stabilization, which works in conjunction with the IBIS system. A button on the left side of the barrel can be customized. Compared to the Sony 24-70 f/4, the 24-105 f/4 also gains two switches for stabilization and AF. Those switches behave quite differently on the A7R2.
- Stabilization is controlled only by the switch on the lens. The body cannot turn it on or off. I find that unfortunate. Currently, I have my two custom modes on the dial set up for hand-holding and working on a tripod. The hand-holding setup turns stabilization on, while the tripod setup turns it off – using stabilization on a tripod reduces image sharpness in a small but measurable way. With the 24-105 f/4, in addition to turning the dial, I’ll have to remember to operate the switch on the lens.
- AF is controlled by both the switch on the lens and the camera. However, AF is active only if both lens and camera are switched to AF. I find it all too easy to brush the switch on the camera by accident and put the camera in manual focus mode, so I would have preferred that the lens switch has priority over the camera.
I hope that Sony will allow a different behavior via a future firmware update.
Visual comparison
The main issue with the 24-70 f/4 is that corners and edges are rather soft, and stopping down does not improve them. Let’s see if the 24-105 f/4 is an improvement by looking at a section of my photography library. The detail is a 600×400 pixels crop of the upper right shelf, the one with the small books.

Below is a 100% detail view of pictures from the Sony 24-70 f/4 at respectively f/4, f/8, and f/16. Notice how the title of the book with the grey spine, the author of the André Kertész book, and the Chinese characters are unlegible at all apertures.


Below are pictures from the Sony 24-105 f/4 at respectively f/4, f/8, and f/16. Even wide-open is already better than the best from the Sony 24-70 f/4. Stopping down improves image quality further, and at f/16, diffraction degrades it.


Below are pictures from the Canon 24-105 f/4 (Metabones adapter) at respectively f/4, f/8, and f/16. Sharpness is better than the Sony 24-70, but not as good as the Sony 24-105, and there is more chromatic abberation than in any of the two Sony lenses.


MTF Measurements
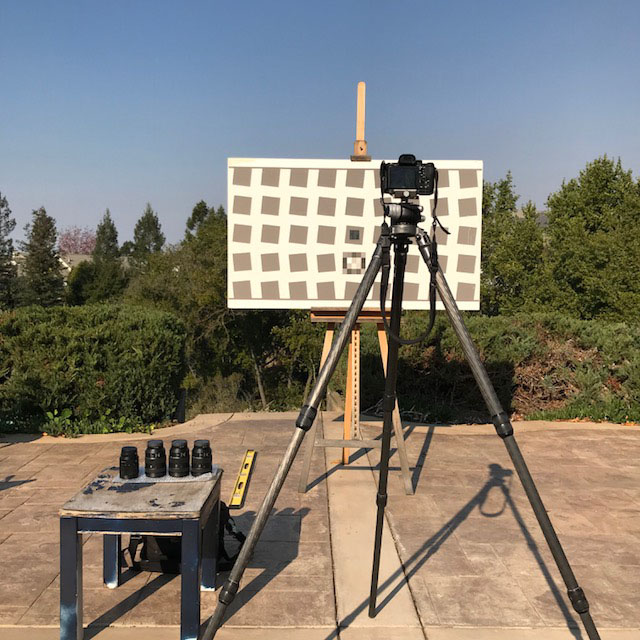
Visual evaluations are all good if you don’t have better, but measurements are more precise and remove any subjectivity. I used a target and software from
Imatest, the leader in image quality measurement. Based on photographs of the target, Imatest automatically computes measures of lens performance.
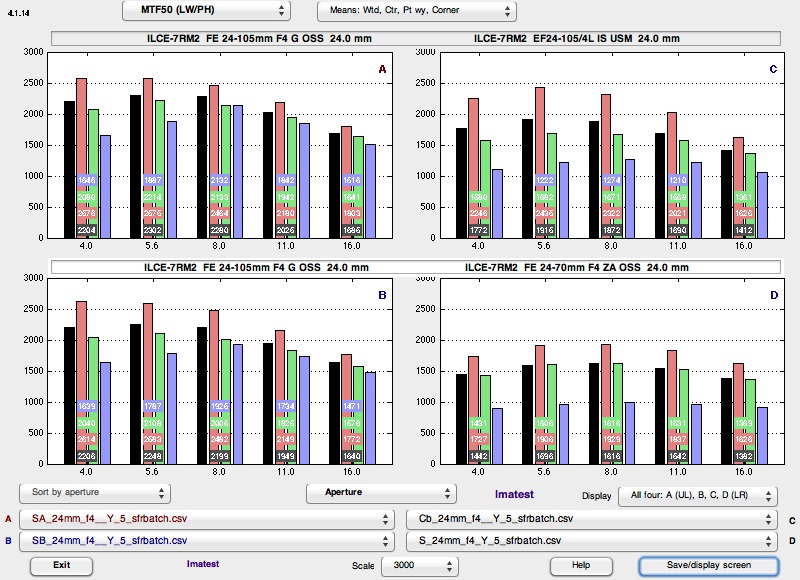
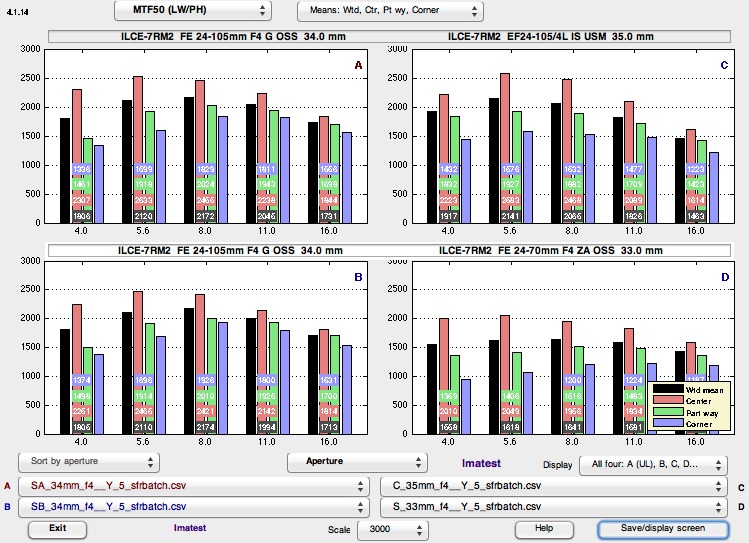
This resulted in a lot of data, here is how to read it:
- The five sets of graphs are for the focal lengths 24mm, 35mm, 50mm, 70mm, and 105mm.
- In each set left quadrants (A,B) are two different copies of the Sony 24-105 f/4 lens. Top right (C) is the Canon 24-105 f/4 lens. Bottom right is the Sony 24-70 f/4 lens
- Each quadrant represents lens performance for the five f-stops between f/4 and f/16.
- Red is image center, green is part-way, blue are corners, and black is a weighted average of the three previous values.
- The value plotted as bars in the graphs is MTF 50, a good indicator of sharpness.
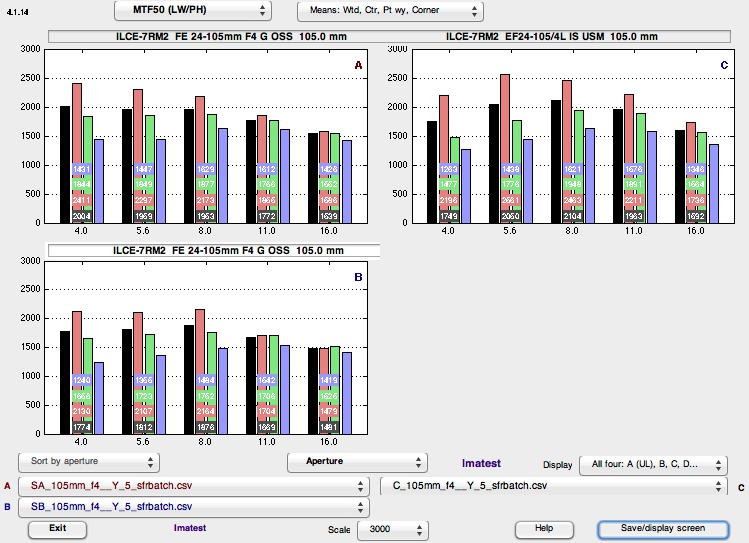
A wealth of information can be found in the graphs above, but here are a few general observations. Some will be well-known to some readers, but are worth repeating for others.
-
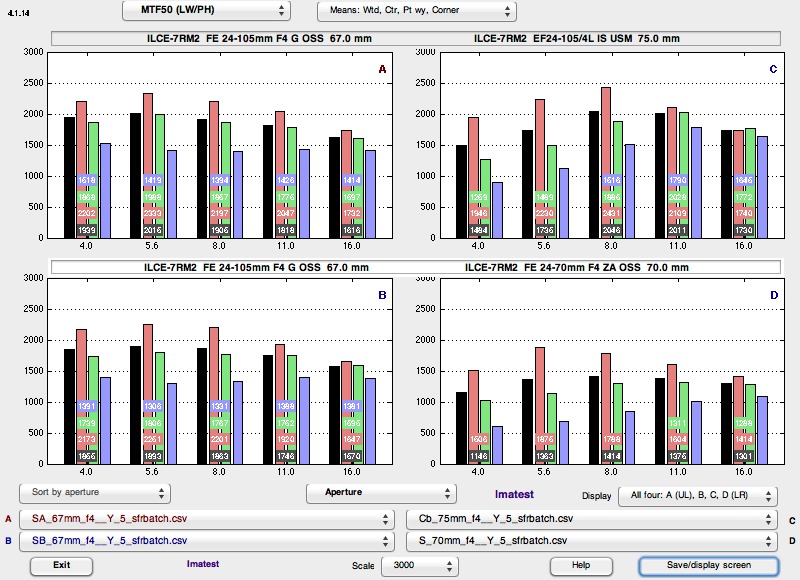
Aperture. Lenses are sharpest at middle apertures (sharpness is limited by abberations at wide apertures and by diffraction at smaller apertures. In fact, by f16, all lenses perform almost the same, which is why I didn’t bother to make measurements at f22). If given the choice, use a middle aperture such as f8.
-
Corners vs. Center. Center sharpness is always better than corner sharpness. At wide apertures, sharpness is less uniform across the image, with corners lagging behind. Stopping down often improve corners more than the center, making sharpness more uniform.
Here are some specific observations:
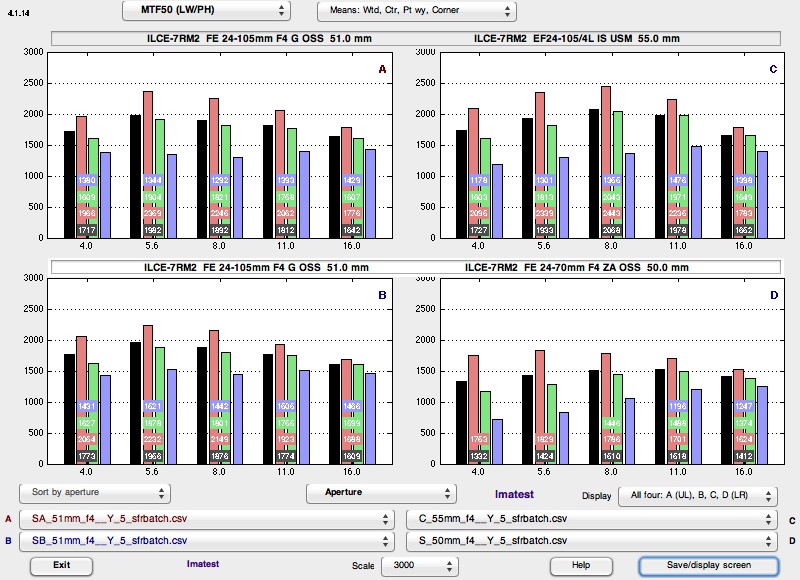
We find that there is a small, but measurable sample-to-sample variation between the
two different copies of the Sony 24-105 f/4 lens. The sample A is clearly better. For the sake of presentation simplicity, I have omitted graphs from the third sample, but they are in the same ballpark. Based on experience testing other lenses, Sony’s quality control is better than average, since I have seen larger sample-to-sample variation.
The first set of graphs at 24mm validate what we observed visually: that Sony 24-105 f/4 has the best corner performance and it keeps improving as the lens is stepped down, and Sony 24-70 f/4 has the weakest one, with no improvements brought by stopping down. The Canon is in between the two. The Sony 24-105 f/4 performs great at f/8 and 24mm, my most used combination!
Based on visual observations, I expected the Sony 24-105 f/4 to measure better than the Sony 24-70 f/4, but the magnitude of the difference at all focal lengths surprised me. Even wide-open the Sony 24-105 f/4 is clearly better than the Sony 24-70 f/4 at any aperture, both in the center and corners. To be totally fair, the Sony 24-104 f/4 is new out of the box, while my 24-70 f/4 has been knocked around quite a bit. I didn’t baby it while
climbing mountains.
It is possible that its alignment was off. This has happened before. One time, while testing new lenses, I included my Canon 24-104 f/4 for reference and noticed that its performance wasn’t as good as what I remembered measuring in the past. I sent the lens to Canon Professional Services for checking, and sure enough, they found that it needed re-alignment!
Distortion
Like many trans-standard zooms, the 24-105 f/4 is not particularly well corrected for distortion. It suffers from barrel distortion at its shorter focal length, and pincushion distortion at the longer focal lengths. This is readily observed on the images of the Imatest target, respectively at 24mm and 105mm. Those images were shot wide-open, and vignetting is visible.
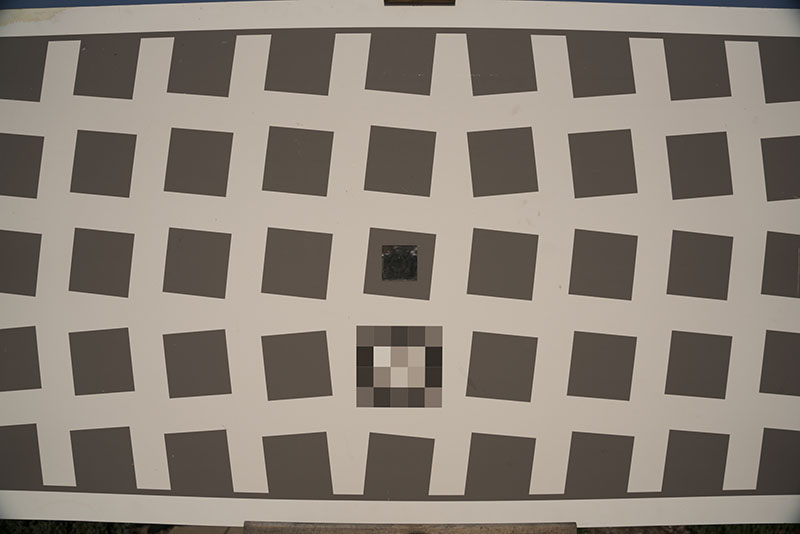
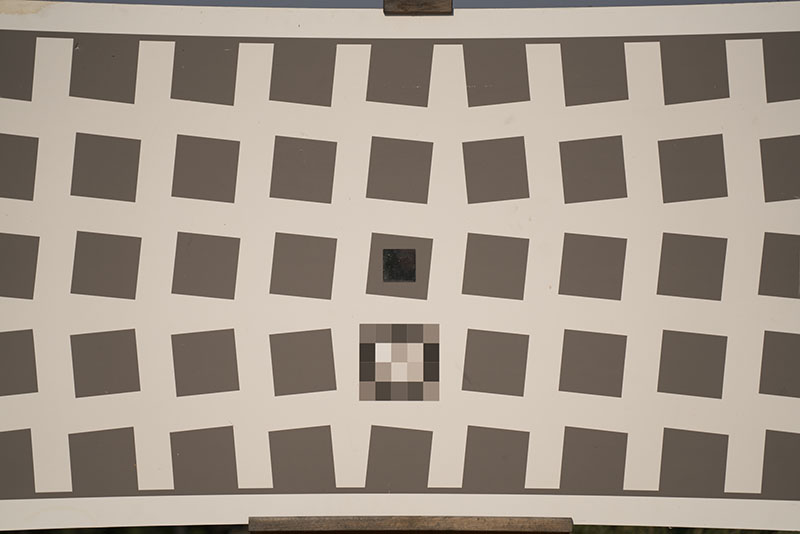
In practice, this is easily and automatically corrected in Lightroom with lens profiles. You can also use Photoshop’s Lens Distortion filter with the opposite of the coefficients below.
However, you have to make sure that the compositions was not too tight to the image edges to leave room for the lost pixels. In fact, with its barrel distortion at 24mm, the field of view is probably more like 22-23mm, and after correction should be very close to 24mm.
Here are the measurements from Imatest.
|
|
Sony 24-105 f/4
|
Sony 24-70 f/4
|
Canon 24-105 f/4
|
| 24mm |
-3.5%
|
-3.5%
|
-3%
|
| 35mm |
1.5%
|
2.1%
|
1.1%
|
| 50mm |
3.1%
|
4.1%
|
2%
|
| 70mm |
3.5%
|
4.3%
|
2%
|
| 105mm |
3.1%
|
|
2%
|
Vignetting
The main weakness of the lens is strong vignetting at 24mm. So strong that uncorrected images have ugly black corners (see example images), something that I have not observed with any other lens in recent memory. Applying a software profile correction sends those corners into oblivion in order to correct the distortion, so the blackening disappears, but there is still some residual vignetting. Stopping down only reduces the problem, and so does zooming to 28mm. By 35mm, vignetting is reasonable. Note also that using a regular polarizing filter at 24mm worsens the black corner issue significantly.
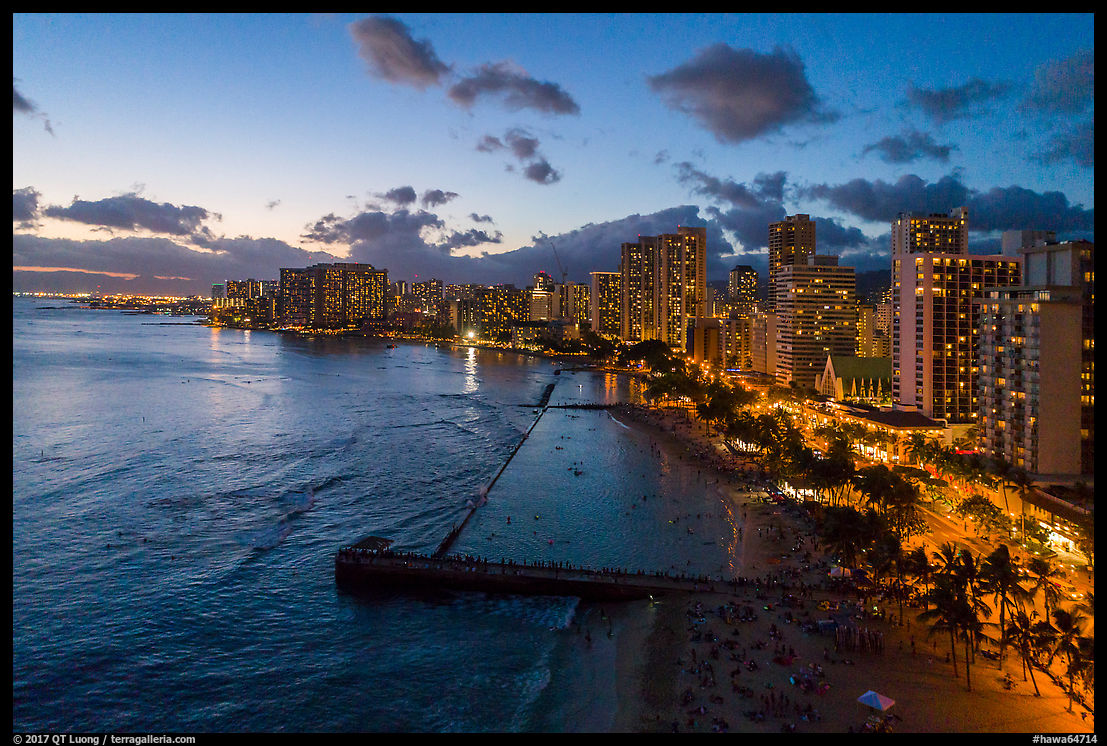
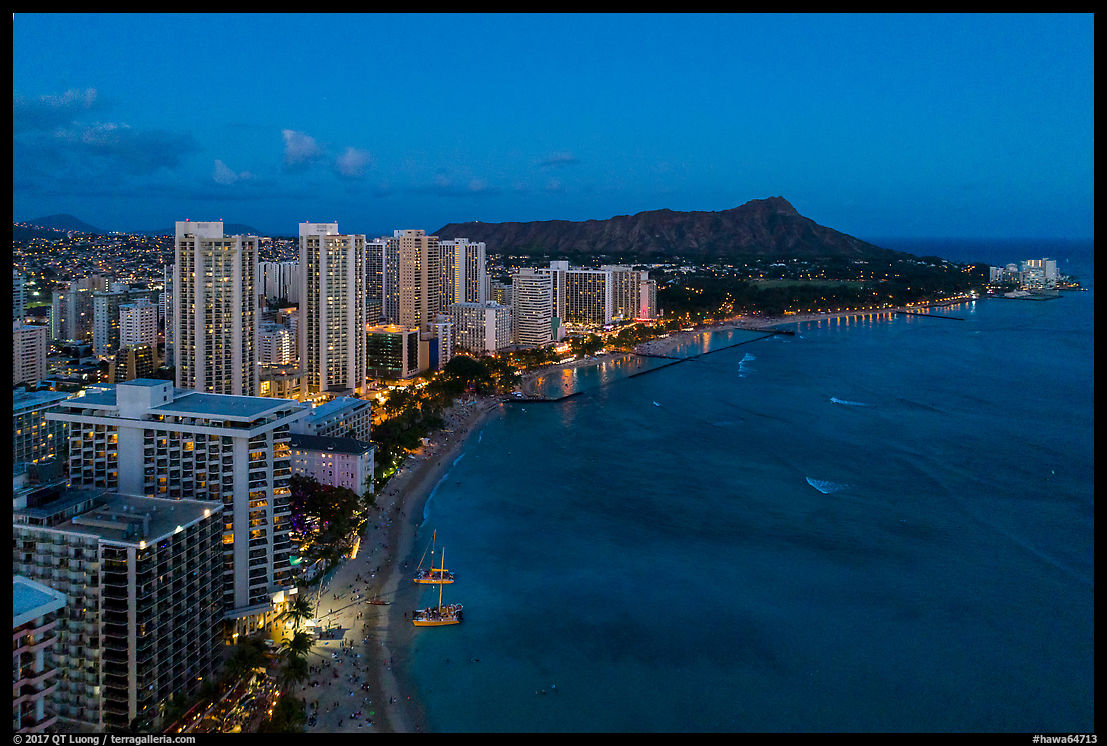
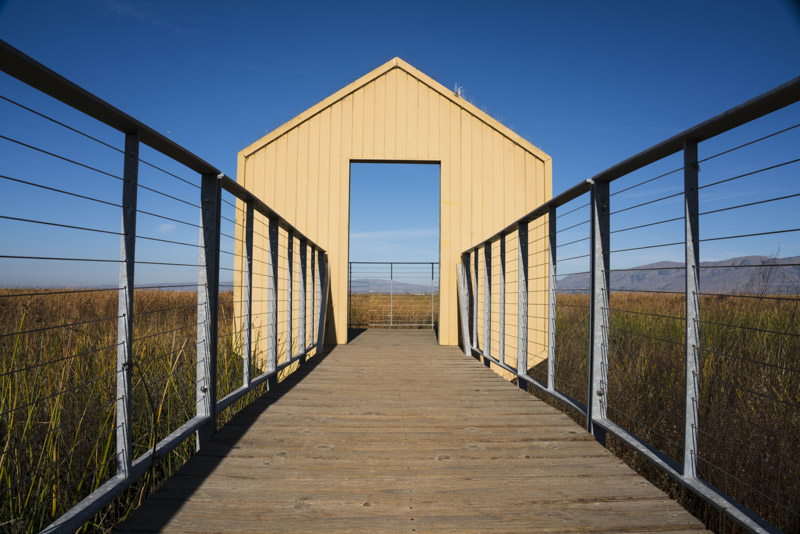
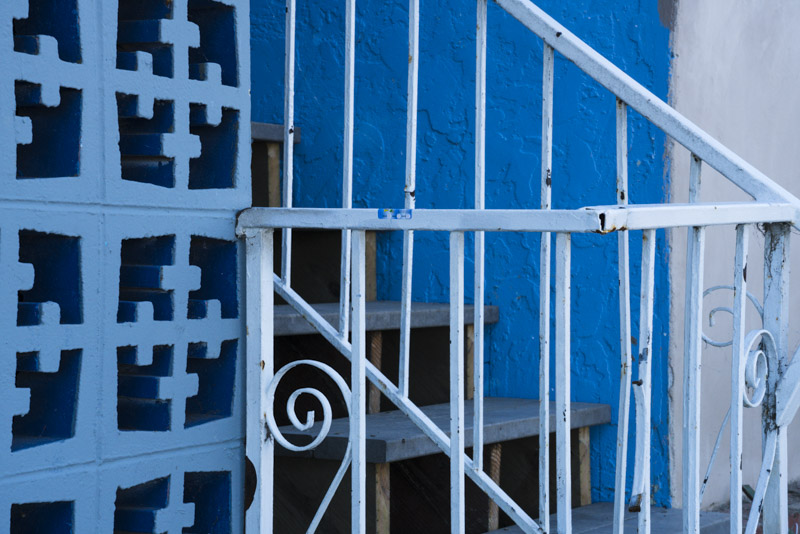
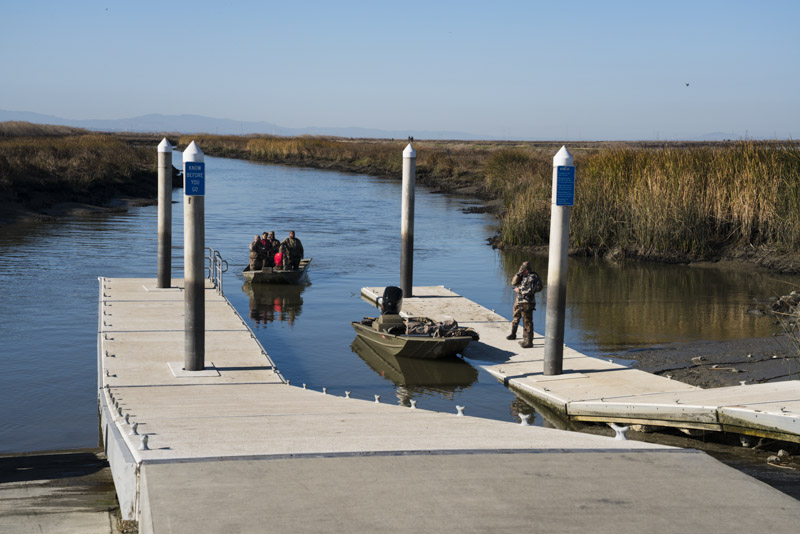
Example images
I took a quick mid-day walk at Alviso. The two last photographs were made from the same viewpoint to illustrate the difference in field of view between 105mm and 70mm.

24mm, f/8

45mm, f/8

24mm, f/8
85mm, f/16

65mm, f/8

35mm, f/8

105mm, f/11
70mm, f/11
Conclusion
The wait has been worth it. Sony finally gets it right for this supremely versatile lens. Optical performance is much improved compared to the Sony 24-70 f/4, in particular with respect to the main weakness of that lens, corner sharpness. It also compares well with the excellent Canon 24-105 f/4L. Like for this lens, a compromise has been made with vignetting and distortion, which is a minor issue if images are post-processed. Definitively recommended! This review required a lot of attention to detail. If you have found it useful, consider buying the lens from
my affiliate link at Amazon. Thanks!