Processing Tip: Highlights and Shadows in High Contrast Scenes
5 Comments
In this post, using images from the Black Canyon of the Gunnison for which I had described the location, I demonstrate two of the processing steps I use most frequently for high contrast scenes. Both consist of somehow counter-intuitive, but extremely simple and effective, opposite slider moves. Although this post is illustrated with Adobe Lightroom, those controls are available in most processing software, including the native Photos app on the iPhone – although the range of those controls are limited by the sensor and jpeg capture.
Oak Flat
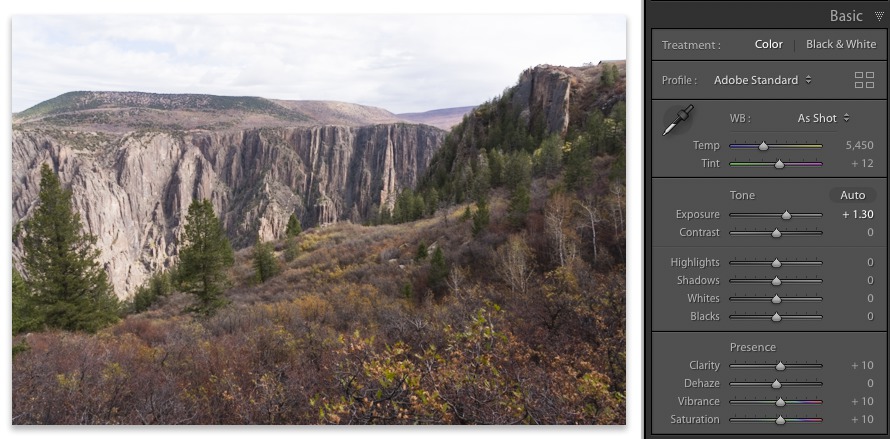
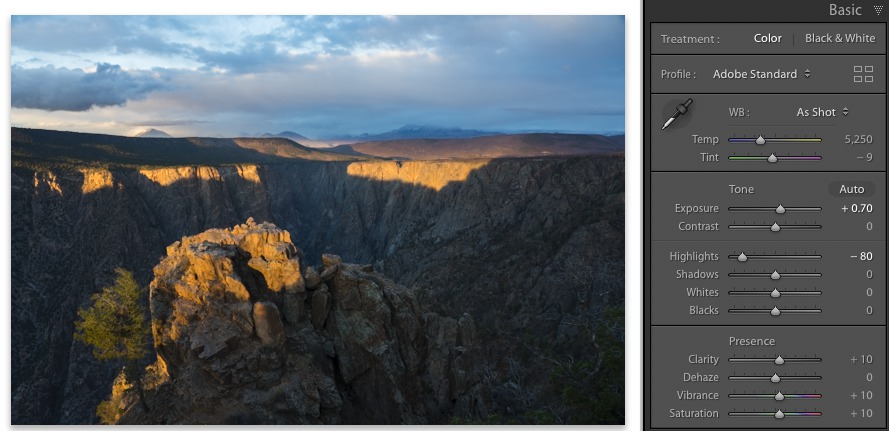
My presets include +10 of clarity, vibrance, and saturation, as well as mild S-curve for more contrast. You can see that in the RAW file, the land is extremely dark, but as shown by the histogram, the exposure is correct, with the highlights close to clipping. There is strong vignetting, and I start by applying the profile as detailed in this post.

I move the exposure slider to the right, which has the effect of brightening all tones, until the land to be bright enough.
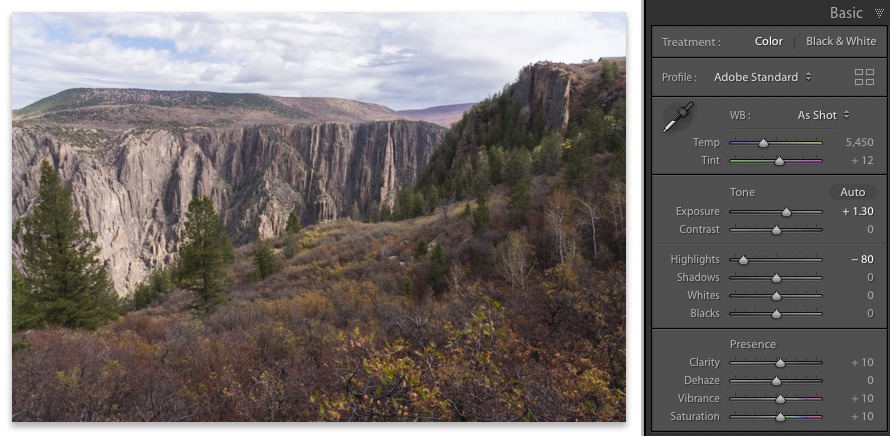
The sky is now too bright, but this is easily taken care with the highlight slider to the left, which brings it to the desired brightness by darkening highlights. With those two simple opposite moves, we are done with the sky.
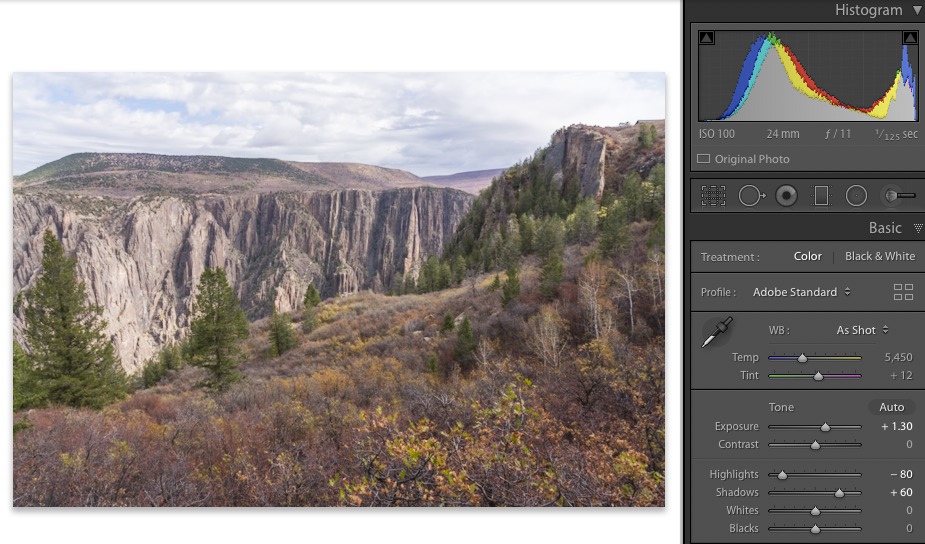
The land is still too dark, and this is fixed with the shadow slider to the right, which brightens the shadows. After the move, the land has the desired brightness, but the image looks “washed out”. The reason is that it lacks deep shadows, as can be seen by the gap at the left of the histogram.
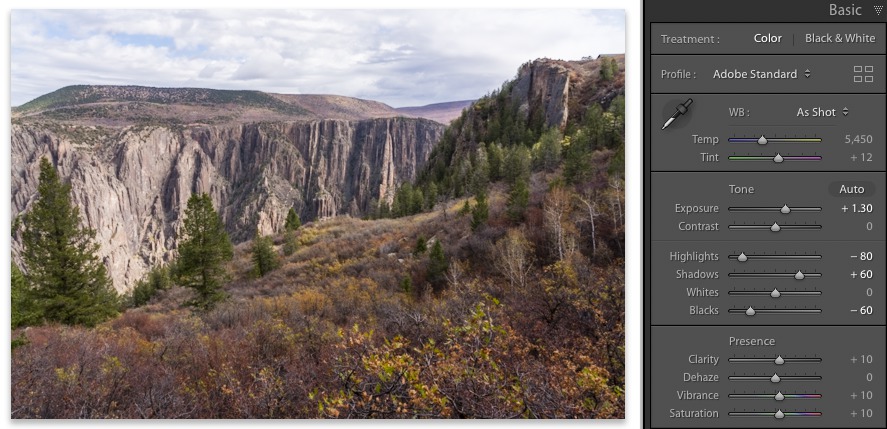
I move the black point by pushing the black slider to the left. The last pair of moves (shadows to right, darks to left) is not something one might have naturally tried, because you are doing two opposite moves that brighten and darken the shadows, but it is very effective.
Warner Point
The second image, photographed just before sunset, has even more contrast, with deep shadows, but you can see that the raw file captures the entire range of tonal values, with just a little shadow clipping and none for the highlights. By the way, note that I have used a white application background as always.

After increasing the exposure and darkening the highlights, the sky and sunlit areas look fine. You generally want to avoid saturated highlights. The eye is drawn to bright areas, and you don’t want to direct it to a place lacking in detail. Lightroom recovers highlights by default to the point that they are no longer clipped, but this is not always enough to bring enough detail in them. Unless the scene has low contrast, I find that darkening highlights most of the time bring some additional texture and color, so I almost always try the slider to see what it does.
I adjust the land with the opposite shadows/black moves. To find out how much to move the black slider to the left, I aimed to clip a significant number of pixels to the left, as can be seen in the histogram. Unlike clipped highlights, clipped shadows are generally beneficial. We expect shadows to be black. An area of pure black in the image helps brings more depth to all the tones.

Modern digital cameras, such as the Sony A7R3 used for those two images, produce files with a tremendous dynamic range. Although bracketing and exposure merging will still yield the highest quality files, for all but the most demanding applications such as very large prints, a single RAW capture and the few simple processing steps described above are enough to handle almost all situations.


Incredibly simple but very effective edition movements! Thanks so much!
@EgertJoan
I edit with Photoshop. Shadows and Highlights is by far my favorite and go to tool. With today’s capture technology, it is amazing what you can do with a single image. Thanks for highlighting this.
With the caveat that I have not tried Shadows and Highlights with recent Photoshop versions, in the past I found they were more prone to creating halos than the equivalent LR controls. For this, and other reasons, in Photoshop, I’ve used instead curve adjustment layers with luminosity masks. Also, you have to keep in mind that with LR, you are working on the raw file, which has more latitude for adjustments.
I should have noted that when I use Photoshop Shadows and Highlights, I only adjust the shadow and the highlight sliders. I do not like the other adjustments with the tool because they add too much contrast and are almost reversing what I’m trying to achieve. I go to curves to fine tune my initial shadows and highlights adjustments.
Hi QT, as always, an excellent post and technique. Thank you!