Terra Galleria Photography

New images: a few locations in Oregon

I’ve posted new images of the following locations in Oregon: Central Oregon Cascades, Southern Oregon Cascades, and Smith Rock State Park, as well as a few from the coast, which are mixed with older images.

Oregon is a state with a great diversity of terrain. Owing to its drizzly weather in winter, it is reputed for its lush vegetation and waterfalls, however the eastern part of the state is actually part of the Great Basin desert.

Those images were taken on a family trip. We particularly liked Smith Rock State Park, with its scenic cliffs, river, nice grounds, and quiet walk-in campground. Oregon has set up a specific fund for its state parks, that cannot be affected by budget crisis. As a result, we have found the Oregon state parks to offer some of the best and cleanest facilities of any parks. California should follow their example. In fact, there is a current campaign to do just that at http://www.yesforstateparks.com/

Photo spot 4: Arches National Park – Delicate Arch

Among the more than two thousand arches in Arches National Park, Delicate Arch, chosen by the state of Utah to be its symbol, is distinguised by its graceful shape and location above a curving slickrock basin with the La Sal Mountains as a backdrop. Even if your stay in Arches is brief, you shouldn’t miss Delicate Arch.

I much prefer to photograph Delicate Arch in winter, for three reasons. First, during the winter months, the La Sal Mountains are snow-covered. Second, since the Arch is south-facing, during the winter, it is entirely lit by the last light of sunset. The warm color of the sunset light enhances the natural color of the Arch, causing it to glow with a color that is almost surreal. On the other hand, during the late spring and summer months, part of the Arch is in shadow at sunset, so you’d have to photograph it at least half-an-hour before sunset, when the light isn’t as great. Last, Delicate Arch is a popular sight, so at the height of the visitation, it can be difficult to get a photograph without someone posing beneath the span.

The trail to the Delicate Arch is a mile-and-a-half long, with 500 feet of elevation gain. It takes about 45 minutes to hike one way. To give yourself enough time for photography, you should allow for at least three hours for the round trip. The trail is marked by cairns and by the wear left by generations of visitors on the slickrock. Although obvious by daylight, it requires much attention by dark, especially in winter, when the last hundreds feet of the trail are often frozen. Since you may be descending after sundown, it is essential to take a good light.

There are not a lot of variations in viewpoint, as there is a vertical cliff beyond the Arch. Yet, by using either a short tele or a wide angle lens, and by photographing from the rim or from below, you can include or exclude the mountains or the bowl. Some photographers time their visit so that the moon can be framed within the Arch. Others use a double exposure to include the moon – which doesn’t prevent their image from appearing on the cover of Outdoor Photographer.

On the way to Delicate Arch, there are two sights worth noting. After you cross the suspension bridge over Salt Wash, turn left on a secondary trail along the dry bed and walk for about a hundred feet to a fork, then turn right. You’ll see a nice panel of Ute petroglyphs. Near the summit, close to Delicate Arch, there is a small arch on your right that can be used to frame Delicate Arch (as Galen Rowell did).

On my second visit, during a frigid late November evening, other hikers took a quick look before heading back. As I stayed in the biting wind, the last light intensified the colors of the red entrada sandstone rock, contrasting it with the blue colors of the snow-covered slope behind. By the time I returned to the parking lot, everybody had left. While the temperature had dropped to single digits, my car battery had died, but my expedition-grade sleeping bag kept me warm for the night. I was glad I was well-prepared for winter travel !

View all photos of Arches National Park

New images: Clifton and Morenci, AZ

I’ve posted new images of Clifton and Morenci, Arizona. If you’ve never heard of those places before, neither did I. One thing that I love about road trips is the possibility to run into places out of the ordinary, although not considered tourist attractions.

Traveling from Arizona to Colorado along US Route 191, the Coronado Trail, as I drove through Clifton, I noticed a side street that had an odd look to it. I parked the car, and walked that street. This felt like a ghost town, with most storefront windows boarded up, some bearing political posters from the Clinton area. But at the same time, the place was not totally abandoned, as it was clear that a few people still live above the storefronts.

A bit further, I noticed an open-pit mine of epic scale. The layers of colors reminded me of some of the canyons of the Southwest. There was an awe-inspiring beauty to be found, which was in tension with the environment destruction at hand. I have always found it fascinating that man could manufacture such artificial landscapes so much faster than the forces of nature. The beauty and spiritual power of wild places is so compelling that it is easy to forget that they are isolated islands in a world radically transformed by man. That’s something I try to keep in the back of my mind when I photograph the natural landscapes for which I am more known.

I immediately thought of Edward Burtynsky’s work. One of the reasons I hadn’t sought those subjects actively is the bureaucratic difficulties involved in access. Although that particular area was thoroughly fenced, the company had provided one viewing area, complete with picnic tables, and even neatly made opening through the chain-link fence, apparently designed for cameras. Upon returning, I did a bit of research, and learned that the Morenci mine is the largest copper mine in North America, and one of the largest in the world.

View more images of Clifton and Morenci, Arizona

Photo spot 3: Death Valley National Park – Zabriskie Point

Zabriskie Point gives you a good introduction to Death Valley. From there, fantastically eroded and colored badlands surround you, with Telescope Peak (the highest point in Death Valley, at 11,000 feet) and the salt pan in a distance. During the winter, temperatures in the Valley are mild, the air more clear, and Telescope Peak snow-capped, contrasting it with the desert. By mid-March, temperatures are already too warm, sometimes reaching in the 90s or even low 100s.

The location is excellent at sunrise, looking towards Telescope Peak, and also good at sunset, looking towards the badlands in the south. From there, you can either photograph a wide scene or isolate landmarks such as Telescope Peak and Manly Beacon. You can compose more abstract images with details such as the giant “elephant feet”.

Zabriskie point is a just a few miles from Furnace Creek, and about 35 miles from Stove Pipe Wells. From the parking lot, you hike a very short, but steep, paved trail to an observation platform. Almost everybody photographs from that platform, or when making a wide photograph, steps over the stone wall to the edge of the hill to avoid having extra foreground in the frame.

Here is a little tip that took me a couple of visits to figure out. When standing on, or near the platform, during the winter months, you are shooting at sunrise in the same axis as the sun, straight in your back, resulting in a flat lighting. Instead, walk a narrow user trail, starting from the parking lot towards the right (north) of the paved trail, and continue for less than 10 minutes. You will get on a narrow ridge, higher than the platform. From there, you can see more of the salt pan. You can include Manly Beacon and Telescope Peak in the same shot. Last but not least, you can shoot a bit towards the south rather than the east. The cross-lighting will give more relief to the landscape, and a polarizing filter will do a better job at bringing out the colors than from the platform. An additional benefit is that you will escape the crowds that gather at the platform at sunrise and sunset.

After shooting at sunrise from Zabriskie Point, you can hike into the badlands, following a trail to Golden Canyon. If you are in a party with two cars, you can hike one-way, which is about 3 miles, otherwise, try returning through the Cower Gulch. There are good views of Manly Beacon and the Red Cathedral rocks.

All images of Death Valley National Park

New images: Sunset Crater Volcano and Chiricahua National Monuments

I have posted new images of three National Monuments in Arizona: Sunset Crater Volcano, Wupatki and Chiricahua.

Both are volcanic landscapes not usually associated with Arizona, yet they couldn’t be more different. Sunset Crater Volcano preserves lava flows and smooth cinder domes (unfortunately the namesake volcano is closed to hiking), while Chiricahua is a wonderland of rocks with formations of shapes comparable to Bryce Canyon’s famous hoodoos, although lacking their bright colors.

Sunset Crater Volcano and Wupatki National Monuments are a short distance from each through a scenic parkway, so they can be visited together in a loop starting from Flagstaff, right off I-40. You can visit this interesting loop, which offers a variety of sights, in half-a-day, making it a worthwhile detour.

Chiricahua, in South East Arizona is considerably more out of the way, far away from any urban area, at the end of a 30-mile road that winds from I-10 through rural grasslands. Being at a higher elevation, Chiricahua is a vegetated island above the desert. During my visit in May, the temperatures were surprisingly cold. If you like solitude and unusual landscapes, do not miss the park on your way between Arizona and New Mexico.

Photo spot 2: Denali National Park – Wonder Lake

Autumn comes to Denali National Park between the last week of August and the first week of September. During this time, the entire tundra floor (almost the whole landscape) turns shades of yellow and red. This is my favorite time to be in the Alaska interior (except for high-altitude mountaineering where conditions are better in the spring), with changing weather and the mosquitoes gone.

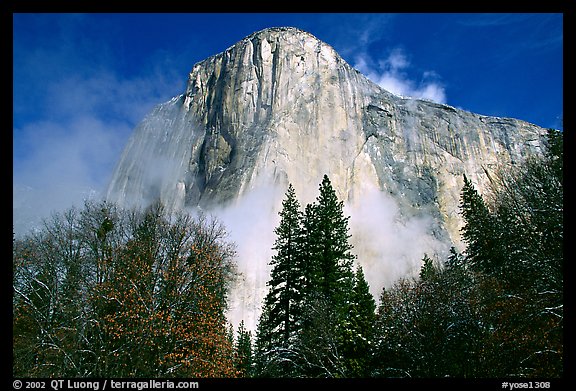
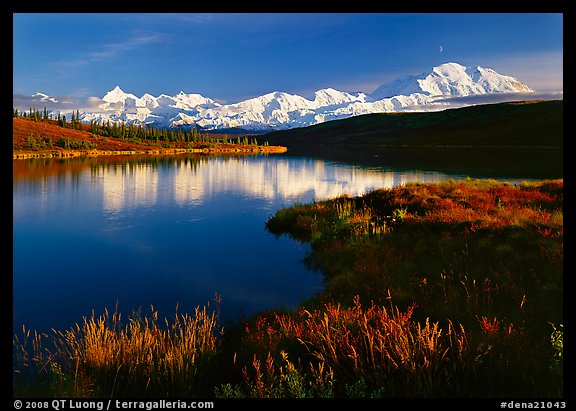
Denali National Park spreads over six million acres, with only one access road inside. At mile 87, where this road skirts Wonder Lake, you can get closer to Mount McKinley, the highest mountain in North America, than from any other place accessible by road. Although 27 miles away, the Mountain will seem close, within touching distance.

Reaching that particular spot at the right time is not as easy as it seems. It it were, everyone would be doing it, as this is one of the most spectacular locations in the world for landscape photography. You’ll have to put some effort: Denali is a popular location with very restricted access. Beyond the park entrance (except for the Kantishna enclave), there are no commercial facilities in the park, such as food, gas, or lodging.

As of 2009, reservations for the next year (including bus and campgrounds) just opened on Dec 1st at http://www.reservedenali.com. If you plan to travel to Denali in 2010, after reading this article, you will understand why you should start planning now.

Although the road is 90 mile long, only the first 14 miles are paved and normally open to private vehicles. Special permits are issued for the unpaved section, but don’t count on getting one. You’d need extensive credentials, and/or win a lottery. Even Galen Rowell didn’t qualify. This means that you’ll have to take a bus. You will need a reservation. There are only a fixed number of buses everyday, regardless of the demand. If you didn’t purchase your ticket well in advance (2/3 of tickets are sold that way) you’ll have to get on a 2-day waiting list for the remaining 1/3 of tickets. The journey by bus from the Park entrance to Wonder Lake takes 6 bumpy hours one-way, clearly not leaving time (nor good timing) for quality photography on a day trip. If you’ve come that far to Denali National Park, just going on day trips does not make sense.

To stay overnight in the park near Wonder Lake, you have three options. The first one is to camp at the Wonder Lake campground (mile 85). You will need a reservation. There are only 28 campsites there, and in general, they are booked many months in advance. The second is to stay in Kantishna, a private enclave at the end of the road (mile 90) featuring a number of resort lodges and cabins. The problem is that staying there will easily cost more than your airfare to Anchorage. With both options, a mountain bike would be useful for moving along the park road. Unlike motorized vehicles, bikes are not restricted.

If, like me, you didn’t plan half-a-year in advance, there is still a third option, which is to get a backcountry permit. Such a permit lets you camp anywhere within a certain area, provided you are at least a mile and out of sight from the road. Those permits are issued on a first-come, first-served at the Park visitor center. Only a few parties are admitted at any given time in each area. Naturally, there is a high demand for the most scenic areas, such as the one around Wonder Lake. The trick is to first get a permit for a less popular area. Once you have a permit for one area, you can get on the waiting list for other areas, moving from unpopular areas to popular areas.

During my trip, I carried my full photography kit, since I in addition to large format landscapes, I was hoping to photograph wildlife. It would have been a lot of work to go backpacking with that kit, and all the gear and supplies necessary to survive in the park. I’ll share with you my strategy: I travelled with two backpacks, one for photography, one for camping. Each evening, I would cook dinner near the road, in order not to have any bear-attracting food at my camp. Then I left the bear-resistant canister there, together with the photography pack before hiking into the wilderness just with my sleeping gear to find a spot for camping. The idea of leaving $15,000 of gear overnight on the tundra might appear hair-rising, but as there aren’t many people around, the worse you have to worry about is rain or snow. I tucked the pack, a Lowepro Super-Trekker, under its all-weather cover, and used my GPS to mark its location.

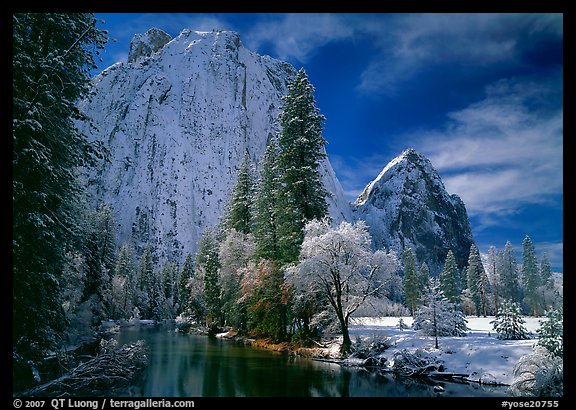
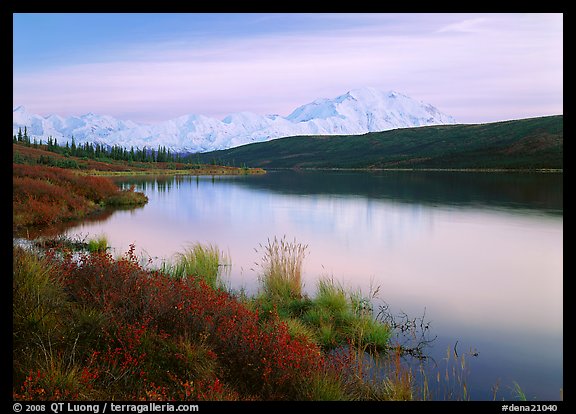
Staying nearby, I was able to catch the best light for this scene, which is late afternoon. Mount McKinley is so tall that it creates its own weather, often hiding behind clouds for days. I was lucky that during one of the three evenings when I was within sight of the Mountain, the clouds cleared for a few hours before sunset, as a half-moon was rising. As you can see in the second image, they moved back soon after sunset, and I didn’t see the Mountain again during my stay.

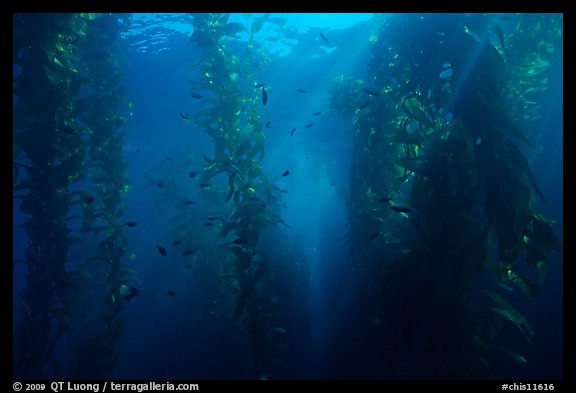
All images of Denali National Park

QT Luong’s images featured in US Dept of State 2010 Calendar

Each year, the U.S. Department of State produces calendars which are given out as gifts by U.S. embassies around the world. I am honored that all the 13 images from their 2010 National Parks calendar are from me.

New images: Acadia National Park in the rain

I have posted new images of Acadia National Park. As always, new images are mixed with old images. Use the button “List most recent images” on the home page to see which images are new.

It had been a decade since my previous visit of Acadia in Oct 1997. Although that 1997 visit was short, lasting three days, I felt satisfied by it, and since then Acadia had ranked high in my list of favorites, for the variety of scenery it packs in such a small area. This, and the distance (furthest from the San Francisco Bay area), explain why Acadia was the only National Park in the continental US that I hadn’t visited at least twice.

In general, I try to return at different seasons, but this time I happened to be in Maine, working on the Maine Woods in September, so I was back again in Acadia during the fall season. The weather made this visit different. The interesting thing with landscape photography is that with changes in light, seasons, and weather, you are never seeing the same scene twice. Some would not have been pleased that it rained most of the time during their two-day visit, but I welcomed the change. The rain made the pebbles on a beach glisten. Leaves look more saturated with colors. The fog created mood in landscape images of Jordan Pond. I could hear tourists stepping out of their car on Cadillac Mountain expressing their disappointment over the limited visibility. I would have been disappointed myself if this had been my first visit. Although trying to keep the lens dry was a challenge, since I had already seen the expensive views, I was excited to photograph in different conditions, and try to make the most of what nature had handed me.

>

Photo spot 1: Yosemite National Park – El Capitan Meadows

This is the first in a new series of postings. Each will feature one specific photographic location (sometimes referred to as “photo hot spot”) in a different national park. I will describe the location, sometimes give tips, illustrate it with a few typical images, and, if warranted, provide links to all the images on www.terragalleria.com photographed at that location. If this is popular, I’ll try to make it a weekly series, so it would run through 2010, since there are 58 National Parks.

Outstanding locations are plenty in Yosemite National Park, but if I’d have to name a favorite, this would be El Capitan Meadows. El Capitan Meadows is located next to the park loop road in the Valley, just at the base of El Capitan (2.5 miles west from Yosemite Lodge) but if you are not craning your neck, you might miss it from the road.

I often came there to catch the early sun rays and cook breakfast in the morning before starting a day of climbing. From there, you can look directly at the face of El Capitan, which is the tallest cliff in America. If you come during the climbing season, there are always a couple of parties scaling the cliff that you can follow with binoculars, and photograph with a super-tele lens. In the evening, the cliff is punctuated like a starry sky by the headlamps of climbers setting a bivy. The meadows is where you start an El Capitan climb. Some meadows may be more central, but to me El Capitan meadows is the heart of Yosemite Valley.

Besides El Capitan, the Meadows are bordered by the distinctive-looking Cathedral Rocks and the Merced River. From the bridge at the end of the meadows, reflexions can be photographed in both directions. Graceful black oak trees grace the meadow. They appear both on the cover of Ray McSavaney’s Explorations and John Sexton’s Recollections. Because the meadow is surrounded by all those high cliffs, the light there is often special, even in the middle of the day at some times of the year. The sun doesn’t reach the meadow until around one hour after sunrise and until one hour before sunset. The trees go from fluorescent green in the spring to bright yellow in the fall. Ferns and wildflowers adorn the meadow. This is there that I took the first series of Yosemite images with which I was really pleased (several years and dozens of trips after my first visit to the Valley) after a snowstorm in the middle of winter.

More images taken from El Cap Meadows. All images of Yosemite National Park.

New images: Channel Islands underwater

I’ve posted new underwater images of kelp taken a month ago during a day of diving in the Channel Islands They were all taken with a Sea & Sea 15mm lens on a Nikonos V using Fuji film.

This might sound awfully wide to those not familiar with underwater photography, so here are some explanations. Because the refraction index of water is 1.33, when used in the water, the lens is the equivalent of a 20mm lens (all lenses become 1.33 times longer). Then, in underwater photography, you need to get very close to your subject, because even a small amount of water between the lens and the subject would degrade images significantly, and in particular absorb the all the reds (resulting in blue hues).

While I am pleased with the images, considering for how long I hadn’t been diving and the equipment that I had, I will be most likely returning next year with a housed dslr and my strobe repaired, since I saw so much more than what I managed to photograph.

Phillip Colla feels that it is crazy to have only 36 exposures available. On the first dive, I was so tired (insufficient weights might have contributed) that I had to force myself to finish the roll. But after I got more comfortable in the water, that did became a limitation. However, what I missed most was the ability to shoot at high ISOs. This would have made it possible to try to photograph sea lions (do they move fast in the water !) and scenes in the shade.