SEO thoughts from a top-ranked photographer
As explained in the previous post on my internet-based photography business, the goal which drove the design of the terragalleria.com site was to license images and sell prints of photographs already created during personal projects, directly from that website. This has been my sole path to a full-time photography career which supports me and my family. This, the final installment of my series about my photography business (1 | 2 | 3 | 4 | 5 ) discusses how I managed to generate the amount of internet traffic I needed to pull it off.
This approach will not work for everyone. When designing your site, you need to define clearly your own objectives, because some goals are just orthogonal. Assignment-based photographers often just want to refer potential professional clients to an online version of a portfolio. A fancy Flash-based site showcasing their specific vision with an extremely tight edit of images and a matching design (the kind that wins design awards) may be the best way to impress a client, but such a site will never pull a large amount of traffic by itself. Others may have intermediate goals: for instance a wedding photographer tries to book jobs with a specific clientele, but this clientele consists of the general public, and there is a good chance that they could find him on the internet by stumbling onto his website, so some of the ideas in this document would apply.
There are three ways for someone to land on your website: they can visit it directly (typing the URL, using bookmarks or lists), follow a link from another website – including a social media site, or click on search engine results after typing in keywords.
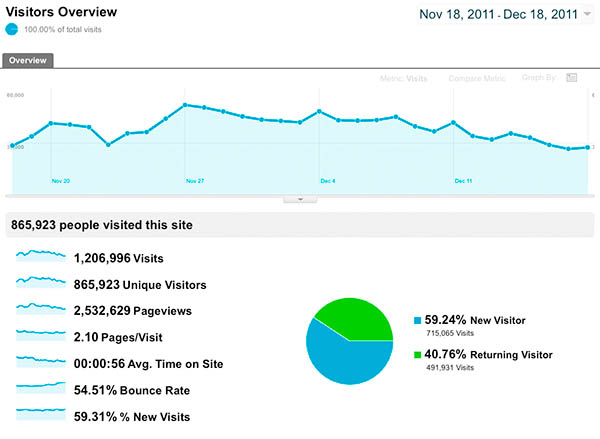
The first way is most beneficial to you, because it is conductive of repeat visits. Repeat visitors are the audience that you are trying to build, those who truly appreciate your work and are most likely to buy something from you. Artwork is not a commodity, therefore priced accordingly, and seldom bought as an impulse purchase. On the other hand, search engine users are fickle. In my case, the majority of them stay less than a minute on the site. The majority do not visit any other page than the one they landed on, returning immediately to the search engine page (this is called a “bounce”). You can see on the graphic below (Google Analytics) that a substantial portions of the visitors to terragalleria.com are returning visitors.
Terragalleria.com has been around for a decade, which is a long time on the internet. If your site is relatively new, your traffic will come almost exclusively from search engines, and maybe social media links, if you are very active. Yet, designing your site so that visitors will want to come back time and time again should be your highest priority. The only way to do so is to repeatedly create a great user experience. This means high quality content (images plus text) and great design (beautiful and easy to use). The often repeated “Content is King” has never been truer, but delivery is also essential, because most photographs do not function best individually: images have to be organized in a coherent and pleasing way, with an easy navigation (including an internal search function) which makes the site attractive and useful. Photographs are useful for what do you ask ? Many visitors have told me that they use the terragalleria.com site to help plan their vacations or even photo shoots. The good news is that making your site user-friendly will also often make it search-engine friendly. If you love your visitors, the internet will love you back. The bad news is that it takes a lot of work over a long time.
I do not design for search engines, but rather for humans. Whenever I am faced with a design choice, I think first about visitors. Let me give a few examples. I have an image category titled Waterfalls. That page includes all of my 400+ images of waterfalls. I could have used multiple keywords such as “waterfall”, “waterfalls”, “water fall”, “water falls” to try to target more, but decided against it, because it would have made it more difficult to browse. On my National Parks page, I could have repeated the word “National Park” with the name of each park. I decided against it because that would have cluttered the page. The visitor already knows he is looking at National Parks ! Yet try a Google search for images of national parks using a variation of keywords and constructs, and see who comes on top. On a page such as Olympic National Park, I could have placed tons of legitimate keywords just by writing captions below the photos (they are in a toolip instead). However, this would have prevented images from filling the page at all window sizes. Also, I find that words get in the way of the images – which is why many fine-art photobooks do not print any words at all next to the images, and instead place captions in a separate section. So in this case, I’ve broken on purpose a cardinal rule of SEO (which I’ll discussed later).
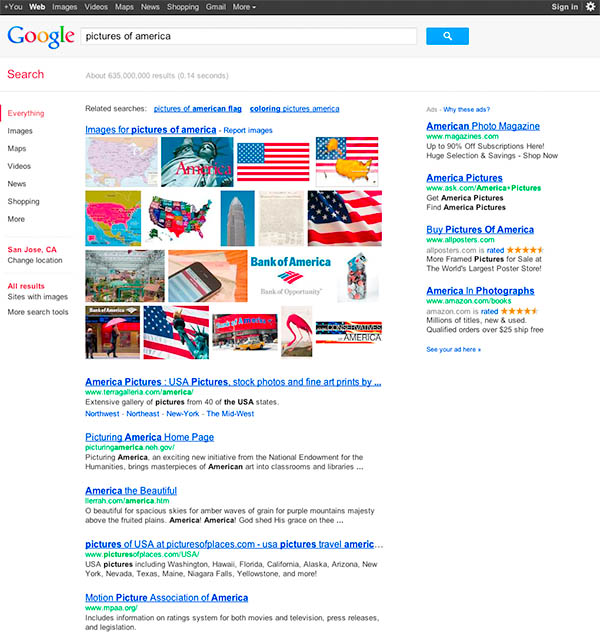
After people type keywords in a search engine, typically thousands, if not millions of results are returned – see the example below, which involves a particularly competitive query. However, studies have repeatedly shown that most people will look only at the first page of results. There is absolutely no way to guarantee that your page will feature on this first page based on organic (unpaid) results. Anybody who tells you otherwise is simply a crook. On the other hand, it is possible to guarantee a top placement with paid results, by buying advertising space on search results pages (the right column in this example). However for a photography site this could be a costly approach. You are not amazon.com. Most visitors do not come to your site to buy anything, so you would be paying for a lot of clicks that do not generate business.
Sound SEO
Search Engine Optimization (SEO) is the process of improving the visibility of a web page by making it higher ranked in organic search results. Because of examples such as those shown above, people sometimes assume that I am a SEO expert, who has mastered complicated and obscure secrets.There are no such secrets. The reason why it is easy to feel confused about SEO is that, within a decade, an entire industry has grown around it, which often relies on smokescreens and hype, if not on sneaky tactics that would be better described as Search Engine Abuse. I do not rely on any such trickery and do not recommend that you do so. Abusing search engines reduces the effectiveness of the very technologies you’re depending on. Whenever someone thinks of a way to artificially improve their web page rankings, every SEO “expert” does it, making the field level again. Not only that, but if you attempt to cheat, the search engines have become so sophisticated that eventually you’ll be found and penalized, sometimes heavily. Google has often dropped entire websites from its search results. I do not wish to give negative examples here, but I’ve seen several photography websites that looked to me built more for search engines than humans plunge dramatically and suddenly in traffic after doing very well for a period of time.
The most important thing is to understand that the “rules” of SEO aren’t magic. They are simply based on any search engine goal, which is to return relevant and trustful results. Once you’ve understood that, the fundamentals are common sense, although the results themselves can almost never been predicted with certainty. I am often puzzled by search results. I’ve read that the algorithms used by modern search engines are some complex that even the software engineers who created them cannot predict their outcome.
Because these days Google is so dominant, all the technical details you need to know are listed in Webmaster Guidelines from Google that you should study carefully. I also recommend to open a (free) account with Google Webmaster, as this will provide you with a lot of data relevant to your SEO. In the rest of this post I will concentrate on the big picture, because there are a number of other articles about SEO for photographers which do a good job at commenting on technical details. Some of the most useful are listed at the end of this article, but study the Google document first.
The importance of text
I mentioned earlier that one should design for humans, not for search engines. For photographers, there is one important exception: while humans (and, to some extent, artificial intelligence programs) can understand images, search engines cannot: they are text-based. For a human, an image is worth 1000 words by itself, but the search engine explicitly needs those. That’s why Google image publishing guidelines explicitly asks you to “tell as much as you can about the image”.That’s also why I advice against the use of Flash as a main platform for the purposes of SEO. Flash is a visual technology: the text is mixed with the rest of the design, you cannot cut and paste it, nor can search engines make sense of it. Flash designers claim that there are workarounds, but I have yet to see any Flash-based webpage achieving high ranking for a competitive search. On the other hand, if you treat Flash content as an image, making it only a portion of a page and surrounding it with text as explained next, you should be OK.
What should the text be ? Anything that you think is relevant. Remember that search engines reward relevance: it is easy for them to figure out that pages are irrelevant by counting bounces. However, since search engine users enter just a few words in the search engine boxes, you have to think which of those search terms (“keywords”) each webpage is going to target, which simply mean include in a prominent manner. The main trade-off with keywords is popularity (how many people search for them) vs competition. The more popular the keyword, generally the more competitive it is. You can compare specific keyword popularity across time and places by using Google Trends. The Google Adwords Keyword Tool provides a measure of both competition and popularity, so that you could try to target popular keywords with less competition.
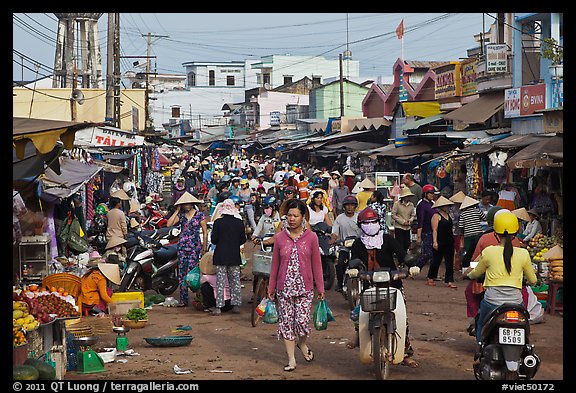
Each combination of words is different. You cannot try to win by “optimizing” for many of them at a same time, as search engines detect “keyword stuffing”. Try for instance a Google search of “america pictures” and compare with the above. If you will allow me a short digression, I’m very pleased to see Jacob Holdt‘s work so well placed, since I think it is important. However I suspect that what got it there is not only its cultural, historic, and artistic importance, but also the fact that the body of work is so extensive (more on that next).
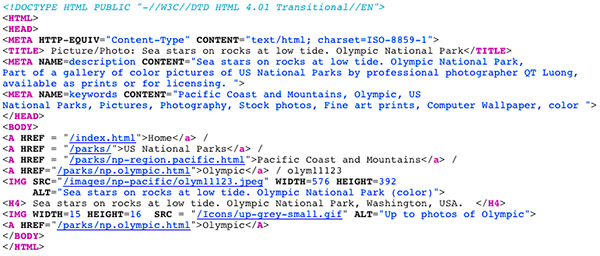
Where should the text be ? The brief answer is everywhere ! However the single most important element on each page is the TITLE tag (this is the text you see on the top of the browser bar). Each of your images should be on its own HTML page, and have a brief but keyword-rich and unique title. If all of your image pages have a title such as “My Name photography” (as I often see), you’ve wasted the most precious real estate on your website. Next in importance is the ALT tag text, which is the surest way for you to associate words with a specific image. Search engines rely heavily on the ALT tag, but it is barely visible to humans, so you also need a descriptive caption next to the image. Although far from ideal, it’s OK to use the same text for those three elements – that what I’ve been doing to save time. Then, you’ll also want keyword text in your navigation links, headers, description tag text, URL, and image filenames. Here again, I made the mistake of ignoring the last two ones, for the benefit of the convenience of using just an image number instead. What does the fact that I’ve done well in spite of not following some “rules” tell ? That those technical details are merely tweaking.
As an example, here are the essential elements of the page http://www.terragalleria.com/parks/np-image.olym11123.html
The footprint
One of the two most important factors in high traffic numbers – one that I rarely, if ever see mentioned in SEO articles, is what I call the “footprint”. I like to use the following analogy: the internet as the earth, and your visitor as an asteroid from space. The chance that it will land in your country is proportional to its surface. Likewise, everything being equal (which is obviously not, more later), the chance of a visitor landing on your website is proportional to its number of pages, which is more or less the number of images in the case of a photography website. I am convinced that no matter how great your images are, if you do not have massive numbers of them, it will be very difficult to achieve high visibility through SEO. That’s why, for the purpose of selling work on the internet, it often isn’t productive to show only the very best of your work on your website. A portfolio is necessary for client meetings. It doesn’t hurt to have it on your website (although I’ve done well without one myself), but if your website consists exclusively of a portfolio, just do not expect to draw any significant amount of traffic.As of this writing, there are more than 27,500 images on terragalleria.com. While some redundancy is inevitable for stock photography sales, I am making sure that each image contributes something a bit different to the whole. This was not built in a day, or even a year. As you can see from this site timeline, for the past ten years, I have strived to post at least 200 images every month. Having fresh and varied content is important to hold your visitors interest, and to signal to search engines that your site is not stale. If your website structure is not amenable to frequent updates, use a blog. SEO is simply not a short-term endeavor. It takes several years for it to pay off, because besides a large site, what you need to build is trust.
Besides the footprint analogy, how does in practice having many images help you ? This has to do with keywords. It makes it possible for you to organize your website in a layered way so that you can satisfy searches both for popular and less-frequent queries. First, let say you are trying to rank high for a popular keyword (such as “Pictures of America”). If site A has 15,000 relevant images, and site B has 50 of them, who do you think will be identified as most relevant by search engines ? I am not saying that all images should be on a single page. A nested structure is the most natural and gives many options.
Second, when you use very specific keywords for an image (“Raspberry cultivation in Watsonville”) there will be very little competition, so that you have a good chance of coming on top, but also very few searches. Yet all those searches can add up to a decent traffic number if you can satisfy a large number of different ones, which you can do if you have a large number of images. This phenomenon is similar to the “Long Tail” described in the book by Chris Anderson “The Long Tail: Why the Future of Business Is Selling Less of More” as the retailing strategy – applied by amazon.com and netflix – of selling a large number of unique items with relatively small quantities sold of each. Because of a change in the indispensable Google Analytics interface, I haven’t figured it out yet how to pull out similar statistics, so I’ll illustrate this point with numbers from Oct 2010:
- top 10 keywords account for 13,891 (4% of visits)
- top 100 keywords account for 36,363 (12% of visits)
- top 1,000 keywords account for 86,912 (28% of visits)
- top 5,000 keywords account for 135,700 (45% of visits)
- keywords 5,000-133,000 account for 165,000 (55% of visits)
Trust and incoming links
The other important factor in high traffic numbers is trust. Factors that contribute to trust are the time your domain has been on the internet, as well as possibly its expiration date. However, these are insignificant compared to incoming links – although it could be argued that receiving links is a byproduct of long tenure on the internet. The breakthrough of Google was to make use of the link structure of the Web to calculate a quality ranking for each web page. The original research paper co-authored by Sergey Brin and Larry Page (shorter version) is an excellent read if you want a good understanding of that algorithm. Nowadays, all search engines use that idea: the more websites link to your website, the most popular and therefore the most trustworthy it must be.
Not all links are equal: the only ones that help are genuine links from important sites. Links from authoritative sites count more than links from obscure sites. The main metric used to assess the importance of a web page is Google PageRank (PR), a number between 0 and 10, named after Larry Page. The scale is exponential, so a link from a PR 5 site is worth maybe 10 links links from a PR 4 site and 100 links from a PR 3 site. terragalleria.com has a PR 6. You can examine the PR of a given page using a number of PageRank checker websites, although by far the most convenient is to install the Google toolbar if your browser supports it. You can also check the site popularity with tools such as Alexa. What also distinguises links is the text. Ideally, it should be matched to your keywords, but in general you do not have much control, since you are not creating the link. Take advantage of the few instances when you can control it, such as links from your other websites, family, friends, and associates.
Obtaining links on other sites is getting harder. The web used to be more open, unfortunately abuses from link spammers are rampant: my blog receives about 400 spam comments daily. Those spammers have ruined it for everyone, forcing every site owner to control more tightly external links. In general, the links that come with contributions/signatures on blog comments or forum posts are automatically tagged as “nofollow” by the site software. All links from the Wikipedia (which have been cleaned-up considerably), Flickr, and even Linkedin (!) are now “nofollow”. This makes them secondary for SEO purposes as they are not followed by search engine spiders, and do not transmit any PR. The exception to all those sites that provide only “nofollow” links would be directories sites, starting from general directories such as Yahoo down to photography and local business directories. The main limitation is that pages on a directory site have tons of links, resulting in the dilution of the value of your link. A webpage page has a fixed PR to pass. If it links to 100 sites, then each of those sites receive only 1/100 of the PR. The same problem, dilution, reduces the usefulness of links from social media sites, maybe unless you manage to get a “viral” propagation. A strategy that I see more and more is to offer content (such as guest blogs, feature articles) in exchange for a link. Such content is often produced by cheaply paid writers. I receive such requests, as well as link exchanges requests daily. But why should someone link to an irrelevant website of inferior PR ?
The problem with some of those strategies is that you are trying to mess with the ultimate organic mechanism of the internet, creating links that are not genuine. Google explicitly warns against artificial linking. They do not indicate trust, but rather manipulation. The widely used practice of “exchanging links” is actually detrimental, especially if the other site is irrelevant, or even worse, part of a “bad neighborhood” such as a link farm. I don’t think you are going to create a link farm, or a network of false blogs, but maybe that’s what the “SEO expert” you are hiring may do. Needless to say, this would very risky to you. If real people are linking to your site, it is because they had a great time there, and think it is worth showing to others. Instead of trying to create incoming links yourself, it is preferable to create awesome content, that make people want to link to you. It can often be easier to attract attention by writing about a photography-related subject such as a technique, gear review, business tips, esthetic considerations – opinionated and controversial topics seem to work well – than by posting photographs. There’s nothing wrong with that, as it indirectly helps you find an audience for your art. However, as a photographer, your ultimate goal should be to create superlative photographs, lots of them, that are good enough to make people want to link to you. So it comes down again to great work: the best you can do to improve your SEO is to go out and photograph.
Other great articles on SEO for photographers
There is a great deal of material on the web about SEO for photographers. The authors below have demonstrated that they can not only write, but are also outstanding webmasters who have achieved great SEO results for themselves or their clients. In particular, the two first entries are good examples of personal photography website that generate business for their owners.- Dan Heller’s book chapter on Web-based photography business: includes remarks on design and SEO from a pioneer, travel photographer, photography business consultant, and creator of the most extensive personal photography website.
- Phillip Colla’s SEO tips: great collection of ideas from a nature and marine photographer with a website which is a model of organization.
- The Photographers SEO pyramid (part 2, part 3): excellent and concise guide from promising photo hosting company Photodeck whose founder JF Maion has a personal experience with SEO on a personal photography site.
- The SEO cookbook for photographers from the leading photo hosting company PhotoShelter, well researched, like the rest of their growing collections of guides.