Photographing the Lava Ocean Entry in Hawaii
9 Comments
Part 1 of 3: 1 | 2 | 3
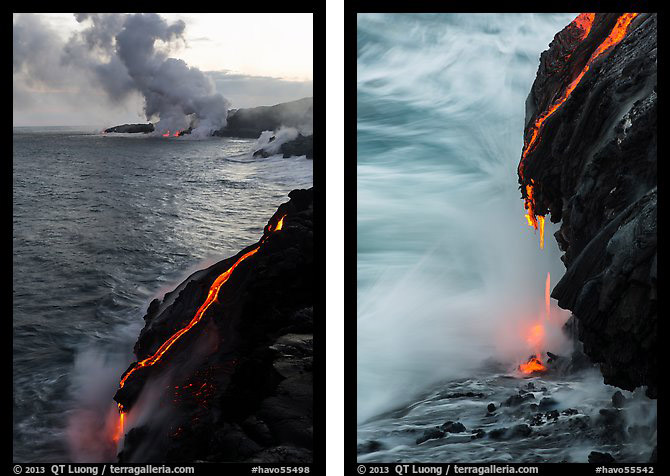
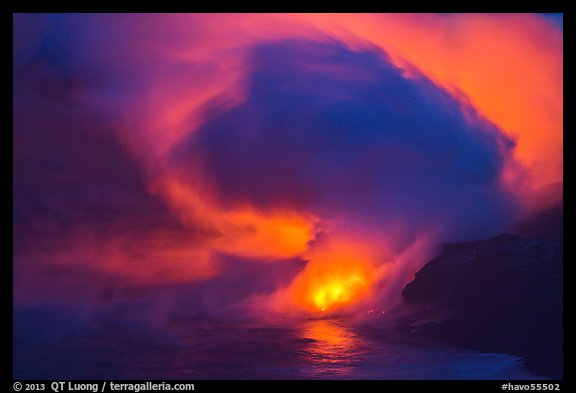
One of the most mesmerizing spectacles of nature you will witness is glowing lava cascading into the ocean to form new land in front of your eyes, as clouds of steam rise from the dynamic meeting of fire and water. This winter, I traveled to the one place where this wonder can be observed readily, the Big Island of Hawaii. In this post, illustrated with recent images, I’ll share what I have learned about visiting and photographing a lava ocean entry by land and boat. I’ll include a number of links to resources as well as detail my own experience.
When ?
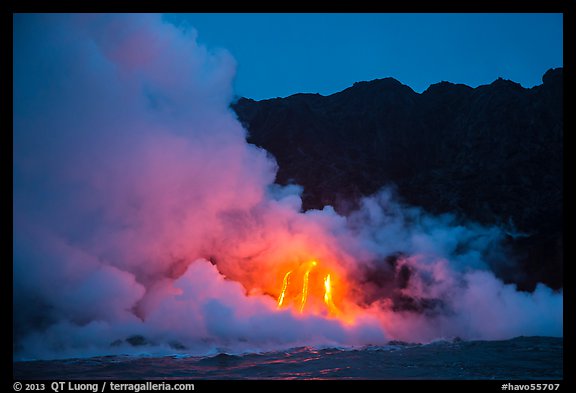
With lava, timing is everything. Although Kilauea has been erupting continuously since 1983, most of the time the lava flows through underground lava tubes which enter the ocean underwater, so there is nothing to see. Visible lava ocean entries occur when the lava pour into the ocean above sea level, often flowing along a sea cliff. Even if most of the lava flows underground, there may be surface flows as well at the same spot, which offer photo opportunities very distinct from the ocean entry itself. Lava ocean entries are visible less than 25% of the time. They can last for a few weeks up to months. Smaller ocean entries are actually easier to photograph because the steam and smoke plume is also smaller. That plume is hazardous and can totally hide the lava flow. During the earlier days of an ocean entry, no significant lava bench is yet built up, which may make it possible to get closer (see below for an explanation). To keep up with the conditions, check the following updates:- Hawaiian Volcano Observatory daily report: most up to date official report
- Hawaii Volcanoes National Park information: a good mix
- Kalapana Cultural Tours blog: photos and info from their daily tours
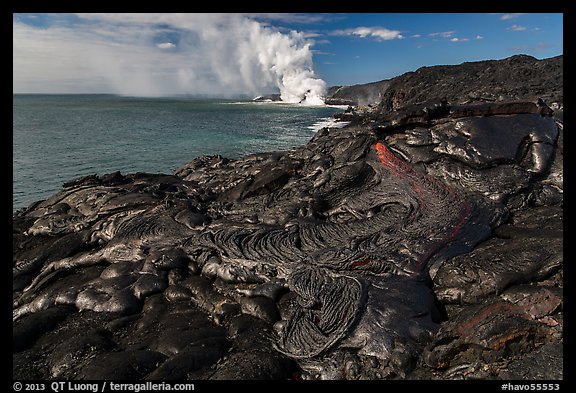
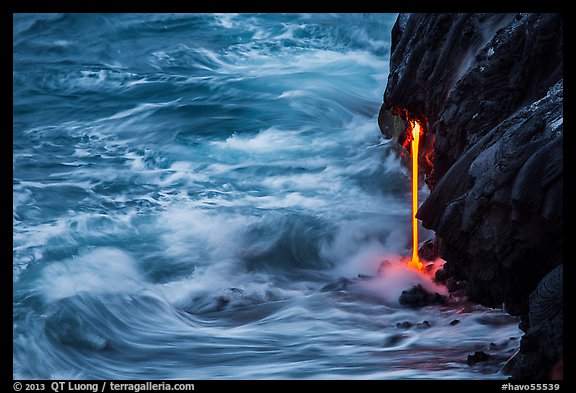
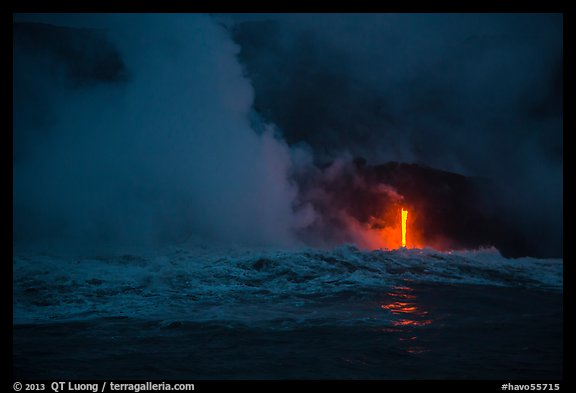
During the day, molten lava can be visible to a close observer as red or yellow patches, but doesn’t appear much brighter than the rest of the land. Most of the time, it will have a grey/silvery color, slightly lighter than hardened lava. An overcast day helps there, as lava glows more in the dimmer light. Twilight and night are when molten lava comes alive, with an impressive glow which also lights up the steam and parts of the ocean and land.
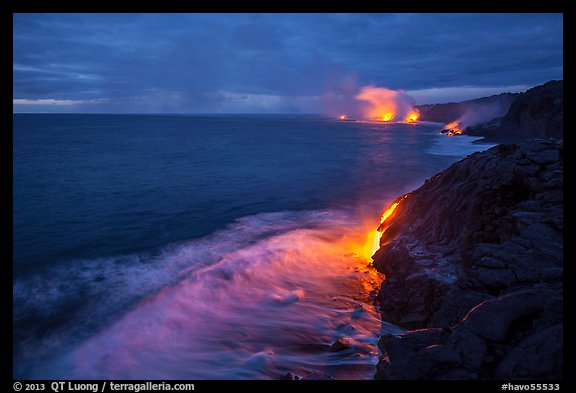
The time around sunrise and sunset, extending to twilight is by far the best for photography. The ideal window is quite brief, so one should plan carefully. During that time, brightness differences between lava and land or sea are small enough that both can be properly exposed in a single exposure: there is enough ambiant light that you can see details in the landscape, but it is dark enough for the lava to glow. In my opinion, dawn is preferable to dusk for several reasons:
- Arriving in the dark makes it easier to see where the lava flows are.
- Flow areas can be very crowded at sunset if the hike is short. When I was there, there were more than a hundred visitors, which, besides degrading the experience, makes it difficult to work. By contrast, there were less than a dozen people at sunrise.
- On that stretch of coast, the sun rises over the ocean, but sets over land.
- Because of the direction of trade winds, you’ll most likely be standing East of the ocean entry, so the direction of light would be more favorable at dawn.
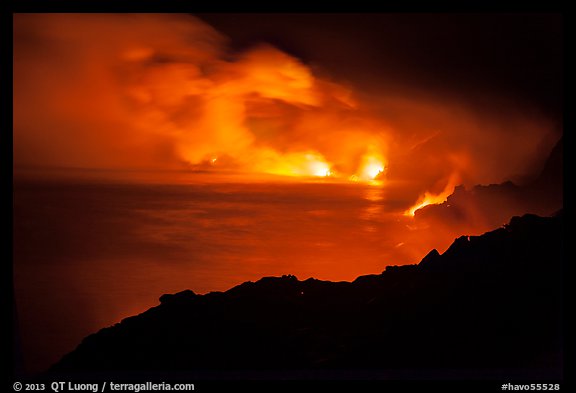
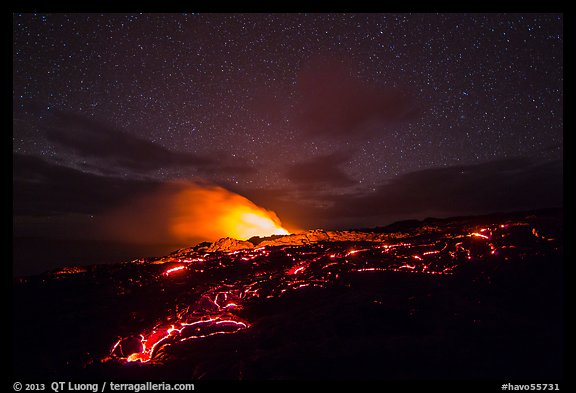
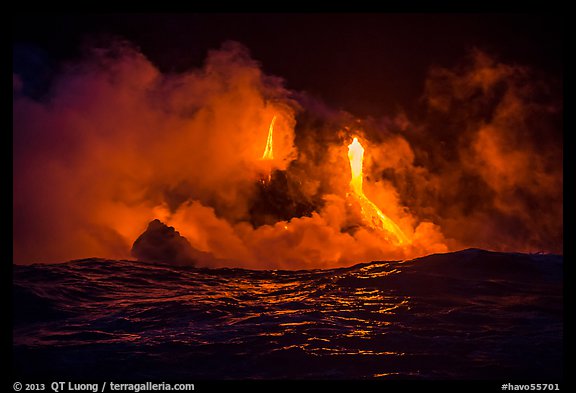
While the sight is most dramatic at night time, I was surprised at how difficult it was to photograph then. Because of the extreme difference of brightness between the flowing lava – which is the light source, the illuminated steam, and the land and sea, multiple exposures are needed (I had to bracket with a 4EV range). Those exposures are not easy to blend: since the steam is constantly shifting, you are not dealing with a static scene. A full moon usually isn’t great for night photography because resulting images look too much day-like, but because of the presence of the lava acting as light source, this is a situation where I think a full moon would work the best.
Where ?
Lava originate at Pu’u O’o vent on the east rift zone of Kilauea volcano. It can enter the ocean anywhere between the end of Chain of Craters Road in Hawaii Volcanoes National Park and the Kalapana Lava Viewing Area. It is about 7 miles from the end of Chain of Craters Road to the boundary of Hawaii Volcanoes National Park, and 2 miles from the Kalapana Lava Viewing Area to the boundary of Hawaii Volcanoes National Park (map).The National Park rangers will tell you how far it takes to hike to the lava flow from the end of Chain of Craters road. They are unlikely to tell you that a shorter hike may be possible from outside the park (that is Kalapana). If the ocean entry is more than 4.5 miles (one-way) from Chain of Craters Road, then it will be shorter from Kalapana. In 2013, the hike was 13 miles RT from the Chain of Craters Road, but only 4.5 miles RT from Kalapana.
Hawaii Volcanoes National Park is open 24 hours a day, and there are no restrictions on parking at the end of Chain of Craters road. On the Kalapana side, the state of Hawaii has set up a Lava Viewing Area at the end of Highway 130 in lower Puna. The free parking area, not always staffed, is open from 3PM to 9PM. The area so is named because at the time it was set-up, lava was flowing sufficiently close to it that you could see the glow from there. As of winter 2013, this is no longer the case. The problem on the Kalapana side is that you cannot park there for a pre-dawn session, and also you cannot linger at the flow too long after dark if you want to be back at 9PM. In addition, most of lands around the Lava Viewing Area are private – although sparsely populated, so crossing them towards the ocean entry may be trespassing if you go by yourself.
Getting ready
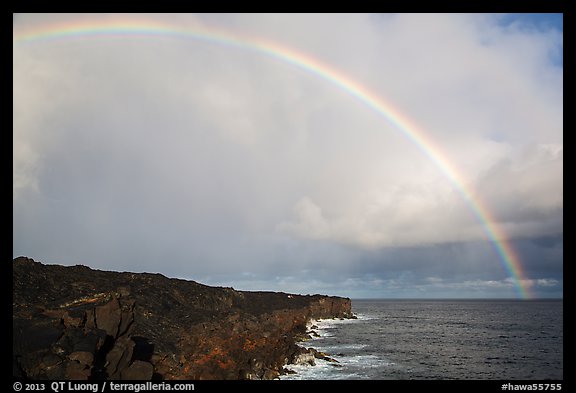
Because you are hiking on recently hardened lava, good walking/hiking boots are a must – it is better to wear boots that are stitched, not glued, since the heat of lava can melt and separate the soles. Long pants and gloves provide some protection in case of falls and also against the heat of hot lava flows. It can rain unpredictably there (makes for great rainbows), so light rain gear may be useful, although getting a bit wet in warm weather isn’t that big of a deal. What is sure is that the weather will be hot and humid regardless of season – not to mention the heat of the lava fields – so bring plenty of water. Despite looking black from a distance, fresh lava has a reflective silvery sheen, so don’t forget sunscreen. Because flashlights are a must in the dark, I recommend to take two, one as a back-up. The brighter the better, since lava is dark.Although rarely needed, a respirator can be handy, particulary if you plan to stick around areas where you could be exposed to toxic gases. The gases are also bad for your eyes, but a half-mask is enough, maybe in conjuction with goggles if you have sensitive eyes. The volcano photographers I have talked to use a respirator designed for paints and chemicals – good against the hydrochloric acids present in the plume – available in hardware stores such as Home Depot or ACE (I carried this one from Walmart).
For photographing the cascades of lava pouring into the ocean, you will want a telephoto lens, since you won’t be able to get very close. A super tele (400mm or longer) is useful for close-up of spigots, while a short tele or normal lens frames the whole coastline. A wide-angle lens is mostly useful for photographing the surface flows rather than the ocean entries: you can get as close to those slow lava flows as you can bear the intense heat. Since the best photography is at twilight, you’ll need a tripod. Bring a good one, since it is often windy there, and you’ll be using telephotos.
The hike
Although the terrain looks flat, you’ll be hopping up and down due to irregular surface structure consisting of hardened lava rocks which are jagged, uneven and sharp. Unless hiking on trail where you place one feet in front of the other, you cannot get into a rhythm because you need constant concentration. This makes it more challenging than it looks from distance alone. Unless familiar with the terrain, you should count on hiking about one mile per hour, esp. by night. A huge steam and smoke flume forms where the lava flows into the ocean. It is simple enough to just walk towards this plume.
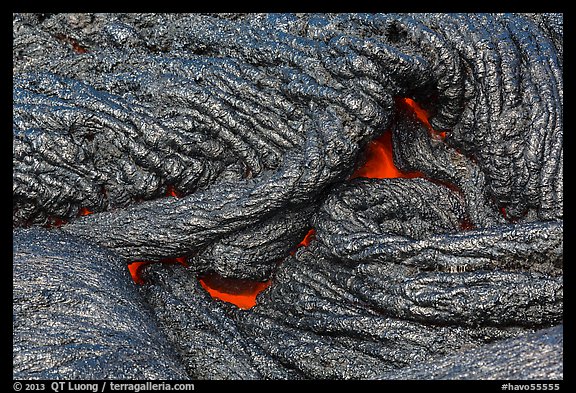
Once you get to the ocean entry, there are a number of potentially lethal hazards to be aware of. The most obvious, is that you may have to cross surface flows, walking directly above lava which is flowing under a thin crust of hardened lava (the outer shell of a lava tube). Even if you cannot see the glow by daylight, the intense heat will leave no doubt as to the nature of what lies underneath. As long as the hardened lava doesn’t crack when you step on it, you are probably safe. Lava hardens surprisingly fast: after just 10 minutes of cooling, one inch of crust can support the weight of a person. Besides, the molten lava within helps support the crust. The risk of falling through the crust is low, because the heat will keep you from crossing where it is too recent and hot. Crossing hot lava is actually more scary than dangerous. On the other hand, a cold, empty lava crust is more likely to collapse because it is not supported by molten rock.
Next, the plume contains sulphuric acid, hydrochloric acid, and all sorts of bad caustic stuff. The trade winds normally blow consistenly towards the southwest, so if you viewing from the other direction, you should be able to usually stay upwind of them. However, the winds can change, esp. if you get close to the ocean entry. When I was there, the guide showed me a viewpoint which he thought would be interesting, but said that he wouln’d walk here himself, since on that evening he did not have a respirator with him. Unless you have a respirator, you should always stay out of the steam (even with one, I’ve read it is bad for clothing and camera equipment).
The most dangerous and less obvious hazard are lava benches: that new land may collapse unpredictably off the coast in chunks the size of a football field, because it builds up so quickly that it fractures. If falling from that height together with tons of lava rocks into scalding water, your chances to survive are small. You should never step on a lava bench. In the National Park, benches are sometimes marked as closed areas, but don’t count on it. Lava benches are always the cliff lowest, and closest to the ocean. Older cliffs are higher, so in doubt do not go low. Someone familiar with the area will know which cliffs are lava benches because they are the most recently formed land, whereas the cliffs they’ve seen in previous visits are safe. You can sometimes feel the vibration of the waves on them. I’ve read a photographer giving the advice “if you hear a crack from under you, run”, but I doubt you’d always be able to run fast enough. The more established an ocean entry is, the fastest it will build a lava bench, whereas with a sporadic ocean entry, ocean action can destroy the new land as fast as it is created.
Detailed lava safety information:
- Active Lava Cautions and Warnings from InstantHawaii.com
- Lava Safety Video from NPS
- Coast Guard establishes temporary safety zone, March 2017
Guide services
From the Chain of Crater Road, no guide services are available, since the National Park does not issue permits for guiding. If the ocean entry is close enough to the road, they may install trail markers and even send rangers there.From Kalapana, there are no trail markers, so better knowledge of the terrain will save some effort since some parts of the hardened lava flow are easier to cross than others. If you are not familiar with the hazards mentioned above, a good guide may provide a safer experience. Last, but not least, guides have permission to cross private lands, and can provide a spot where to park your car outside of the Kalapana Viewing Area opening hours.
Not all guides are safe. In particular, some will take you on new lava benches, where you may get better pictures, but also die if the bench collapses. Here are a few guides recommended by other photographers:
- Volcano Discovery 808-640-4165 highest rated (only ones to provide respirators) but most expensive
- Kalapana Cultural tours 808-936-0456 (guided Tom Anderson)
- Poke a stick guided lava tours 808-987-3456 (guided Jay & Varina Patel)
- David Ewing’s Kalapana lava tours 808-315-2256 least expensive (referred by local photographers)
- Bryan Lowry: most experienced and safety-concerned, however you shouldn’t try to emulate most of the explorations in his blog !
- CJ Kale & Nick Selway: operate a gallery in Kailua-Kona
- Bruce Omori and Tom Kualii: operate a gallery in Hilo
- Leigh Hilbert: lives in Kalapana and maintains Hawaiian Lava Daily
The boat tour
Although working from the land will provide the best opportunities, in no small part because you can use a tripod and lower shutter speeds, a boat tour can provide you a different angle not available from the land. In particular, you are able to photograph lava flowing down cliffs that are difficult to see from the land, as well as reflections in the water. It is also a good solution for those who cannot or do not want to hike, although note that the ride can be pretty rough. When riding against the swell, the boat to rises up and then slaps the water at the back of the swells very hard, which is why the operators warm that the trip is unsuitable for people with neck/back/spine injuries. Also, there is no protection against rain and often huge waves in the open boat.
Because of high cliffs, the closest point where the boat can be put in the water is Isaac Hale Beach Park/Pohoiki Boat Harbor (13-101 Kalapana Kapoho Road Pahoa, Hawaii), a good distance from Kalapana. There is a campground right there, which is helpful since the sunrise tour starts at 5am. It takes about 50 minutes each way to ride from there to the National Park boundary, and the boat will hang out at the ocean entry for about 30 minutes. You are not allowed to walk around the boat. You must remain seated at all times, however the captain will frequently turn the boat around so each side get equal viewing time. Just like for the hike, a sunrise tour is preferable to a sunset tour. The main reason is that morning seas are calmer. Besides a smoother ride, calmer seas are much more favorable to photography: the boot moves less, letting you use longer shutter speeds and/or lower ISO. Not only longer lenses are practical, but also the captain can position the boat closer to shore. A calm water surface also let you capture beautiful reflections.
The sunrise and sunset tours are quite popular, so I’d advise to make reservations at least a week in advance, although it means taking your chances with the weather. Be sure to dress up very warmly, because once you get soaked (and if it rains or the sea is rough, you will, even with raingear), no matter what the air temperature is, you will not feel warm. I would also bring an extra jacket or cushion you could put between your back and the seat for absorbing the shock of the hard hitting of the ocean by the bottom of the boat. Some water protection for your camera equipment is very handy, as is an easily cleaned filter and water-absorbing cloth for wiping the lens or filter. Because you are shooting from a boat, fast medium tele lenses, such as a 70-200/2.8, with stabilization would be ideal.
Boat operators include:
- Lava Ocean Adventures 808-966-4200 has the largest, therefore most stable boat, and runs more tours than others
- Kalapana Lava Boat 866-478-4044
- Lava Boat Tours 808-934-7977
The helicopter tour
This being Hawaii, land, sea and air tours are all available. During the day, helicopters constantly buzz above the ocean entry. I did not take an helicopter tour because I was skeptical that such a tour would yield good lava images. Although one of the operators (Paradise Helicopters) claims to be flying doors off close enough for you to feel the lava heat, at the ocean entry the helicopters hover quite far – I’ve been told because of a crash in the past. In addition, they are not allowed to take off before sunrise nor to land after sunset. Since then a photographer who took such a tour has confirmed this.My experience
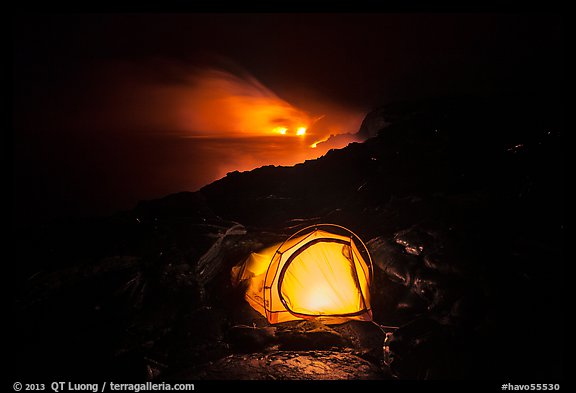
For the hike, I signed up with the friendly and laid-back David Ewing because (unlike others) he agreed to let me stay there for the night with my car parked at his home on the lava flows and come back by myself the next day. The hike was actually lead by his assistant Skylar, a very nice young man. Although the flow was only a 2 1/4 mile (each way) from David’s house, overnighting certainly beat spending only about an hour there, then hiking back in the dark, and forth again in the dark for dawn. I brought sleeping gear consisting of a thin sleeping bag, short foam mat, and one-person shelter (against wind and rain), a gallon of water, and some cold food. Although I wasn’t sure if this was going to be possible, I found a spot suitable for sleeping very close to the flow. Was it preferable to sleep, or be up all night – like the Man, Bryan Lowry, whom I had the pleasure to see in the morning ? I am not sure. By being up all night, one certainly could be alert for the best configurations since they change constantly. One could also scout more areas to be ready for a great sunrise. On the other hand, since this was the beginning of the trip, I was still feeling quite tired, and I thought that the best opportunities were at twilight anyways. My night was pretty short, and I cherished every minute of the time I spent with the flow, especially after the other visitors had departed, when the only sound I could hear besides the crashing waves was the crackling of the lava.
For the boat tour, I traveled with Lava Ocean Adventures. All the sunrise tours were sold out for 5 days. Although the booking was less than smooth, things got ironed out. A few reviewers have described them as unsafe for running tours in borderline conditions, but although I felt that the ride was uncomfortably bumpy, I never thought it was out of control. The passengers in front of me even seemed to enjoy it, hollering each time the front of the boat jumped 6 feet in the air. It was quite thrilling the first few times, when we were heading out in the dark, but on the return trip, jarred and soaking wet, I couldn’t wait to return to “port” – you actually get in and out of the boat through a ladder on the campground’s parking lot. When we got back, many people, who had already paid, were lining up for the next tour, but the captain cancelled it because of ocean conditions. During my tour, the conditions were awful for photography. The seas were so choppy and it was so dark (because of the rain clouds, no pre-dawn glow nor sunrise !) that I used mostly my 24-105. The boat was rocking so much that longer focal lengths were problematic. As it wasn’t raining when we departed, I forgot to pack my rain cover. It started to rain heavily at the ocean entry. My 100-400 got wet and unusable for the rest of the trip. I had to send it to CPS where they diagnosed it as “submerged in water” and charged hundreds dollars for repair. I am still glad to have taken the boat tour for the different perspective, interesting images that I managed to squeeze out (largely thanks to a new processing technique) and experience, but I am not sure I would repeat it when hiking offers such a rich and satisfying connection to the land.
More images of Hawaii Volcanoes National Park


Superb images and fantastic detailed post Tuan!! 🙂
Very well done QT. It was good seeing you out there. Glad you posted the safety info too. People do get careless out there. I was going to get a shot of you’re tent but, didn’t want to wake you.
Aloaha Bryan, and thanks for your help in planning the trip and improving this blog post.
Loved reliving the magic of this place. Brand new black sand beaches, “candle-wax” caves, and lava! Great photos, esp. the stars and glowing tent. My 2 favorite times were both illegal as hell (of course). Once a friend and I went in from end of Chain of Craters but it was closed for activity & a recent death. That was in early 90s. Jumped (stupidly) down to a low bench and saw an amazing long spigot pouring out from a cliff about 50 feet above the sea. So orange! Another time more recently was alone and hiked in to Puu O’o. Amazing hike! Couldn’t stay ’till dark though, since it was extremely rough going the last 2 or 3 miles to the vent. The ground was the least stable most rumbling/shaking I’ve ever been on, including earthquakes. Anyway, this makes me want to go back with my better camera gear.
Sorry but, I want to comment on hiking to Puu Oo. People need to know, Puu O’o isn’t a place to be going. No disrespect to Michael Flaherty.
Best to stay away as its very unstable. Lava suddenly and rapidly overflows what’s left of its rim. Minor fluctuations of magma are easily causing this. Its only a matter of time before a large event occurs and you won’t survive it if you’re up there.
I know Puu O’o vent very well. The most important thing is knowing when to stay away. Also, sudden zero visibility can occur at anytime and last for days. Even when it is relatively safe you need to be well prepared for all types of issues/conditions. The unsuspecting and inexperienced can easily die. All of the shaking is a warning sign that shouldn’t be ignored.
QT states; “Bryan Lowry: most experienced and safety-concerned, however you shouldn’t try to emulate most of the explorations in his blog!”
Puu O’o is one of those places.
I reiterate that in nearly every post I do.
Better to do a heli tour or stay on the flats by the ocean entries.
Wow QT thanks for sharing your experience I am trying to plan a trip over to the Big Island soon and will be referencing your article often. I look forward to hearing more about your trip and seeing your images.
Aloha
Justin
QT, thank you so much for sharing your beautiful photos with us. I just saw your time-lapse – it was amazing!!! I visited the Big Island, for the first time, a couple of weeks ago and I used your lava tour reference- David Ewing (Skylar was our guide). That hike was one of the most amazing experiences of my life. Thanks again for the inspiration.
Thanks Krissy, I’m happy if I’ve inspired someone to to get outside and explore the outdoors, especially the magical places that our National Park are.
Thanks for sharing this lovely photographs.