Photographing the solar eclipse of May 20, 2012
The “annularity path” in which the moon passes entirely in front of the sun, creating a ring, was a strip of about 300km wide, starting in Asia, and ending near Lubbock, in Western Texas. Only right on the center of the path is the moon perfectly centered over the sun at the eclipse’s maximum. Outside the path, the eclipse is partial, resulting in a crescent sun. I was initially planning to photograph the eclipse in Lassen National Park, which is almost perfectly centered, and a reasonable driving distance from San Jose.

However, a few days before the event, as I began to do more research, I realized that Lassen National Park would not work for the images that I had pre-visualized. Although the photographs would be made in a National Park, they would fall short of my goal to create landscape images that include the eclipse, rather than astronomical images. Using the NASA mapping tool, I noticed that the sun would be quite high (20 degrees elevation) and bright in the sky, as the maximum of the eclipse there would be at 6:30, two hours before sunset.
Observing the sun that high, you have to take serious precautions to protect your eyes (and cameras). You basically need a neutral density filter of about 14 f-stops which can absorb IR as well. After doing a quick test with such a filter – actually a stack of a Lee Big Stopper (10 f-stop) and a Hi-Tech (4 f-stop) – at 6:30 pm in San Jose, I found that the brightest exposure which did not overexpose the sun to be f8.0 1/250 at 100 ISO. At such an exposure, the sky is pitch black. It is underexposed by a massive 12 f-stops. So even in a composition with a silhouetted landmark – forget about trying to get detail in the landscape – would require a considerable amount of compositing and processing just to un-merge the silhouette from the sky. One could try HDR but at 12 EV difference and with the sun high in the sky, there is no real connection between the foreground and the sun, so you might as well clone in the sun, which results in an image which, no matter how interesting it would be, screams artificiality to me.
The solution for was to travel to West Texas, where the maximum of the eclipse would occur shortly before sunset,so it can be exposed properly while retaining color in the sky. At that time, the sun is much less bright. Equally important, it is closer to landforms, which make it possible to photograph the sun together with land using a telephoto lens, which fills more of the frame with the sun. In keeping with the project that’s occupied me for almost twenty year, I wanted to photograph in a National Park. Grand Canyon was in the annularity path, but the sun would be at a fairly high 10 degrees elevation, and the Canyon landforms are in a hole in the ground, rather than sticking out in the sky. I settled on Guadalupe Mountains National Park, although it is about 50 miles south of the annularity area. This meant that I settled down for a strange crescent rather than the “ring of fire”. Booking airfare on a short notice can be very expensive, but I was able to redeem air miles on United Airlines for a flight to El Paso, Texas.
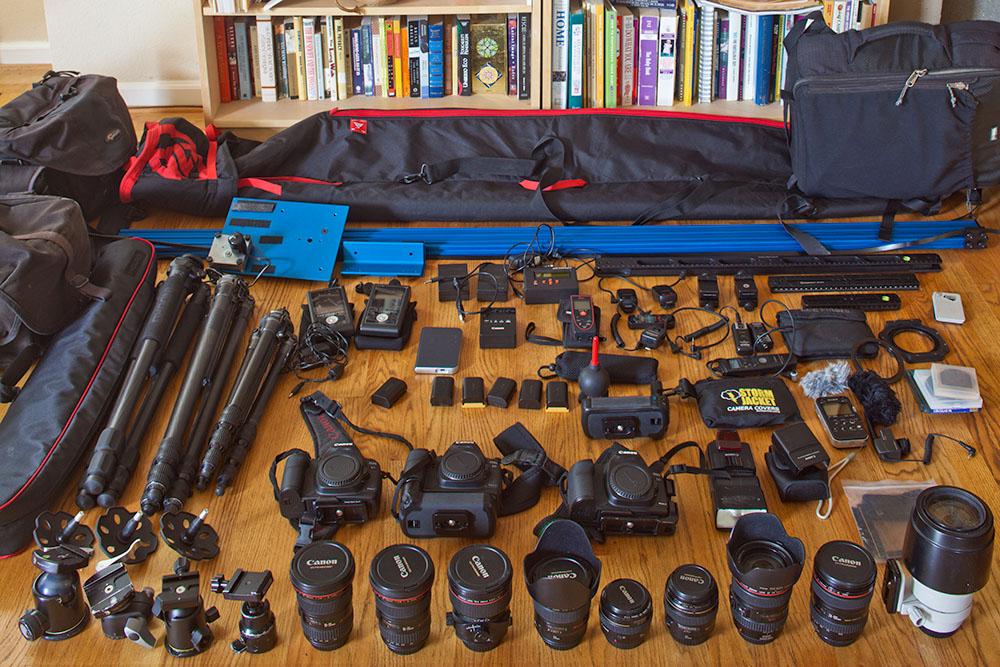
After packing past midnight, I caught an early morning flight. Because I had to walk more than a mile with more than 40lbs of camera gear – fortunately airlines don’t weight carry-on bags in the US – during the connection in Phoenix International Aiport, I didn’t have time to buy a sandwich there. After getting one in El Paso, since I was eating while driving, to save time I declined to stop for groceries in town, thinking that on the 130 miles to Guadalupe Mountains National Park, I’d find some. It turned out that the area was more remote than I remembered from my last visit a decade ago. I had to make a significant detour to Dell City – there is no food in the Park – but there I found only a tiny store with not much provisions suitable for a vegetarian. I bought the last pack of cheese available. They didn’t even have bananas. I arrived in the Park in the late afternoon, one day before the eclipse, and started to scout.
I had envisioned images of the sun setting near the profile of El Capitan, this prominent landmark of West Texas, however I immediately understood that working from Hwy 62/180 east of the park would not do. The road was too close to El Capitan (therefore preventing the use of a telephoto), and also too low to catch the setting sun. The main difficulty was that El Capitan has a fairly broad shoulder on its south side, which would block the sunset unless one would stand several miles away. Near sunset time, I hiked to a high viewpoint, and from there observed which points of the surrounding rugged land caught the last light. The next day, I hiked to the most promising of those points for the whole morning, following industrial dirt roads before scrambling on outcrops. For each of them, I mapped the location on a topographic map using my GPS, then used the Photographer’s Ephemeris App to predict where the sun would set, which allowed me to calculate the longest focal length that I could use to include both the eclipse and the profile of El Capitan. As it was getting hot and my water supplies were almost depleted, I returned to the car and drove to White City (“City” is another misnomer) to look for food and continue planning in the shade.
The choice between the two top locations was difficult. One of them would allow me to work with a longer lens. I picked the other one, because the sun would set later from there. I had traveled all the way to West Texas so that the eclipse would occur near sunset ! I figured it out that I would make the best of the situation by setting up two time-lapse sequences, one with a wider view (65mm) including El Capitan (which would capture a longer portion of the eclipse), the other with a narrow view (400mm) focused on the setting sun, and a distant ridge. I loaded my backpack with three cameras, two tripods, and an assortment of lenses, and arrived on site half an hour before the start of the eclipse.
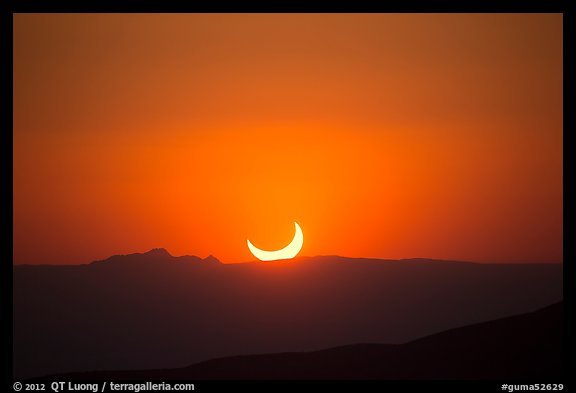
Close to sunset time, the sun at first glance may look like a crescent moon, but such a configuration is of course impossible with the moon. The contrast was low enough that some single-capture frames look good in video (and at web resolution), although I’ve yet to see if I can produce a smooth complete time-lapse movie. However, I wasn’t satisfied with them as stills, for which I wanted the potential to make prints. For the wide sequence, I didn’t get the optimal exposure, due the difficulty of adjusting for the considerably changing brightness of the sun over one hour as it went from blindingly bright to dim as approached the horizon, compounded by the distraction of juggling with two cameras. In the last minutes before the sun disappeared behind the ridge, the shutter speed was not high enough, which resulted in some blurring of the crescent’s edge. At that time the crescent was dim enough to easily observe directly with your own eyes, but the Canon 5D mk2/3 cameras have a much more limited dynamic range than eyes. Even with sky underexposure, there was no color detail left in the sun crescent, which was reduced to pure white. Moreover, brightening the sky by 1.5 f-stops resulted in annoying pattern noise, even at ISO 320, certainly a persistent weakness of Canon cameras – especially compared to Nikon that I’ve been eying since.
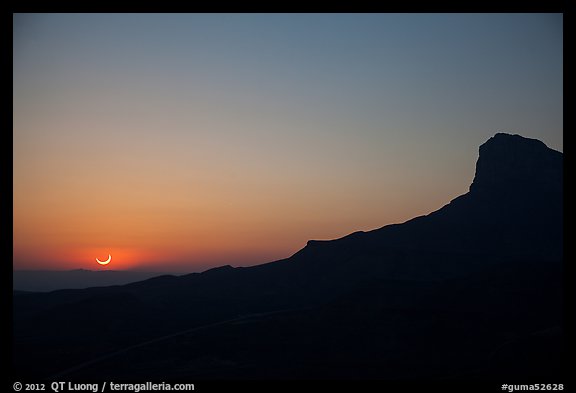
I decided to make a digital composite instead of adjusting a single-frame capture. For the landscape and sky, I used a frame taken just right after sunset with a better exposure. The sun was from a frame that I had captured a few minutes earlier using a different camera, and then scaled down and positioned to match the single-frame capture of that moment. Personally, I think that although it is a composite, it is truthful enough to what you’d see if standing on the edge of that plateau on the evening of May 20, 2012. What about you ? Would you have preferred the purity of the single-capture frame, or the better image quality of the digital composite ?