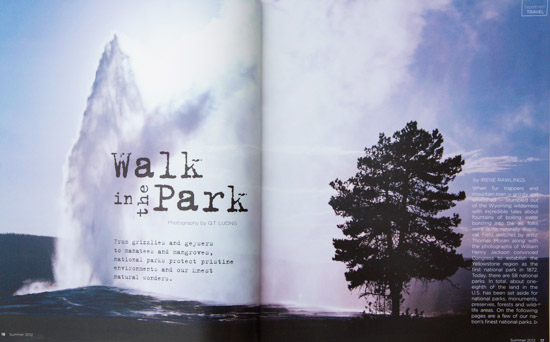
Eliot Porter was to color photography what
Ansel Adams
was to black-and-white. The jacket flap of one his books published in 1970
simply stated “Eliot Porter is recognized as the finest color
photographer alive today”. It can be argued that Porter was not only
the first color nature photographer, but also the
first major artist working in the medium of color photography, a decade before
“early colorists” Saul Leiter and Fred Herzog, and more than two decades before
William Eggleston.
Eggleston began to experiment with
dye-transfer printing in
1973, but Porter had worked in the early 1940s with an even more
complicated precursor, the
washoff-relief process, which was so obscure that Porter – who was
initially a research scientist with a MD degree from Harvard
– had to obtain information about it in research papers.
Dye transfer allowed a fine control of hue, saturation, and contrast
which Porter would use to make highly expressive prints.
In those early days, technical challenges of color photography
were such that Porter’s photographs were a supreme technical
achievement. From an artistic point of view, besides seeing in color,
Porter broke away from the sublime emphasized by
Ansel Adams expansive romantic views of the landscape, striving
instead for intimacy and abstraction, and defining the genre of
“intimate landscapes”.
Books of color photography are nowadays omnipresent, but it was
not always so. There was a first, and it was Eliot Porter who lead the
way in 1962 with In Wildness, the pioneering “coffee table” book. It
has since then spawned an entire industry which also includes nature posters and
greeting cards. Its success led him to eventually publish
more than 25 books. At the time of his death, in 1990, in terms of
publications, public and institutional acclaim, influence on other
photographers and on the environmental movement, Porter stood apart.
Yet, for reasons I am not sure, in
the 21st century, Porter’s reputation seems to have faded to the point
that none of his books remain in print as of this writing. However
In Wildness is coming back soon, and a new catalog from the Getty Museum,
Eliot Porter: In the Realm of Nature is announced for this fall. Fortunately, so many of his books
were sold that most titles can readily be found on used-books websites at
prices that are a bargain.
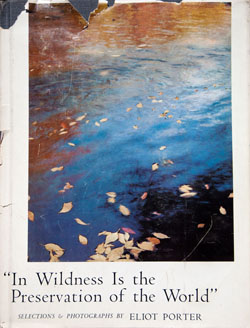 In Wildness Is the Preservation of the World
In the 1940s, Porter began a personal project to photograph forests, ponds, leaves, and
wildflowers in the Eastern woods, introducing a more intimate window on nature, in color and soft hues,
in which he looked for the transcendental as he was reading Thoreau at the suggestion of his wife.
When David Brower accepted the proposal from Porter to publish the
project as his first book, the Sierra Club did not skimp on its production. Raising $40,000
($300,000 in today’s currency), they printed out a large (10×13) and
heavy
book – part of the “exhibit format series” which had started with
This is American Earth, possibly Ansel Adams most important and
famous book. In Wildness consisted of 72 large format color
photographs of the New England woods, reproduced as well as they could
be at that time, using four-color lithography and a special varnish
only on the photo pages which used Kromekote paper.
Each of them is cleanly paired with a quotation
from Henry David Thoreau – printed on the left opposite page and served by great typography – which matches the image in spirit.
First published in 1962, the book was an instant sensation, selling close
to 60,000 copies – more than This is American Earth.
To understand the magnitude of this success, notice that the cost of the
book was $25. This is $188 in 2012 currency.
The book revolutionized the publishing industry by setting new standards
for designing and printing fine art photography books, and
proving that there was a market for them.
It earned the Sierra Club an
international reputation as a publisher of fine books, and
helped expend their audience (for a thorough exposition, see the book chapter
The
Sierra Club and Coffee Table books). Published in the same year as
Rachel Carson’s Silent Spring, and delivering a complementary
message, the book had a lasting effect on the nascent conservation
movement.
Besides establishing Porter’s reputation as the
pioneer of color photography, and effectively launching his career,
the public’s positive response to In Wildness showed him
that he could use photography to make people aware of nature’s beauty
without compromising his artistic goals. This transformed him into an
active conservationist.
In Wildness would remain in print for decades. According to the Amnon Carter Museum, more than one million copies were sold.
I remember purchasing a used copy in the first month after I
moved to Berkeley in 1993, and keeping it at my
bedside for weeks, as I found it incredibly inspiring, even
with the diminished power of the paperback edition. Porter’s images
showed to me that beauty could be found in the most humble scenes, and
revealed by a honest representation without excessive effects.
I eventually
bought a copy of the first hardcover edition, which is more
satisfactory with its large size and more vivid reproductions. Yet,
there is no doubt that book printing has improved considerably since
then. Comparing side by side, the reproduction of the original cover image (“Pool in a Brook,
Brook Pond, New Hampshire, October 4, 1953”) looks better in
Intimate Landscapes (1979) and Eliot Porter (1987). With that in mind,
I had good hopes for the
50th anniversary edition released by Ammo books in Nov
2012, but didn’t purchase a copy after seeing that Michael Johnston and Geoff Wittig gave it a thumbs down: “In comparison with the original first edition, which I have, the reproduction in the reissue looks like bad color Xeroxes”. The link at the top of this entry points to the first 1962 edition, which is somehow difficult to locate amongst all the amazon links for various editions.
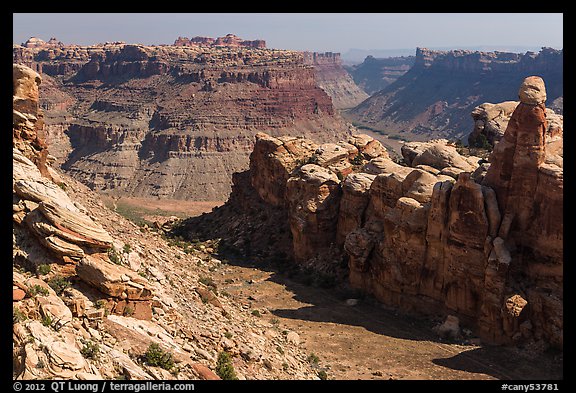
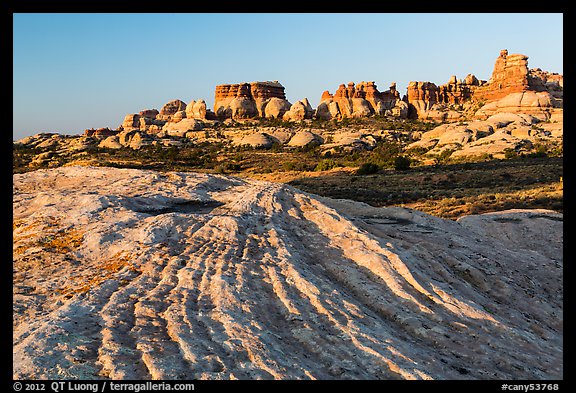
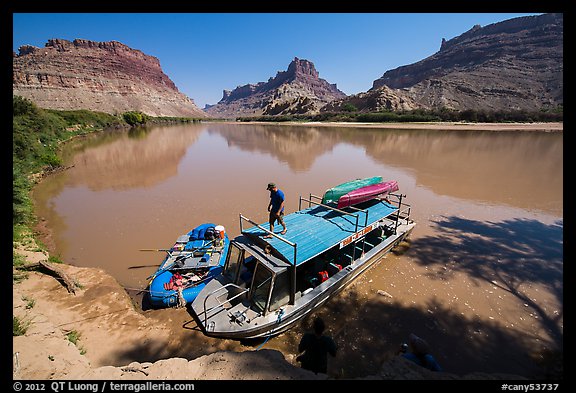
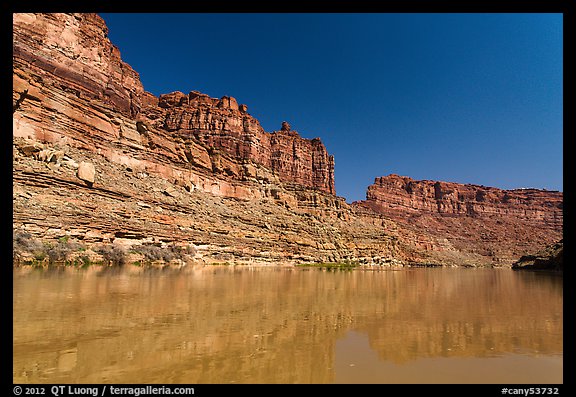
 The Place No One Knew, Glen Canyon on the Colorado
Unlike his first one, the second book of Eliot Porter
was to be part of an environmental campaign – to stop construction of the Glen
Canyon Dam. Unlike the gentle woods were Porter spent much of his
early years, it depicts the more striking and harsh geology of the
Southwest where Porter would live for the second half of his life
after his move to Santa Fe. This setting, and the stronger light
yields some of Porter’s most colorful and abstracted
photographs. The influential conservation photographer Robert Glenn
Ketchum considers this work to be the pinnacle of Porter’s career,
because “he was free in those canyons to give service to his science and his
documentation and still be in abstraction heaven”.
The book is all the more precious because it is an eulogy. It came too late
to affect public opinion and prevent the flooding,
although it did result in federal review of reclamation projects on western rivers
and the eventual passage of the Wilderness Act in 1964. Therefore, when looking at
the vibrantly colored photographs of gulches, rock walls, and hidden
canyons carved by the Colorado and San Juan Rivers, one cannot help remembering
that those treasures would never be seen again. The book design – by
David Brower himself – and format are identical to In Wildness, making it almost a companion volume. The design used in the Sierra Club Exhibit series has varied over the years, but all the Porter books in the series present images with adequate white margins, consistent placement, and no gutter overlap, although the print quality appears to have degraded over the years. A compelling writer who would often share the circumstances of his photography adventures and educate about their subjects, Porter wrote the text in the opening and concluding pages. He selected the quotations facing the photos from a variety of writers to face the photos instead of just one.
 Summer Island: Penobscot country
This is the most personal of all Porter’s books. His father had bought
Great Spruce Head Island, accessible by an hour boat ride in the
Penobscot Bay of Maine, where “there was nothing anywhere that was
unnecessary; nothing; whether the work of man or nature that existed
without a purpose”. The summers that he spent there were the
source of his love of nature and photography. The book is divided in
two equal parts. In the first part, autobiographical texts are mixed
with early black and white photographs of Penobscot Bay. The second
part, in the spirit of the two first Porter Books,
consists of color photographs in Porter’s mature style, mixed
with short literary quotations from more than a dozen of
authors. Published in 1966, this
was the third book by Porter in the Sierra Club Exhibit series.
Twenty years later, in 1986, Porter revisted the place closest to his heart by compiling
unpublished images into a new book
Maine where he lets the
photography do all the speaking
– there is
little text besides a short opening autobiographical essay –
in a clean NYGS/Eleanor Caponigro design.
 Antarctica
Maine and the Eastern forests were Porter’s first stomping grounds. He
then explored extensively the Southwest where he relocated, but his sense of adventure led Porter to expend his
horizons to exotic locales as diverse as Baja California, the Galapagos, Africa, Greece,
and China, each trip resulting in a book. But none location was as remote as
Antarctica, which he visited on two trips in 1974 and 1975. At that
time, no commercial trips
were available, but Porter had been selected as an artist-in-residence by the National
Science Foundation, which provided him transportation and logistics that allowed him to work in a large
array of locations for several months. The book consists of an extensive travelogue supported by maps. In between written chapters, there are six photo sections which illustrate diverse aspects of Antarctica, including wildlife as well as landscapes – both ground and aerials – and even historic settlements. Porter was remarkably fit for his age,
however he was 74 during those expeditions. Because of the difficult
working conditions, he used a 35mm camera for much of this work, which sometimes
compromised a bit the quality of reproduction compared with his older books, although in most cases with his later books, the printing was too contrasty.
 Birds of
North America: A Personal Selection
Birds of
North America: A Personal Selection
Porter had been photographing birds since his early years, but in 1939 a publisher rejected
his bird book proposal because he thought that color was essential for bird
identification. This was the impetus that prompted Porter
to take up of the challenge of color photography. To fully appreciate it,
remember that Porter was working with a 4×5 camera, a few
feet from some birds, and the speed of the initial Kodachrome was a
ridiculously low ISO 5. With the support of a Guggenheim grant, using custom lighting equipment and building towers, Porter was able to make color bird pictures which were good enough to be the subject of a solo exhibit at the Museum of Modern Art, New York, in 1943. Those are far more interesting than the visual simple contemporary bird photographs with a blurred background captured with AF, super-teles, and fast frame rates, and high ISO. Instead, Porter portrays the birds at close-range, in their natural nesting environment with
exquisite colors and textures revealed by great resolution and depth of field. Despite artistic recognition, the book had to wait because of the high cost of color quality color reproduction. It wasn’t until 1972, long after gaining success with his non-bird photographs, that Porter would publish that book about his first photographic love. It consists of a five-chapter narrative about his time in the field as a caring bird photographer, (“the steps necessary to safeguard the welfare and even the lifes of the subjects may take up more time than the photography itself”) mixed with seven groups of full-page photos – 64 in color, 16 in black and white.
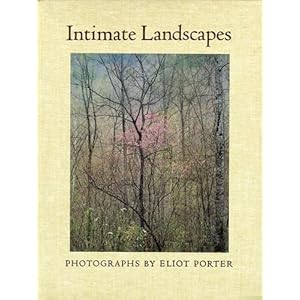 Intimate Landscapes
In 1979 the work of Eliot Porter was exhibited in Intimate Landscapes,
the first one-person show of color photography at The Metropolitan
Museum of Art, New York. This exhibition earned Porter praise as the
individual who brought credibility to color photography as a medium of
fine art. The image selection defined what is now meant by the term
“intimate landscape”: the close-range, quiet compositions of natural
elements with muted colors and dense textures, meditative and dense with layered meanings, which were the hallmark of Porter’s
work at the exclusion of more expansive and spectacular landscapes. The book is the catalog
of this landmark exhibition, well printed (although maybe too muted) and flawlessly
designed by Eleanor Morris Caponigro in an understated way which fits
perfectly the work. Curator Weston Naef authors one of the first
essays on Porter, describing him as “captivated by colors that had not yet been
named”. Except for a few, all the images are in vertical
orientation, therefore fitting the format of the book
well. Unlike others, this book has become collectible, with no
reprints available, so there are no
inexpensive copies.
 Eliot
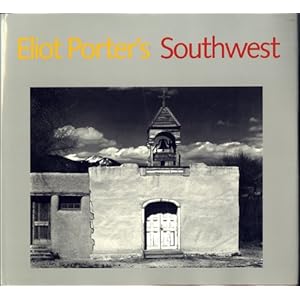
Porter’s Southwest *
Eliot
Porter’s Southwest *
Long before bursting on the scene with the color photographs of “In
Wildness” in 1962, Porter had become a recognized black and white photographer
through a body of work which is now mostly forgotten. His black and
white photographs were exhibited at Steiglitz “An American Place” art
gallery in 1938 – not an insignificant honor since Ansel Adams and Paul Strand were the only other
photographers represented there -, prompting him to leave science and
devote himself to photography full-time. In 1980, Janet Russek who Porter
had hired to help catalog his photographs, came across boxes of
pictures that she did not recognize. There were hundreds of
unpublished images taken in New Mexico, Arizona, Colorado, and Utah
from 1939 to 1962. This 1985 book, the only one devoted to Porter’s black
and white work, consists of a selection of 90 of those images, covering an
unexpectedly large range of subjects.
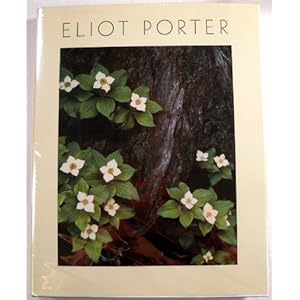 Eliot Porter
The book was published in 1987 on the occasion of Porter’s first major retrospective at the
Amon Carter museum, to which Porter would later bequeath his entire work,
which is available to view at the extensive Eliot
Porter online collection guide.
It opens with a 75-page autobiographical memoir which ranges from his
early years, move to Santa Fe, work with the Sierra Club,
to his later exotic travels. Porter remembers a pivotal encounter
early in his career:
“The other photographer turned out to be Ansel Adams, of whom I had
never heard… After dinner, I was asked to show my pictures, which I
did with a certain amount of self-satisfaction. Ansel Adams looked at
them but said nothing, and then showed his. That was a traumatic and
embarrassing experience; I saw immediately how vastly superior his
photographs were to mine, and how little I know about photography
technically, or what its potential was for creative expression …
Sensing my embarrassment, Ansel Adams tried to encourage me, suggesting
that my photography could be improved by using a larger format
camera.”
The memoir concludes with an epilogue: “But before all else a work of
art is the creation of love. Love for the subject first and for the
medium second. Love is the fundamental necessity underlying the need
to create, underlying the emotion that gives it form, and from which
grows the unfinished product that is presented to the world. Love is
the general criterion by which the rare photograph is judged. It must
contain it to be not less than the best of which the photographer is
capable”.
The plate section presents a selection from all his projects,
including not only color natural landscapes, but also early black and white
work and bird photographs, and later foreign cultural work, which even
includes a few portraits. Excellent reproductions and design (also by Eleanor
Morris Caponigro) make it the best introduction to Porter’s work.
 Nature’s Chaos
When his son gave him James Gleick’s recently
published book about chaos theory, Porter felt as if all
he intuitively sensed in nature and tried to capture
in his photographs, but could not conceptualize scientifically during
all his life, was described by complexity sciences and fractal
geometry. Science and art, the two strands of his life that had been separated for a
long time – despite in background and continued interest –
were all of the sudden reconciliated, which brought him much peace.
Porter quickly made contact with James Gleick and he validated his
intuition as they began
to work on this book, his last before he passed away in 1990.
Nature’s Chaos was the first book of Eliot Porter that I saw. I bought it
during a brief scientific visit to the US in 1991. At that time,
as a PhD student in Artificial Intelligence, I was first drawn to the
science, but it the photographs that had a lasting impact on me. They
opened my eye to the richness, diversity, simplicity and complexity of nature.
It remains one of my favorites because the selection of images – almost all previously unpublished – is very cohesive and strong, and as
one of the more recent books, it is has some of the best reproductions.
“The images selected for this book are mostly details of nature which
emphasize how nature’s apparent disorder can be reduced to
aesthetically stimulating fragments. Although subjects such as mosses,
lichens, or leaves that have just fallen are not orderly at all, when
viewed as detailed sections, they become orderly. This process
suggests a tension between order and chaos. When I photography, I see
the arrangement that looks orderly, but when you consider the subjects
as a whole or on a larger scale, they appear disorderly. Only in
fragments of the whole is nature’s order apparent.”
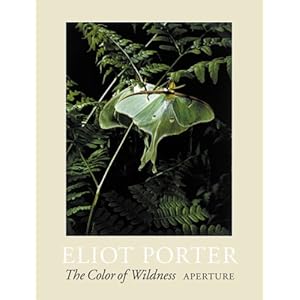 The Color of Wildness *
The most comprehensive survey of Porter’s work to date, published in
2001 as a catalog to the centennial exhibition, using the same large trim as
In Wildness. Although there are plenty of autobiographical essays in Porter’s books, not too
many critical essays were available in previous books.
The Color of Wildness include two interesting ones: John Rohrbach addresses Porter’s innovations in
photography compared to photographers such as Ansel Adams, while
Rebecca Solnit explores its environmental influence.
In addition, his son Jonathan memoir discusses Porter’s lifelong love of the natural world,
his working methods, and his interests outside of photography.
Since this is a relatively recent book, I would
have expected excellent reproduction. While most plates are fine, some
do suffer from excessive contrast, resulting in blocked shadows.
Although Porter used a large format camera, he made small, gem-like
dye transfer prints, whose richness is very difficult to reproduce by
ink. Maybe the best reproductions so far are in
Regarding the Land: Robert Glenn Ketchum and the Legacy of Eliot
Porter, which as indicated by the title, is more about RGK than Porter.
I have a half-dozen more books by Eliot Porter on my shelves – of uneven quality I must say – but those are either my favorites (for a variety of reasons), or books that shed a particular light on Porter’s work. Did any other book inspire you ?
Part 3 of 5:
1
|
2
|
3
|
4
|
5