Terra Galleria Photography

The Everglades in Summer

Being sub-tropical, South Florida has only two different seasons. The wet season starts around the middle of May and continues through to November with the last major storms. During this time, South Florida gets a lot of rain and everything gets really wet. The dry season runs from December through April. During this season, everything starts to dry up in a short amount of time. Not only are temperatures cooler, but the dryer air also make the air feel more crisp.

In the past, I had always recommended a winter visit to the Everglades, writing for instance in a handout for my 2010 NANPA Summit presentation: “During the rainy summer season, water submerges most of the Everglades, spreading out the wildlife. As water bodies shrink during the dry winter season, countless birds gather at the water holes, making it easy to photograph them. Winter offers the smallest concentration of mosquitoes in Everglades and Biscayne, as well as pleasant conditions, while summers are hot and humid.”

Common wisdom agrees, since the high tourist season in South Florida is indeed winter, when prices for lodging climb sharply and Everglades National Park schedules most of its activities. Many photographers come to the Everglades primarily to photograph the birds, for which winter is the season of choice. However, not all photographers operate under common wisdom. For my specialty, landscape photography, I had long guessed that summer could actually present the best conditions. This summer, I had the chance find out for myself.

At first glance, I noticed that during the wet season, the vegetation looks green and lush, whereas in winter it is kind of brown and dead-looking. High water levels enable beautiful reflections.

I saw this native Butterfly Orchid, which blooms only during the summer, as well as the Pond Apple, and several others.

During the winter skies are often cloudless all day. In summer powerful afternoon storms move in daily. Those storms are often localized, with an extension of less than 10 miles, so the sky is not all overcast. This means dramatic skies, an important element in a very flat landscape.

Clouds also translate into beautiful sunsets. Behind this serene image, some danger lurked. Paurotis Pond in Everglades National Park is bordered by thick vegetation with just a few openings, so to get a good perspective I had to wade in the water while keeping an eye for an alligator hanging out at the other end.

The super-heated storms produce frequent lightening, relatively easy to photograph because the storms are so localized. While it takes some luck to capture such an image with a single frame, setting up the camera to fire long-exposure continuously, I was sure not to miss anything and I got a time-lapse as well.

The state of Florida spends a great deal of resources to control the mosquito population, particularly in high tourist areas like the Keys. Of course, such programs are not applied in a protected area such as Everglades National Park. I was surprised that mosquitoes weren’t much of a problem during the day even in the heart of the park. However, at night they were definitively in full force, even in the pinelands, which is the areas where they are normally the less dense.

In the swampy areas – which is to say most of the Park – bugs got much worse. However, I came well equipped, with the Bug Shirt based on a recommendation from local photographer Paul Marcellini (do not miss his excellent Everglades Photography E-book if heading towards the area). Even though, it was difficult to concentrate because of the loud buzzing around. The mesh used to keep mosquitoes off your face also makes everything look darker, which does not help at night. I used my headlamp, standing on the side for cross-lighting, to illuminate the dwarf pond cypress. Light on the horizon is from the Miami metro area. The clouds continued to enhance the sky, even at night !

I felt confident enough in my bug protection to walk a mile (each way) into Biscayne National Park, to photograph the mangrove coast at night, when the access road was closed. During the day, the light is always difficult there, but at night a lantern provided nice illumination for an image not commonly seen.

On this trip, I actually spent the bulk of my time in the Dry Tortugas, where the summer conditions were great, but based on what I saw, despite the uncomfort of the season, I plan to return at some point to the Everglades in summer.

See more images of Everglades National Park

History Channel 2014 calendar + National Parks ranked

For their official 2014 Calendar, the History Channel Club has chosen 12 of my National Parks images, including 12 parks not featured in their 2012 calendar: Wrangell St Elias, Arches, Biscayne, Grand Teton, Big Bend, Saguaro, Olympic, Death Valley, Shenandoah, Isle Royale, Redwood, and Haleakala.

Speaking of National Parks selections, The Active Times recently embarked on the almost Sisyphean (and akin to a parent picking a favorite child) task to rank all 59 of the National Parks, considering factors such as accessibility, the diversity of activities available, biodiversity and straight-up awe factor. What is The Active Times ? A relatively new website dedicated to the outdoors, fitness, endurance and adventure sports launched in June 2012 by former Forbes.com CEO Jim Spanfeller and John Rasmus, founding editor of Men’s Journal and National Geographic Adventure. In the process, they asked me for my list of top 20 parks – a good answer to the frequently asked question “what are your favorite national parks ?”. See how it differs from their final list of 59 parks ranked. I’d love to hear about YOUR favorites !

A summer visit to Dry Tortugas National Park

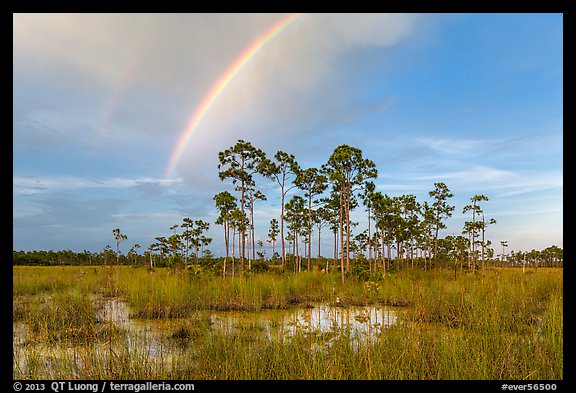
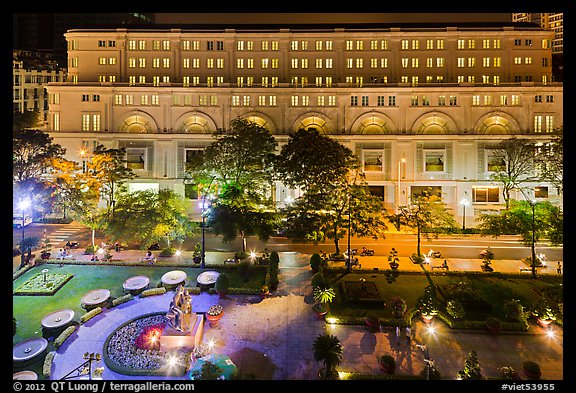
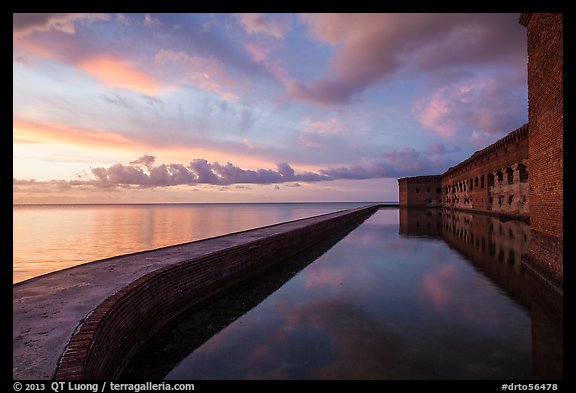
In July, I returned to Dry Tortugas National Park. Considering that I had visited the Park three times before, each visit longer than the previous, and that its main area, Garden Key, has a tiny size of 400 meters by 500 meters, 3 days/2 nights may sound a lot of time to spend, but this turned out to be barely enough to create the new images I had planned.

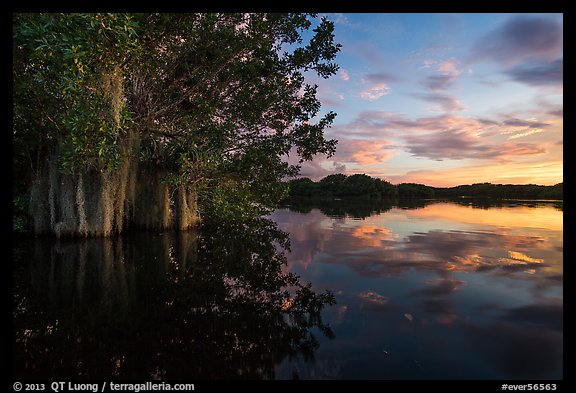
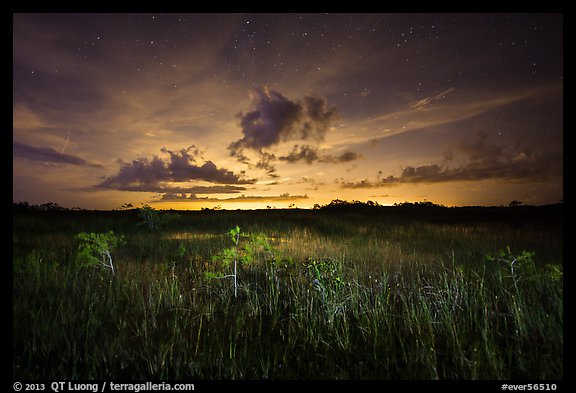
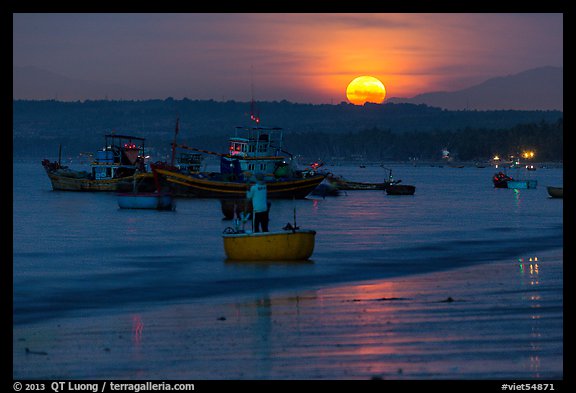
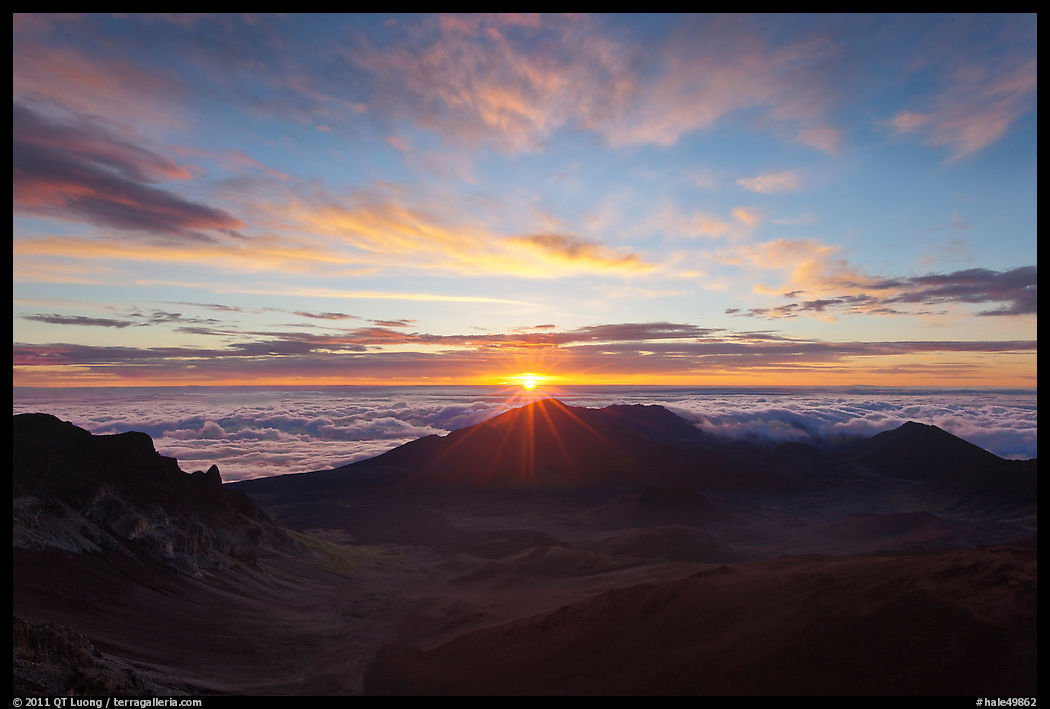
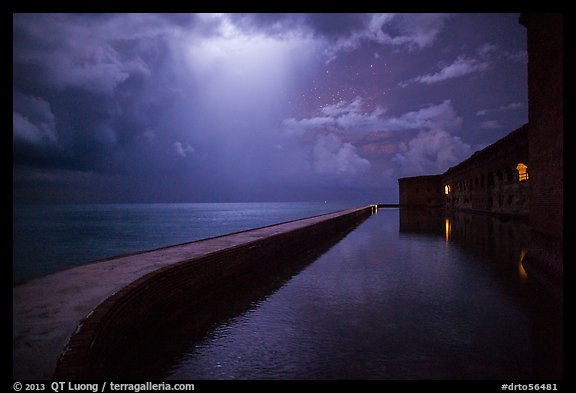
As described in much detail in post #37 of National Parks Photo Spots series, I have photographed one favorite view quite a few times, but had not been successful in capturing it with sunset colors. My first two visits were day trips. On my only overnight stay, a decade ago, cloudy skies meant that the sunset was a monochromatic blue. This time, I got two good chances to create images with a mix of warm and cold hues. On the first evening, the clouds were low, so the color was great looking West, but kind of muted looking North. The second evening was more favorable, so having two chances was useful.

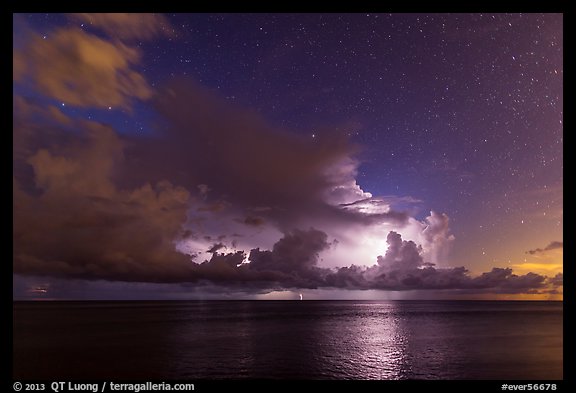
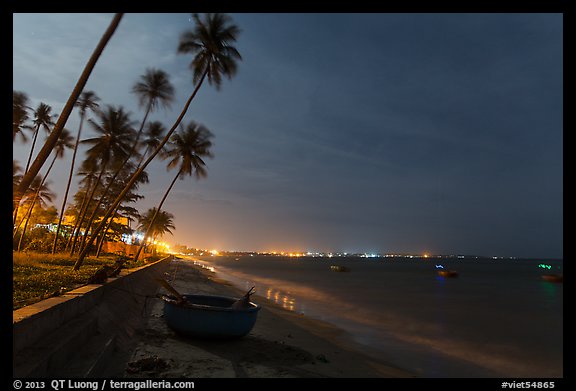
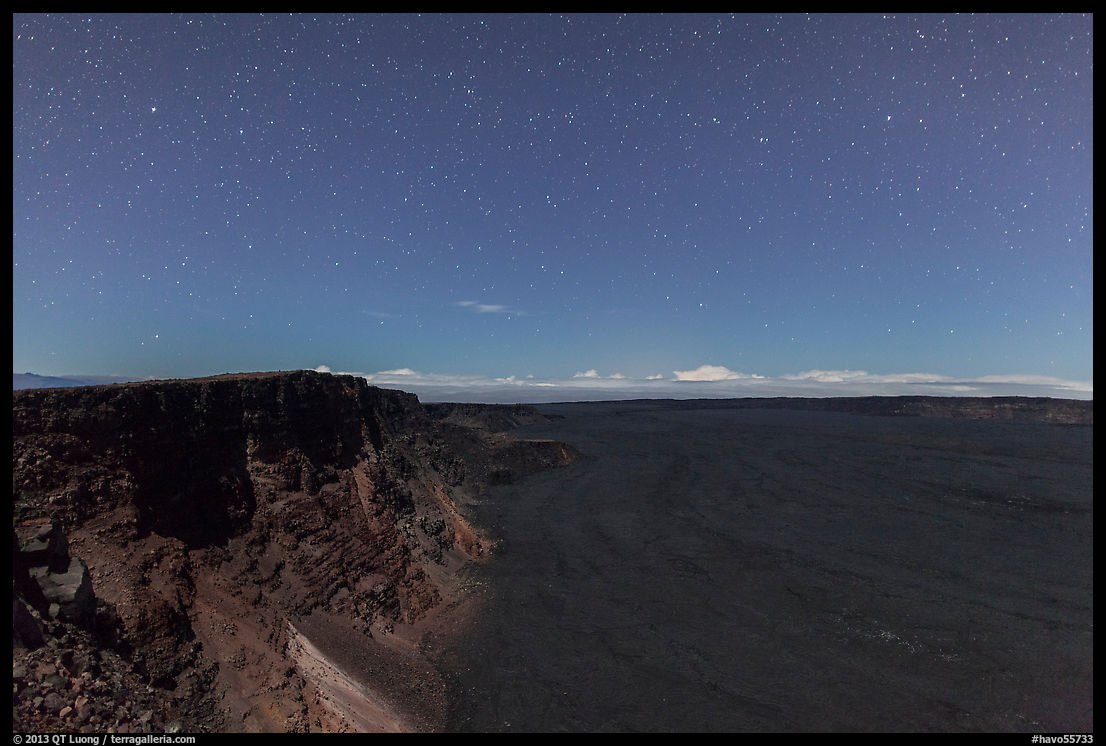
Last time I visited, the first full frame digital camera had yet to be released. This time, I felt confident shooting at ISO 3200 on the 5Dmk3, which let me work in the middle of the night. Despite the 1.4 maximum aperture of my 24mm lens, 30s (maximum shutter speed for point stars) were still necessary as the tropical sky was partly cloudy. Fortunately, distant thunderstorms intermittently illuminated the sky. In winter, the seas can be rough. With no waves sweeping over the seawall in the calmer weather of summer, I was able to leave my camera all night with an intervalometer and capture those flashes of light, part of a time-lapse sequence.

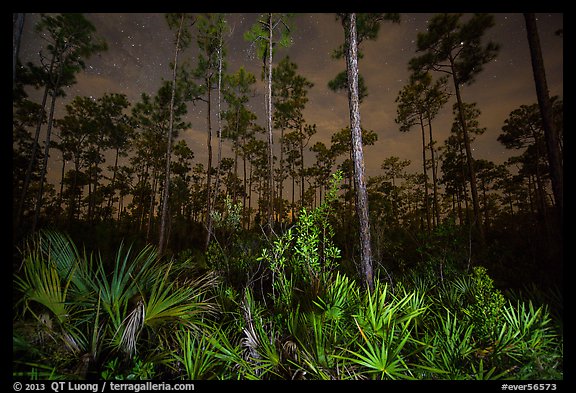
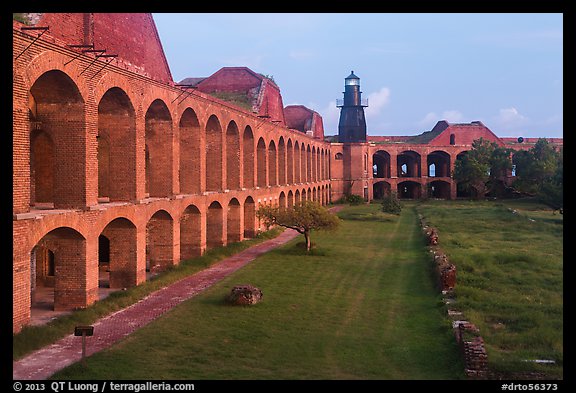
Camping on Dry Tortugas is a wonderful experience. A cluster of trees provide shade for most of the spots, which are only a minute walk from the beach. Because there is no freshwater on the island (“Dry”), there are no mosquitoes unlike on Florida mainland. During the day, up to 200 visitors arrive with the daily Yankee Freedom ferry and the seaplanes. A day visit doesn’t leave much time: the ferry arrives around 10.30, and leaves at 2:45. By mid-afternoon, day-trippers are gone, so that you share the island with at the most one or two dozen campers. In late afternoon, when the light is less favorable for underwater explorations, and the sun less harsh, the fort is deserted.

A bit of planning is necessary, since camping there is primitive: facilities are limited to clean chemical toilets, except during the time when the ferry is docked when you can use its facilities and get some iced water as well, and the Fort itself could make for an excellent emergency shelter. Everything you need, in particular food and water, has to be brought, however I had no difficulty handling all my gear, which included a huge duffel bag, heavy Pelican case containing a underwater housing, camera bag, and large cooler. Wheelbarrows are available at the deck in Key West and at Garden Key. The official stated 60 lbs per person luggage limit isn’t really enforced by the Yankee Freedom crew. The only thing I have to warm you is to make reservations for camping transportation well in advance. The National Park will not deny you a camping spot (first come, first serve, stake shady spots quickly !), but the Yankee Freedom has a strict limit on the number of campers they will transport on each trip. Besides ample time, sunset, sunrise, and night photography opportunities, you get to witness the daily cycles of life on the island, such as thousands of colorful hermit crabs of all sizes and shapes crawling up all the place, even trying to scale trees, in the summer evenings.

Garden Key is the centerpiece of the park and the only frequently visited key, but of 
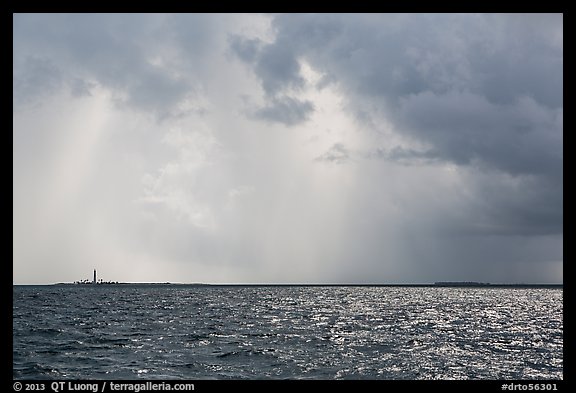
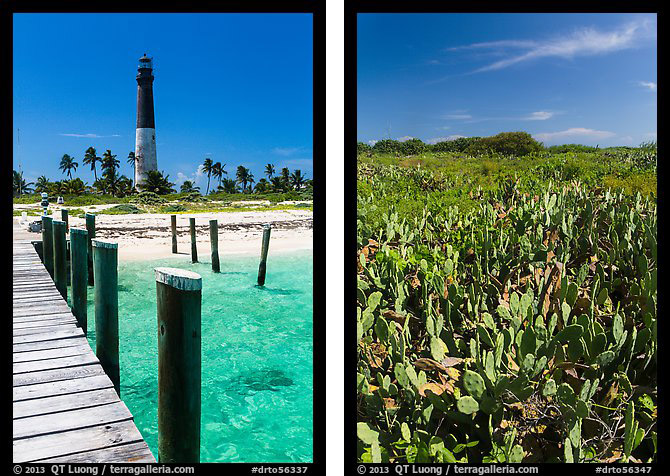
of the seven diminutive Keys that make up the Dry Tortugas, Loggerhead Key is actually the largest. Maybe because it is home to one of the tallest lighthouses in Florida, it appears deceptively close, but is separated from Garden Key by three miles of open ocean. Only a maximum number of 24 visitors are allowed each day on Loggerhead Key, but this number is almost never reached, since there is no public transportation from Garden Key to Loggerhead Key. In winter and spring, high winds make the crossing problematic. I rented a sea kayak in Key West from Marty Stonely, who specializes in renting kayaks to be taken to the Tortugas. Marty arranges for the kayak & gear to be delivered and picked-up at the ferry pier, and also provides safety equipment, including the essential marine radio. After observing the weather patterns on the first day, I became weary of the tropical storms. They could appear out of nowhere, at any time of the day. One minute, you are sweltering under the tropical sun, but before you know it, the temperature drops by 15 degrees, torrential rains soak you, and as you are buffeted by high winds, all of a sudden staying on course and keeping warm becomes a concern when you have no place to hide.

I was still planning to paddle solo to Loggerhead, but then I was fortunate that captain Glenn Patron, Gale, Ron, and Jean were also planning to sail to Loggerhead Key that day on their 50-foot sailboat Encore. I am extremely grateful to them for letting me ride along and for their kind hospitality on that day. On the way to Loggerhead Key, we did get hit by a tropical storm in the morning, and had to wait it out for more than one hour before we could dive the Windjammer. I was glad not to be on the water by myself since I am not sure I would have had the fortitude to continue in those conditions. Like the other keys of the Tortugas, Loggerhead Key is almost entirely covered in sand, with little arable land, so the vegetation is desert-like. There are also long and totally deserted beaches, but the main draw of Loggerhead Key are its outstanding reefs.

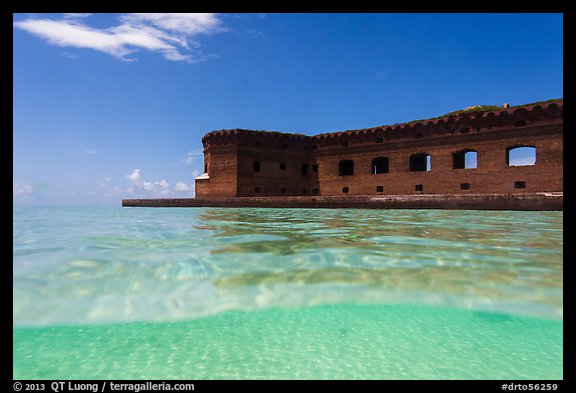
The total surface area of Dry Tortugas National Park is 64,701 acres, but only 104 acres are above water. This means that the park is more than 99% water. While winter is the popular season in Florida because of the cooler temperatures, lack of oppressive humidity, rain, and biting insects, summer is the better time for underwater activities, because the water is warmer, calmer, and clearer. I thought that a split-image would illustrate best the idea of the improbable Fort Jefferson rising out of pristine tropical green-turquoise waters. I photographed at mid-day so that more light would penetrate the water. To execute such an image, you need to have a large contact surface between optics and water. The Nikonos I previously used doesn’t work for this. This time, I had a 5Dmk2 with a 17-40 and a +2 diopter inside an Ikelite underwater housing equipped with a 8-inch dome port.

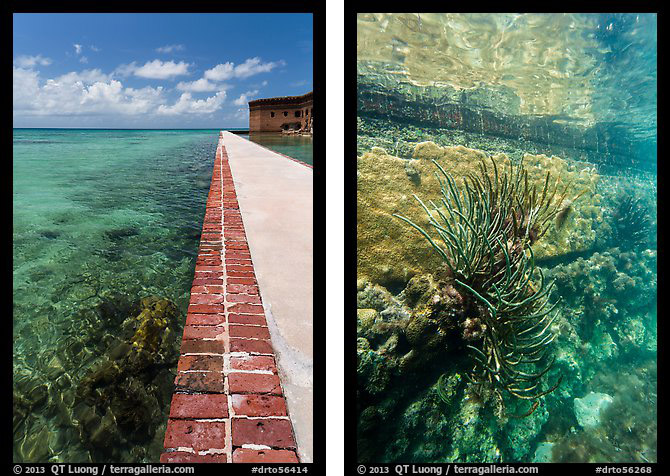
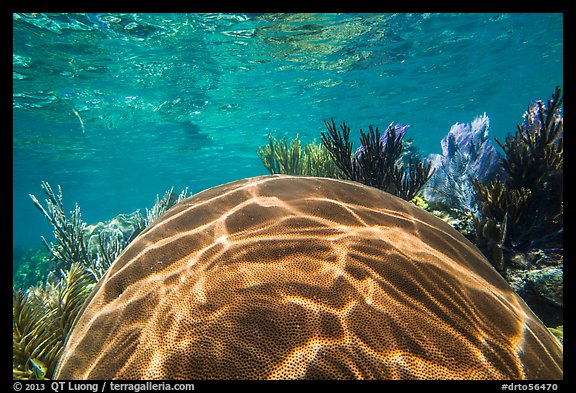
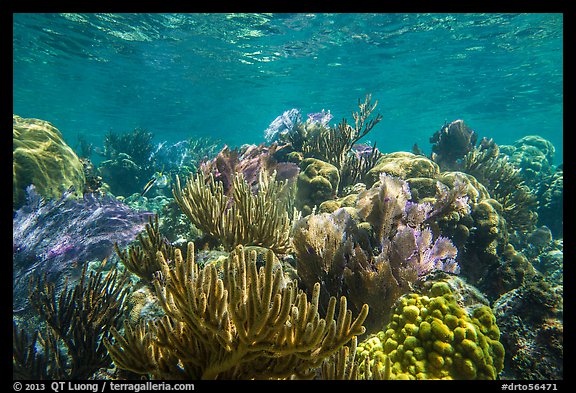
The reefs of Dry Tortugas lie in the Gulf of Mexico, at its juncture with the Atlantic Ocean and the Caribbean Sea. The intermixing of those three ecosystems results in a one-of-a-kind collection of marine life which is totally protected in the National Park and quite undisturbed because the remoteness of the location. Just outside the fort seawall, the snorkeling is already good, with an abundance of corals visible as you stroll the seawall, and it gets more interesting as you swim away.

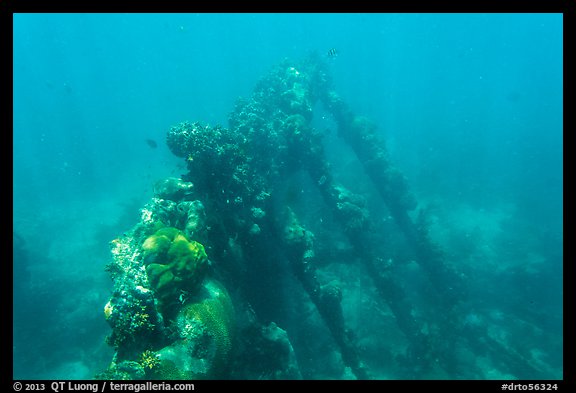
The best snorkeling in the park is found in two sites off Loggerhead Key. The Windjammer is the most popular dive site in the park. It is the nickname of a three-masted ship that wrecked on Loggerhead Reef in 1901 and since then has be resting in shallow water. The structure forms an artificial reef attracting a host of fish from small tropicals to huge jewfish. The maximum depth is 20 feet, with a small piece of wreckage breaking the surface, making the site also suitable for snorkeling. I wished I had scuba gear, since photographing while free-diving is much trickier with a large camera housing, however for logistical reasons, the only practical way to scuba dive the Tortugas is to come on a live-aboard diving boat.

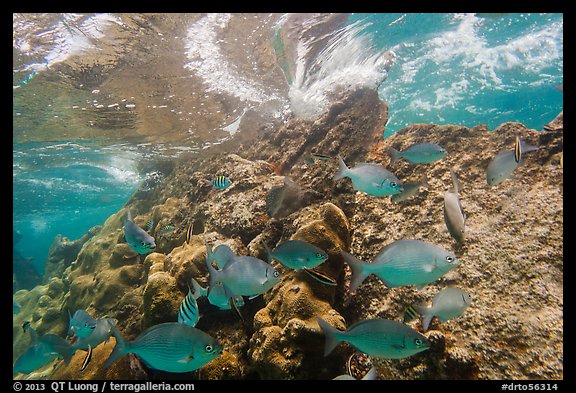
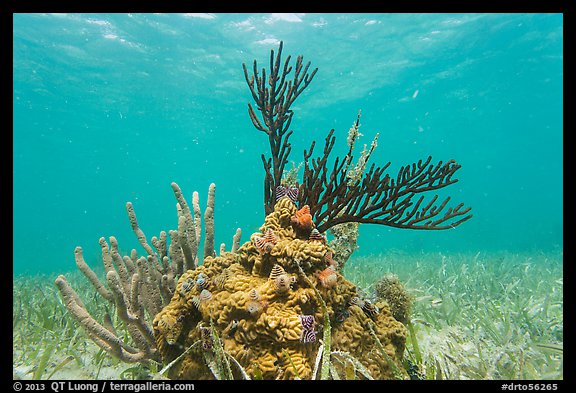
Located off the north side of Loggerhead Key, and easily accessed from the beach, Little Africa Reef (named for its shape), is protected and calm. It had the densest concentration of corals at shallow depth I saw anywhere. I could hardly find any sandy spot to stand, and the water was so shallow than you had to swim in zig-zag in order to avoid touching the corals. The shallow depth made it possible to capture vivid colors, even without a strobe, which is always difficult to handle while free-diving.

Our explorations of Loggerhead Key took an entire day. On my last day, I had to pack my gear to have it ready on the dock at 10:30, so the time went pretty fast. By comparison, see the perspective of a day traveling family on what to see and do in Dry Tortugas. In retrospect, I wished I had stayed for the maximum of three nights allowed, as there were still spots on and around the island that I did not explore, even though at this point my gallery of pictures of Dry Tortugas National Park is already the most comprehensive on the web.

Mui Ne Beach, Vietnam

The Ho Chi Minh City project is simply “The image of the President in the City”: in each of the photographs, all made in Ho Chi Minh City, there is a depiction of Ho Chi Minh, for instance as framed portrait, poster, sculpture, bust, post stamp, post card, or book cover. The continued presence of that image in several contexts amongst contemporary city life evokes several political and social issues related to communism, control, influences, history, and change, but rather than offering an answer, each photograph in the series remains open to individual interpretation. There is little contest that Ho Chi Minh was one of the most influential leaders of the 20th century (for the better or the worse, depending on whom you speak to), but nowadays that Ho Chi Minh City is at a center of a free-market economy, what is his legacy beyond a carefully cultivated figurehead image ? Is he still admired by the common people, or just a subject of a cult of personality ? Is he a sinister big-brother figure, an obsolete icon to whom nobody pays attention anymore, or a reassuringly familiar and respected symbol ? The photographs contain evidence for multiple readings.

Now for a contrast to this project, in this post I am presenting images of traditional – some would say eternal – Vietnam, photographed on the fishing beach of Mui Ne. I’ve posted before about the sand dunes, do you recognize this image, a gift to my subject ?. Once a sleepy fishing village famous for its fish sauce, Mui Ne has become in the last decade a popular resort town, whose main street is lined up with so many resorts on the ocean side that tourists outnumber locals on the sidewalks. Yet life hasn’t changed much over the years elsewhere.

If you go just a kilometer north of the main tourist area, the resorts become more sparse. Instead of catering to Western or Russian foreigners, their clientele consists of domestic tourists, mostly Saigonese on a quick getaway. Last December, while traveling with my family, we stayed at one of those resorts. The rate was good, the rooms less so. The folks from the neighboring room invited me to share some fish and beer. Unlike in the more expensive tourist area, the resort with surrounded by private houses belonging to fishermen. The following images were all made from less than a hundred yards from our beach-facing room from which we could observe their activities from dawn to dusk (more images).

A few more kilometers north, you get to the fishing village (Lang Chai). Down a long flight of stairs, the beach there is an early morning gathering place where fish and shell sellers wait for the fresh catch from on night’s work on the sea (more images).

Ho Chi Minh City project

For family reasons, I’ve been spending a fair amount of time in Ho Chi Minh City almost every year. Besides photographing sights all over the city, as well as many aspects of everyday life, I’ve been working on a more focused project. Here are a dozen images from that series. Can you guess what the series is about – the common element in each image ? Answer in the next blog post ! More images from the series and hints on Facebook and Google+.

Pinnacles National Park

I’ve not blogged much recently because I’ve been traveling this summer. I’ve quite a backlog of National Parks images to edit and process. The ones that I did process are from our newest National Park: Pinnacles.

The legislation for the new status was signed by President Barack Obama on Thursday, January 10, 2013. On January 11, the first day Pinnacles opened as a National Park, I arrived at the East Entrance at the crack of dawn. Instead of the spectacular rock formations for which the park is named, the first image of the new National Park that I made depicts grasses and shrubs covered with a layer of frost which would melt away a mere half-an-hour later. It is almost certainly the first large format photograph made in Pinnacles National Park.

As part of my National Park project, in the first half of 2013, I photographed Pinnacles more thoroughly, resulting in maybe the second most extensive gallery of photos of Pinnacles on the web. One afternoon, in order to photograph the namesake rock formations, I hiked up the High Peaks (1,200 feet elevation gain) with my 50 lbs large format camera bag to photograph at sunset. The sunset was weak. I didn’t take a single picture with the 5×7 that day and hiked down entirely in the dark. After a short night, the next day, I hiked up in the dark, arriving at a pre-scouted location half an hour before sunrise. However, just at sunrise, some clouds lighted unexpectedly and didn’t fit the composition I had set up with the 5×7. I frantically tried to recompose: take the holder out, open the lens, get the dark cloth on, move the camera, close the lens, stop down the lens, re-insert holder, re-meter. By the time I was done, the light, which lasted only minutes, was gone. I was left with he following large-format image:

I like this pair of images for the contrast between the cold and the warm, the intimate and the spectacular.

Pinnacles was one of the oldest national monuments in the nation, having been established in 1908 by none other than President Theodore Roosevelt using the power given him in the Antiquities Act of 1906. At that time, though, there were no drivable roads into the Monument, and in 1922, the superintendent of Yosemite National Park, after a quick survey visit, even recommended that the monument be abandoned. By the late 20th century, the value of the area had become clear. Only Congress can designate a national park, but many national parks began as national monuments designated by presidents.

I’ll dwell a bit of the history of the bill which re-designated Pinnacles into a National Park because it sheds some light on the workings of the US Congress. It is the brainchild of Democratic Congressman Sam Farr who represents California Central Coast (Carmel – CA-20) district – who had been working on this since since he was elected to Congress in 1994. Its main goal was in fact to boost tourism dollars to the local area, since National Parks draw more visitation than National Monuments. The legislation consists in essence of just designation changes: Pinnacles National Monument becomes Pinnacles National Park, Pinnacles Wilderness within becomes Hain Wilderness (after Schuler Hain, an early 20th century proponent of Pinnacles National Monument), and is expended by 3,000 acres using existing park land. You’d think that given that there are almost no costs, it wouldn’t that hard to pass.

However, first introduced in the House of Representatives in 2009, the bill got nowhere, dying inside a committee without getting to the floor for a vote. In 2011, Sam Farr tried again, with the help of a Republican ally (Jeff Denham CA-19) who co-sponsored the bill. This time with bipartisan support, the bill cleared up the House in July 31, 2012, but not before Sam Farr was forced in the House subcommittee to remove expansion of the Hain Wilderness within the park – that Congress was the 1st one not to designate any single additional acre of Wilderness. Senate was to vote quickly on the bill, but a senator put a “hold” on it using arcane rules, because of an unrelated dispute about public lands and fisheries in South-East Alaska from where the relevant senate committee chairwoman hails. Without action in the senate, when 2012 ends, the whole process would have had to be restarted again from the House. Eventually the Senate got their act together at the 11th hour, passing the bill on Dec 30, 2012.

I had visited Pinnacles National Monument in the year I arrived in California, 1993, for the same reason that initially drew me to Yosemite: rock climbing. I also occasionally returned to Pinnacles just for hiking. Although other areas have more resources, I am pleased with the recognition Pinnacles is getting. Only an hour and half away by road, Pinnacles is the closest national park to where I live. The park’s area is quite small. At 38.3 sq miles (99.2 sq km), it is one of our smallest National Parks. But as it is not crossed by a road, the park feels larger, since you have to explore it on foot. To my surprise, I found within the Pinnacles one of the steepest trails that I have ever hiked, kind of similar to Half-Dome, but with barbed wired to pull yourself up instead of cables. For 12 miles, I did not see a single soul. It remains to be seen how the re-designation will increase park visitation. I don’t expect the park do become crowded. However, as the trailhead parking for Bear Gulch, the most popular area in the park, is shockingly small, I could foresee a shuttle becoming mandatory on busy weekends in the spring.

Unlike parks like Yosemite, Pinnacles does not have icons, so the park rewards personal seeing. Only an hour and half away from the major metropolitan areas of the San Francisco Bay area, an isolated, wild, and quiet area where a variety of subjects awaits your exploration: spectacular rock formations, expansive vistas, rare talus caves, a beautiful and reflective body of water, an abundance of wildflowers in the spring, and dark skies. I’ll write in more detail about my findings in Pinnacles National Park at another times, but for now I’ll let the images speak for themselves. Please let me know if you have any favorites, and if you have any questions about locations, feel free to ask.

More images of Pinnacles National Park

Hawaii Volcanoes time-lapse video: notes and stills

Thanks to everybody for the interest in my newly released video, Hawaii Volcanoes, which was played more than 35,000 times on Vimeo in the first week. Although information about the scenes depicted is available elsewhere on the blog, I wrote this post to collect it in a single spot for the benefit of viewers. High-res stills from the video may be downloaded for personal use or posted (with link & credit) in write-ups about the video.

The rising sun colors the sky above the immense summit caldera of Mauna Loa, an active volcano, as evidenced by the fumaroles on the floor. Few get to see this scene: I did not meet a single person there for the entire day. Hiking Mauna Loa is an arduous 13 mile journey on mostly trail-less lava rocks during which I did not see a single plant. This could be another planet.

Next to the Kilauea caldera, fumaroles and endemic Ohia trees (see also next image) are backlit by the rising sun. The Hawaiian islands are further away from a major land mass than any other. Plants who managed to make the voyage to the once barren islands evolved into more specialized life forms. Over 80 percent of Hawaii’s native flora and fauna is found nowhere else in the world.

Kilauea is the world’s most active volcano, erupting continuously for thirty years. Halemaumau crater – home to Pele, Goddess of Hawaiian Volcanoes according to the traditions of Hawaiian mythology – is a pit crater within Kilauea caldera. During my two first visits there, a decade ago, I could walk to the edge of the crater, which is no longer possible because in 2008, a series of explosive eruptions awakened the Halemaumau crater, which now spews a dangerous sulfur dioxide plume day and night.

Lava flows several miles from the center of the eruption, and eventually meets the ocean, forming a acid gas plume when it contacts water. Unlike most, the lava from Hawaii volcanoes is very fluid, creating the rope-like patterns. As there is little danger of explosion, I could approach the 2000 Fahrenheit degrees lava to a few feet, until the heat became unbearable.

One of the most mesmerizing spectacles of nature you will witness is glowing lava cascading into the ocean to form new land in front of your eyes, which is instantly destroyed by the action of the ocean. I had to be careful not to stand on unstable lava cliffs, since they are known to collapse into the ocean without warning. More about photographing the lava ocean entry in Hawaii.

Most of the time, lava flows underneath the surface. The first time I returned at night, its glow through cracks startled me, since by day I had stepped onto the freshly hardened lava, unsuspecting that molten lava was flowing underfoot. In the background, lava cascading into the ocean illuminates the plume and land. After everybody had left, I stayed to record the pulse of the flow over an entire night.

At night, molten lava, forming a lake at shallow depth within the Halemaumau vent, create a spectacular incandescent illumination. The juxtaposition with the Milky Way shows creation through violent gases from two time eras, the distant past of the stars, and the present on earth. I captured it appearing in a weather break above by setting up my camera in driving rain, protecting it with an improvised cover so I could leave it all night.

At 10,500 feet, Haleakala is one of the world’s largest dormant volcanoes. As a tall peak on an island, its summit is often floating above clouds, on top of the inversion layer separating lower maritime air from upper atmospheric air. The sunrise from the top of the crater is considered by many to be the “most beautiful sunrise in the world”, prompting many to leave their resorts at 2am to witness it.

In an opening in clouds, the distinctive shield volcano shape of Mauna Loa on the Big Island is seen one island away from Haleakala on Maui. Mauna Loa’s very gently slopping 10000 cubic miles makes it the world’s most massive mountain. The world’s largest volcano, it rises just 13700 feet above sea level, but its 42000 feet below the sea make it the tallest mountain from base to summit.

Despite temperatures (in Hawaii !) that left my water bottle frozen solid in the morning, fierce winds, and altitude sickness, I camped on the 13700 feet Mauna Loa summit, above 600 feet vertical cliffs, so that I could capture an all-night time-lapse sequence, likely the first ever made in this place. More about Hiking Mauna Loa summit via Observatory Trail

Check out my extensive collection of images of Hawaii Volcanoes National Park.

Making 1st time-lapse video: Hawaii Volcanoes

I have just released my first time-lapse short. Best viewed Full Screen with sound !

Hawaii Volcanoes from QT Luong on Vimeo.

I have actually been capturing time-lapse and video footage for several years now, so you may be wondering why this comes out only now. This blog post is a long answer to that question.

The nature of photography, which catches an instant in time, is such that a single photograph can communicate powerfully – even though well-sequenced projects go deeper. By contrast, video is intrinsically a story-telling medium. To tell a story, you need to put many shots together so that the end product is a film. Looking at the successful time-lapse film-makers on the internet, like TSO or Timescapes, I realized that they don’t upload many movies, just a few very good ones. I wanted my first completed video to be good. Did I achieve my goal ? I’ll let you judge.

This turned out to be an arduous journey which has taught me a new level of respect for film-makers. No wonder a film is almost always a team effort. It took me a while to learn the skills to put a short together. Although you use the same camera, shooting time-lapse, especially at night, is much more demanding than shooting stills, because everything has to work for the next few hours, as opposed to just for a few seconds. The careful planning, deliberate approach, time spent, cumbersome gear, and large amount of data captured (temporally instead of spatially) reminded me of large format photography. Changing light, such as night-to-day changes brings a new set of challenges, since you are trying to capture smoothly a transition that occurs over a range of over 20 f-stops.

Then, there is the post-production. Software such as Adobe Premiere Pro and After Effects make Photoshop look very simple. For many important functions, there are not even menu items available: you need to know the right keyboard shortcuts. Even finding the right music took a long time. I had to check out hundreds of tracks – you cannot evaluate them at a glimpse, like a photo editor does, you need to listen. Unless the music was composed for your movie, you need to do sound editing to synchronize it with the visuals. All those technical hurdles are secondary compared with the challenge of deciding what story to tell, and how.

The other thing that I didn’t have enough of was footage. The clips need to be compelling by themselves, but also fit in the puzzle of a larger story. On the other hand, it is easy to miss shooting something that you’ll need later if you don’t have the story planned in advance. Like many of my other pursuits, this one started in Yosemite. My first capture consisted of stars rotating in a perfect circle above the face of El Capitan. However, just like in photography, over the recent years existing Yosemite time-lapse work set the bar intimidatingly high.

I was eventually inspired by the volcanoes of Hawaii. In 2001, I “accidentally” captured a time-lapse in the process of photographing the Milky Way above the Halemaumau vent in Hawaii Volcanoes National Park, after setting up the camera in the rain and leaving there all night. In Haleakala National Park, the clouds below were beautiful in stills, but I felt that their motion was even more mesmerizing. The volcanoes of Hawaii are the tallest mountains situated on an island, so the weather on mountain tops and flanks can be particularly dynamic. The landscape itself is one of the most dynamic on earth thanks to the flow of lava and the various volcanic steam sources. I thought that motion would be particularly well suited for showcasing the raw power of the eruption.

I noticed that although there is good lava footage available, there was no video that covered Hawaii Volcanoes National Park from sea to summit. This may be because filming requires backpacking on difficult volcanic terrain, including overnight stays near hot active lava flows as well as at the 13700 feet Mauna Loa summit in sub-freezing temperatures. During this winter’s trip to the park, I managed to capture enough footage in various areas to complete this first short, on which I have been working for the past few months.

Thanks for watching, and let me know how you like it.

Hiking Mauna Loa summit via Observatory Trail

Part 3 of 3: 1 | 2 | 3

As part of my sea-to-summit visit of Hawaii Volcanoes National Park, after photographing the lava ocean entry and exploring around and above Kilauea, I hiked to the top of Mauna Loa, the world’s largest volcano. In this post, you will learn enough to plan your own trip there, or at least to know what you would see on this difficult, but exceptional and rewarding walk.

Why ?

Mauna Loa is the largest volcano in the world, spanning a maximum width of 75 mi (120 km), and making up more than half of the surface area of the island of Hawaii. If we consider its underwater part of 16,400 ft (5,000 m) to the sea floor in addition to its 13,680 ft (4,170 m) height, Mauna Loa rises 30,085 ft (9,170 m) from base to peak, more than the 29,029 ft (8,848 m) elevation of Mount Everest from sea level, and twice its elevation from base. The volume of Mauna Loa is approximately 10000 cubic miles, more than 100 times the size of a Cascade volcano such as Mt. St. Helens. Mauna Loa is an active volcano, which last erupted in 1984. Fumeroles can be seen in the summit caldera, most clearly at sunrise and sunset.

Mauna Loa is not to be confused with the other large volcano on Hawaii, Mauna Kea. Although Mauna Kea is slightly higher at 13,796 ft (4,205 m), its summit, home to a large complex of astronomical observatories, is easily accessible by a road and heavily visited. By contrast, you need to hike to the Mauna Loa summit. No matter which route is chosen, those are the most difficult trails in Hawaii. The quiet and solitude are exceptional. You are almost sure to stand by yourself on the top. For the two days I was on the mountain, I saw only one other party, and this was near the trailhead.

The hiking is an otherworldly journey. Hiking from the Mauna Loa observatory, for the whole length of the journey, I did not see a single plant, not even one of the pionnering ferns. This is like watching the bare bones of the earth. You could be on another planet. I expected the hike to be monotonous because it is all lava, but I was surprised by the variety of the lava landscape and the interesting variations in colors (reds, greens) and textures.

Mauna Loa looks unimpressive from a distance, because it is a shield volcano. Hawaii lava flows are particularly fluid, which allow them to travel farther than lava from more explosive volcanoes, resulting in accumulation of broad sheets of lava, building up the volcano in the form of a warrior’s shield with a slope of just 6%. However, the summit itself turned out not to be a flat expense. I knew that it was made of a huge caldera, but this didn’t prepare me for the experience of standing at the very edge of vertical cliffs six hundred feet tall, way above the spectacular caldera floor where ripples of hardened lava looked like waves in an ocean.

Choosing the route

To reach the summit, there are a number of trails, of which only two are traveled with any regularity, the Mauna Loa Trail, and the Observatory Trail. Both trails meet at a four-way junction situated near the North Pit (13019 ft), a secondary shallow caldera at the northern edge of the Mokuaweoweo summit caldera. The Mauna Loa Cabin (13250 ft) is situated on the East side of the summit caldera, 2.1 miles from the North Pit. The summit (13,680 ft) is situated on the opposite (West) side of the caldera, 2.5 miles from the North Pit.

The most popular route, the Mauna Loa trail, starts at the Mauna Overlook at the end of Mauna Loa road in Hawaii Volcanoes National park (6662 ft). The distance to the North Pit is 17 miles, so total round trip distance to the summit with a stay at the Mauna Loa Cabin is 44 miles, which take most hikers 4 days to complete. Fortunately, you do not have to carry a shelter (although a bivy bag can be useful in an emergency) nor all your water, since there are two first-come, first-serve cabins on the trail with water catchment reservoirs (boiling or filtration required), the Puu Ulaula Rest House (10035 ft) 7.5 miles from the trailhead, and the Mauna Loa Cabin previously mentioned.

The lesser-used Observatory trail starts at the Mauna Loa Observatory (11040 ft). From there, it is 3.8 miles to the North Pit. The round-trip distance to the summit is only 12.6 miles (add 4.2 miles if staying at the Mauna Loa Cabin) but the trail is steeper and more rough. It is possible to do it as a day trip (not a casual one !) but an overnight is preferable for most. Because of the high starting point, you do not get a chance to acclimatize progressively to altitude like on the Mauna Loa trail. I very rarely get altitude sickness, yet when sleeping at the Mauna Loa summit, I suffered a mild headache, despite spending the previous nights at Kilauea (4000 ft), Mauna Loa overlook (6660 ft), and the Mauna Loa Observatory (11040 ft) to which I had driven the night before starting the hike. It might have been worse – forcing me to descent prematurily – if I had not acclimatized before.

Because the Mauna Loa Cabin is situated opposite to the Summit across the caldera, many hikers who stay at the Mauna Loa cabin bypass the summit. Those who don’t get there at mid-day, since nobody really wants to hike the 4.6 miles from the Cabin to the Summit (count on 1 mile per hour at most) in the dark. I chose instead to bypass the Cabin, so that I could photograph from the Summit at sunrise, sunset, and during the night, although this would mean having to carry a tent, sleeping pad, extra water, and camping in cold and exposed conditions instead of taking advantage of the comfort and protection offered by the Cabin.

The Mauna Loa trail is said to be the more scenic of the two trails, however because of my limited time on the island, I chose to hike the Observatory trail. For a group, a good alternative would be to hike one-way using a shuttle. It takes about three hours to drive from the Mauna Loa Overlook to the Mauna Loa Observatory. Hawaii Outdoor Guides 888-886-7060 can organize a shuttle service for $100/person, with a minimum of $300.

Getting ready

The summit is situated above the usual inversion layer, which means that it is often dry and sunny there, even though at lower elevations (and in particular around Kilauea) it rains all day. I hiked down in clear weather, but then drove the Observatory road in wet conditions with no visibility. However, snow is possible at any time of the year. Hiking with snow on the ground is very tricky, as the trail would be very difficult to follow (likewise in bad weather) and the rocks slippery. During my previous visit to Hawaii, in May, a snowstorm prevented me from making the trip to Mauna Loa. I settled for a Mauna Kea visit, determined to return another time to attempt Mauna Kea.

The base of Mauna Loa is in the tropics, but in February the summit felt more like Alaska. I kept one of my water bottles inside my sleeping bag at night. The one left outside froze overnight. Although temperatures can be warmer in the summer, they still drop below freezing at night. The temperatures are compounded by high winds. On the second day, the wind howled all the way from the summit down to the trailhead. Even though I was moving most of the time, I had to wear my hat, fleece, top and bottom shell to stay warm.

I packed like I would for a winter mountaineering ascent. I carried the same sleeping bag that I used to climb Mt McKinley, because that is the only winter sleeping bag that I own. For my night on the summit, the -30F rated bag did not feel too warm used inside a one-person tent. Since I expected to be camping on lava rock where stakes would not penetrate, I rigged the tent’s anchoring points with long loops of string. In addition, I carried four quarts of water, since I didn’t go to the cabin. There are no reliable water sources ouside of the cabins, including at both trailheads. Since the air is so dry, drinking plenty, even in cold temperatures, is necessary to avoid altitude sickness. Sunscreen and lipbalm are also needed at that elevation. I normally backpack wearing trail running shoes, but for this hike, I wore lightweight hiking shoes and was glad for the additional support and protection. Because of the temperatures, hot meals and drinks are much appreciated. I found cartridges for my ultralight butane/propane stove at the ACE hardware store in Volcano near the Park entrance.

Overnight hiking requires a permit from the backcountry office of Hawaii Volcanoes National Park. This improves your safety. The rangers provide information about the weather, cabins and cisterns water levels, and go through a checklist to make sure you are adequately experienced and equiped. Here is the official trail information, some contributed trip reports, and a most useful trail guide with landmark mileages.

Hiking the Observatory Trail

The road to the Mauna Loa Observatory is unmarked. Driving on the Saddle Road, I missed it at first. It branches out not too far from the Mauna Kea road, slightly East of it, at the base of a small volcanic cone. It took me 45 min to drive its 17 narrow and twisting miles. In the past it was marred by big potholes, but when I was there in Feb 2013, it had been recently resurfaced, so my rental minivan was totally adequate. The road ends at a gate – unlike for the Mauna Kea observatories, and there are no facilities. Just before the gate, there is an unpaved jeep road below, on the right. Unless you have an expedition-grade 4WD high clearance vehicle, this is where you park your car. After walking along that road for a third of a mile, you see a trail sign on your left. The trail is much shorter than the road because it cuts through switchbacks. I’ve read that driving the rocky jeep road can take more time than hiking.

For approximately two miles, the trail consists just of rock piles (cairns, locally called “Ahu”) marking an undistinct itinerary. I made sure to spot the next one before leaving the cairn where I was. On my way down from the summit, I found myself still on the trail, half a mile from the trailhead, after dark. I didn’t get lost (I used a GPS to mark waypoints on my way up), but it took me an unusually long time to finish the trail, because it is extremely difficult to spot lava rock cairns at night. Do not get caught on the trail after sunset unless you carry a search-grade flashlight (500+ lumens). It would also be difficult to see those cairns in a whiteout, which is why some recommend waiting them out instead of trying to hike – and carrying survival gear to handle being stranded overnight even if setting out for a day hike. The trail sections on aa lava have been flattened and worn out, so they are clearly easier to hike than the surrounding trail-less lava. When you are hiking on smoother pahoehoe lava, you may have the impression that hiking outside the trail wouldn’t make a difference. That would be a mistake, as you’d soon end up in rough aa lava flows, or get lost, as there are no distinctive terrain features to orient yourself. In 1981, a visitor who wandered off trail on Mauna Loa was never found despite a week of the most extensive search in the Park’s history.

For another third of a mile, the trail joins the road – which cannot not be driven past the National Park boundary, because of a very solidly locked gate. At that point, I followed a trail sign on the right, and for the next half mile, enjoyed the only well-defined portion of the trail, as it follows green olivine cinders bordered by a very dark lava flow. After crossing the jeep road a last time, and hiking another half-mile, I reached the junction with the Mauna Loa Trail (17 miles) , Summit Cabin trail (2.1 miles), and Mauna Loa Summit trail (2.5 miles). Next to the junction, there is a shelter built out of lava rock. Called Jaggar’s Pit – named after the volcanologist and founder of the Hawaiian Volcano Observatory, Thomas Jaggar who spent many nights there while watching eruptions – it is a mere hole in the ground enhanced by rock walls and stairs descending into the pit. On the second day of my hike, this was the only place where I was able to get some respite from the wind after leaving the summit.

The junction is almost at the edge of the summit caldera, which would be easy to access, as it is almost at the same level (13018 feet). The summit was visible in the distance, but those last 2.5 miles felt some of the longest I had ever hiked. I understood why getting to the summit of Mauna Loa is so tough: you are walking all the time on unstable lava rocks, at high altitude, and unlike when hiking other, steeper mountains, you are staying at high altitude for an extended time. When I reached the summit, marked by a huge cairn festooned with ritual offerings, since this was uncertain from the beginning, I was delighted to find an excellent camping spot surprisingly sheltered from the wind. Completing the 360 degrees view, an older volcano emerged from a sea of clouds on the West.

At this elevation’s dry atmosphere, the sky shined with exceptional clarity thanks to the lack of nearby light sources – the brightest of them being the glow of the Halemaumau vent faintly visible in the distance. After dark, only a few yards from the tent, I set-up a 24mm f/1.4 lens on the Canon 5D mk2 for an all-night time-lapse sequence which captured the shadow projected by the quarter moon moving across the immense caldera, likely the first ever made in this place. I woke up one hour before sunrise to monitor the camera and update settings as night turned into day. The spectacle of the changing light and color at sunrise mesmerized me. I felt so privileged to be able to witness those moments from this spot.

Since I had brought only one tripod, I had to wait for the light to brighten before I could use my other camera, a Canon 5D mk3, to make hand-held landscape photographs in the other direction, making good use of the stabilized 24-105mm f/4 lens to create images that I’ve never seen done before at sunrise. The 600 feet of elevation gain from the junction meant that I was standing 600 feet right above the caldera floor, giving me an entirely different perspective than from the junction over this spectacular feature of Hawaii that only few get to see.

More images of Hawaii Volcanoes National Park

Part 3 of 3: 1 | 2 | 3

Exploring around and above Kilauea in Hawaii Volcanoes National Park

Part 2 of 3 : 1 | 2 | 3

After photographing the lava ocean entry, my other main goal in this sea-to-summit trip was to hike to the top of Mauna Loa. Altitude sickness is a frequent problem for hikers going from low elevations to the summit – in Hawaii, most people stay close to the beach, which is sea level. In order to acclimatize a bit, I spent some time around and above the Kilauea area of Hawaii Volcanoes National Park. Kilauea is at about 4000 feet elevation, where it can gets surprisingly cold and wet.

On my previous visit to the area, I had some success photographing the Halemaumau vent, so this time I focused on different areas of the Halemaumau crater. Shot backlit at sunrise, the otherwise ordinary-looking Steaming Bluff took an ethereal quality.

In rainy weather, one of my favorite spots in the park is the short hike to the Thurston Lava Tube. The Tube itself is not great to photograph, but on the way you’ll cross one of the lushest spot in the park, a wonderful rainforest with giant ferns towering above your head (great for close ups too).

The Kilauea Iki trail is one of my favorite trails on the entire Big Island. It is a moderate hike of about 3 miles with about 450 feet of elevation gain/loss which offers a great variety of terrain. It starts in the rain forest nearby the Thurston Lava Tube trail.

You go suddenly from the ancient forest to the newly created maw of the crater floor, where just a few plants cling to life. The contrast couldn’t be more dramatic.

The trail traverses the entire Kilauea Iki crater, which just a few decades ago was a lava lake, offering a close view of different types of lava formations.

It then takes you back through the forest, with some glimpses of the crater you’ve just hiked across. Because the crater is surrounded by a rain forest, weather can change very quickly there, turning from sunny to showers in an instant.

At the start of the Mauna Loa Road, The one-mile Kīpukapuaulu trail – another rainy day favorite – explores a hot spot of biological diversity, with more native tree species per acre than any other forest in the park.

The essence of this habitat is captured in its name kipuka (an island of ancient vegetation surrounded by a sea of younger lava flows), pua (flower), ulu (growing).

The underlying lava there is more than 8,000 year old, while the lava around the kipuka is much younger, at around 600 year old. More than 10 feet of soil has supported thousands of years of plant succession, resulting in huge, mature trees.

Mauna Loa Road, for the most part one-lane, winds up its way for 11 miles which can take up to 45min to drive. On the way, you can observe how the vegetation changes as you gain almost 2600 feet of elevation. In overcast or rainy conditions, the beautiful dryland forest is a great subject.

The terminus of the road is the Mauna Loa Overlook, from which you can look at the forest below, and in the distance, the Halemaumau crater and plume if the weather is clear. Notice how small it appears in the image above. Super-telephoto required for the image below ! The light there is best at sunrise, which was convenient for me to capture as I slept there to acclimatize.

The Mauna Loa Overlook is also the trailhead for the Mauna Loa trail, which leads to the summit of Mauna Loa, an adventure I’ll describe in great detail in the next post.

More images of Hawaii Volcanoes National Park

Part 2 of 3 : 1 | 2 | 3