Nikon 14-24 lens review from a Canon user
7 Comments
This is a review of the Nikon 14-24 f/2.8 lens from the point of view of a Canon user. However, Nikon users will find the sections about filters and focus shift of interest as well.
Canon has many great lens offerings, but their area of weakness has long been the wide-angles. Both the two Canon wide angle zooms deliver unimpressive performance unless stopped down at least two stops, and even though the corners are significantly trailing in sharpness compared to central areas.
On the other hand, the Nikkor AF-S 14-24mm f/2.8G ED is considered by many as the best wide-angle zoom ever made. As I was looking for an ultra-wide angle lens that I could use wide open for night photography, I looked at the 14-24. It is an expensive lens (currently $2000 at Amazon), fraught with several drawbacks, but consider that the Canon 14mm/2.8 costs more, and in those comparisons was clearly inferior, and suddenly it becomes a reasonable proposition.
A bulky lens
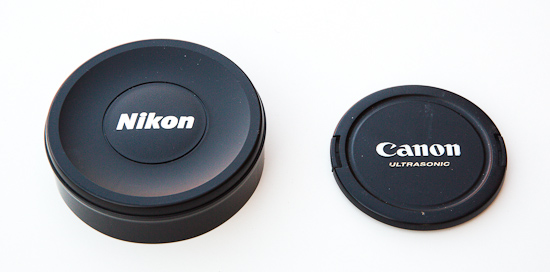
The 14-24 is quite big and heavy. It weights a bit over two pounds (969g), has a front diameter and length of about 5″. The front element is curved like a fish-eye lens – although this is a rectilinear lens, making it quite exposed, and rendering the use of filters difficult (more on that later). It looks like Nikon set out to design an exceptional wide-angle lens (they succeeded) with a no-compromise design. Canon users will notice that both infinity focus and longest focal length are on the left, whereas on Canon lenses they are on the right. Here a picture of the Canon 16-35 and the Nikon 14-24 side by side. Notice the size difference of the lens caps !

A great optical performer
The good news is that in my own testing, as expected, the 14-24 outperformed the Canon 16-35/f2.8 II. Here is one image example. Canon 16-35 on top, Nikon 14-24 at the bottom, both 16mm, f/2.8. Note better correcting of vignetting with the Nikon.
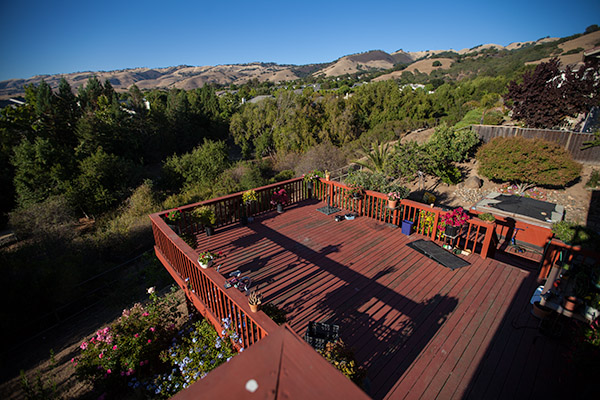

Here an actual pixels crop from the left end of the skyline. Note how much sharper the Nikon is.


To guard against sample-to-sample variation – always a problem as my previous testing has shown -, I tested two samples of each lens. Needless to say, I kept sample B. Here are the Imatest results (the most reliable way to measure lens performance, see this post for an explanation of numbers and methodology). Note that the results stopped down underestimate the real performance of the 14-24 because I didn’t refocus the lens (more on this later). In each graph, is Canon on top row, Nikon on bottom row (marked as “50mm” by software because no EXIF data is available to the Canon body from the Nikon lens).


Flare resistance of the 14-24 is excellent. Here is an example with the sun in the frame:

Focus shift
Extracting the absolute best performance from the 14-24 is tricky because this lens suffers from “focus shift”, which means that as you stop down the lens, the focus point changes slightly. So if you are going to shoot at f/5.6, you should focus the lens at f/5.6 because if you focus at f/2.8, once you stop down to f/5.6, the lens will be ever slightly out of focus. Focusing at f/5.6 is more difficult than at f/2.8 because the image is dimmer and the DOF is larger (making the in-focus/out-of-focus transition more difficult to see), but at 100% liveview on the 5D mark 3 it is possible – The 5D mark 2 made it even easier. On the other hand, liveview on the D800 leaves much to be desired. From what I’ve seen so far, focus shift is a subtle effect – the shift is even different in the center area and the corners – but one can be readily observed by pixel-peeping or measuring resolution targets. However, I’ve read somewhere the claim that it can cut effective resolution in half in some circumstances. From an optical point of view, it is a quite curious effect, so I may elaborate on it in a future post. Fortunately, I bought the lens primarily for night photography, when I would be using it wide open all the time, so it hasn’t been a real issue for me. I focus the lens at infinity, wide-open, while there is still enough light, and tape the focus ring.Filters
The 14-24 doesn’t come with filter threads, and the huge curved front element makes it more difficult to use them. However, there are a few solutions developed by ingenious small manufacturers. They are all quite expensive and bulky, but they work.- Lee filters was the first to introduce a custom holder and filters specifically for this lens, the SW150 Filter Holder Kit based on 150mm square filters. It works fine for density filters (including grads), but doesn’t include a polarizing filter. Several photographers use a square polarizing filter from Cavision which needs custom fitting.
- Lucroit, in collaboration with Hi-Tech, the long-standing Lee competitor, has created a 165mm square filter modular system which can be used on almost any lens. Here’s the Lucroit kit for the 14-24.
- If you want to use circular, screw-on filters (including ND and polarizer), the most compact and least expensive solution is the Fotodiox system. The filter diameter is a large 145mm. It still adds considerable bulk: this will not fit in any camera bag ! Being all metal, it also weights almost a pound, making the 14-24 as heavy as a 70-200/2.8, and equally front-heavy. On the upside, this system provides additional protection for the lens and includes a solid metal screw-on cap. The Fotodiox system isn’t designed for a square filter, but you could hand-hold or tape one in front of it (if you tried to do so on the bare lens, this wouldn’t work as some light would get on the filter from behind because of the petal hood).


Using a Nikon G lens on Canon
Canon re-designed their lens mount from scratch in 1987 with the EOS system. As a result, it has two favorable characteristics: the shortest flange focal distance (distance between the mounting metal ring and the image plane) as well as the largest diameter of any of the major SLR systems. This makes it possible to use adapters to mount other brand’s lenses on Canon EOS, while the reverse is not possible.In older Nikon lenses, the aperture is controlled by a mechanical ring. Inexpensive adapters work well for them. The 14-24 is a “G” lens without an aperture ring. The aperture is set by the camera body through the lens mount, so you need an additional lever to control the aperture, otherwise the lens would stay wide-open. Photographer Mark Welsh designed the first such adapter, which after a few iterations, was eventually manufactured by Novoflex. It is expensive, but it is precision-made, and the fit is perfect. The instructions suggest that you remove the lens weatherproofing ring, but this isn’t necessary. It just makes the operation of the aperture lever smoother. With the lens weatherproofing ring in place, fine control of the lever to 1/3 of stop is still possible, but it requires more force. Here’s a picture of the 12-24 with the adapter:
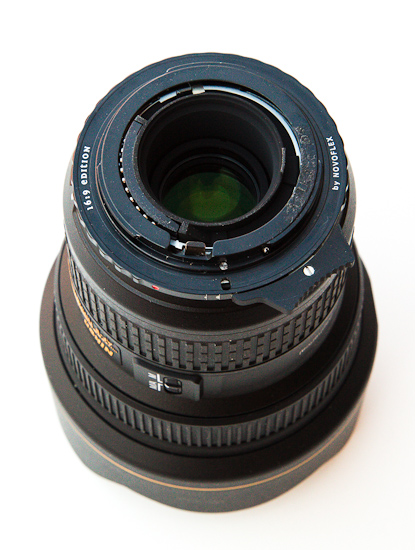
On a Canon body, you loose autofocus, which in itself is no big deal, but you need to remember to focus the lens. Mark Welsh sells on his site a version of the adapter with a chip that enables AF-confirmation. The problem is that the chip is merely glued to the adapter, and mine fell off (you can still see the glue marks in the picture above). Metering works normally in Aperture Priority and Manual modes, except that maybe because evaluative metering lacks information, it tends to be a bit erratic, resulting in frequent overexposure of up to +1 f-stop – easy enough to correct if you can reshoot. The difference in operation is that when you stop down the lens, it is actually stopped down all the time, whereas a normal lens stops down only at the time of exposure. It’s kind of like having the DOF preview button pressed permanently. Older PC and tilt-shift lenses with no aperture coupling (prior to the Canon TSE lenses for EOS) had to be operated this way. You set the aperture wide-open to compose and get initial focus, then stop down and refine focus and aperture with Live View. That workflow is pretty effective on a tripod, although a bit slow, but doesn’t work well for hand-held shooting. In fact, this workflow may be the best way of extracting maximum resolution from the 14-24 even for Nikon users, because of “focus shift” as described above.
To see some images made with the 14-24 mounted on a Canon EOS 5D mark 3, check my previous blog entry Southwest tour under changing moon phases.


Wow QT. Nikon blows the Canon out of the water when it comes to corner sharpness. What aperture setting were you using for those examples?
Yes, that lens is really superb. I had the chance to get one for a day, since then I don’t like my Sigma 14mm any more, although this isn’t a bad lens. Its ways more prone to produce lens flare. I am now saving for the big 14-24.
Richard, both were wide open. At mid-apertures, there is less difference, although it is still noticeable.
Nice comparison between Nikon 14-24 and Canon 16-35. Particularly appreciate that you noticed – and passed on – the focus shift on stoping down.
I’m mostly interested in use for shooting video with EOS Canons, particularly the smaller sensor APS-C ones, so a really good wide-angle is a great asset. Thanks for explaining the aperture adjustment when adapted to a Canon. I saw another review that left this VITAL part out, and I was wondering how!
Thanks, Robert Render Harrison
Am i missing something here?the top image is miles clearer than the one below it…making Canon the winner in that shoot.
Yes there is obvious vignetting on both lenses a bit more on the canon,but if i were choosing between the 2 i would go the 16-35 canon,heaps more sharper.
William, I am not sure what you see exactly in the two first images, but note that they are reduced in size by a factor of almost 10 from the original.
I agree with William : the 1st image if far better than the second one. It is obvious that the Canon image is sharper !