| Home/Mountaineering/Yosemite Rock information |
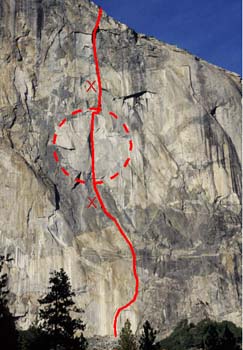
BETA
FOR
ZODIAC
VI 5.6 A2+
May/June 1997
Aid ratings are what I consider New Wave-ish, and are based on how I
did it. You can make it harder or easier depending on your ethics and
willingness to nail. See
Long/Middendorf
and
Walling
for definitions of NW aid ratings. Rope lengths are estimates: YMMV.
I'm a member of the Camalot generation, so all my sizings are based on
those. As always, everything here is subject to my faulty memory,
take it on faith at your own risk, etc., blah, blah, blah. You are
responsible for your own actions.
- P1
- A nice hook move to start your day out right. Then
pretty casual aid to the roof belay. A fair amount of fixed gear, and
I found it pretty easy to make it go clean. Nothing bigger than a #2
cam. SB, 80', C1.
- P2
- Traverses down and under to rivets. The 5.8 can be
aided, then easy aid to a belay. Could possibly be combined with P1
with 60m rope if you were soloing (I didn't try it 'cause I was
waiting on the party in front of me). Otherwise rope drag would be a
drag. 1 rope to ground. semi-stance, 80', C1.
- P3
- Mostly rivets, bolts, and a couple of enhanced hook
moves. Fake belay with good bolts under the roof, then C1 to Dead
Bird Ledge, which has crappy bolts, but can be backed up with a #1
cam. One rope to P2 belay, two ropes to ground, haul from here if
fixing. Stance, 150', C1.
- P4
- Easy aid/free. Unmemorable (in other words, I can't
remember anything about this pitch, so it must not be either hard or
fun). Semi-stance, 5.6, C1.
- P5-6
- Usually combined. 20' 5.8 or C2 hook traverse to
rivets. I used a few hand-placed LAs as hooks here. Backclean the
crappy rivet ladder to the crappy P5 belay (CP must have been so
disappointed when that dihedral turned out to be blank, though if the
route were done today, it'd be copperheaded). Big loose blocks here
when you finally get your first good placements right before the P5
belay. Watch them. Back clean after you clip the bolt. Easy free
over loose diorite to bolts. Try not to put any gear in the free
section (it's loose anyway), and continue to backclean to the belay.
A rivet has blown here. I used a red Lowe Ball to get past it, though
you could nail or use a cheater stick. Stance, good biv, 160', 5.6 C2
if the rivets hold, could be exciting if one pops.
- P7
- C2 on fixed tatty slung RURPs to the Black Tower. A
bomber small cam placement (yellow Alien, quadcam, or TCU), then
ratty, tatty fixed RURPs above a bad fall onto the Tower. Okay, I
first nailed here, rather than risk a fall onto the RURPs and then the
point of the Tower. I'm a weenie. Nice stance, 160', A2 if you nail,
C3+ if you don't (it's gonna hurt).
- P8
- C1 to a hook. A couple of bolts, then a bomber #1
cam placement (below a bolt - whassup with that?). Under a roof to
offsets to a couple of fixed RURPs (and some blown ones), then a
bomber Petzl bolt. SB, nice bivy, 120', C1.
- P9
- Fun pitch, lots of small stuff, a few fixed pieces and
copperheads. SB, crappy bolts at the belay, but can be backed up in
the crack, 120', A2+.
- P10
- The Nipple pitch. Another fun one. Baby angles,
maybe a couple of #3 LAs, aliens, small TCUs, offsets, the usual
assortment of thin gear, then all of a sudden it gets wide. The Green
Monster #5 gets you to the bolts, a #4 gets you to the thin part
again. You could do the pitch with one #4 and some swearing.
Probably. It doesn't quit after the nipple. More small stuff, and a
nice 3 cam #1 placement. SB, very nice bivy, 150', A2+.
- P11
- Wild. Overhanging black diorite to a tatty sling and
a 5/8" angle. I could not figure out how to do this pitch without
using a RURP or birdbeak. Some loose flakes, then a couple of LAs,
copperheads and the usual assortment of thin gear. There's a belay
ledge off left about 20' below the marked belay that looks like it has
at least one new bolt. All the ones at the marked belay were manky,
and it scared me to haul off them. It looks like it would be hard to
get to the ledge, and hard to get back off of it, though. SB (or
ledge), 160', A2+.
- P12
- An LA or two up and left to some loose diorite flakes
(fishhook), then up to the kinda scary Lunar Eclipse blocks. Thin
edges and obviously detached. #3 and #4. Rivets to fixed
copperheads to exciting hooks to a nice bivy. SB, 160', A2+.
- P13
- Up a little, traverse left then back right. I nailed
an angle to start the traverse, though I had a pretty good nut in not
too far below. I'm a chicken. A couple of hook moves. Backclean
everything to the fixed pin and the bolt ladder, then hook and
traverse right into the big cams. Continue backcleaning the left
traverse into the stellar crack. Bomber nuts until you get to the
top, #4 handy here. I also walked a couple of #1s for a bit. I
must not have backcleaned enough, because even with a 60m rope, I had
about five feet left at the end of the pitch. The Peanut Ledge (a
sidewalk bench in the sky - dangle your legs over the edge and check
it all out), good bivy, 165', A2+.
- P14
- Hmm. What'll I use here? I think it'll be... the
#4 camalot. Fun camalot walk. I left a #2 at the bottom, and the
#5 about 1/3 of the way up just because I could. Otherwise it's just
the #4s. A few rivets and bolts to clip, though you couldn't ask for
better cam placements, and I trusted them more than the rivets anyway.
Don't leave them behind when you hit the three bolts in a row, you
still need them higher. Bomber Petzl bolt starts the traverse out of
the roof. Okay, you can abandon the heavy artillery now. Sharp edge
here, pad/tape for rap, haul, and clean. You could make it up this
pitch carrying five camming devices (I won't tell you which five,
though), about 10 carabiners, and five rivet hangers. Sloping ledge
belay, good bivy, 120', C1.
- P15
- Hook left, clean up, hook left, clean up, walk down
the sidewalk to the belay directly above the last after wandering left
then back right. Sounds like a football pass pattern - run a zig-zag
and buttonhook right. Stance, good bivy, 80' haul, 140' of rope for
the lead, C1+.
- P16
- Not a giveaway at the end. There are several ways to
end this game, or so I've heard. I freed right and up, then A2 to the
top (includes a hook, nailing, pulling on tatty slings, and placements
under loose rock), then went right under the summit boulder on fixed
pins. The new Wadman El Cap topo poster shows this variation as A4-.
Hmmm. Stance (hell, it's the summit), one good bolt and rivet
hangers, 80', A2.

RACK
The route has gone clean several times, though it requires bigger
balls than I have, or maybe just picking the right team to follow. Or
a cheater stick. I didn't nail a lot (maybe half-dozen times?), but
there were some things I just couldn't see how to get past without
nailing. Maybe I just don't have the NW mindset yet. I probably
don't use my camhooks enough. How many sets of each thing you need
depends on how much backcleaning you are willing to do. I had about
three sets of everything up to #1 camalots, and was pretty happy (the
route traverses quite a bit, and you're just screwing the clean unless
you backclean *everything*). I'd bring a bolt kit and bat hooks,
because some of the rivets are time bombs. Almost all the free
climbing can be aided.
-
- 1 RURP or birdbeak
-
- 2 1/2" angles (not that damn useful)
-
- 2 5/8" angles
-
- 1 5/8" sawed-off
-
- 1 3/4" sawed-off (lots of placements want the size between
these last two)
-
- 1 each #2, #3, #4, and #5 LAs
(These are the pins I had, so I know you can get by with this. More or
less, according to your tastes. I didn't use all these; remember, I
headed up thinking I was going to do the Trip.)
-
- 2 sets of nuts (including offsets)
-
- 1 set of Lowe Balls (okay, I just used the red)
-
- 2 sets of camming devices from smallest to #4 Camalot. #5
is useful, but probably not necessary.
-
- 1 Fish hook
-
- 2 Chouinard hooks
-
- 1 ea Leeper cam hooks (not necessary, but nice)
-
- Several rivet hangers
ObRant: After the Second 100 Year Flood of December '96 (as opposed to
the First 100 Year Flood of May '96) I expected to find major changes
in Yosemite. What I found were the same old things. Everything
necessary for commerce was open (big surprise, eh?). The roads were
fine. The Valley looked the same from a thousand feet up as it always
does. Tourists still dress badly. The bad news: The `free' showers
at the Lodge cabins are no more. I went over and checked out the
damage, and to my unpracticed eye, it looked like there was very
little damage to the cabins and the bath that a hose and a wet mop
wouldn't fix. Hardly anything that would necessitate a major
rebuilding plan. Many of the changes, though minor, seemed to have
been designed to keep the OBC types away. Derelict's Row in the Lodge
overflow parking is gone. I didn't see many of the usual nomads
festering around C4.
A couple of facts for the budding solo wall climber out there. My
rack weighed 37 pounds. With no partner to tag things to me, I pretty
much carried this up every pitch. At the end of the climb, with
everything wet, each haulbag load weighed 90 pounds. And there were
two of them. That's without food and water, at least potable water.
Everything I had was completely, thoroughly soaked. Had I known how
difficult the descent was going to be, I might have had yet another
excuse for bailing. But luckily, I have the three qualities necessary
to be a wall climber: a high tolerance for pain, a bad long-term
memory, and I forget the other.
© Brent Ware
<ware@ligo.caltech.edu>
Zodiac solo trip report by Brent Ware
Brent Ware's homepage
View or add comments

